me tell you that having a multilingual website helps you reach new segments of the audience interested in the content of your site, especially if the content of your site is useful to many audiences who speak different languages.
In this case, providing more than one language. Translating your site’s content into languages understood by your site’s visitors is one of the important things that increases the degree of audience interaction and connection with your site’s content, thus achieving the maximum possible benefit from visitors.
In this article, we will take you on a tour of the illustrated explanation of the practical steps for creating a multilingual site and adding more than one language using the language switcher, so that every page, every article, and every link within the site is provided in more than one language, and the visitor can choose between them. Thus, you get Several benefits from it.
- When your site is available in more than one language, the site’s content will have a chance to appear on searches conducted in multiple languages, not just one language, and thus its chance of obtaining a larger segment of your site’s target audience increases.
- If you are an online store owner , providing product pages and product classification pages in more than one language will help you achieve more sales when visitors who speak more than one language enter your store and browse the products.
- When a visitor from a country who speaks a language enters and does not find the content of the site available in this language, he may leave the site and not return to it because he does not understand the content of the site. On the other hand, the fact that the site is multilingual gives you the authority to expand in targeting visitors and audiences from more than one country in more than one language.
Change the default language of the WordPress control panel
Before we begin explaining how to create a multilingual website, let me explain to you here how to change the default language of the WordPress control panel to choose the language you prefer in which the control panel and all the elements in it will appear. Also, this may affect some of the templates and plugins used on the site.
You can enter the WordPress control panel, then go to: Settings << General , and you will find the “Site Language” option, through which you can choose the appropriate language for you to display the WordPress control panel and all its elements.

In this article, we will explain creating a multilingual website to translate all the site’s contents, including add-ons, templates, and all content components that appear to the user. The user can view them in several different languages. However, if you want to Arabize your template, you can see the article on Arabizing the WordPress template . If you have not created your website yet, we advise you to read the explanation of creating a professional WordPress website .
Create a multilingual website with Polylang
There are many WordPress plugins for translating your site , and each plugin comes with its own advantages and disadvantages. However, some plugins do not fully provide all the translation features except by purchasing their paid version, and the paid solution certainly has better features than the free solution for any plugin.
In this article, we will rely on Polylang, which may provide you with acceptable translation features in the free version, where you can translate the home page, article pages, sub-pages, classification pages, and other various parts of the site that you can translate and provide in another version for visitors who speak languages other than the primary language. On a website, you can use any other add-on with the same idea.
Install and activate the add-on
First, we will install the add-on by logging into the WordPress control panel, then going to: Add-ons << Add New and typing the name of the add-on in the add-on search box. The add-on will appear for you, then you can install and activate it. Or read: How to install a WordPress plugin on your site

After installing and activating the plugin on your site, you will find within the WordPress control panel a new tab that appears called “ Languages .” When you enter the languages, you will find the page for the general settings of the plugin, which appears to you as follows:

You will find that the settings page is divided into two main parts:
Part (1): Through which you can add any language you want to your site so that you can later translate your site’s content into it and customize it to be an additional language.
Part (2): which contains the languages that your site supports and can be included in all pages of the site and all site content can be translated into them.
As you can see in the previous image, the plugin installs three languages on your site by default (Arabic – English – French). You can keep them, delete any additional language you do not want, or add other new languages.
Steps to translate website content
Now that you have installed and activated the add-on. In the following paragraphs, we will take you step by step towards translating your site and all internal content into more than one language. Suppose we want to create a website that supports Arabic as well as English as a second language.
1- Translation of fixed texts on the site
In WordPress, there are many fixed texts, such as titles, date and time formats, etc., and in order to translate these texts and titles, you can go to the plugin’s settings, then go to the “ Sentence Translations ” option.

You will find in front of you all the sentences and fixed texts in WordPress, and under each sentence you will find the box for the other language, which is English in this case, where you can write the translation for the sentence that you want to translate yourself.
2- Translation of the website’s home page
Suppose that your site has been designed in Arabic as the default language, and you now want to create an English version of the site’s home page. You can also create an English version of the site’s home page with ease, as you can enter the WordPress control panel and then enter the pages, to find among them the page Your website home page:
Next to the page you want to translate (the home page) you will find an “ Edit ” button. Click on it to open the editing page for you on that page.

You will find the form of the editing page, in which you will find the languages box that the polylang add-on added to the site’s editing pages automatically, and you will find the “+” button that you can click to add another copy of the main page, but in English.

In order to add an English version of the home page, click on the “+” add language button that appears inside the editing page. You will be directed to a new, blank page in which to write the content for the English version that you want to create in English, as in the following illustration:
A new page will open for you, and its default language is “English.” On this page, you must translate all the content of the home page into English because this page will be the English version of the site’s home page.
Then after you translate and publish the page. Go to the WordPress control panel, then go to Pages, and you will find in front of you two pages that are designated as the “ Home Page ”:

The first page, “Homepage, ” is the home page of a site that will appear in the English version of the site, and the second page, “Home Page,” is the one that will appear in the Arabic version of your site.
Note : As we explained above the method of translating the main page into an additional version in English, you can translate any other page on your site into English in the same way that we explained.
3- Translating the website’s main menu
After that, you will need to set a main menu at the top of the site that appears in the Arabic version only, and also a main menu translated into English, and we will do this through the control panel by going to: Appearance << Menus . Then create a new menu in the desired language.

As you can see in the picture, you will find that you have the option to set that menu whether you want it to appear in the version only of your site or in the English version only, or you can choose both versions to display the main menu that you create.
Then after that you can create a main menu and set it as the main menu for the Arabic version, and you can also create a main menu and set it as the main menu for the English version.
4- Activate the language switcher to change the site language
Now suppose that the visitor wants to switch from the Arabic version of the current page he is on, but wants to move to the English version of the same page, he can do that by showing the buttons to switch between languages in the multiple versions of your site in an easy way.
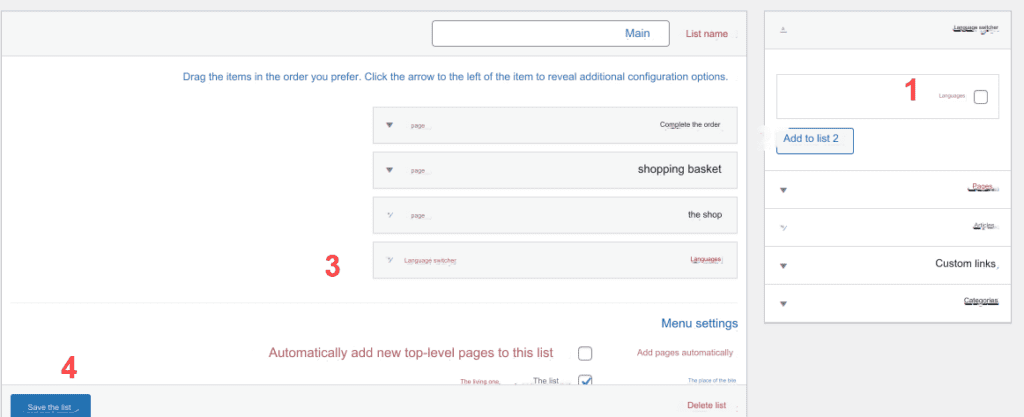
All you can do is log into the WordPress control panel, then go to: Appearance << Menus , then choose the main menu for the version of your site, then follow the following steps:

- You will find the “Languages” item, which enables you to add a new language
- Click (Add to list) to provide the list translation feature
- You will notice that there is a language switcher to add other languages to the list
- Click Save
Now, if you enter your website, you will find the option to switch between Arabic and English appearing within the main menu in the Arabic version.

In the same way, open the main menu of the English version of your site:

Using the same steps as in the picture above, you will add the “ language switcher ” to the main menu of the English version. Then, if you enter your website, you will find the ability to switch between English with ease:
As you can see, the names of the “English” languages appear like this in the navigation menu, but you can set the language switcher to show only the language’s logo or flag instead of the word itself.
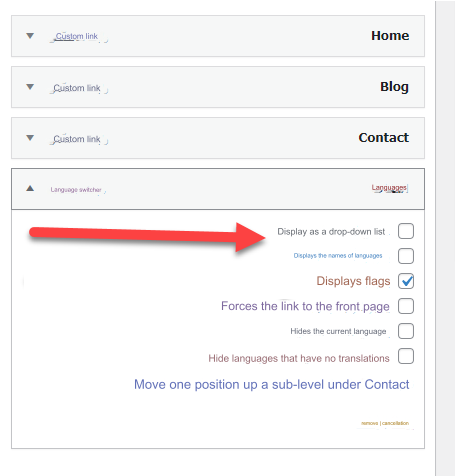
To show the flag for the language instead of its name, you can access the menu from within the WordPress control panel, and in the box for languages, open it, to find the “Define Flags” option:

After saving the list and entering your site, you will notice that the notification to switch appears instead of the language names:

If your site contains many languages, displaying many notifications next to them, some of which will be annoying for the visitor, so you can change the way it is displayed so that it is displayed as a drop-down list so that the visitor clicks on it and chooses his preferred language from it. You can do this by choosing the option “Display as a drop-down list.” “:

5- Translating website articles or creating articles in multiple languages
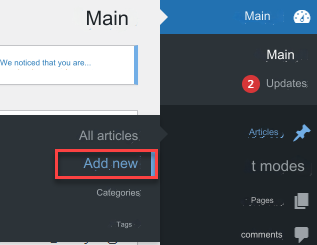
In the same way that we explained the translation of the site’s home page, you can also create articles in multiple language versions, by going to: Articles << Add New

The article editing page will open, in which you will find the language control box, which consists of two elements as follows:

- The default language for the article or page, which is Arabic in this case.
- “ + ” button to add another version in a different language.
Thus, you can create an additional copy in English of all articles and pages within your site as you wish.
6- Translating website classifications
As we explained the translation of articles, pages and main menus, in the same way you can also access the categories from within the WordPress control panel on the site and add different categories and choose the language in which you want to display the category:

7- Edit the URL links for the Arabic and English versions of the site
You can also customize and configure the form of links for multiple language versions of your site, by entering the special settings page in addition to within the WordPress control panel, in which you will find a special option to “modify links as follows:

When you enter the link settings, you will find more than one formula for configuring the form of links for copying the site in other languages. You can choose from among them:

- When you select the first option, the website link will not be changed in other languages, but the translated content will appear on the same link without change.
- The second option, as you can see, will add the language abbreviation, such as en, in the links for the English language.
- The third option will set the other language, such as English, to a subdomain name such as en.site.com, but do not activate this option unless you already have a subdomain.
- The fourth option is to choose an external link to specify other language versions of the site.
Thus, we have explained the method of translating all the contents of your site easily and with clear steps using manual translation, which is the method that we explained in the article, where you translate every page and every article within the site yourself and translate the content into the other target languages. You can also rely on the automated method, but it will not give more results. Professionalism or accuracy in translation.
In this explanation, we relied on the Polylang add-on, but you can translate the site in the same manner and in the same manner, by translating basic contents, translating pages, translating menus, and so on. The settings vary from one add-on to another, but they are very similar in terms of the method and mechanism of translation work


Leave a Reply