The site includes many prominent elements, perhaps the most important of which are the header and footer. The header is the part that is at the top of the site, and the footer is the footer or the part that is at the end of the site when you browse it to the bottom. There is a long list of tools and plugins available that help WordPress website owners change and customize the Footer element specifically and in different ways that add a kind of difference and distinction to the site.
For example, the following shows the Footer template for a WordPress site in Arabic. As you can see, the Footer has been customized to include important links that benefit site visitors, such as support, help, and communication pages and other important pages that cannot be displayed within the content of the site itself so as not to take up space from content that is of greater importance to visitors. Property rights are also placed in Footer most of the time.
The importance of customizing your site Footer
When you acquire a targeted visitor and attract him to your site, it is not an easy matter. Rather, it requires customizing and configuring your site well to provide him with comfortable browsing. One of the most important elements that helps in this is having a suitable and well-organized footer. If the visitor wants to view the site’s policies or wants to communicate with technical support and other basic pages related to your site, he does not have to search much. Rather, these links must be clear and easy to access in a fixed place on all pages of your site, and here comes the role of the Footer in securing these. Seamless visitor experience.
Here are the most prominent uses of footer on your site:
- Place links to basic pages such as “Contact Us,” “About Us,” “Privacy Policy,” “Send Complaints and Suggestions,” links to site article categories, and other page links that are not appropriate to place at the top of the site or within the content so as not to distract the visitor’s attention.
- Placing the site’s logo or slogan that reflects your site’s identity to visitors
- Adding some important pages on the site that cannot be displayed in the main menu so as not to distract the visitor’s attention
- Your geographic location map can be placed inside the footer, if you are a business owner with a headquarters
- You can add social media links to your website if you have any
- Footer is sometimes used to display an introductory summary of the business owner
- You can add a special box to subscribe to your website’s newsletters by adding an email
- Through Footer, you can also add links to the site’s application on the Google Play Store or elsewhere, if available
- Footer helps organize the site content and provide a comfortable browsing experience for the visitor by displaying less important content to the visitor, which he may want to access after reviewing the basic site content. The organization strategy helps make the site content at the top more organized and organized.
Ways to modify footer
In a previous article, we explained how to customize the header of your WordPress site , and in this article we will explain in detail the various methods that help you modify and customize the footer of your site with ease and without the need for experience or skill in programming matters.
First, you must know that the shape of the footer varies according to the type of template that you have previously installed on your site. WordPress templates differ from each other in many elements, and the footer is one of the elements that template developers always try to distinguish and be unique in their design to be different from other templates.
In general, all templates allow you to modify the template elements in the way and design you want, and this is what we will discuss within this article.
1 – Use the “Customize” tool

First, the “Customize” tool comes as a fixed tool that contains most of the footer customization functions in most WordPress templates . You can access it through the WordPress control panel, then go to: Settings << Customize . You can access the edit panel and customize many important parts of your site in an easy and simple way through the customization tool, as this tool contains many options for modifying the different parts of the site, including the Footer.
The options for modifying the footer within the “Customize” tool vary depending on the template you are using within your site. For example, look at this very simple footer that includes only one element.

You will notice that the form of the footer is very simple and unprofessional and does not include any links or details that may interest the visitor. If the form of your site is like this, do not worry. You can modify it and customize it to make it look professional and attractive to all visitors to your site.
When you enter the WordPress control panel, then Settings, then Customization, you will find the customization menu for your site, which contains many site customization tools, including tools for customizing your site’s footer:
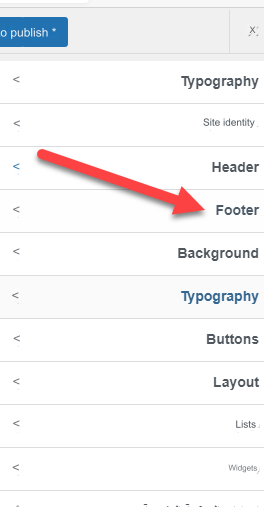
When you enter the section for modifying the Footer, a new window will appear for you that includes many tools that differ from one template to another, as we mentioned. The following image shows the customization options in one of the free templates. We can notice that the customization options are few and include modifying text colors and colors. Wallpaper backgrounds only:
We can see in the previous image the simple options provided by the WordPress template in our example, as it only allows you to modify the background color and the color of the text inside the footer.
On the other hand, if you use a template that allows greater modification to the footer, you will find many tools that provide you with professional customization options, such as the following image. One of the other templates, which is the Sinatra template, which allows you to “customize” the footer in a completely attractive way, as it divides the footer into 3 parts. Main parts, and you can access any part you wish to modify. Among the elements that the template allows you to customize are:
- The possibility of dividing the footer into four or fewer or more consecutive columns
- The ability to set the footer to appear only on mobile phones, tablets, or both, in addition to the ability to modify the appearance for most other devices
- Change the color of the entire footer background
- Change the color of existing texts in the notebook
- Many other editing tools on Footer
As we mentioned, you can modify the footer of your site according to the tools provided to you by the template that you are currently using on your site. There are many additional ways that help you edit the footer more freely if the modification and customization options that the template offers you are few and do not achieve your ambitions to provide a distinctive, professional footer for your site.
2 – Customize the invoice through widgets
You will also find yourself relying on widgets that help you customize the footer on your site and provide many options and tools that help you customize every part of the footer.
This method includes adding and controlling widgets; It is one of the main tools in the WordPress control panel, and you can access it through the control panel and then go to: Appearance << Widgets

As you will notice, once you enter the “Widgets” tool, the widget control page will open for you, which you can add to many parts of your site, and among those parts is the Footer.
In the widgets control panel, you will find two main parts. The first part contains many add-ons and elements that you can drag and drop into the footer or any other part within your site.
In our example, we see four sections for customizing the footer (footer 1 to footer 4). This is due to the template currently used, which divides the footer into four consecutive parts, where you can customize each part separately and modify it in the way you see fit.

The image above shows the footer layout of the current template, which divides it into four consecutive columns.
By customizing the “widgets”, you can add many elements within each of these parts. In the following image, we will show, for example, how to add elements from the widgets to the different parts of the footer in this template.
Now the look of the footer is as in the picture, as it contains the elements that we added from within the ready-made widgets available by default with almost all WordPress templates.

Add a Menu navigation menu inside the notebook
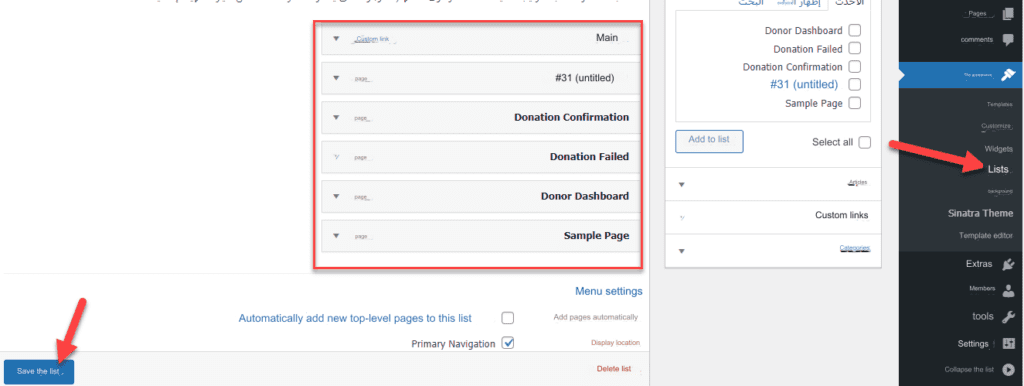
One of the most popular modifications that you can make within Footer is adding a list containing some website links to Footer. To create this list, we will go to the WordPress control panel, then Appearance, then Lists. You will create a list of items and save it, as in the following image:
Then, after creating the list, you can go to the widgets panel on your site and add the list that you want to include in it and specify the part in which you want to place the list, as in the picture:
After confirming the addition, you will notice that the menu you chose will appear on your site’s footer in the place you chose:

Editing the property rights line inside the invoice

It is also necessary to add your site’s copyright information and many other rights instead of the default rights bar that is automatically set by WordPress themes. You can modify the rights line in easy and direct ways and set and add the rights to your site, whatever they may be, yourself.
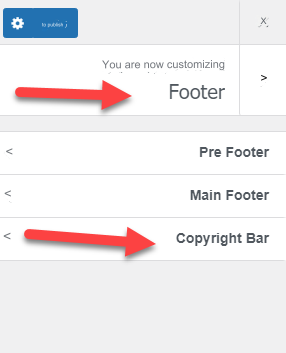
The method of modifying the rights line varies from one template to another, but you will find that most templates provide modification to the rights line in a similar way, by entering the “Customize” option from within the WordPress control panel, then the option to modify Footer, and among the available options you will find the option Amendment to Copyrights as in the picture:
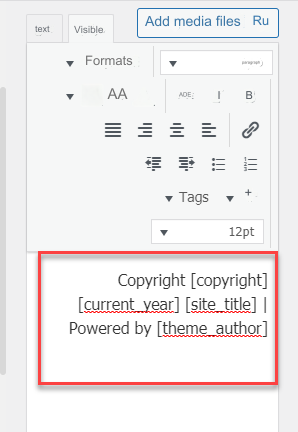
As we mentioned, the place designated for modifying the rights line may differ from one template to another, but in general you can go to Customize and then the part for modifying the invoice, in which you will find a text box containing the text for the rights line, and from there you can modify or delete it and write the rights line that you want to add. To your site instead of the default option, as in the picture:
3 – Modify the footer using CSS formats
This method provides you with additional options for modifying the formats of the footer content, but it does not allow you to add elements or insert links, lists, and other elements that we explained previously. All you can do is change the formats, including colors, backgrounds, fonts, and other formats that can be controlled through the famous formatting language, CSS, which you must have good knowledge of in order to be able to use this method.

You can use CSS formats to modify the footer of your site by entering the WordPress control panel, then “Appearance” and then “Customize” to show you a list of site customization tools, which differ in terms of the number and type of tools and options in them from one template to another. However, you will find the option “Additional CSS formatting” whatever type of template you are using.
When you access the “Additional CSS Formats” tool, you will see a window of formats that you can add and apply to any parts of your site, including Footer.
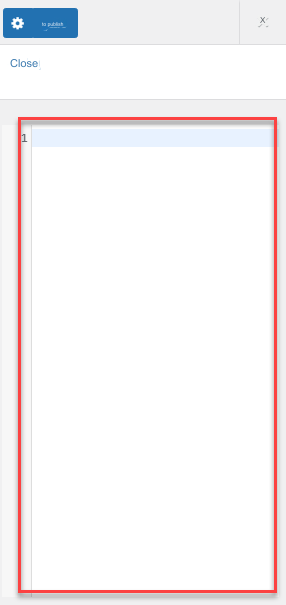
In this window you can add CSS language codes, through which you can modify the formats of any of the elements on your site, not just the footer. We will give you a simple example of how to change text formats within Footer through some simple codes.
To apply CSS formats to one of the elements on your site, you must know the element’s meta name, or what is called “Class,” which is a programming name assigned by the template developers in order to distinguish each element from the other. To access the class of any element to which you wish to apply CSS formats, you must right-click on the element, and click “Inspect”, where a page will appear that contains many codes, including the class name. of the item whose format you want to modify.
The image above shows how you can get the name or class of any item you want to modify.
After you obtain the Class for the element you wish to modify, you can access “Additional CSS Formats” in order to write the formats you want to apply to the element by writing the meta name of the element followed by the formats you want to apply to it, according to the method used in the CSS language. Which you must be fully aware of when following this method.
The following image shows applying special formats to change color based on the meta name of a text element in Footer:
Note : Do not make these modifications unless you have good knowledge of the CSS formatting language. You can skip this method if you are not familiar with how to modify CSS codes.
Read also: How to add custom CSS code to your WordPress site
4 – Modifying the invoice by editing the code
This part is intended only for people who have good experience in dealing with code (especially the PHP language), and it is not recommended for anyone to manually modify the code if they do not have sufficient experience to do so, because it will affect the site completely.
We will not review specific codes for modifying the invoice manually, but we will only show you the method and how to do it. Therefore, if you are not an expert in manually modifying the source code, we advise you first to make a backup copy of the site before making any modification to its software code.
Within there is a dedicated window to access the template’s code files. In that window there is a special footer file called footer.php, which can be accessed from within the WordPress control panel, then “Appearance,” then “Theme Editor,” as in the following image:
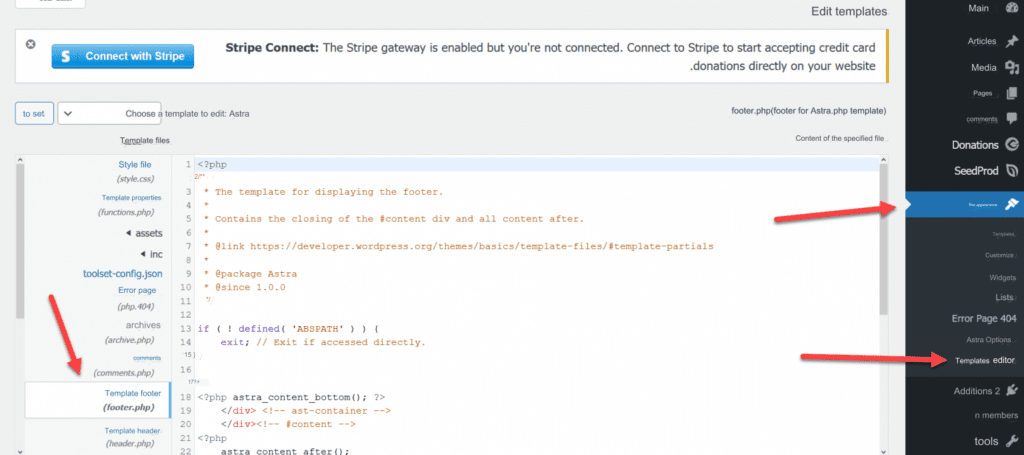
As you can see when entering the template editor, you will find on the left a list of all the programming pages for the current template, including the footer.php file, which is the file for the programming codes related to the footer, which can be modified, after taking a backup copy, as we mentioned previously. You can modify the look and feel of your site’s footer.
5- Modify the invoice using add-ons
In all the previous methods, we tried to explain all the tools and methods that WordPress provides in order to modify the notebook without the need to download and install external plugins. But sometimes the template you use on your site may not allow you to customize the footer the way you want, then it is necessary to install some external add-ons, which provide more options for modifying the look and feel of the footer.
Add Footer Mega Grid Columns
The Footer Mega Grid Columns plugin allows you to insert more elements into your site’s footer. The addition provides the ability to insert widgets into the invoice in the number you desire.
You can go to the WordPress control panel, then “Add-ons,” then “Add New,” and type the name of the add-on to appear. After that, you must download it and install it, as in the following image:

After installing and activating the plugin on your site, you can go to the WordPress control panel, then “Appearance,” then “Widgets.” You will notice that a new box has appeared in the widgets titled Footer mega, as in the image below:
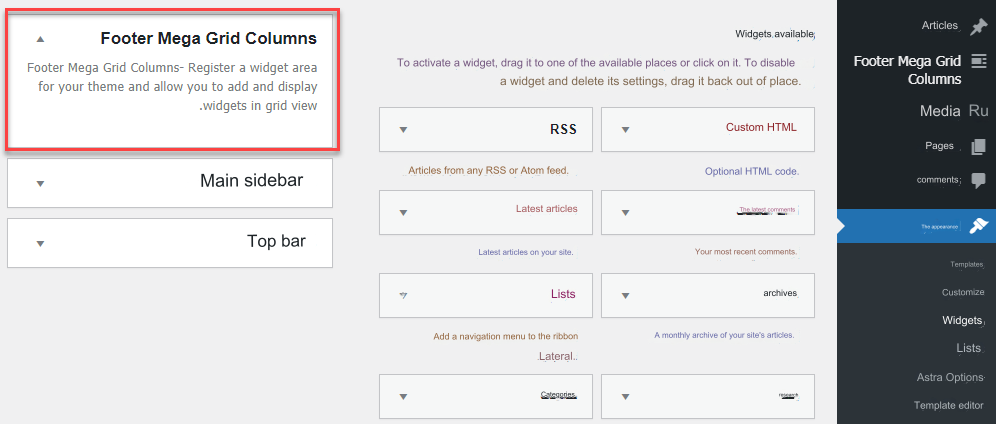
Now you can drag any of the widgets that you want to add into the footer and insert them in the special box in addition to adding them to the section at the bottom of the site, and the widgets will be divided into successive columns one after the other.
Add insert header and footer
The Insert header and footer plugin allows you to insert code into the footer.php file without having to open your site’s code files.
This add-on is used when there is a need to place activation codes on your site and codes to prove site ownership, in addition to many other purposes.
After installing the plugin and activating it on your site, you can go to the WordPress control panel, then “Settings” to find the settings for the plugin, as in the following image:
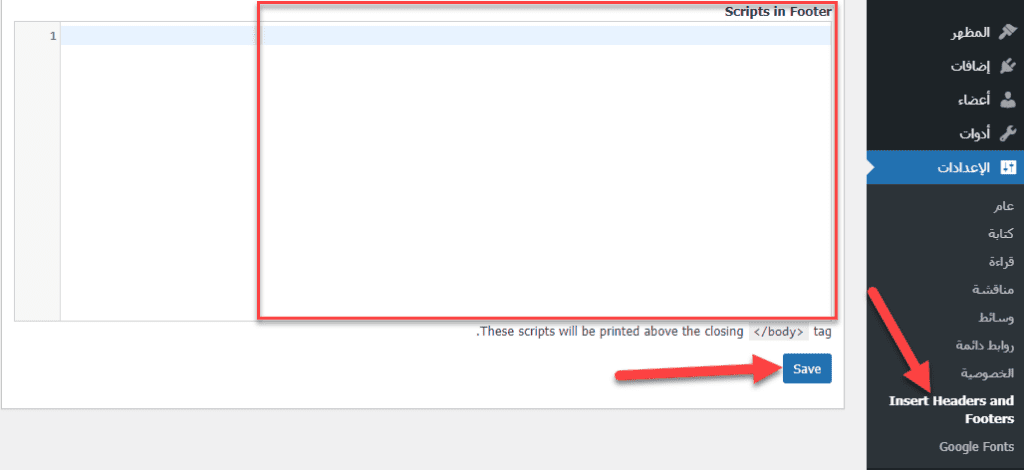
The add-on provides the ability to insert codes into the header and footer, and you will find a box titled Scripts in footer as in the picture, where you can add the codes that you want to insert into the footer in this box and they will be added after pressing the “Save” button.
Add remove footer credit
Through this add-on, you can automatically delete the copyright line that the WordPress template places, by entering the code of the footer.php file.
In the following example, we will delete the sentence “Astra template for WordPress” from within the rights line and replace it with the name of our site, publishing data, etc.

First, you must install the add-on and activate it from within the control panel, then click on the “Add-ons” icon, then “Add New,” then type the name of the add-on so that it appears, then you must install and activate it on the site, as follows:

After activating the plugin, you can access its settings page through the WordPress control panel, then “Tools,” then enter the plugin control page, as in the picture:
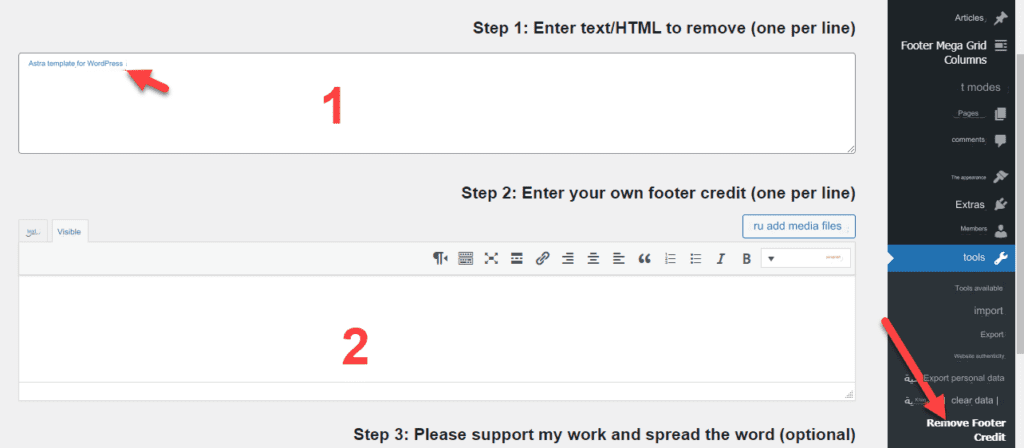
As you will notice when you enter the settings page for the add-on, you will find two boxes:
- The first: You place the texts and elements that you want to be hidden or removed from the footer.
- Second: You place the new texts that you want to add instead of the old texts that will be removed.
Now notice how the sentence defining the name of the template has disappeared from inside Notebook:

In the same way, you can add the rights line for your site in the second box designated for that, where it will appear in the rights bar at the end of your site.
Conclusion
Whatever modification you make to your site’s footer, always try to make the footer design simple and help the visitor access information and important parts within the site. Stay away as much as possible from the complexity of the footer elements so as not to distract the visitor’s focus, and let its design be as attractive and simple as possible and at the same time. Time contains messages that are useful to the visitor


Leave a Reply