Do you want to install a new WordPress theme that will give your site a new look? You may know one way to install a template, but in this article we will explain to you how to install the template correctly, step by step, and alternative methods if you cannot access the WordPress control panel.
Installing and preparing WordPress templates is an easy and simple process, and there are 4 ways to install the template you want with ease and without the need for an expert or writing code or anything else.
Method #1: Install the template from the WordPress control panel
You must follow the following steps for installation
1- From within the WordPress control panel, you must go to (Appearance >> Templates)

2- The next page will display all the templates previously installed on your site. You must click on (Add New) to add and install a new template.

3- Here you can choose the template that suits you and you can choose between the templates (distinctive, most popular, newest, or specify the type of template you want to search for)

4- After choosing the appropriate template, you must click on ( Install ) to install it, and you can also click on ( Preview ) to preview the appearance of the template before installing it.

5- After installing the heart, it must be activated by clicking on ( Activate )

6- Now the template has been installed and activated, and the following page will appear with a set of options:

(1) The template will suggest a group of important and good plugins that suit your site
(2) You can visit your site directly to preview the appearance of the template.
(3) You can start customizing the template to your liking and what suits you
Then, in the next step, you can modify the template settings by clicking on (Customize) . Of course, the template settings vary from one to another.

Thus, the template is ready to use and customize it as you like.
Method #2: Install the template by uploading it to WordPress
You can use (Method #1) if you want to install the free templates available to you, and if you want to get a paid template, you will need to purchase the template and then upload it to your site.
When you purchase the template, you will receive it in the form of a zip file, and then you must upload this file by following the following steps:
1- From within the WordPress control panel, you must go to (Appearance >> Templates)

2- After that, you must choose (Add New)

3- On the next page, you must click on (Upload Template).

4- Then you must select the location of the template and click on (Install Now)

5- After installing the template, you must click on (Activate Template).
6- Now the template has been installed and activated and you can begin preparation.
There are many companies you can buy good templates from, such as:
We advise you on the importance of relying on a reliable source to download the template and upload it to your computer, and to avoid stolen templates and templates of unknown origin in general.
Method #3: Install templates using your hosting control panel
This method is not suitable for beginners, but you may need it if you cannot access the WordPress control panel. To do this, you must follow the following steps:
- First, you will already have the template that you want to upload in the form of a zip file (let us assume, for example, that we have a Divi template and we want to upload it).
- The file must be decompressed in order to upload it using FTP
- After decompressing, you will need to connect to your website using the account you have via FTP.
- Then you have to go to (wp-content>> theme), where you will find the names of the templates installed on your site. Now you only have to specify the location of the template you want to upload, then upload the template (Upload).
- After uploading the template, you can go to the WordPress control panel, activate the template, and start setting it up.
Installing templates using the control panel (cPanel)
You can install WordPress themes using cPanel, through the following steps
1- First, you must log in to the cPanel control panel through your account.
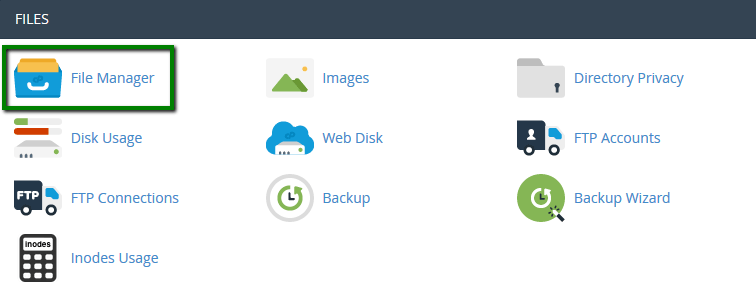
2- You must go to the File Manager.

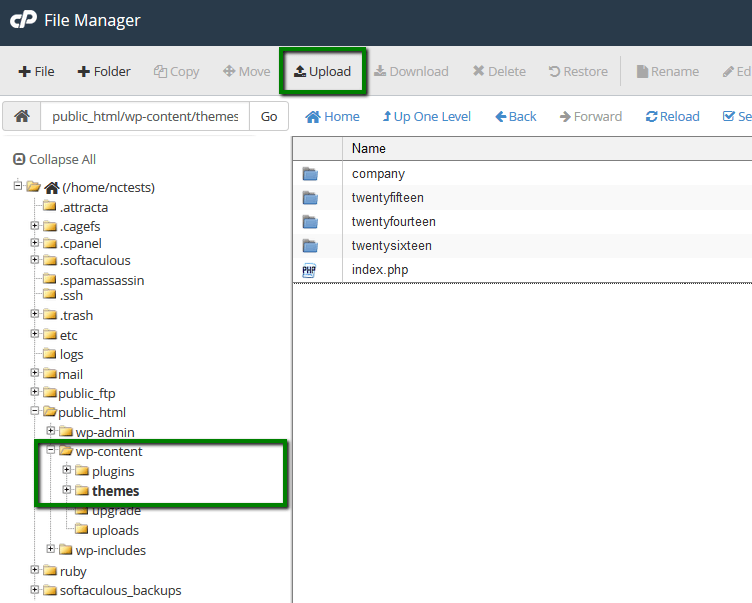
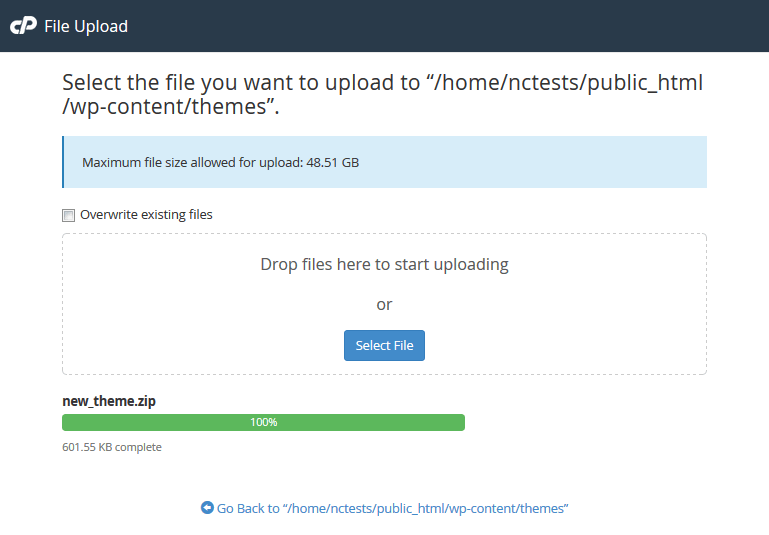
3- Then you have to go to the file (wp-content >> theme) and click on (Upload) to download the template.


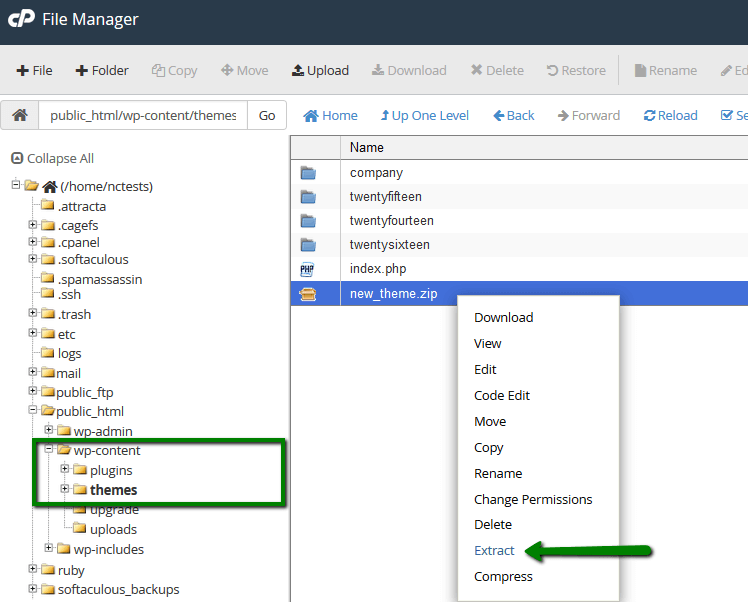
4. After selecting the template file and uploading it, all that remains is for you to decompress the file by clicking (Extract)

5. After decompressing, you must go to your WordPress control panel, then (Appearance >> Templates) and search for the name of the template that was uploaded, activate it, and start setting it up.
In the end, installing WordPress templates is an easy and simple process. You just have to carefully choose the appropriate template for your site that suits your requirements. If you want to buy a template, you must buy from reliable and good sites.
We hope that you have benefited from this explanation of how to install your new website template.


Leave a Reply