Creating a podcast website helps you reach a larger audience interested in your podcasts, especially with the recent significant increase in interest in podcasts. According to Edison Research, more than 67% of young people around the world listen to and are interested in podcasts online. So, it’s a good opportunity for the success and spread of your podcast project online.
Creating a podcast website also helps you promote and build a professional brand identity in front of your listeners, with the ability to organize the content of podcast episodes in an organized manner or in the form of integrated series. In addition to the ability to benefit from direct advertisements for your website on search engines to reach a larger audience. And many other features.
So, during today’s article, we will learn how to create a professional podcast website on the WordPress system, starting with preparing the basic system for the podcast, and we will rely on the WordPress system because it helps us organize podcast episodes in a distinctive way, and all the options we need to customize the site in the required manner.
Steps to create a podcast website
Knowing that implementing these steps yourself will take time and effort, you can instead invest money to save time and effort by hiring a professional freelancer through the Mostaqil platform to create your website with the requirements you need. If you rely on a freelancer, the following explanation will give you the experience necessary to supervise the freelancer and ensure the successful implementation of the work steps.
Whether you decide to hire a freelancer or create the site yourself, here are the steps to follow in detail.
1- Get the basic WordPress site requirements
First, you need to get the basic WordPress website requirements, which are web hosting and domain .
You will find many hosting options available, and we always prefer to rely on cloud hosting options due to their great stability based on the cloud service, in addition to their high speed and flexibility in modifying server resources. Also, the monthly accounting system is based on the amount of hosting resources consumed only, and not a fixed cost, which makes it suitable for your site in all stages of creation and deployment.
The best cloud hosting options you can rely on are Digital Ocean Hosting, Cloudways Hosting , or Google Cloud Hosting , and there are many other options.
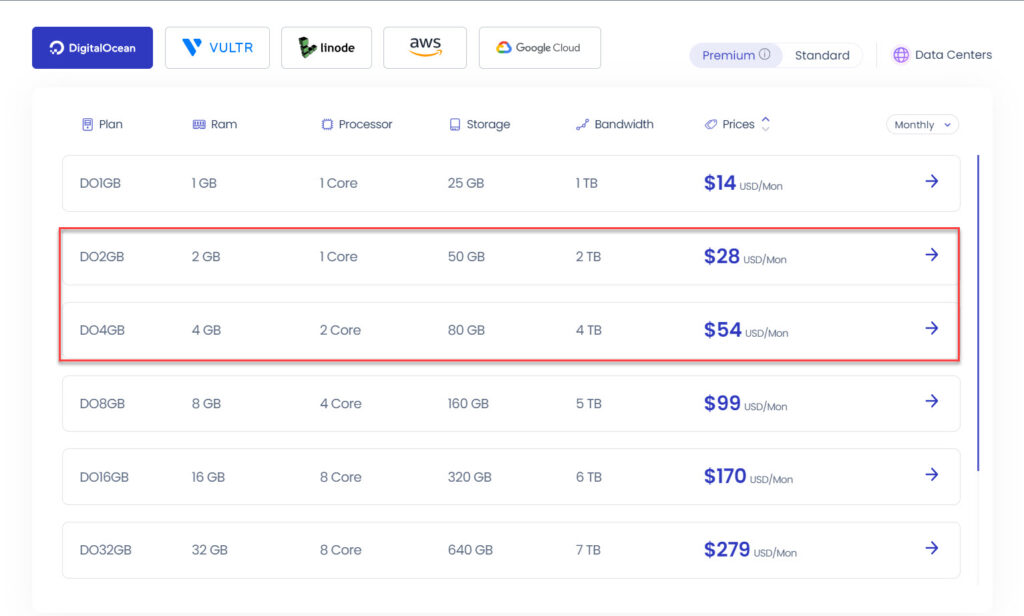
For example, if you rely on Cloudways managed hosting, you will have multiple hosting options based on server resources . You can rely on the following minimum resources to have a site with good stability and speed:
- RAM : WordPress sites should have at least 2GB of RAM.
- CPU : You can count on a single-core CPU for medium-sized podcast sites, and a dual-core CPU for larger podcast sites.
- Storage space : It should be at least 50 GB, and it should be at least doubled if you are hosting podcasts directly on WordPress.
- Bandwidth : Bandwidths starting at 1TB will be suitable for podcast sites.
Based on the above requirements, Cloudways hosting DO2GB plan can be used for medium-sized podcast sites, and upgrade to DO4GB plan for podcast sites with larger audience or podcast files.
Next, you need to get a custom domain for your website , and you can rely on companies like Godaddy , NameCheap , or Domain.com . It is preferable to choose a short, distinctive domain name that is easy to remember, and related to the business. It is also preferable to rely on the main commercial extensions such as .com or .net.
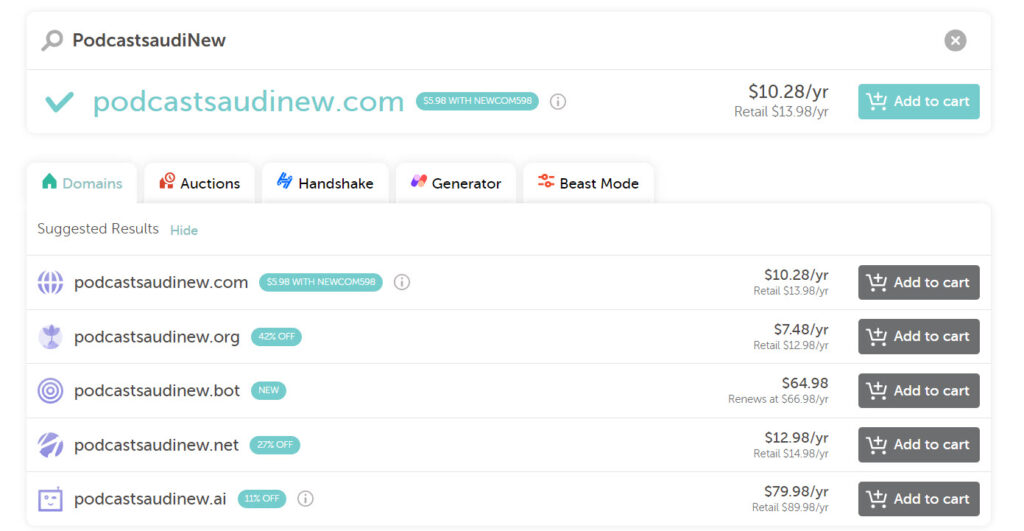
To learn more about purchasing a domain, DNS redirection with hosting, you can review the article How to link a domain to hosting .
2- Install WordPress on the hosting
Now that we have the basic website requirements of hosting and domain, you need to install the content management system on the hosting. During this article, we will rely on the WordPress system because of its many features and flexibility in creating podcast sites, in addition to the multiple template options and plugins supported in WordPress, which makes it suitable for beginners, especially thanks to the direct Arabic control panel.
Installing WordPress on your hosting varies depending on the hosting company you rely on. However, it is worth noting that most hosting companies provide the ability to install WordPress with just one click.
For example, Cloudways hosting lets you select a primary hosting company like Digital Ocean, as well as the desired WordPress version, RAM, and data center. WordPress is then set up directly on the hosting.
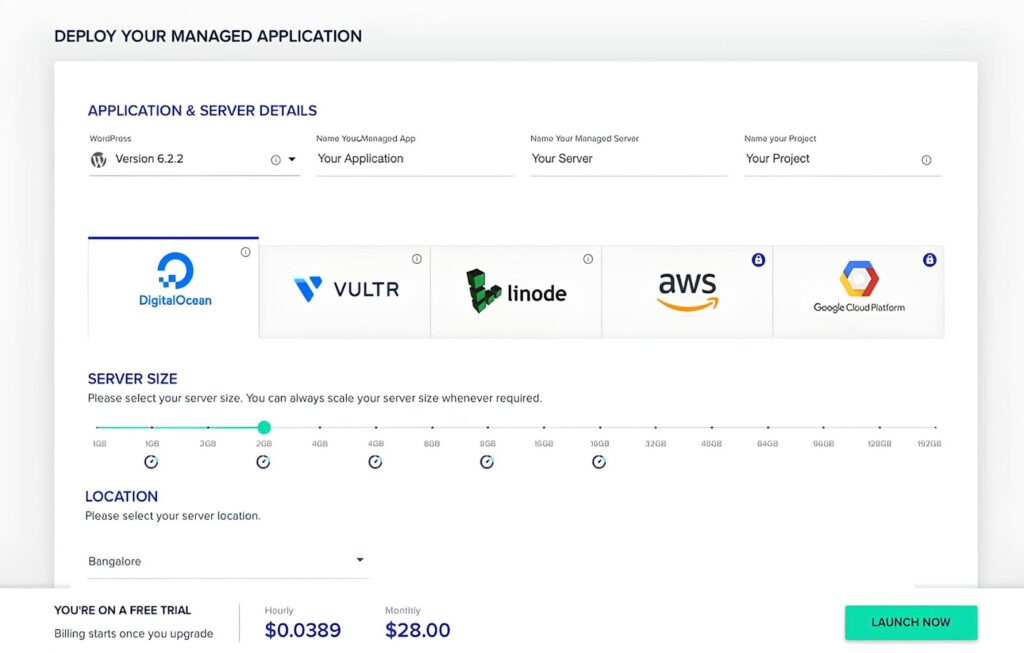
To learn more about the steps to install WordPress on Cloudways hosting in more detail, you can review the article “What is Cloudways hosting and how to install WordPress on it ”
Then, after installing WordPress on the hosting, you can access the main WordPress control panel by typing the wp-admin extension after your site’s domain name in the following format:
www.Domain.com/wp-admin
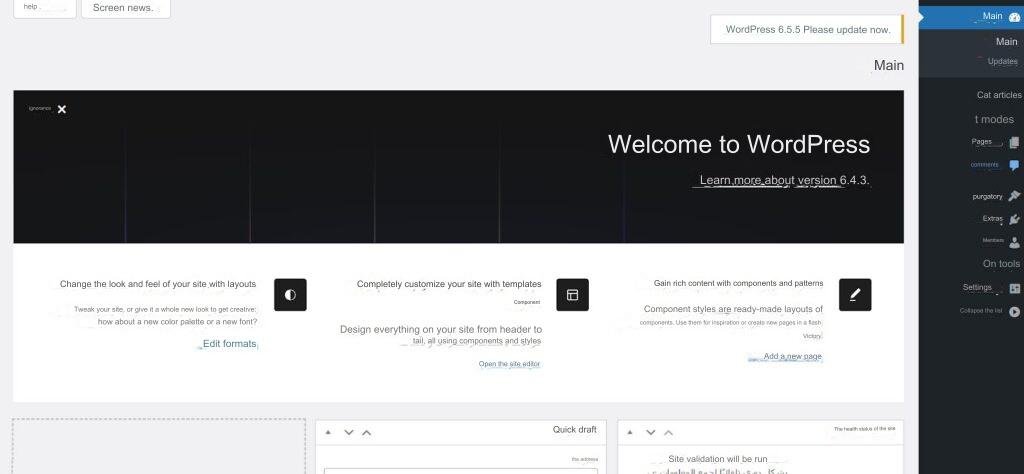
The main WordPress dashboard will be used in all the upcoming explanation stages.
3- Install a WordPress template suitable for podcast sites
The next step is to prepare the interface of the podcast site, and you can rely directly on WordPress templates compatible with podcasts. WordPress has many options available at both the free and paid levels. Among the distinguished options are the Blocksy template, the Astra template , the Livecast template , the Megaphone template , and many other options.
Blocksy is a reliable theme that integrates with the powerful Gutenberg block editor and offers a wide range of ready-made templates compatible with podcast sites. The theme also features a small page size, which positively impacts site speed. It is also designed to be responsive to all screen sizes, whether desktop or mobile.
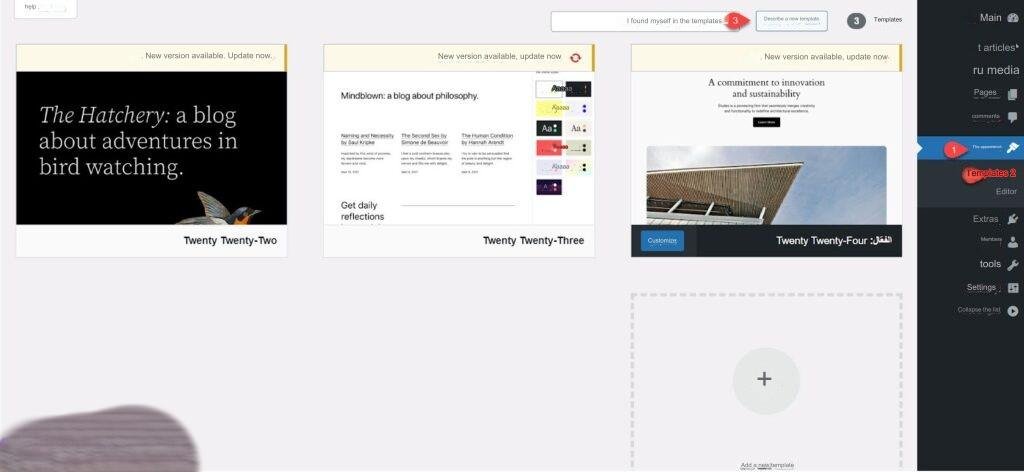
To start installing the Blocksy theme on WordPress, go to your WordPress dashboard, select “ Appearance ” from the sidebar, then select “ Themes ”. After that, click on the “ Add New Theme ” button.
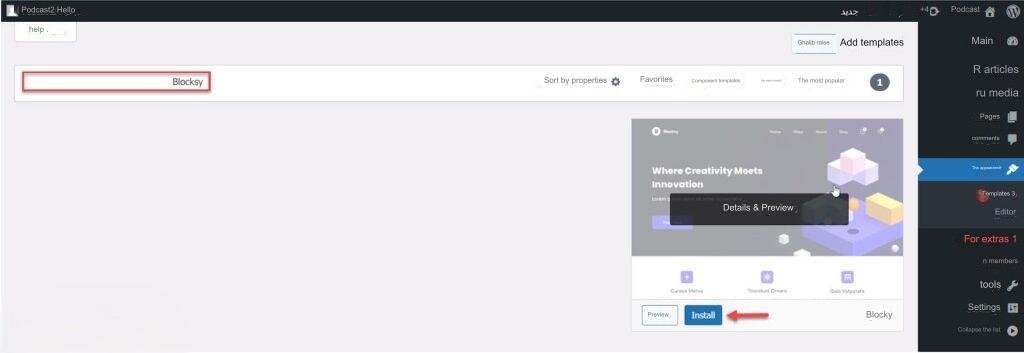
Then you search for the “ Blocksy ” template, then you install the template on WordPress by clicking on the “ Install ” button next to the template name.
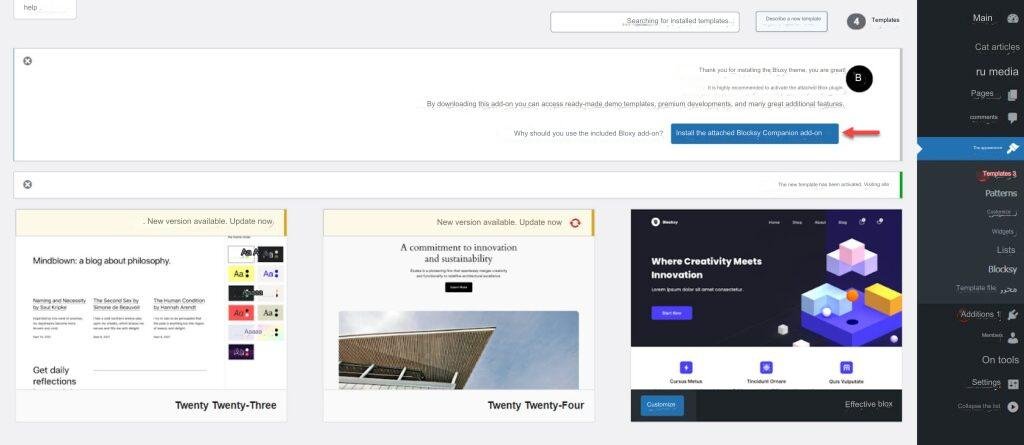
Then you activate the template on your site, and you will be redirected to the templates page again.
Next, you need to install the Blocksy Companion plugin to take advantage of all the features of the theme. So, click on the “ Install Blocksy Companion ” button in the Blocksy theme notification as shown in the following image:
Now, you need to install one of the ready-made templates on your site. To do this, go to the “ Blocksy ” option from the side menu, and from there choose “ Ready-made Website Templates ”.

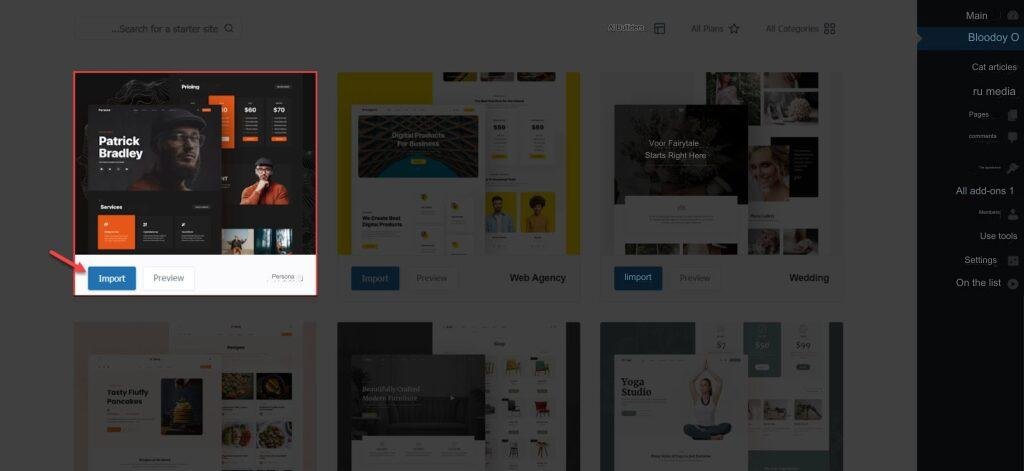
Now preview the ready-made templates in the template, and choose the appropriate template. For example, the “ Persona ” template is one of the suitable options for podcast sites. Choose the template and then click on the “ Import ” button as shown in the following image:
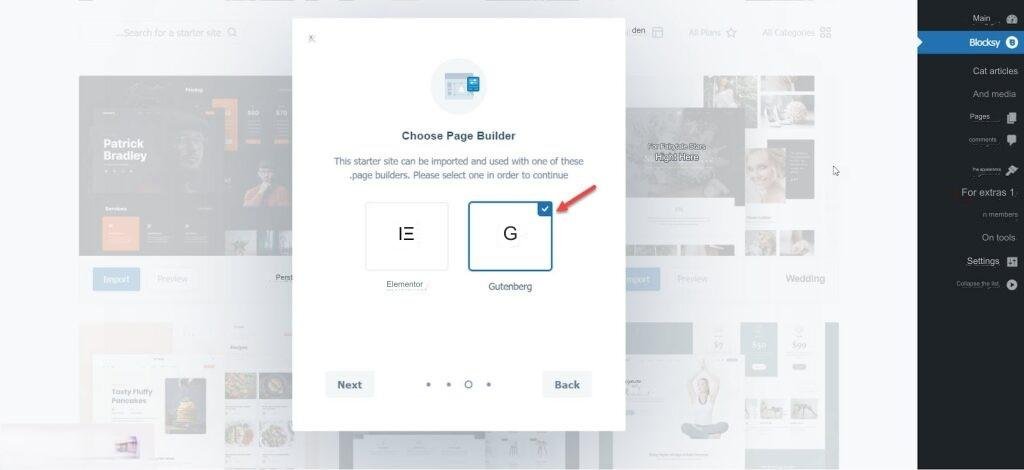
Then, select the component editor that will be used to edit your site pages, between the Gutenberg editor or the Elementor editor. It is preferable to use the “ Gutenberg ” editor.
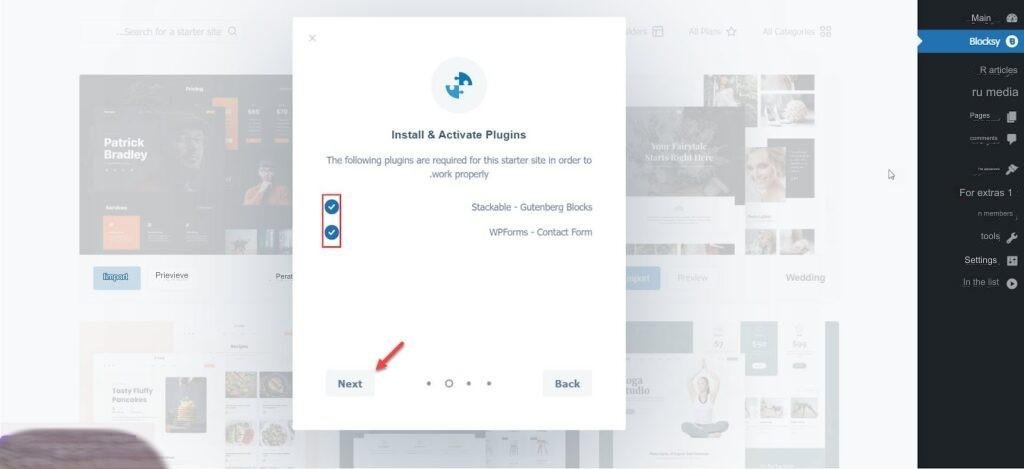
Next, select the essential theme plugins to be installed with the theme, from Stackable – Gutenberg Blocks for editing pages, and WPForms – Contact Form for creating contact forms. Then click “ Next ”.
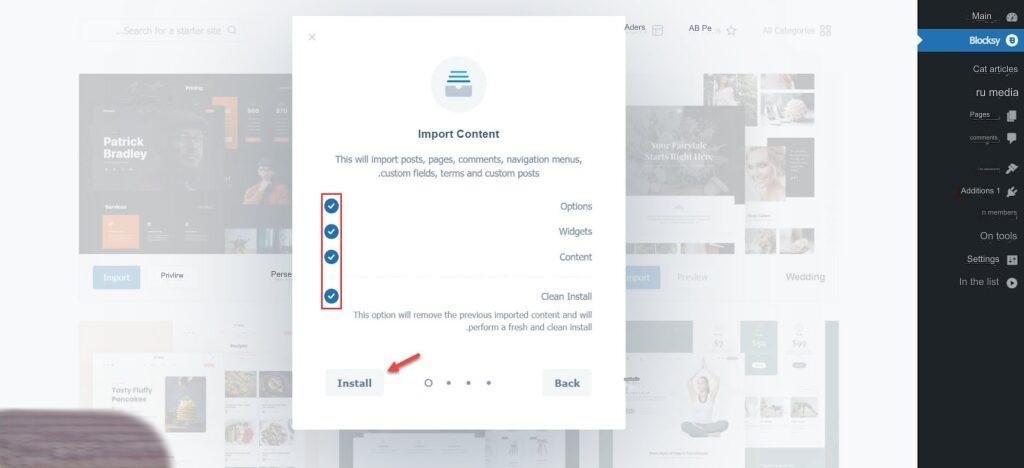
Then select the content you want to import with the template. You must select all the contents from the settings, widgets, and content. After finishing, click on “ Install ” as shown in the following image:

The form will now be imported to your site. Wait for the import to complete and you will see the message “ Starter Site Imported Successfully ”.
Now you go back to your site interface, you will find that the form has been fully imported onto the site in a way that is completely identical to the ready-made forms.
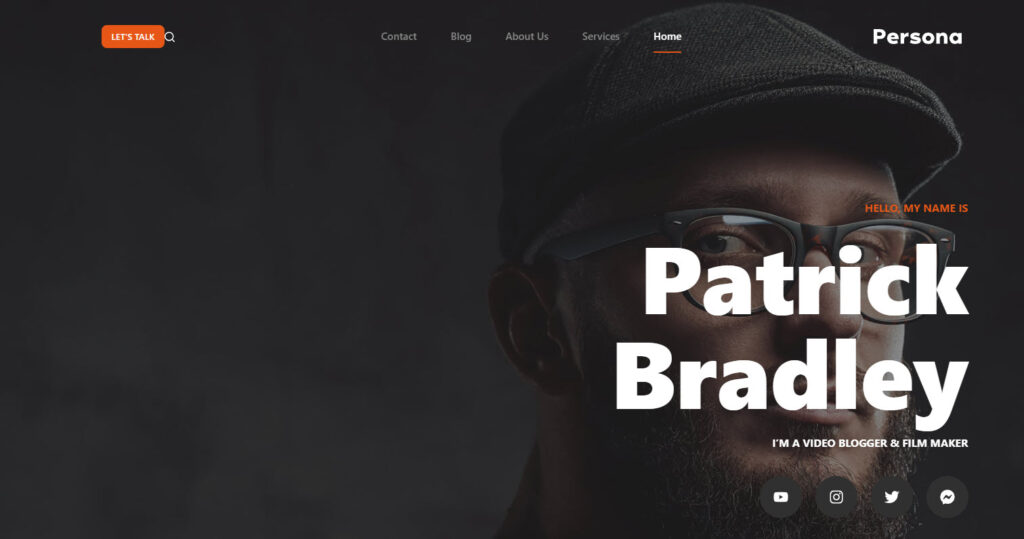
4- Customize the podcast website interface
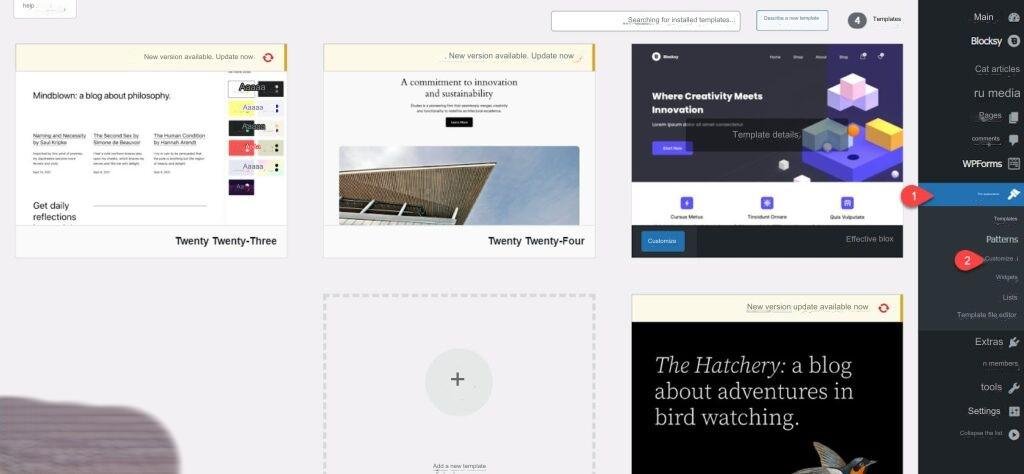
Next step, you need to customize the site interface in terms of visual identity from logo, colors, fonts. In addition to header, footer, etc. To do this, go to the main WordPress dashboard, then choose “Appearance” and from there choose “Customize”.
You will be directed to the template customization panel. It is worth noting that the panel is fully Arabized and simplified and does not require advanced experience to deal with it. For example, you can start modifying the site colors. Choose the “ Colors ” option from the general options.
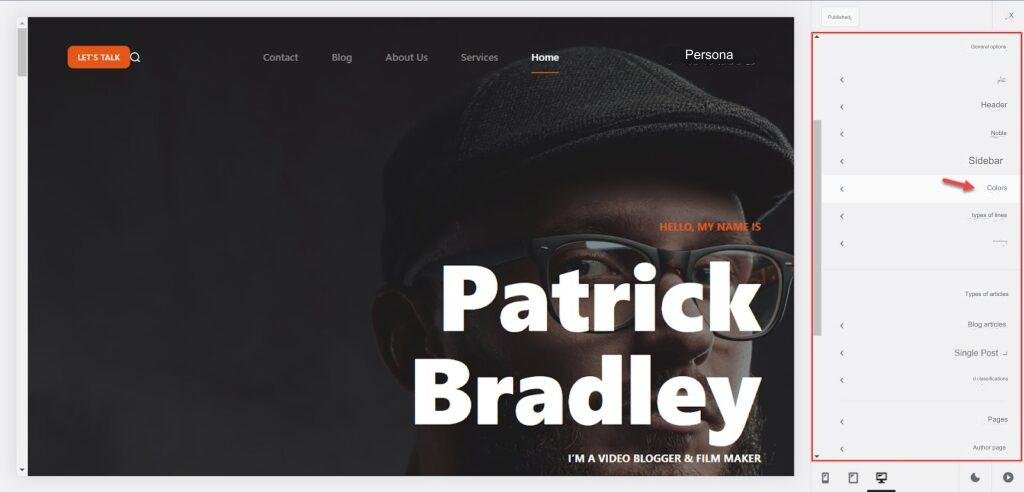
Then customize all the colors of the site in terms of primary colors, secondary colors, background color, font colors, buttons, titles, menus, etc., and you will find all the modifications applied directly in the side view window.

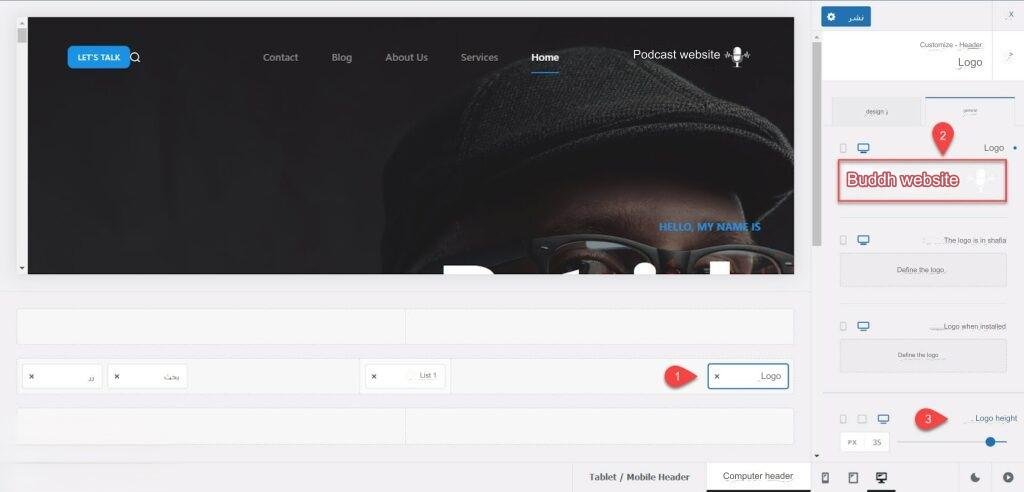
Then you can go to the Header option to modify the structure of the top menu Header in terms of the number of columns and rows, and the contents. You can move and arrange the elements by direct drag and drop.

For example, you can modify the logo in the top menu. Select the “Logo” option, then upload the logo of the desired site and control the width and height of the appropriate logo as shown in the following image:
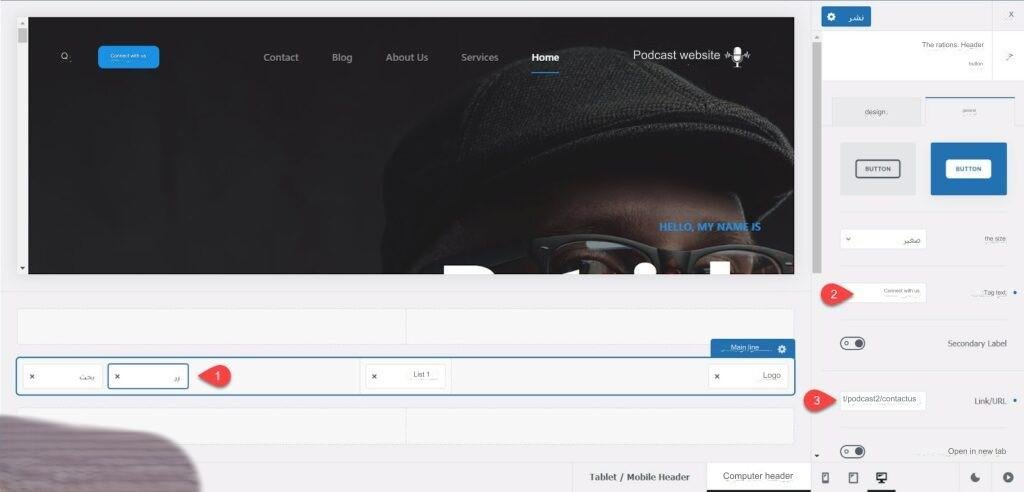
Similarly, you can modify the buttons as well. Select the “ Button ” option, then specify the desired text in the “ Tag Text ” and specify the button link in the “ Link URL ” option. After that, control the height and width of the button from the top menu.
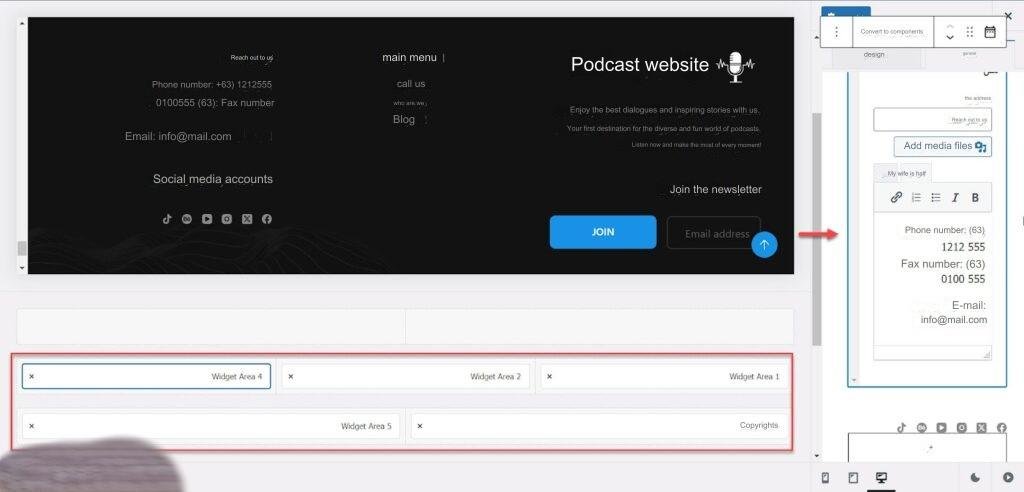
In the same way, you can go to the Header option, then edit the Footer menu. You can edit the menu structure in terms of the number of rows and columns, menu contents, order of items, etc.
You can also go to the menus option and set up the main menus on your site, so that they include the main site pages, podcast pages, blog, etc.
You will find several other options that you can customize just like we did in the previous options. For example, fonts, sidebar, navigation options, etc. After you finish customizing all the options, click the “ Publish ” button so that all the changes are applied to your site.
5- Modify the layout of the main interface.
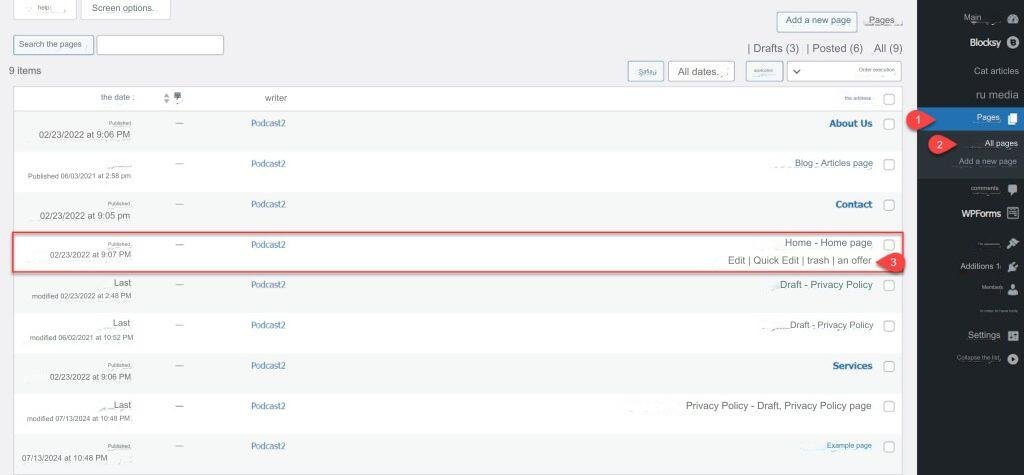
The next step is to edit the layout of your site using the Gutenberg editor. You can do this by going to the “ Pages ” option from the WordPress sidebar, then selecting the “ Home ” page . After that, click on the “ Edit ” option .
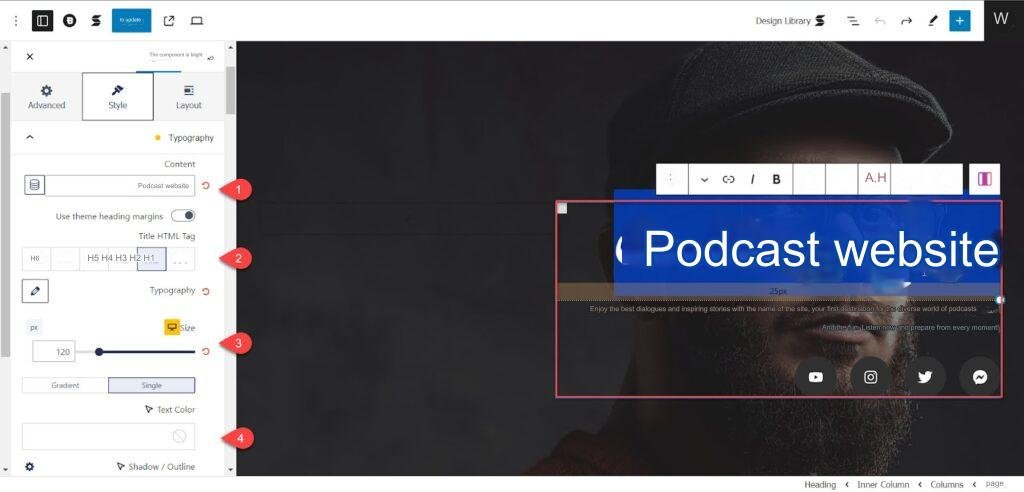
Now, select the desired section of the website interface and start editing it. For example, to edit the website name in the interface, you select the desired sentence and then edit the content, grade, size, color, etc. You will find that the edits are applied directly in the side view window.
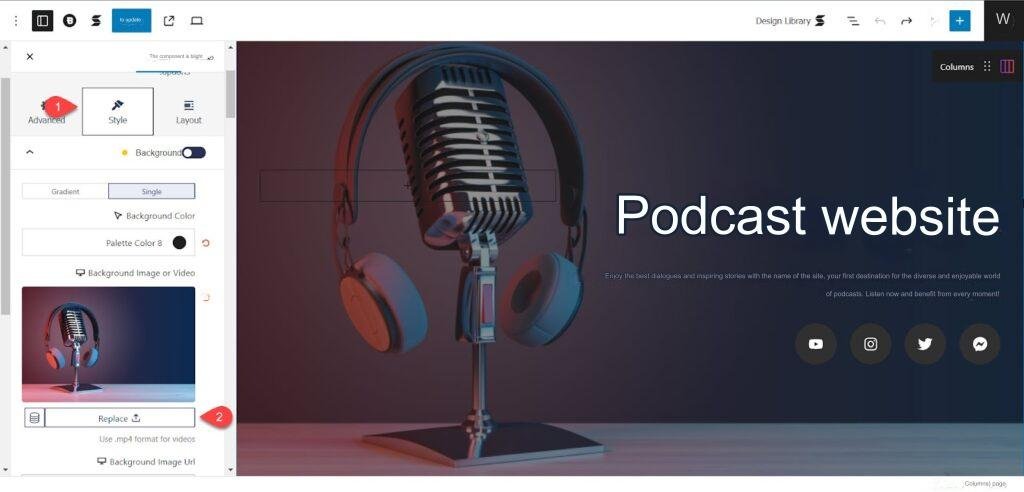
You can also modify the background of the sections in the interface, where you select the required section, then choose “ Style ” and select the required image, color degree, or appropriate color gradient.
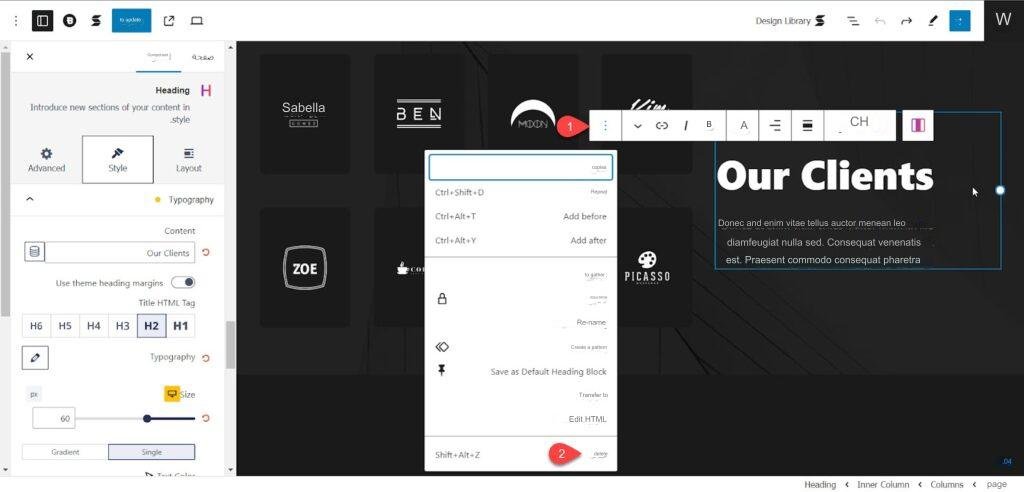
If you want to remove sections from the site interface, select the section you want to remove, then choose the options points, and then choose “Delete.”
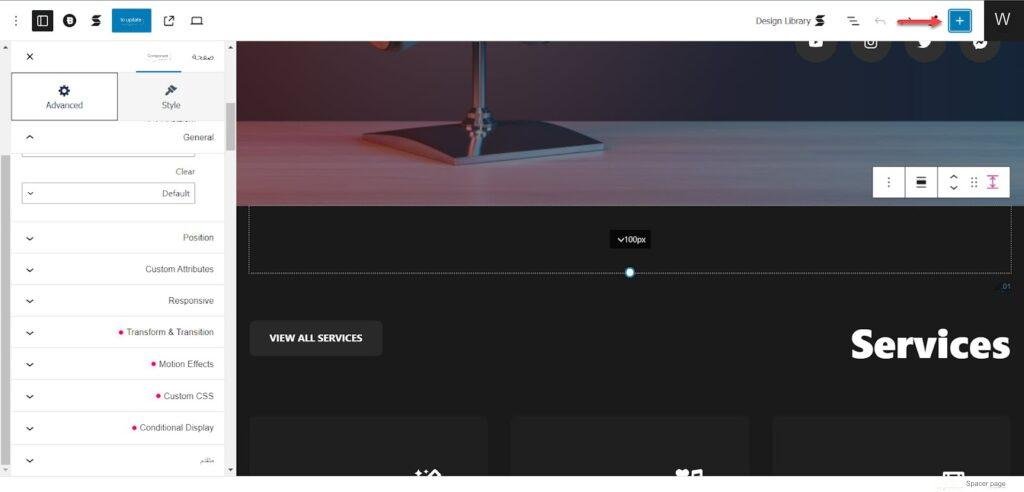
You can also add new sections or elements to the site interface using the Gutenberg editor widgets, by clicking on the Add button in the top menu as shown in the following image:
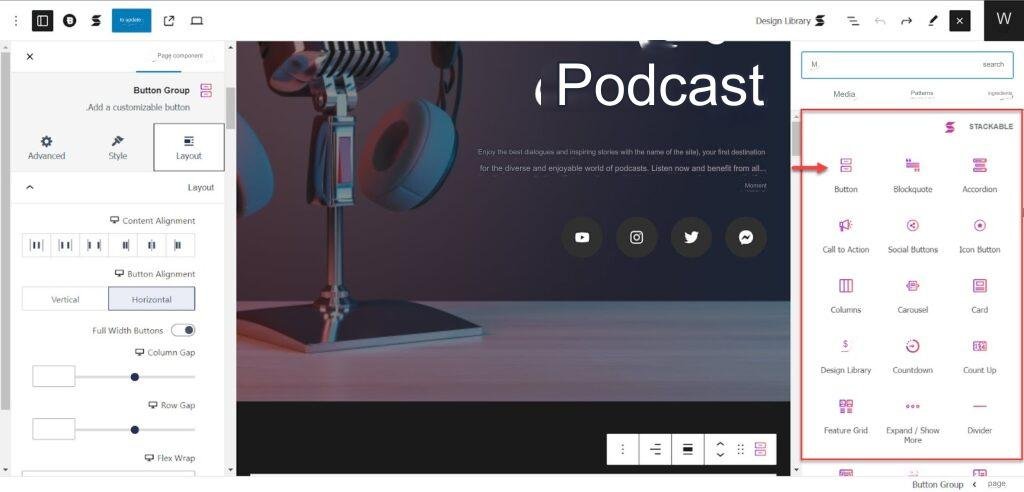
After that, all the STACKABLE editor tools will appear. For example, you can add a new button to the site interface by selecting the “ Button ” tool and then customize the button in terms of content, colors, links, alignment, size, etc.
After you have finished customizing the entire website interface, click on the “ Update ” button from the top menu so that the changes are applied to your website directly.

Now, go back to your site interface and you will find all the updates applied to the site as shown in the following image:
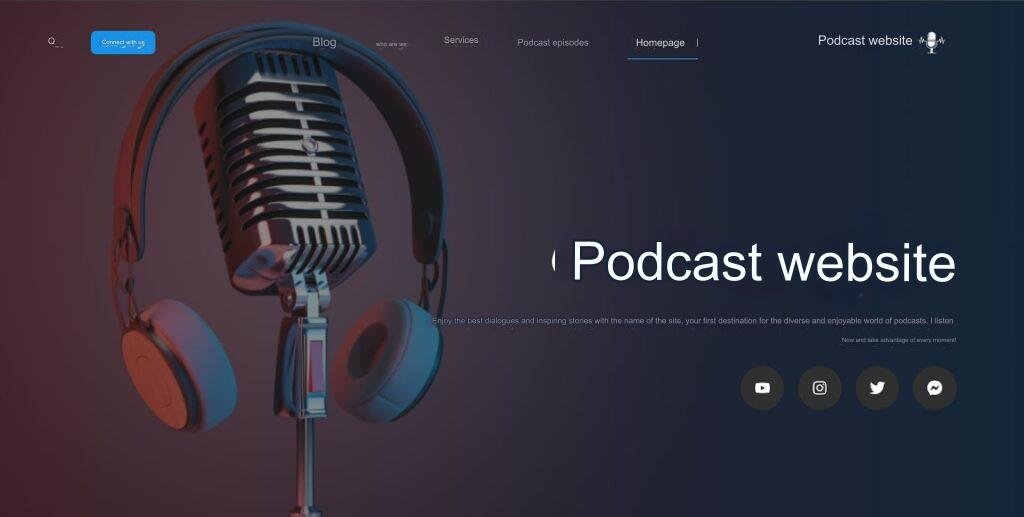
6- Install the podcast system on WordPress
The next step in creating a podcast site on WordPress is to set up the podcast system on the site, as this system helps you upload, organize and manage podcast episodes on your site. You can rely on the “ Seriously Simple Podcasting ” plugin to set up the podcast system on the site.
To do this, head to your WordPress dashboard, select “ Plugins ” from the sidebar, and then select “ Add New Plugin .” Then search for the “ Seriously Simple Podcasting ” plugin and install it on your site.

After activating the plugin on your site, you will be directed to the Seriously Simple Podcasting plugin’s auto-setter where it will help you set up the basic plugin settings on your site. Type in the name of your podcast, as well as a short meta description. Then click “ Proceed .”

Next, upload a thumbnail image of your podcast. It is best to use a 1:1 ratio so that the entire image appears in the podcast player on the site.

Next, select the main and secondary podcast domain. For example, the main domain is “ Business Domain ”, and the subdomain is “ Business Management ”, then click “ Proceed ” as shown in the following image:

Next, the plugin will ask you to integrate with Castos, a cloud service for hosting podcasts online. You can skip this step by clicking the “ Skip Setup ” button.

The podcast system will be set up on your site. Once completed successfully, click the “ Let’s Start ” button to exit the plugin’s auto-setter.

7- Adjust the basic podcast player options on the site.
The next step is to set up your site’s podcast player options. To do this, go back to your WordPress dashboard, select “ Podcasting ” from the sidebar, and then select “ Settings .” Then, select “ Player ” from the top settings menu as shown in the following image:
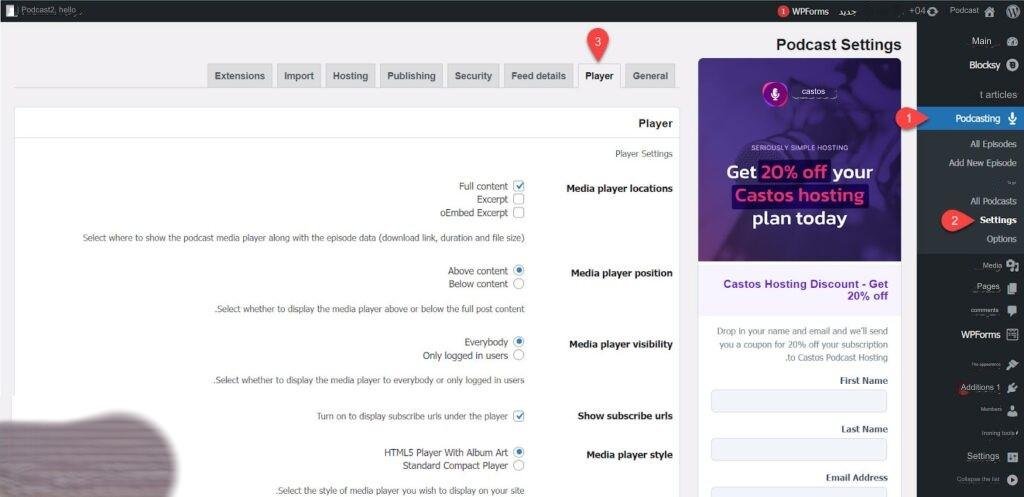
Next, set the WordPress podcast player options as follows:

- Media player locations : Specify how the podcast profile is displayed in the player, whether it is the full description, just the excerpt, or a fixed custom content for all podcasts.
- Media player position : Specifies the position of the player in relation to the podcast meta description. Either below the description or above the description.
- Media player visibility : Specify the accessibility of the podcast player. Whether for all site visitors or only site subscribers. You can activate the paid subscription system on the site, thus converting the podcast site into a paid platform.
- Show subscribe urls : Show the podcast subscription link on the site.
- Media player style : Determine the appropriate player style for your site. The “ HTML5 Player With Album Art ” theme is preferred, which includes options to speed up the podcast to 2X or slow it down, as well as options to fast forward and rewind by 10 seconds. These options are not available in the traditional player, making it the most professional choice.
- Player mode : Set the appearance of the player between basic mode or night mode on your site.
Next, you can scroll down and customize the elements that appear in the WordPress podcast player as well, like this:

- Show subscribe button : Show the follow button in the podcast player.
- Show share button : Show the podcast share button on social media to visitors.
- Enable Player meta data : Enabling this option will display metadata below podcast episodes such as the download link, episode duration, podcast upload date, etc. You can control whether to show or hide this data in the following options.
- Show download file link : Show the podcast download link at the bottom of the player. It is not recommended to enable this option to protect podcast files on your site from being downloaded.
- Show play in new window link : Show the podcast open button on an external page. It is also not recommended to enable this option to prevent direct access to podcast files and thus protect them as well.
- Show duration : Show the duration of the podcast below the player.
- Show recorded date : Show the date the podcast was recorded or uploaded to the platform below the player.
- Enable Custom Player Colors : Enable the ability to customize the appearance of the podcast player with custom colors.
After completing all the previous settings, click “ Save Settings ” to save and apply the modifications to your site.
8- Upload a new podcast to the platform.
Now, the site is ready to upload your first podcast episode. To do this, go back to your WordPress dashboard, select “ Podcasting ” from the sidebar, and then select “ All Episodes .” You will be directed to the dashboard that manages all podcast episodes on the site. To upload a new podcast episode, click on “ Add New Episode .”

First, write the title of the podcast episode on your website, and the meta description. It is preferable that the meta description is short and comprehensive so that it appears completely in the podcast player on the website.

Next, adjust your podcast settings on the site as follows:

- Episode type : Specify the type of podcast episode if it is an audio file or a recorded video.
- Episode file : Upload the podcast file directly from your computer to the site, or from a direct link.
- Episode Image : Upload the main podcast image, which should be 300px x 300px. You can use the free Dynamo tool included with the template to design podcast images for free via drag and drop and direct editing.
Next, scroll down and specify both the podcast duration and file size, which is necessary if you allow files to be uploaded to your site. Also, enter the date the podcast was recorded, if you don’t specify a custom date the date the podcast was uploaded to your site will be used.

Next, go to the sidebar and select the podcast list the episode is in from the “ All Podcasts ” option. You can also create a new series dedicated to the podcast. If you don’t select a podcast list, the episodes will be individual.
Then upload the featured image for the podcast. After completing all the settings, click “ Publish ” to publish the podcast on your website.
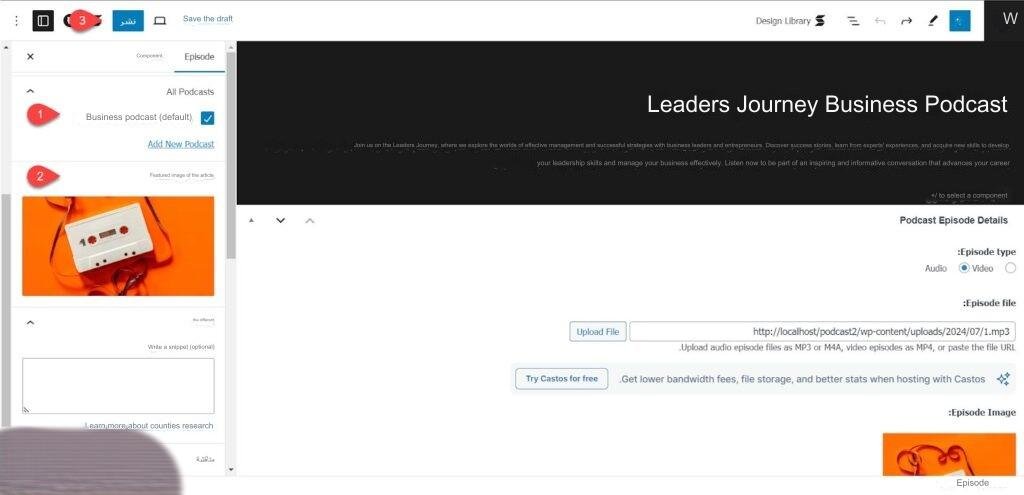
Now, you can preview the podcast episode on your website using the pre-set player as shown in the following image:

9- Support WordPress with basic podcast codes
You can publish podcast episodes separately on your site using separate podcast pages. If you want to create podcast playlists, such as an ordered series or custom list, or embed podcast episodes in sections of your site on the home page or other pages, you’ll need to power WordPress with essential podcast code.
You can rely on the Seriously Simple Stats plugin to add all the basic podcast codes to your site and then modify them, and it is also compatible with the Seriously Simple Podcasting plugin .
So, you first need to install the Seriously Simple Stats plugin on your site as we did with the Seriously Simple Podcasting plugin .
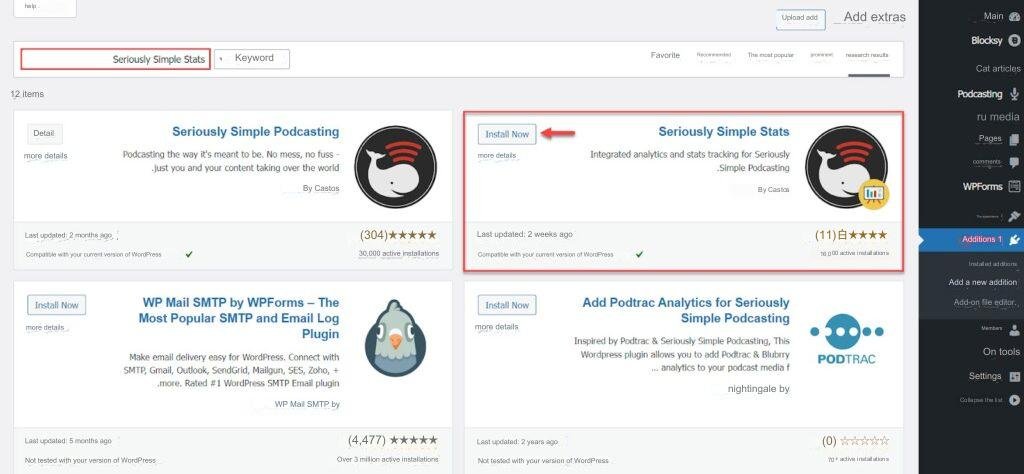
After that, activate the plugin on your site and all the basic podcast codes will be automatically activated on the site. You can learn about all the Seriously Simple Stats plugin codes and how to work with them on WordPress based on the plugin’s profile .
For example, if you want to publish podcast episodes collected in a list on the main interface of the site, or within the site pages, you can rely on the following code directly:
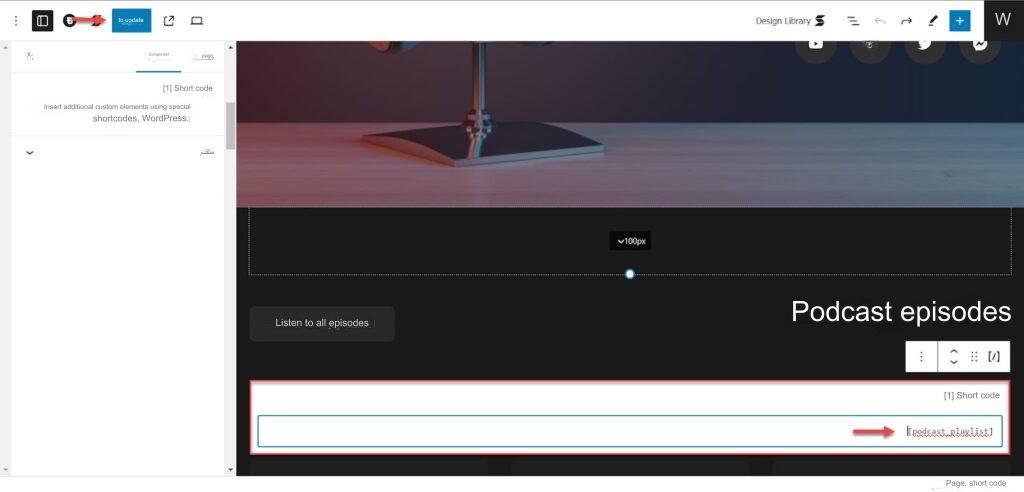
[podcast_playlist]Where you go back to edit the home page with the Gutenberg editor, then add a short code in the location where you want to embed the podcast episodes on the home page.
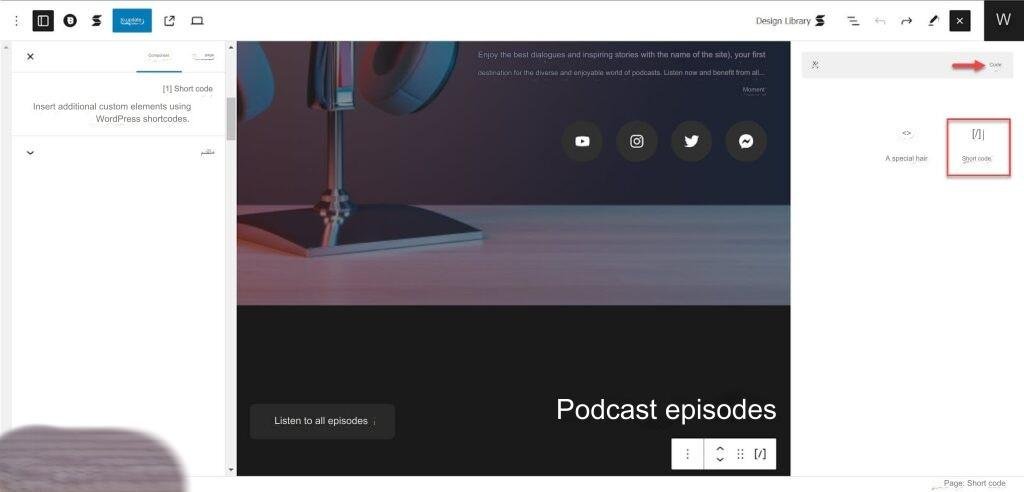
After that, write the code of the previous podcast episodes on the site [podcast_playlist], then click “ Update ” as shown in the following image:
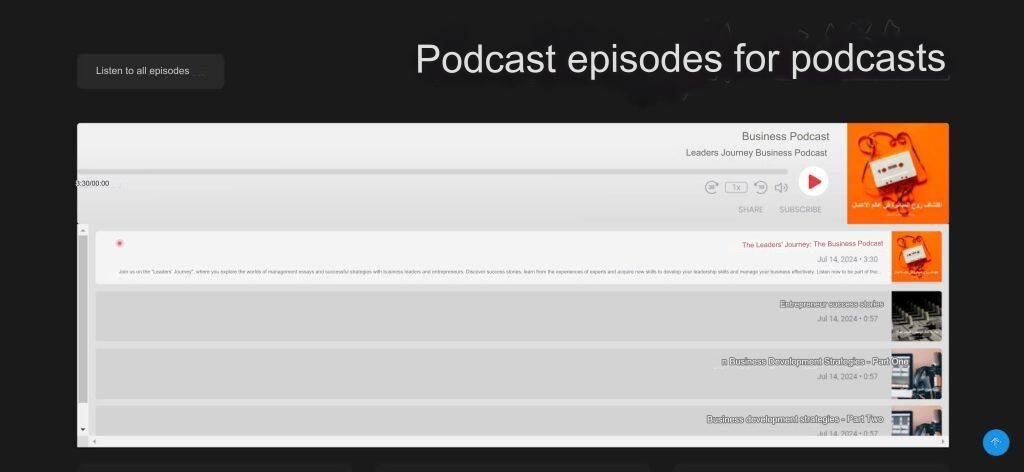
Now you are previewing the appearance of the podcast episodes on the main interface of your site, you will find all the podcast episodes appearing in a list on the main interface as shown in the following image:
If you want to add a series of podcast episodes only, instead of all the episodes collected within your site pages, you can rely on the following code:
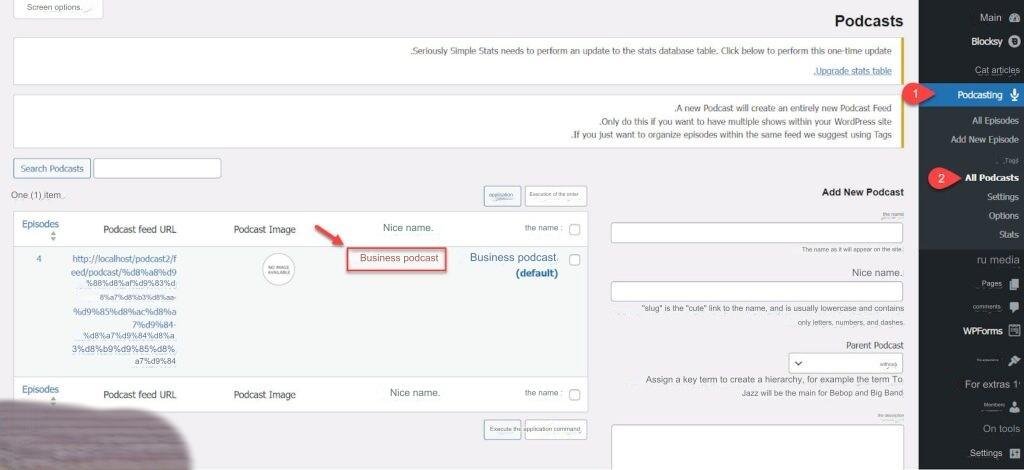
[podcast_playlist series="my-first-series"]Where my-first-series is replaced with the cute name of the podcast list you want to include on your site. You can access the cute name of the list by going to the “ All Podcasts ” option from the “ Podcasting ” side menu, and you will find the cute name of the desired list.
If you want to add separate loops in a list on your site pages, you can use the following code:
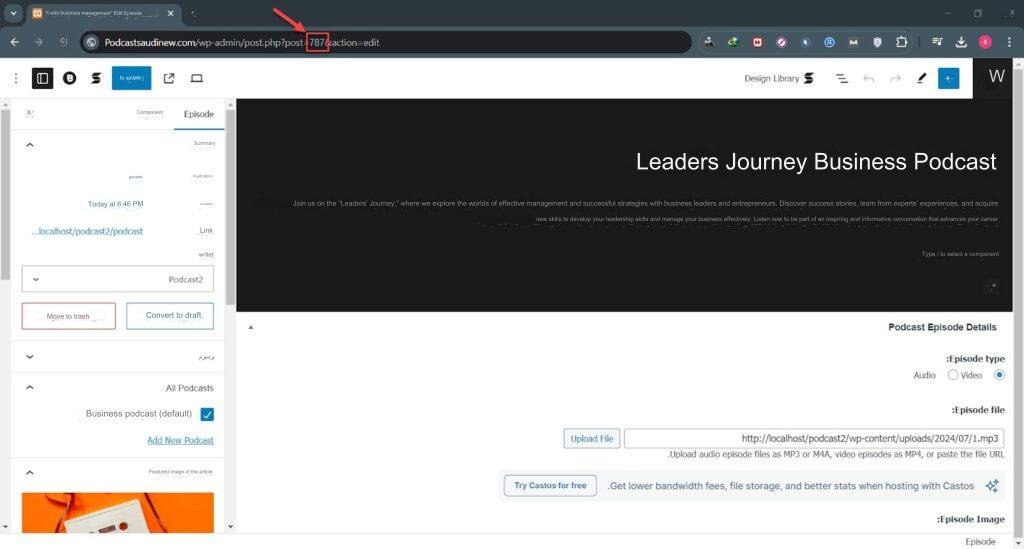
[podcast_playlist episodes="ID1,ID2"]Where the ID1 code is replaced with the podcast publication number on your site, and the episodes are separated by a comma as shown in the previous code. You can access the podcast publication number by going to the podcast episode page on WordPress, you will find the code directly after the =post domain as shown in the following image:
In this way, you can add all the podcast episodes according to the appropriate order and display method on your site pages, and the final appearance of the podcast site will be as shown in the following image:
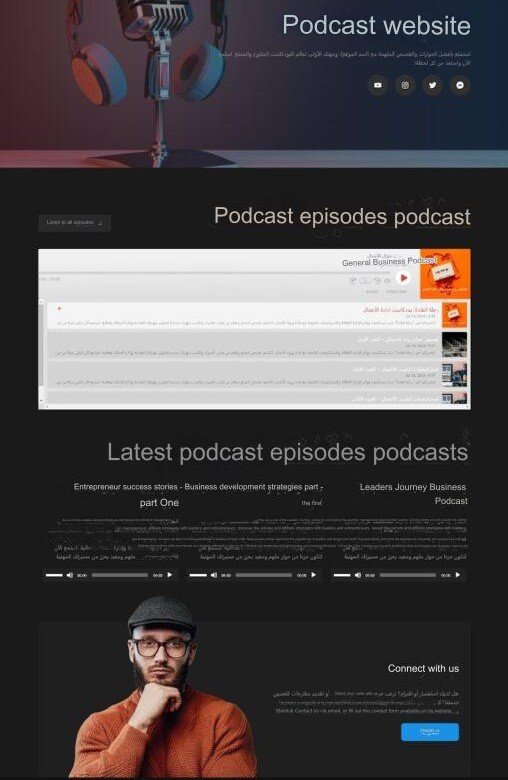
In this way, we have reached the end of the article, and we have reached the final professional appearance of our podcast site and added all the main podcast elements to the site.
You can now publish the site to reach the largest group of people interested in the podcast episodes you provide and benefit from all the features of the online podcast site. You also need to periodically develop and improve the site in terms of performance and general appearance to improve the user experience and enhance your brand identity.


Leave a Reply