The WordPress platform enables millions of individuals and companies to share their ideas and stories through their websites, by allowing them to easily add and publish articles on the site, whether it is a blog, store, or anything else.
In this article, we will show you how to add articles to WordPress by explaining the steps of the process in detail. We will also shed light on some of the basics related to this, in addition to the best tips that help in formatting articles.
Steps to add a new article in WordPress
WordPress allows adding articles to the site through a content creation editor that provides many powerful tools that make the task much easier and allow it to be carried out professionally.
This editor is called the Component Editor or the Gutenberg Editor , and it helps divide the parts of the article (titles, paragraphs, images, tables, etc.) into separate blocks or components so that you can add and change content easily.
The process of adding an article in WordPress consists of a set of steps, the most important of which are adding titles, textual content, and visual content (images and video), in addition to specifying the classification and adjusting some important settings related to adding an article, then clicking on the publish button.
First: Go to the Add a New Article page
- Log in to your WordPress website control panel .
- Then from the (Articles) tab, click on (Add New) as shown in the picture.

Second: Add the title and content
Here you can fill in the blanks as appropriate as shown within the editor itself:
- Write the title of the article in the first box (add a title), and make sure it is expressive, clear, attractive, and concise.
- In the second box, write your own content. You can also write it anywhere, such as Word, and transfer it instead of writing it on WordPress. In addition, this does not have to represent only textual content, but various types of content can be added through the use of components.
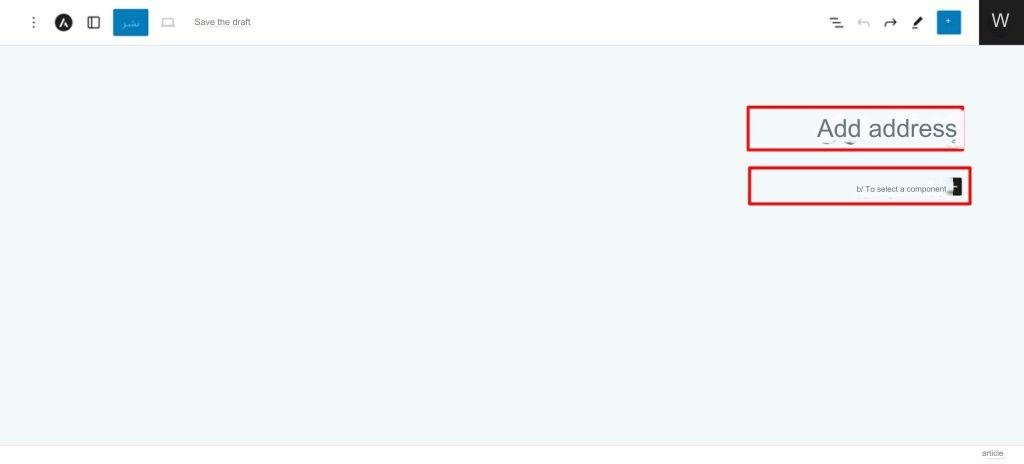
The editor provides the ability for many types of components. Components are elements that make it easier to add different types of content. The Image component allows you to add an image to the article, the List component allows you to add a list, and the same goes for the rest of the components.
Components can be added within the article by clicking on the plus sign (+), where the various components that can be added appear.
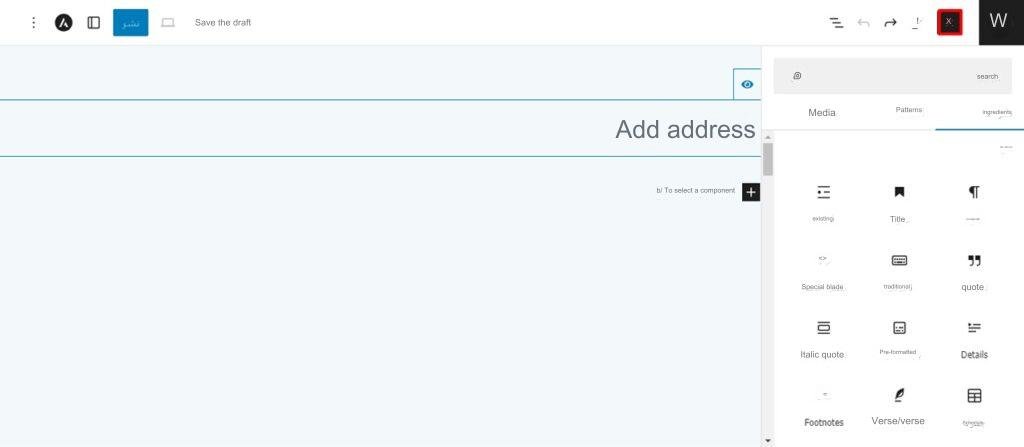
Third: Add photos
Good images attract the attention of visitors, and there are two types of images that you can add to WordPress articles, either an individual image or a group of images (gallery). To add an image, we follow the following:
- Click on the Add Component (+) button, then search for the (Image) component by entering its name in the search box, and then click on it to be added directly to the article within the editing window.
- Now you can choose the image that suits you, whether from the device through ( Upload) or from the Internet by selecting (Insert from URL link) or from the media library in WordPress.
This method enables you to add any media type to your articles.
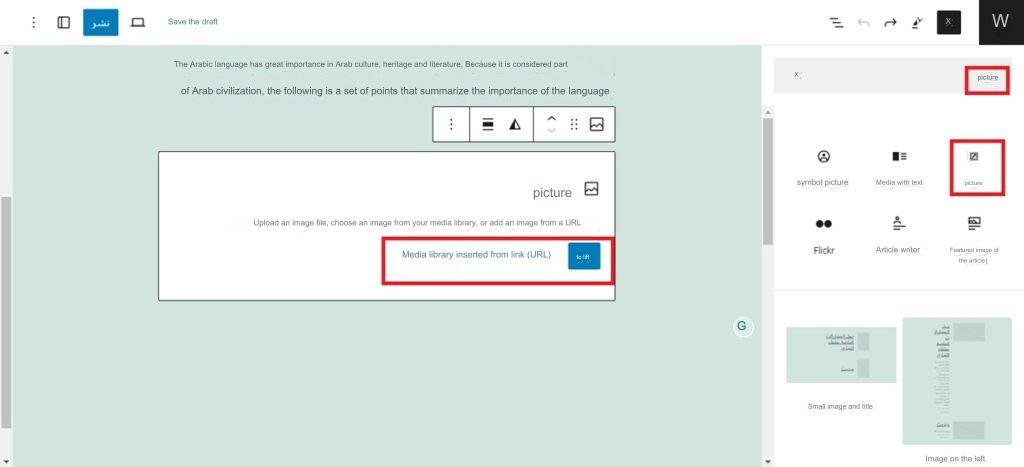
In order to edit the image, click on it and go to Settings, where you can change the image style, size, and dimensions.

For more information about images and ways to upload and edit them in WordPress, you can review the article ( Ways to upload images and media to WordPress and edit them correctly ).
Fourth: Defining categories and tags
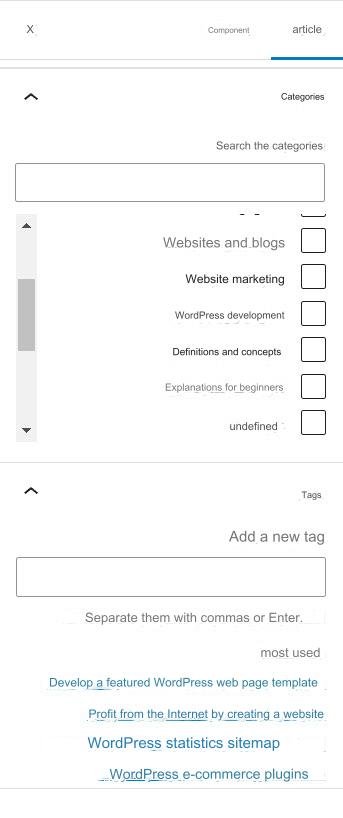
Categories and tags are similar in some ways, but different in others. Categories cover and organize the general topics of the blog or website, and are in the form of main and sub-categories, while tags are used to organize content in a way that is different from classifications or to help classify it better. You can see the article ( What are tags? How do they differ from classifications? And how do you benefit from them? On your site? ) to learn more about the differences between them.
You can add the article to a specific category or categories or place a tag or tags for it from within the editing page, through the (Categories) and (Tags) tabs located within the sidebar of the article options, where you can choose from what has been previously added to the site or add categories. Or new tags.
Fifth: Determine the permanent link or Permalink
The permanent link usually stands for the permanent link, which means the article title (post URL), and is automatically generated from the article title, but the permanent link can be modified through the article editing page. To do this, you can click on (Link) from the article settings sidebar on the editing page, then write the link you want.
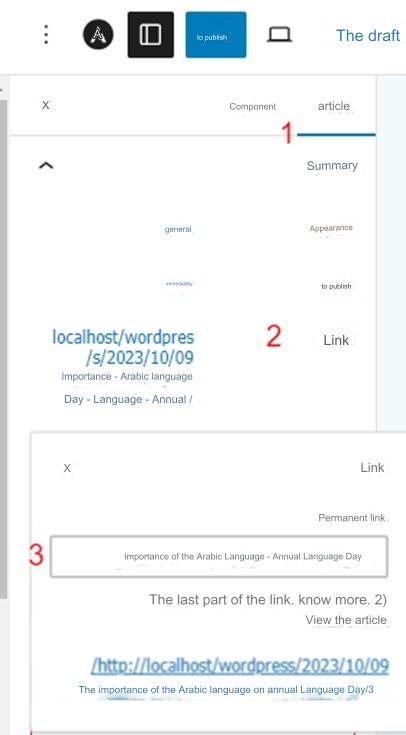
Note: Punctuation marks, commas, quotation marks, apostrophes, and title characters are not valid for writing a permanent link, and are replaced by bars. For example, if the title of the article is The Importance of the Arabic Language “Annual Language Day,” it will be converted to (The Importance of the Arabic Language-Annual Language Day) You can review the article ( Explaining permanent links and using them to improve SEO ) to learn more about permanent links in WordPress.
Sixth: Adding the excerpt
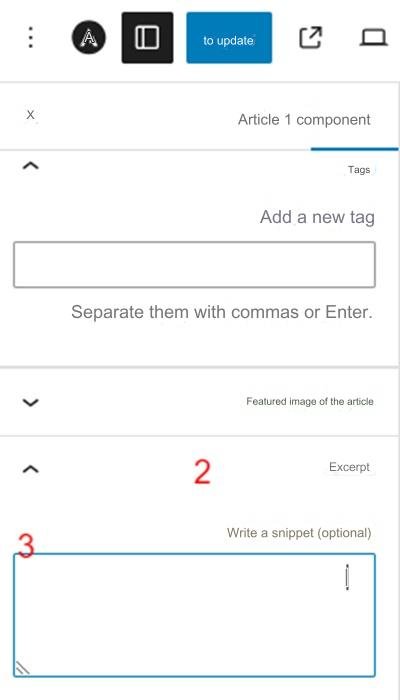
A snippet is a summary or teaser about the article, and can also be used and displayed by WordPress themes. WordPress automatically marks the first 55 words of article content as an excerpt when you don’t type an excerpt into its box.
To add an excerpt to the article, all you have to do is look for the Excerpt tab in the side toolbar on the editing page and click on it, then write the text you want the article excerpt to be in the box that appears.
Seventh: Activate or deactivate comments
Enabling article comments in WordPress allows readers to interact with the content you publish on your site. You can activate or deactivate comments as you wish through the (Discussion) tab in the settings sidebar on the article editing page.

Read also: Manage comments on WordPress sites and control their settings
Eighth: Adjust additional settings and options for articles
There are some important additional settings that you can adjust on the article editing page before publishing it, and we explain them to you in the following paragraphs.
Inspection
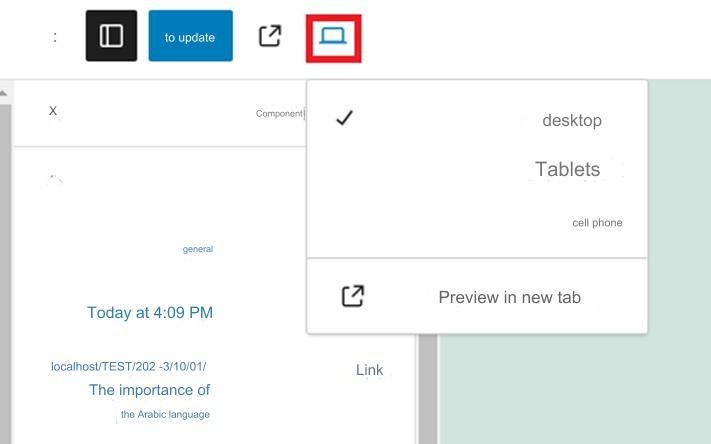
The preview button shows how articles will appear on your website. This feature helps you check any modifications required before publishing, and the preview option can also be set to different screen sizes. WordPress shows a desktop preview by default, but you can also choose for tablet and mobile devices.
Appearance
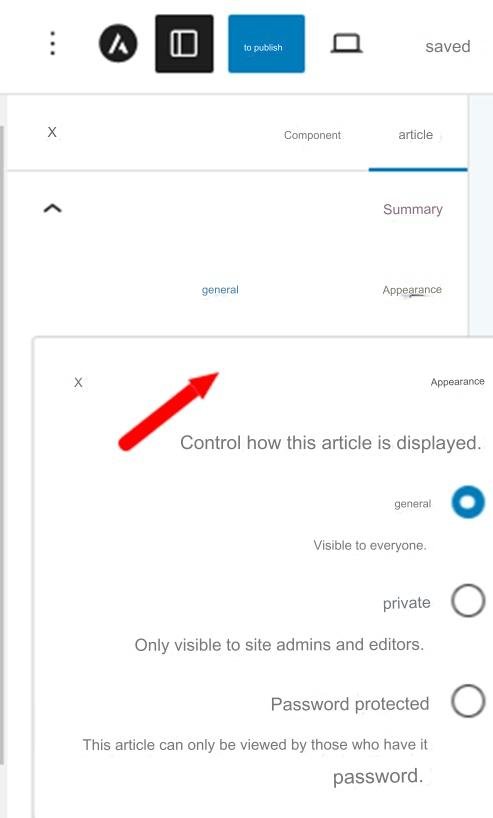
There are three options to specify to whom the article will appear:
- Public : Makes the article visible to anyone.
- Private : Private articles are only visible to senior members of the site’s team (site managers and editors).
- Password protected : You can specify a password for the article, and it will only be viewable by those who know the password.
You can change the appearance type for a post that has already been published or that you are currently adding to WordPress. To do this, go to the article settings bar, then click on the specific appearance option, and choose what you want.
Scheduling
You can schedule your article to be published at a specific time in the future automatically or to be published at an old date. The article can be scheduled through the (Publish) option within the article settings bar.
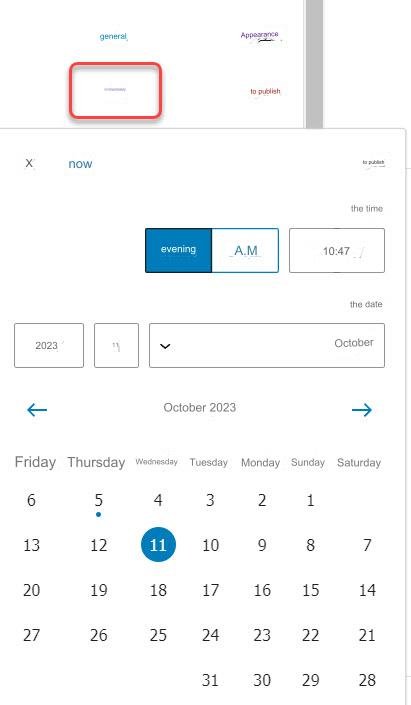
Read also: How to schedule a post or page on WordPress sites
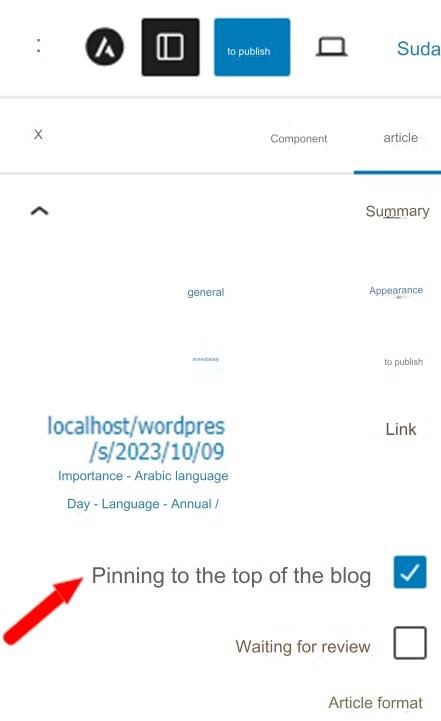
Pinning to the top of the blog
This feature highlights specific articles by pinning them to the top of your WordPress blog. These pinned articles are for important content.
To pin the article, go to the settings sidebar, then select the option (Pin to the top of the blog). This will place the article on top of other posts.
Ninth: Publish the article
Now that you know and set all the options in your article, it is time to publish it and make it available on the site to visitors. To do that, all you have to do is click on the (Publish) button located in the top bar of the editing page, where within moments the article will be published on the site.

Then you can click on the (View Article) button that appears at the bottom of the screen to go to the article page on the front end of the site or blog, and make sure that the publishing process has been completed as you want.
How to delete a post in WordPress
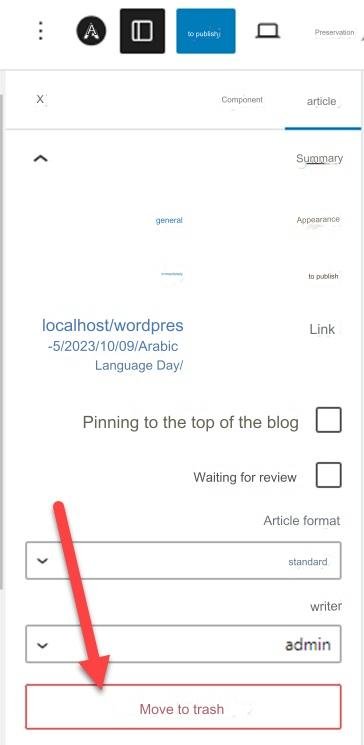
There are several different ways to delete articles in the WordPress system. If you are on the article’s editing page, you can simply click the (Move to Trash) button in the settings or options sidebar.
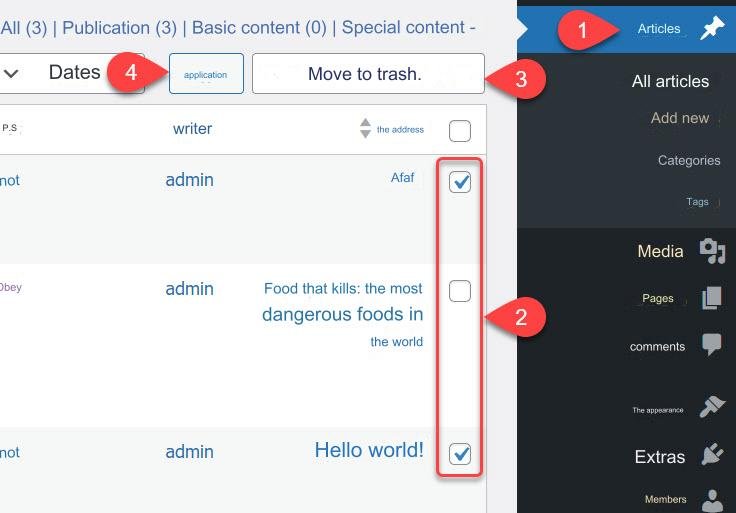
You can also delete a group of articles at once (or a single article) from the “Articles” page in the WordPress control panel, by selecting the articles you want to delete, then choosing (Move to Trash) from the (Execute Command) menu, and then clicking ( application).
Tips for formatting your articles effectively
Here are some important tips that will help you format articles correctly and professionally when adding them to the site:
- Use main headings and sub-headings : Headings help improve the format of the article by dividing it, and facilitate searching within it, so they should be used, especially when adding a long article to WordPress.
- Apply formatting options sparingly : Too many formatting options can make an article unattractive or not easily readable, and they can also slow down the site at times, so do not use them excessively.
- Make the article paragraphs short : Short paragraphs make the article easier to read, and because readability is important for retaining visitors, it is preferable to make your paragraphs as short as possible, and subheadings can be used to help with this.
- Avoid large blocks of text : It is important to break up the text of your article using different media, quotes, social media sections, and lists, because large blocks of text are repulsive to visitors.
Read also: How do you write an interactive article that achieves wide spread on the Internet?
With this, we have finished explaining how to add an article to WordPress, as well as giving you tips to help format it. We would like to point out in conclusion that in all steps of writing and adding an article, the user experience must be given great importance, in order to provide a high-quality article that attracts visitors and keeps them in the audience. Your website.


Leave a Reply