

WooCommerce has become the most widely used and popular e-commerce platform, used by 5 million active users around the world and supporting more than 64 languages. Therefore, you find many articles and videos on the Internet that explain how to use it and benefit from it.
With the expansion of its use on e-commerce sites, it has become important to expand the linking of various payment methods to it so that it is easy to use by anyone, anywhere in the world. Because collecting payments is the goal and objective behind operating your online store, it is worth paying attention to taking advantage of the benefits of electronic payment methods, which are as follows:
- Speed: Payment and transfer are completed in a few minutes, safely, without worrying about collecting the profits of each individual sale.
- Convenience and ease: Your expansion in offering different payment methods makes it easier for your customers to pay, which increases your chances of selling and collecting profits, especially with the increasing spread of electronic payment methods.
- Increase sales: To encourage a greater number of customers to buy from your store, as we mentioned in the previous point.
- Increasing profit margin: As it is faster and increases your sales, it therefore increases the speed of capital turnover.
- Lower cost than traditional payment methods, especially with regard to collecting money from customers outside your country.
It has also become an alternative to employing a person responsible for following up on every payment process, as payment here is done electronically for a large number of transfers and financial procedures automatically. - Security: (Taking the necessary measures) it reassures the customer by protecting him from being exposed to fraud and fraud, thus increasing his confidence in your store and also protecting you from fake payments and fraud.
In our article today, we will focus on clarifying the many electronic payment methods that can be used with WooCommerce, such as: major credit cards, PayPal, bank transfers, checks, and cash on delivery. With an explanation of how to install and use it with WooCommerce, and also focusing on the easiest methods to use in our Arab region. But before talking about it, we simplify the concept of the payment process, then mention the criteria that you need to take into consideration when choosing the payment methods that you will use on your site, and then present the payment methods that are optimal for you.
Simplifying the electronic payment process:
To simplify the process that occurs in electronic payment, we list it in the following steps:
How to choose the appropriate payment methods for your customers
Below we advise you on the most important criteria that you need to take care of in choosing the appropriate payment gateway:
- Is it integrated with WooCommerce or standalone?
In one way or another, there is a way to link each payment gateway to your website, but there are payment gateways that have plugins ready for WooCommerce and other gateways that need to be linked through a developer. Here we will pay attention to the existing ones that have ready-made additions for ease.
- Accept your store’s main currency
Some payment gateways do not accept a large number of currencies and provide these currencies through the exchange rate (to which a commission is added for converting the exchange rate), and therefore not accepting your currency directly may cost you additional expenses.
- Ease of working in your country (for you and your clients)
It is important to make sure that it accepts payment from the countries to which you sell, and you can also withdraw and transfer your profits easily to yourself (mostly profits are withdrawn to Visa or to your bank account that you register on the payment gateway website).
- The amount of fees required for each sale transaction
All electronic payment gateways take fees as a commission for every payment transaction made in your store, and these fees vary from one gateway to another and according to the type of card that the customer uses as well as the country from which you provide your services. So make sure you understand the fee structure before committing to a payment gateway long-term. In general, fees are in the range of 2.9% + 30 cents per transaction. There are also discounts that depend on the amount of sales you achieve. The more sales you make, payment gateways provide you with offers with lower fees.
Therefore, you must compare the service fees between each payment gateway and another, as you may have to increase the price of the service/product that you provide to compensate for the payment fee expenses, which raises the price for your customers, and this may lead to customers not accepting this high price.
- Other fees
Some payment gateways add other fees, such as fees for transferring money directly to you or to your bank account, first-time subscription fees, annual fees, or others. It is important to be sure of all these fees, especially if you are starting a new store, as these costs are a consideration.
- Followed security protocol
The amount of security is very important, as the customer will not risk his bank information, nor will you risk your profits being wasted. This is one of the main points that must be taken into consideration. Here we also advise you on the safer solution, which is to use iFrame or redirection (don’t worry, all payment gateways provide it), meaning that the customer enters his payment data on the payment gateway’s website and not your site. This gives better security to your customers and encourages them to deal with you.
Before entering into the different payment methods, we advise you to ensure that the payment and money collection settings work correctly, as you will be able to activate the basic payment methods, which are:
- Payment through PayPal, which is the most famous electronic bank in the world, and is supported in many Arab and foreign countries
- Cash on delivery, where the customer pays cash to the shipping representative once he delivers the product
- Payment is through direct bank transfer, where the customer can transfer to your bank account and then sends you the transfer number. After you review your bank account and ensure that the transfer is complete, you implement the customer’s request.
- Payment through checks: The client sends you a check for the amount, and after you spend it, you fulfill the client’s request.
You can adjust these settings from the aforementioned article by adjusting the WooCommerce settings. Then, in this article, we will continue to expand on adding other payment methods.
You can also use more than one payment gateway, as this has the advantage of making your customer choose what he prefers, but it also has a disadvantage that your sales will be divided into more than one gateway, as this may increase the cost of your payment gateways (you can start with one gateway and then test the point of adding other payment gateways over time over time). Your website to evaluate for yourself the amount of increased sales in exchange for increased payment fees and whether it is rewarding and desired by customers or not).
Below we apply the above criteria to different payment methods:
1) PayPal
Before talking about adding PayPal to your WooCommerce store, you need to open a merchant account with PayPal by following these steps:
- First, you need to open a personal account from the PayPal website
- Activate email through the message that will reach you. Here you can receive payments from friends and family, but with limited amounts
- Add your Visa to PayPal so that funds can be withdrawn and transferred to it (PayPal will activate it by sending a code to it that you will receive from the bank issuing the Visa card)
- Here you can transfer and receive money by transferring to your account. To facilitate this, PayPal offers the PayPal.me service solution ( explanation of the service here ), which gives you a link that you send to your customers so that they can transfer an amount to you.
- Convert the account to a business account from here for free
So you have an active account and you can receive your payments through 3 different methods:
- Send the paypal.me link directly to your customers so they can pay you.
- Send a payment request to your customers, whether by sending them an email or by sending an invoice (open your account at this link to choose either option)
- Collect payments online by linking to your site, which we will explain in the following steps, but we would like to point out here that there are several ways to add PayPal to your site, depending on the required use, and we will refer to each method separately.
Using PayPal Sandbox
This method is not a direct installation of a payment gateway, but rather creating a test environment that simulates reality to test your online store and its compatibility with PayPal, thus ensuring that everything is fine.
The importance of this step lies in several points:
- If there are problems with your site and you have not discovered them yet, this means that your customers may encounter them and not inform you about them.
- Errors may occur in the payment process and you may lose your money
- Another important point is that you will make sure of the fee rates that you understand so that you do not find that you have been charged more fees than you expected and thus lose your profits.
- You will create fake accounts to experience the payment process as the customer goes through it (user experience).
- Experimenting with mechanisms to return money to customers.
- Experience and understand the notifications that accompany the payment process, such as: payment completion, cancellation, refund request, etc.
To try PayPal Sandbox, we do the following:
- Open your site and go to the WordPress admin page
- Click “ WooCommerce ” then “ Settings ”
- Select the “ Settings ” tab

4. Choose to activate PayPal Standard as shown in the pictures.
5. Click “ Setup ” and WooCommerce will take you to PayPal’s settings page.

6. Make sure to choose “Activate Standard PayPal.”
7. Write “Name,” which is what the customer sees. (It is recommended to add the word “test” next to the name so that you can distinguish this account from the real account)
8. The email address you use in your PayPal account.
9. Choose “Activate PayPal Test”. Click on “ Developer Account ” to take you to the PayPal website to open a Sandbox account there.
10. Click on “ Developer Account ” to take you to the PayPal website to open a Sandbox account there.
11. You then log in to the PayPal website with your real account and then create a number of fake accounts inside it:
- Let’s create a fake personal account from the United States of America (the country whose laws most affect the purchases of its citizens from outside their country, so there is no harm in trying it if you want)
- Another fake personal account that PayPal will automatically create in your country
- A third fake personal account from a third country of your choice. (created by you)
- A fake merchant account that PayPal will automatically create in your country.

12. By clicking on the three dots to the right of each account, you can change its data (as you wish, as they are fake accounts) to distinguish them easily.
13. Click the three dots, then the API Credentials tab, to obtain the data required to link your site to PayPal so that we can return to writing it on our site.
Thus, we have accomplished what was required of PayPal.
14. We then return to our website. In the email field required in Step No. 8, we write the merchant account that we created in PayPal Sandbox (here in the example: Your-Shop-testing@buisness.example.com ).


15. Under API Credentials, write the data that you transferred from the PayPal Sandbox website.
16. Save the changes by clicking (Save Changes).
Thus, we have finished adding PayPal Sandbox as a payment method on the site, and you can thus carry out the entire purchasing experience until we are sure that everything is fine.
17. After that, you can repeat the previous steps, starting from step No. 7, but with the sandbox disabled and the real data, which you can obtain by logging in with your real account at this link to obtain real API Credentials.
Thus, you will have an activated PayPal payment method on your site
2) Payment upon receipt
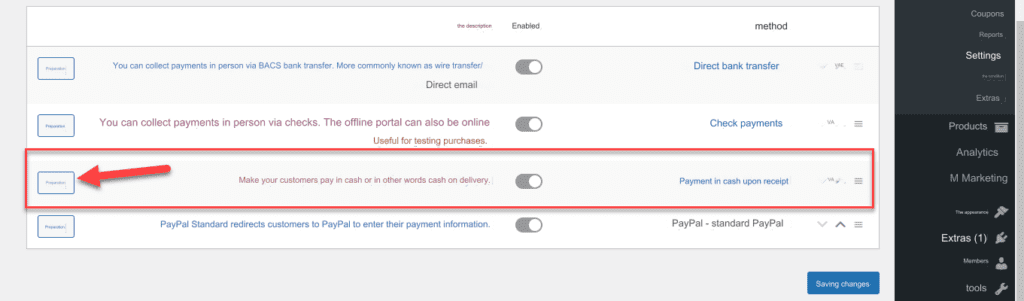
The picture above shows the second most popular payment method that can be relied upon in your online store, and it is the most accepted in the Arab world, which is cash on delivery.
You can click on the “ Set Up ” button next to the payment method to be directed to the page for setting up the payment method upon receipt, which opens the following page for you:
As you can see in the following image, the steps and fields that you must fill out in order to set up and prepare the payment method upon receipt within your store.
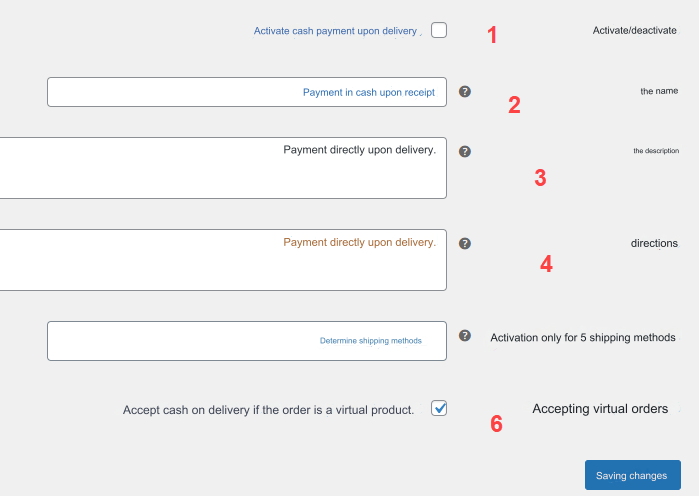
- Activate or disable the payment method upon receipt in your store.
- The name is an address written on the payment method within the purchase page that appears to the customer when completing the order. You can write “This product is available for payment upon delivery” or any other text.
- Description: You can write any descriptive text that appears to the customer during the purchase.
- Instructions: In it you can put any instructions that you want the customer to see regarding payment upon receipt
- Activation only for shipping methods: You can choose a specific shipping method for payment upon receipt to be activated, if you use more than one shipping method in your store.
- Accepting virtual orders: You can activate or stop payment upon delivery on virtual products such as e-books, pictures, and other intangible products that the customer does not receive with his own hands.
3) Direct bank transfer

The picture above shows the third payment method available within the payment options in the WooCommerce store. In this method, the price of the products sold is transferred directly from the customer’s account to your bank account, where the customer himself transfers the money to your account completely outside the site or store, and only attaches the transfer number. Banking in purchase order.
After the customer transfers the money from his bank account to your account, he will send you the bank transfer number, which you can verify from within your bank account, and then you will ship the product to the customer after confirming that the money has been successfully received.
To activate this method, you can click on its “ Setup ” button to display the settings page for configuring and customizing the direct bank transfer payment method:
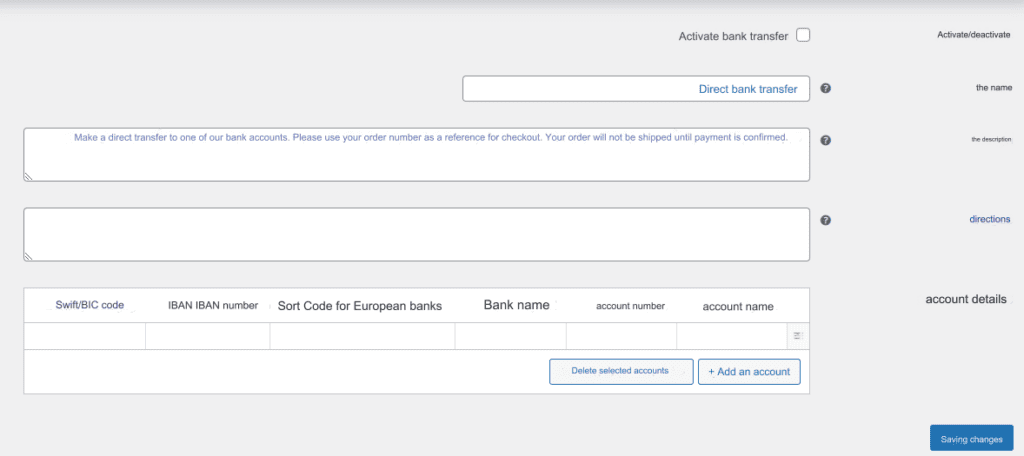
As you can see in the image above, you can enter all the required data and instructions in order to set up the payment method using bank transfer.
On the settings page, as you see in the picture above, you can add the data for your bank account on which you want to receive money from your clients. You must be careful and add the data correctly so that problems do not occur while the client is transferring money to you.
4) Payment via check (instrument)
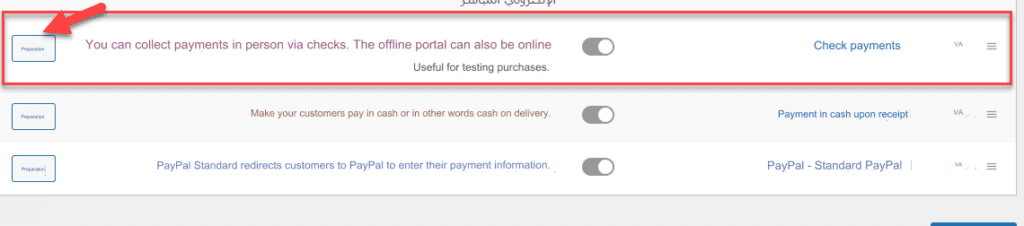
As you can see, you can activate the “Check Payments” option and click on its “Set Up” button to be directed to the settings page for this payment method:
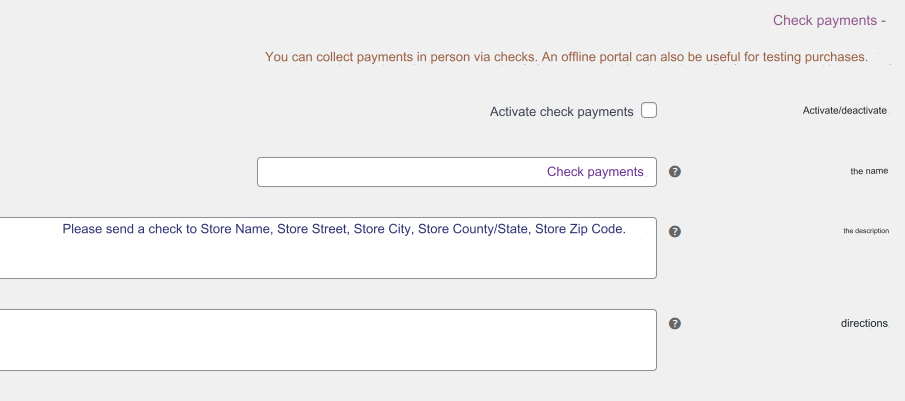
On the page for setting up the payment method via checks, put the details and instructions that appear to the customer while completing the order and choose to pay via checks.
You must also add data and information about the address at which you wish to receive checks. You must write the address correctly so that you receive the checks in the mail. After receiving the check, you can go to the bank and cash it to ensure that the payment is completed correctly, and then you ship the product to the customer and complete the order.
5) Payment method is by Visa/Master Card
By default, there is no Visa or MasterCard payment method available with WooCommerce, but you can install a payment method based on the customer using the Visa or MasterCard he owns to make the purchase and payment within your online store. First, you should know that to activate the option to pay using cards, you must do two necessary things:
- First: Subscribe to a payment gateway
Payment gateways are an electronic payment system provided by most banks in almost every country in the world. Nowadays, Arab banks have begun to provide electronic payment gateways. You can go to the local bank in your country and request to subscribe to an electronic payment gateway, and after completing the procedures, the bank will deliver the data (software codes) for the payment gateway for your online store. You will learn in the article later how to install the payment gateway codes to complete the installation of the payment gateway correctly.
You can also subscribe to electronic payment gateways spread around the world, one of which we will explain to you. They do not require a lot of data from you and you can subscribe to them online and obtain activation codes without the need to go to a local bank and do many procedures.
- Install a plugin through which payment gateway codes can be installed
In the first step, we explained that in order for you to be able to activate card payment in your store, you must have an electronic payment gateway. We will shortly explain to you how to subscribe to one of the payment gateways and how to fully activate it.
In this step, you will need to add a plugin to help you only install the activation codes for the payment gateway that you have previously subscribed to.
Most electronic payment gateways have their own add-on, and you can contact the technical support of the company from which you obtained the payment gateway and ask them about the name of their official add-on to activate the payment gateway codes on your site.
A practical explanation of subscribing to an electronic payment gateway and installing it on the store using one of the add-ons
We explained to you theoretically in the previous paragraphs what you will need completely in order to be able to make payment available on a site using Visa/Master Card.
Now let’s get to the scientific explanation, in which we will randomly select one of the companies that gives you the opportunity to obtain an electronic payment gateway, then we will explain to you the method of installing and setting up this payment gateway completely.
Electronic payment gateway 2Check o ut
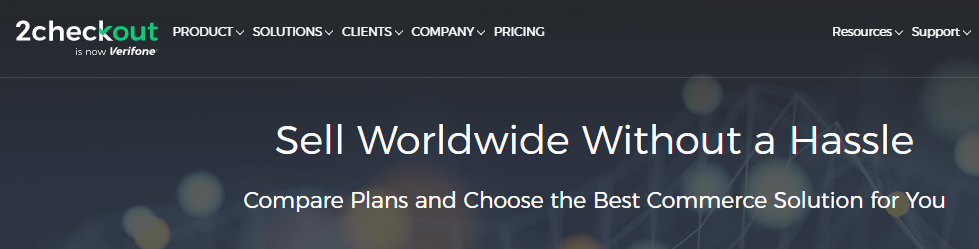
This is one of the famous companies that provides an electronic payment gateway, and you can subscribe to it online in a few minutes and obtain the payment gateway data for your online store.
Note : You can certainly use any other payment gateway, whether a payment gateway from a local bank in your country or an electronic payment gateway via the Internet. There are many, many companies that provide you with a payment gateway, and they all perform almost the same, but the difference is in the level of security and also in the commission. What each payment gateway takes from every sale made on your site.
Regarding the 2checkout payment gateway, when you enter its website, you will find that their prices start from 3.5% of every sale made on your store + in addition to an additional 35 cents on every sale.
They have subscription plans that take a larger commission in exchange for providing you with lots of payment options

We assume that you have logged into the company’s website and created an account with them, and of course it will provide you with all your data, such as email, a username, and password to open a new account with them, in addition to a link to your online store.
After creating your account with them, you will have to contact the company’s technical support to request activation of your account and creating the electronic payment gateway.
After creating the account and activating the payment gateway for your online store by the company’s technical support, you will now log into your account with the company to find the API codes and data, which you can copy and add within your store’s code to connect successfully.
In this case, the company provides an easy-to-use WordPress plugin that you can install on your site to help you link API data to successfully activate the payment gateway.
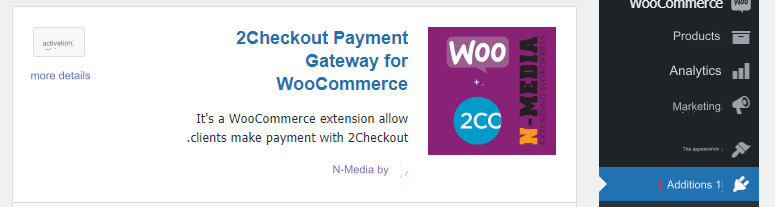
This is the add-on that helps you link the payment gateway data to your online store, and you can certainly obtain the name of the add-on from the technical support of the company from which you obtained the payment gateway. As each company provides its own add-on only for the linking process.
After installing the add-on or any other add-on belonging to the company from which you obtained the payment gateway, immediately after that you will find an additional payment option that appears for you on the payment settings page for the woocommerce add-on:
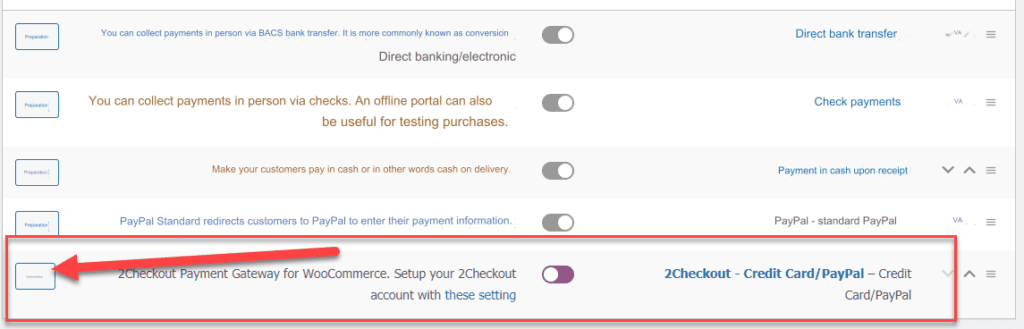
As the image above shows, the new payment option appears, which allows the customer to purchase with multiple payment methods, including credit card and others. The available payment methods vary according to the company from which you obtained the payment gateway and the options it provides to you.
You can click on the “Set Up” button next to the new payment method to be redirected to the page from which you can link the API data for the payment gateway that you obtained from any company or bank you chose:
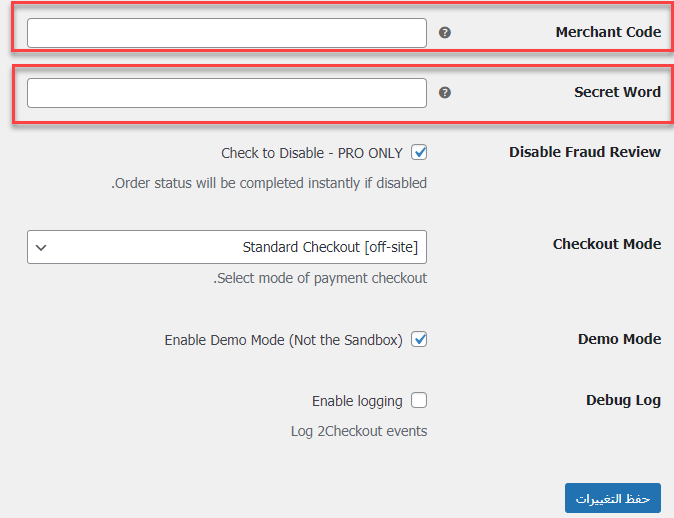
As you can see, on the settings page, you will find some data required of you (this data varies from one company to another, as if you obtained the payment gateway from a different bank or company, you will find that this data is different).
All the data that is required of you on this payment setup page can be found within your account that you opened in the company from which you obtained the payment gateway, whatever this company is.
The following image shows the data for connecting the payment gateway from 2Checkout:
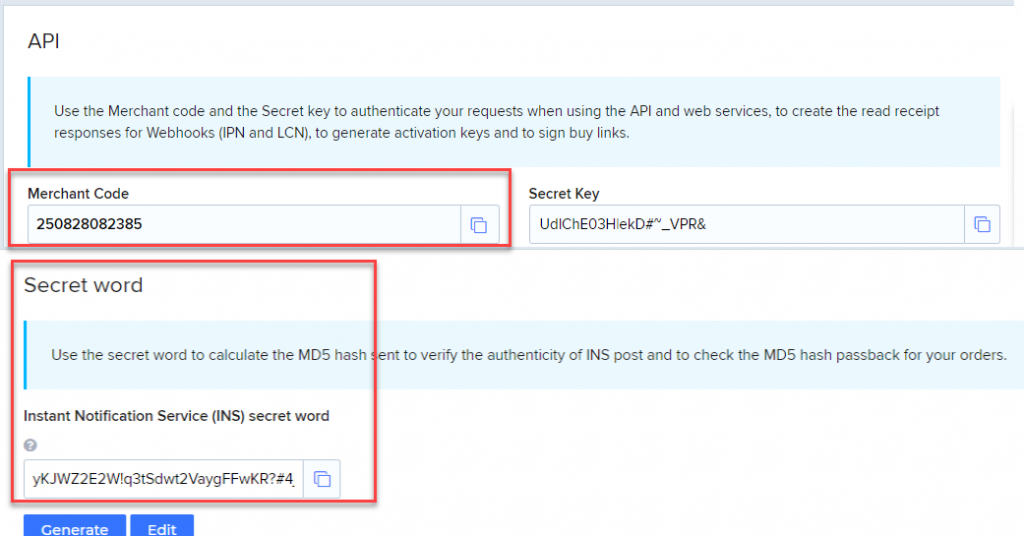
All you have to do is copy the payment gateway data from within your account in the company from which you obtained the payment gateway, and then paste that data on the payment settings page for the addition within your online store on the payment settings page.
After completing the linking process successfully, the customer will be presented with multiple payment methods for the payment gateway that you have subscribed to, including Visa/Master Card:
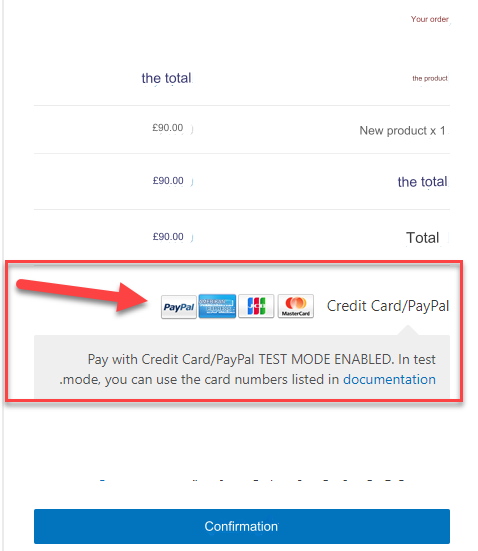
Now, any purchase made on your site will be done through the payment gateway that you have subscribed to from one of the different companies, and the money will be added to your account in the company and you can withdraw it from the company providing the payment gateway according to the methods provided to you by the company and the time frame agreed upon for transferring the money, as These things vary from company to company.
Conclusion
There is a long list of different payment methods that you can link to WooCommerce, but we tried to talk about the basic payment gateways. You can also search online for electronic payment gateways to find dozens of banks and companies that provide this service all over the world. You can choose the company that you can trust based on Customer reviews, popularity and support. Whatever company you choose, the most important thing is to choose the method that is most popular among your potential customers to provide them with an easier shopping experience