company that provides its users with a free blog creation service for the purposes of blogging and publishing content. These sites build what is called a network of multiple websites, where a large network of sites is created by installing their content management system only once!
In this article, you will learn how to create a website network through the WordPress system, based on the current WordPress installation that you are using on your site. This way, you will not have to install a new version of WordPress every time you want to create a sub-site from the main site.
Create a multisite network using WordPress
When you need to create a number of sites that differ from each other in their specializations and method of operation, and you want to manage them, their content, and everything related to them from within only one WordPress control panel, then this article will be perfectly suitable for you.
In this article, you will learn how to create a subsite network from just one main WordPress installation, after which you can create an unlimited number of subsites that can be managed and controlled from within the control panel of the main WordPress site.
Also, when you create a large network of WordPress sites, you can then manage each site separately, as a separate manager can be appointed for each of the sites within this network.
Also, if your site network contains 10 sites, for example, then you can install an add-on only once to work on these 10 sites together through the control panel of the main WordPress site.
You can also update WordPress on all sites within the network at once by updating the main installation of WordPress, as all sub-sites within the network follow the main installation.
Of course, when you own a network of WordPress sites, it is possible that you will encounter some problems, such as slow loading of all sites within the network if one site receives a large number of visits at the same time. This is because all sites share the same resources allocated to them by the hosting company, but This problem can be overcome by obtaining powerful hosting with sufficient resources.
There are other problems related to multi-site, which are that server resources, although they are consumed if there is a high rate of visits to one of the sites on the network, in return, they decrease on the other hand because we only need to install one WordPress, and it is known that WordPress requires a large amount of resources on the server.
Also among the most prominent negatives is the presence of some plugins that do not support the feature of working on multiple sites, and the inability of individual site managers to install or uninstall plugins and templates, and the matter is limited to the main manager, which limits the power of sub-site administrators, and the occurrence of an attack or hack on Main site server data or a failure of the main server will affect all sub-sites.
What hosting is suitable for creating a WordPress website network?
Of course, there is no specific hosting that is suitable for the WordPress network. It depends on the good resources and strong capabilities that the hosting company provides you. Regardless of the company you deal with to obtain hosting, it is important that you obtain strong hosting in order to withstand the amount of visits that will enter each site in the network of sites, which may become very large and complex.
We note here the exclusion of small and limited hosting, such as shared hosting, which provides limited resources and may not handle the amount of data and visits that take place within the site’s network, and can only be relied upon if you are creating a network consisting of two sites, for example, and each site receives a small number. of visits.
If you are planning to create a large network that contains a large number of sub-sites, we advise you to read the guide that we relied on in the criteria for choosing the best reliable hosting company .
Create a WordPress website network from within the main WordPress installation
Before we begin the practical explanation of creating a multi-site network, we must note that we assume in this paragraph that you have already installed WordPress, and if you have not done this step, you can use the article on how to install WordPress correctly before starting.
Then, activate the WordPress multisite network system feature, through the hosting control panel (Cpanel), and then enter the file manager:

After entering the file manager, go to the WordPress installation folder, inside which you will find a large group of files, including a file named “ wp-config.php. ”
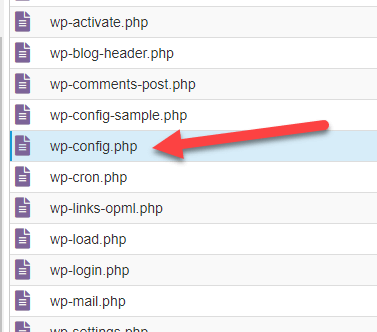
Click on this file with the right mouse button, and choose the “Edit” command. The page for editing this file will open for you. Paste the following code into it:

As shown in the previous image, after pasting the code like this into the file, click the Save changes button to save the changes, and then the WordPress multi-site network system will be activated within the main WordPress site that you are using.
Then, go to the WordPress Control Panel > Choose Tools > Network Configuration :

Note: The “Network Configuration” tab appeared after you added the previous code, and this option was not previously present in the control panel.
When you enter the “ Network Configuration ” tab, which is the tab for setting up and configuring the WordPress multisite network, you will notice that a notification appears telling you that you must disable active plugins on the site in order for you to start creating your own site network.
So, now go to the WordPress Control Panel > Add-ons, then disable all active plugins so that you can create the site network. After creating the network, you can activate the plugins again on your site.
After disabling the add-ons on your site, you can now go to the “ Network Configuration ” tab to find that it opens before you the settings page for the network you want to create, which contains 4 basic settings that you must specify as follows:

- If you choose “ subdomains ”, this will make the link to the subsite in the network be in the form of a subdomain such as blog.example.com
- If you choose “ subpaths ,” this will make the link to the subsite in the network be in the form of a subfolder, that is, in the form of a path within the link, such as example.com/blog1
- Network address: This is the address that will appear to you in the control panel as your network of sites.
- Network Administrator’s Email: In this field, you can write the email of the site network manager ( Super Admin ), who will have all powers over all sites within the site network.
After filling in the previous data, click on the “ Install ” button to begin the installation process, and after a few seconds the following page will open for you:
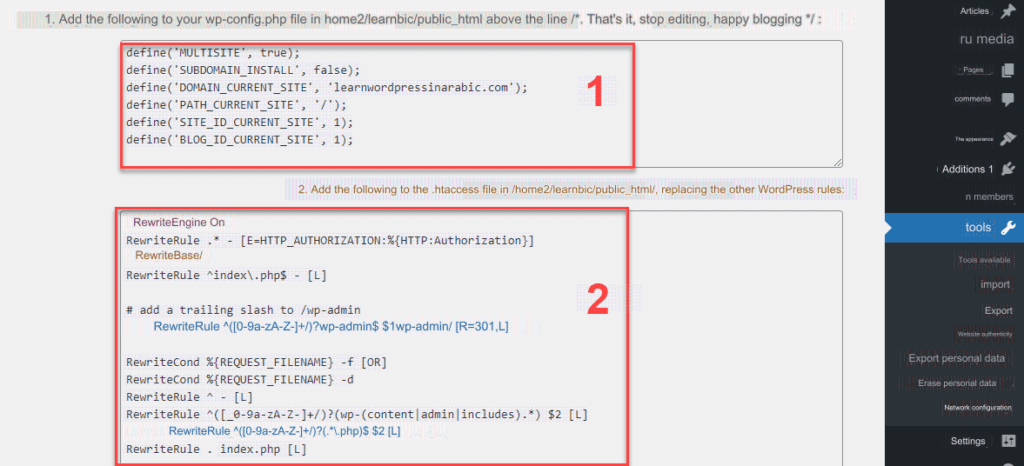
As you can see in the image above, you must add the first code (1) inside the wp-config.php file, and you must also add the second code (2) inside the htaccess file .
To do this, you must enter the hosting’s Cpanel control panel , enter the file manager as we explained in the previous paragraphs of the article, then paste the codes into the mentioned files, and finally save those files.
Then, after you have added each code to its own file as we explained, you can refresh the WordPress control panel page, and you will notice the appearance of a new tab titled “ Network Management ” within the WordPress control panel as shown in the following image:
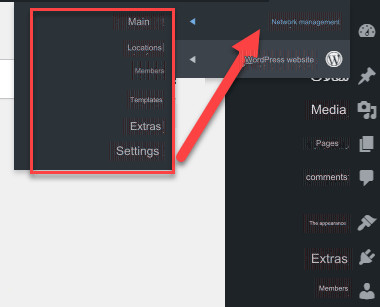
Thus, you have already succeeded in creating a multi-site WordPress network, which you can now manage, create sub-sites within, and fully control, as we explain to you in the following paragraphs.
Manage the WordPress website network, control sub-sites, and customize their appearance
At this step, we have created a multisite WordPress network, which we can control, create many subsites under, and even allow members or visitors to the site to create their own personal sites or blogs.
In the following paragraphs, we will review some important tools that help you customize, configure, and manage your network of websites.
1. Control website network settings
Before you create subsites, or allow members to create their own subsites under the main WordPress installation, you should first review the general settings for your site network, and make sure the settings are completed the way you want them.
To control the subsite network settings, you can go to the “ Network Management ” tab and then enter the “ Settings ” tab:

When you enter the settings page for the website network, you will notice that there are a large number of tools and options through which you can control the website network and customize it exactly the way you want. As shown in the following pictures:

- Network Address: In this field, you write an address for your network of sites to distinguish it.
- E-mail: In this field, you enter the e-mail designated for managing the entire network of sites.
- Registration settings : In this section, you can specify whether you want to allow members to register and create sub-sites for them under your network of sites, or not allow them by activating the “ Registration is disabled ” option to prevent people from registering and creating sub-sites for them, and in this case you can Just create subsites within the network.
- Registration notification : When you activate this option, an email notification will be sent to the site administrator every time someone registers and creates a new subsite within the network.
- Adding new users: You can activate this option when you want to give sub-site owners the authority to add other members and moderators within their sub-sites, but they will not be able to add admins to the main site that is controlled by the network administrator only.

6 . Prohibited names: In this field you can write names that members will not be able to use in the addresses of subsites that they create within the network.
7 . Allowed mail cards: Here you can specify only the email domain names that are allowed to be registered, for example: gmail.com or yahoo.com
8 . Banned Postcards: Here you can specify domain names that cannot be used to register on the site.
9. Website owners welcome message: This is a message that appears to owners of new sub-sites within the network after they create a new sub-site in the network.

10. Allocated upload space: Here you can specify the maximum size of total files allowed to be uploaded to sub-sites within the network.
11. Types of files allowed to be uploaded: Here you can specify the types of files that sub-site managers are allowed to upload within their sites.
12. Maximum upload file size: You can specify the maximum size of a single file uploaded within the subsite.
13. Default language: You can choose the default language for any new subsite created within the site network.
14. Allowed admin lists: You can activate the “Add-ons” option to allow sub-site administrators to turn on or disable add-ons within their sites.
2. Create a new subsite within the WordPress network
In the previous paragraphs, we created and configured a network of sites within the same current WordPress installation on the site, and we adjusted its settings.
In this paragraph, you will learn how to create the first sub-site in the site network, which you can create and customize as you wish. You can also add managers to manage the sub-site only without the ability to control the main site.
To create a new subsite within the network of sites, you can go to the “ Network Management ” tab, then go to “ Sites ”:

When you enter the Sites tab, a page will open for you containing all the sub-sites affiliated with the network. Certainly, in the beginning, there will not be any sub-sites, and you will see only one site, which is the main WordPress site:

To create a new subsite within the network, you can click on the “ Add New ” button to open the page for creating a new subsite within the WordPress site network:
On the Create a New Subsite page that appears above, you will find 4 fields that you must fill out to create the new subsite within the network, which are as follows:

- Site address: In this field, you write the name of the URL on which the new site will be installed. For example, you can write site1. In this case, the URL of the site will be as follows: example.com/site1.
- Site name: In this field, the curator must write the name or address of the new subsite.
- Site language: Through this drop-down menu, you can select the default language for the new site.
- Manager Email: Enter the email of the primary administrator for the new site in this field, and you can later assign other managers or moderators.
After filling out all the information, you can click on the “Add Site” button to publish the new site within the network.
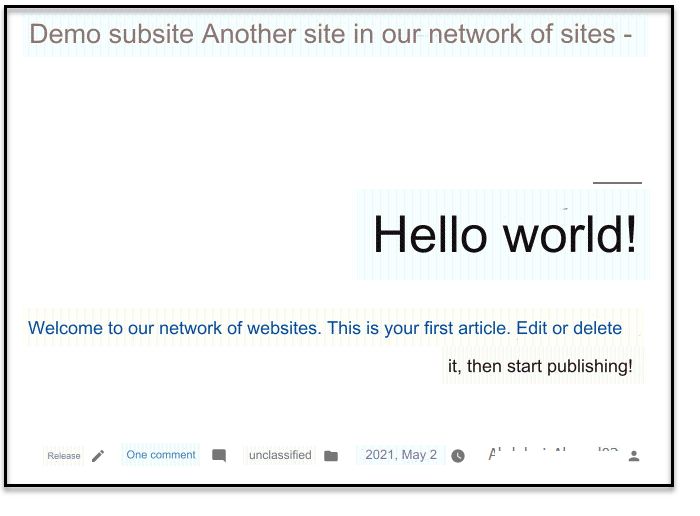
This is how the site will look when you visit it, and it will certainly be simple at first. You can change the template and start customizing it however you want, as we will explain later in the article:
Now you can go to the “ Sites ” tab within the sites network and you will notice the presence of the new site:

As you can see in the previous image, there is a link called “ Edit ” below the name of the new site. You can click on it to open the Edit Site page for you, which contains several tabs through which you can modify all the basic information related to this site:
The image above shows you the page for editing the new subsite within the network, which contains a “ Members ” tab that is used to add members or managers to the new subsite. When you enter this tab, the Add Members page appears to add a new member or manager to the subsite, by filling in the data shown as follows:

- Username: This is the username of the new member, and it can also be used to log in to the site.
- Email: This is the email designated for the new member and can also be used to log in to the site.
- Rank : Through this drop-down list, you can choose the rank of the new member, and if you want him to be in full control of the subsite, you can choose the rank “Manager.”
After filling out all the data, you can click on the “ Add a new member ” button, and an automatic message will be sent to this member’s email in which he can log in to the new site’s control panel.
3. Set the default template for subsites within the network
As we mentioned previously, the main administrator of the basic WordPress is the person who is able to control the templates and plugins for all sub-sites that are created within the network of sites, and in order to set the default template for sub-sites within the network, you can go to the “Network Management” tab > “Templates”
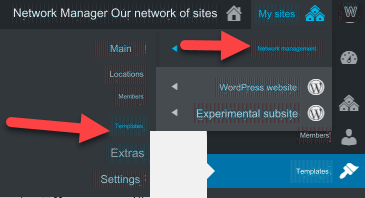
When you open the Templates tab, a page will open for you containing all the templates that exist within your site:
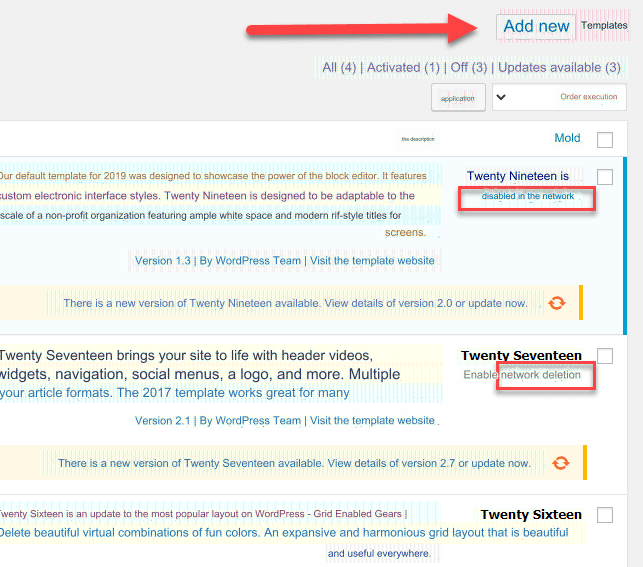
As you can see in the previous image, you can upload a new template to set it as the default template for subsites or choose from the current templates available within WordPress. As you can notice, below each template you will find a checkbox called “ Enable Network. ” When activated, this template will be enabled for use on subsites on the network.
You will also find a check box named “ Disable in the network ” when the template has already been enabled in the network previously and you want to disable it and delete it from sites within the network.
Please note that clicking on the “ Enable Network ” checkbox for any template is not sufficient alone to set the template on the new subsites, but you must also add the following code within the Config.php file to set any template as the default template for sites in the WordPress network:
Of course, in the previous code, you must replace “ theme name ” with the name of the actual template that you want to set as the default template for the website.
Thus, you have comprehensively and practically learned how to create a multi-site network using only one main installation of WordPress. Through this method, you can create many sites with just a few clicks. You can also add and assign people to manage subsites within the main network. And control the templates that run on the website network, and other tools that you can use to set up and customize the website network however you want, as we explained in the article.
Leave your comment below the article about how much you benefited, and if you have any questions about the explanation application or some things that were not clear to you


Leave a Reply