faced many difficulties and a significant decline in the level of work during the period of the Corona pandemic that struck most countries around the world since the end of 2019, due to the complete or partial closure. On the other hand, meal delivery services have spread and flourished as an effective solution for delivering orders during the quarantine period, which has made restaurants having their own website an essential element for their success and even for the continuation of their work in such circumstances.
So, if you are planning to open a new restaurant or you already own a restaurant and want to set up a website for it on WordPress, in this article we will explain in detail how to create a website for meals with the features of advance reservations and delivery services in simple and easy steps so that you can create your own website without the need for any Experience or familiarity with programming matters.
Steps to create a website to sell meals online
The basic steps for creating a professional website for organizing and delivering meals and orders via WordPress include the following:
- Choose the appropriate hosting and domain name
- WordPress installation
- Choose a template
- Installing the basic add-ons, which are:
Simple SSL add- on to install the insurance certificate.
A custom add-on for building menus, reservations, and delivery.
A custom add-on for building pages. - Basic information of the restaurant
- Services and working hours
- Specify delivery area and prices
- Payments and taxes
- Request application
- Food menus
- Building basic pages
- The final appearance of the site
But before you start creating your restaurant or food store website, let us first learn about the importance of having this website:
The importance of creating a website for the restaurant
Before starting to create your own restaurant or store website for meals, let us first learn about the importance of having this website. The importance of creating a specialized website for restaurant orders lies in the following points:
- Introducing your restaurant
Search engines, led by Google, have become the first destination that people go to search for everything they need to know, and for everything they want to access in terms of products and services, and to view the comments and evaluations of others. Therefore, having an electronic interface is extremely important for the long-term success of your restaurant.
- Expanding Business
A website allows you to reach more customers and expand the target audience base of your restaurant. The website also allows you to provide services to a larger number of customers. For example, if your restaurant can only accommodate 100 people, then this number will be the ceiling of your capabilities. However, if you adopt delivery services via websites, you will be able to reach thousands of customers, who would not have been possible. Reaching them through traditional marketing methods.
- Adapting to exceptional circumstances and continuing to work.
There is no doubt that reducing working hours and restaurant capacity due to health conditions, such as the Covid-19 epidemic, has harmed many restaurants, so the presence of a website and delivery services will compensate for this deficit.
- Providing more services
Restaurants fall under the services icon, so a wide choice of services for your customers will attract them to you and build the foundation of trust and loyalty to your brand, not to mention the financial profits that you will earn from adding fees for delivery services and reservations to the customer’s bill.
- Taking advantage of reviews and comments from customers:
Customers often talk about their experiences by writing comments and placing reviews on the site, in contrast to traditional direct communication, in which customers avoid expressing their opinions due to the embarrassment that accompanies it or fears of negative reactions or in the event of some kind of They have social phobia, and these comments will definitely help you in continuously improving your business if you provide excellent services to your customers.
- E-Marketing
Owning a website gives you the opportunity to benefit from the e-marketing component and reach a larger number of customers via the Internet and social media sites at a much lower cost than traditional marketing campaigns.
After this quick review of the importance of creating a meals website using WordPress, we will go into the details and steps of this process.
Steps to create a meal website using WordPress
We will highlight eleven basic steps for creating a professional website to organize, control and deliver orders for your restaurant through a private website.
1. Hosting and domain name
To build a website on WordPress, you need to purchase hosting from a hosting site, which is the site that stores all of your site’s files (images, videos, data, written content…). To build a restaurant website, you need hosting of medium size and capacity only, so that it allows customers to browse the site and make their orders and reservations quickly and securely.
You can get suitable hosting at good prices from famous international hosting companies, such as ( DigitalOcean ), ( Linode ) or other companies. These companies offer a variety of hosting plans in terms of cost and available resources. We previously talked about the 12 best criteria for choosing The right hosting for you .
Domain or domain name: It represents the address of your site on the Internet, such as the domain name of the WordPress site in Arabic is: www.wpar.net, which appears in search results in search engines or is written directly on the browser to access your site. You can write the name of your restaurant, the name of the brand you adopt in your project, or any short, clear and meaningful name.
Read also: What is a domain? A comprehensive explanation for beginners
Some hosting sites offer a domain name as an additional service for free or at a discounted price. If you like, you can subscribe to hosting from a company and obtain a domain name from another independent company, then link the domain to the hosting , but it may be a complicated process for you, so we advise you to purchase the domain and hosting from the same service provider.
2. Installing WordPress
WordPress is a comprehensive content management platform that allows you to build an entire website without needing any knowledge or experience in computer programming languages and without even having to write a single code. It is one of the most popular open source content management systems (CMS) ever.
Some hosting companies provide the ability to automatically install WordPress once you complete your subscription to their hosting service. While other hosting companies offer the service of installing WordPress with one click from within the control panel, you will find the option to install WordPress present on the main page of the hosting control panel, as we previously talked about how to install WordPress on the hosting service provider to launch your site .
3. Install the appropriate template
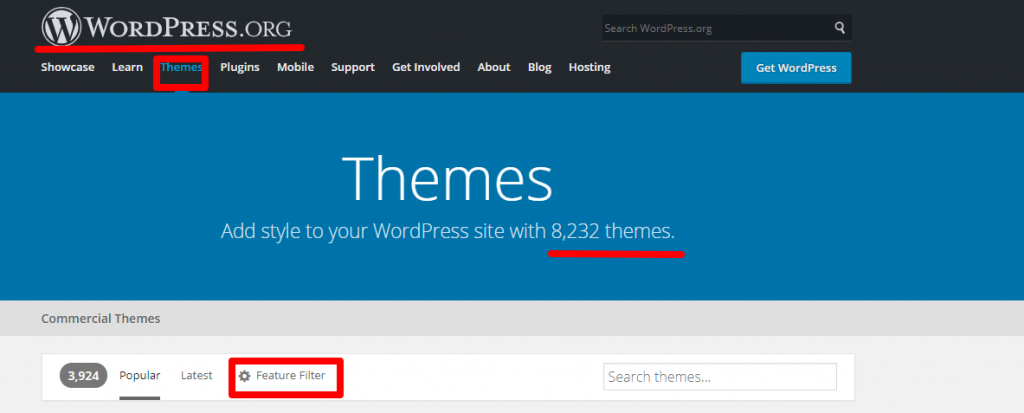
A theme is a set of ready-made appearances, settings, and visual qualities for various elements within a site. Customizing the template ensures consistent colors, text fonts, and overall page layout without having to add code. Of course, you can do without templates if you have experience in website design. You can choose a suitable template from more than 8,000 templates on the WordPress website, some of which are free and some of which are paid and require paying a fee to obtain them.
To view the templates available on the WordPress platform, you can visit this link . To facilitate the process of browsing templates, you can click on the “Feature Filter” option, where template classifications will appear, each of which is assigned to a specific type of site, as in the image below.
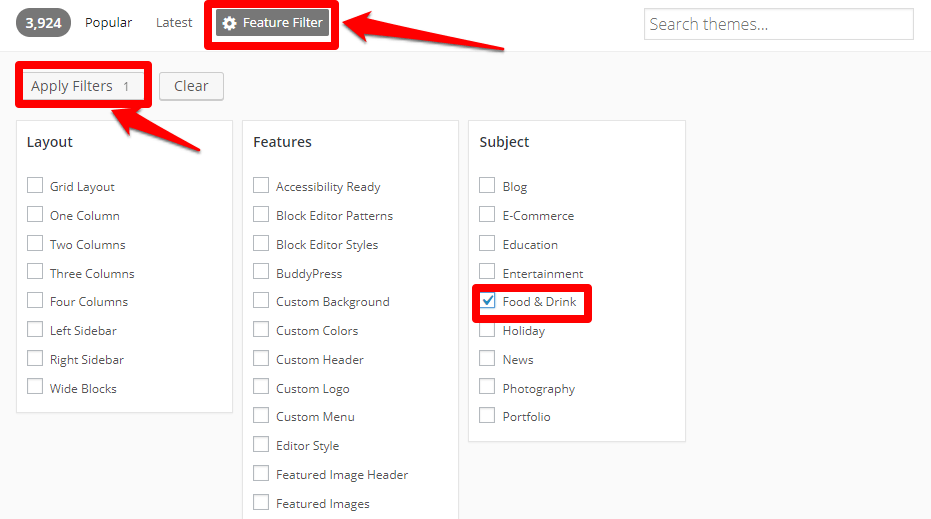
For example, if we want to search for templates suitable for restaurant websites, we can place a check mark next to “Food & Drink” and then click on the ( Apply Filter ) option to show the templates corresponding to this category, as in the picture. You can choose more filters as you wish.
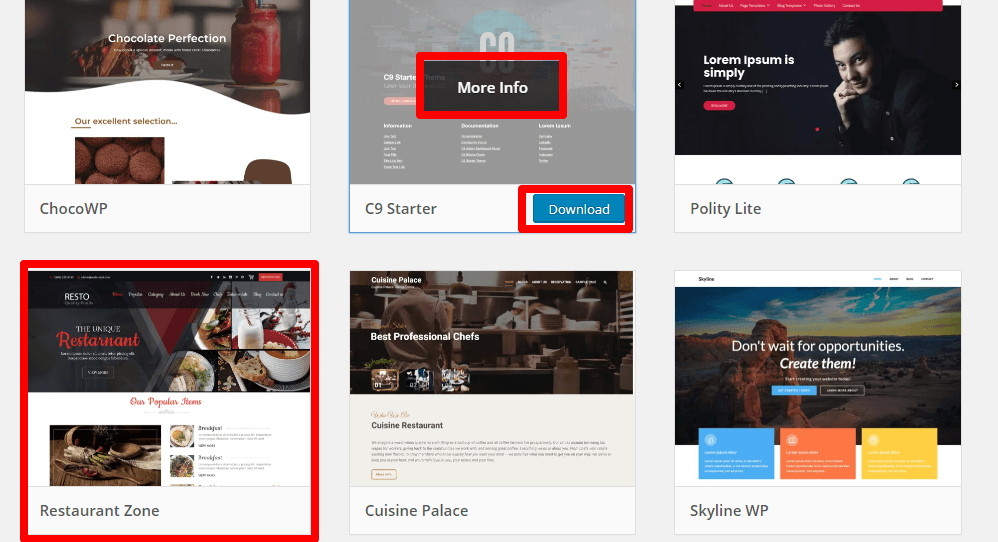
Then you will see a list of templates that are compatible with the search you conducted. By clicking on the (More Info) option, the full page will open for you to view the features of the template, and by clicking on (Download) you will download the template to your device.
After choosing the appropriate template, we will move again to the main WordPress control panel. Click on the “Appearance” option , then the “Themes” option, then click on the “Add New” button , then select the “Upload Theme ” option , and after that you must select a file The template that you downloaded to your computer and uploaded it to the site to be installed and activated automatically, as in the image shown below.

Read also: How to install a WordPress template on your website
4. Installing basic plugins
We will now move on to the steps to install the necessary plugins to create a professional meals website as follows:
- Add Really Simple SSL
This addition is necessary to install the security certificate known as the SSL security certificate on your site, which most hosting sites provide to you for free after subscribing to it.
To install this add-on, first go to the Plugins section in the user interface of your site, then click on Add New as in the previous steps, and in the search box type ( Really Simple SSL ), and after the add-on you are looking for appears, click on the option “ Install Now ” then the “Activate” option .
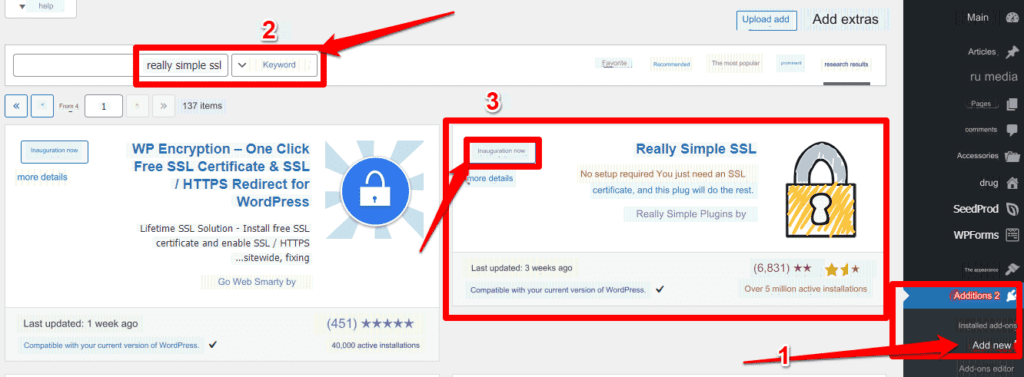
After installing the add-on, you will automatically exit the site in order to perform updates. Then re-enter the site by typing the login name and password to log in again.
- Add Gloria Food
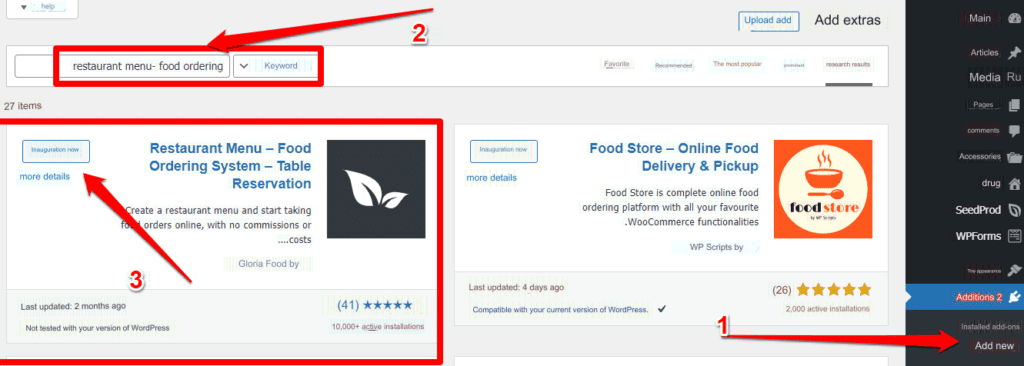
It is the addition that we will use to create menus and the ordering and reservations system on the site. Now, in the same way as before, from “ Add-ons ” then “ Add New ”, we will write the name of the add-on ( restaurant menu- food ordering ), download it and activate it as in the picture.
After installing the add-on, its settings will appear on the sidebar of the control panel. Click on those settings, then click on the ( Dashboard ) option as in the picture.
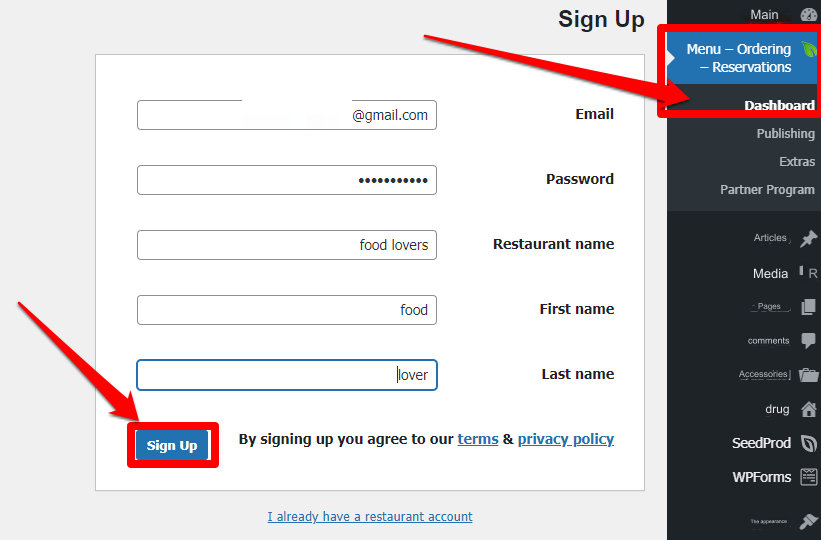
Now we are creating an account for your restaurant on the Gloria Food website . All you have to do is enter your information (email, password, restaurant name, name and surname) and then click on the “ Register ” option ( Sign Up ). An email confirming registration will be sent to the email address you chose.
Now go to your email inbox, then click on the ( Validate Email Address ) option, which will be attached to the confirmation message that the site sent to you after entering your data, as in the picture.
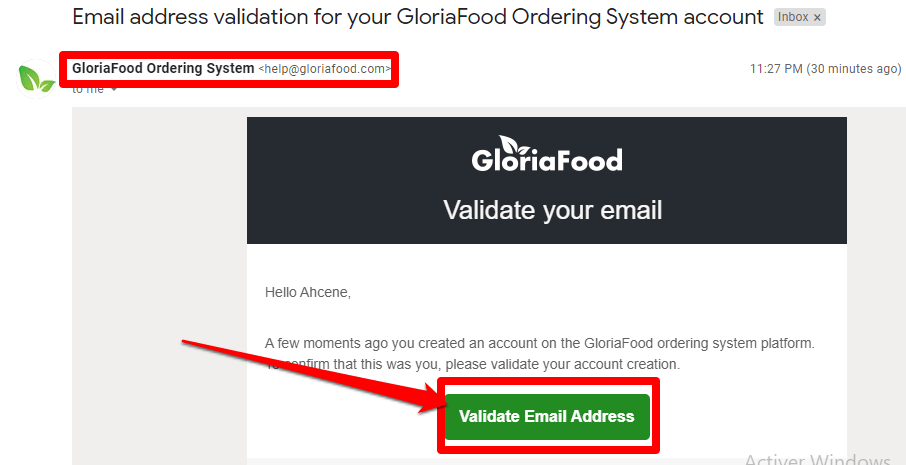
When you click on the confirmation option, you will be automatically directed to your personal page on the official website of ( Gloria Food ) to complete entering the basic settings to build your site.
5. Restaurant Basics
After entering your data and registering on the add-on site for creating a meal site, we will complete the details of the basic data according to which you will establish your site, and this data is:
- Name and address: You must now enter the following data:
- Type the name of the restaurant again
- The restaurant’s phone number
- Country
- the address
- Then click (Next)
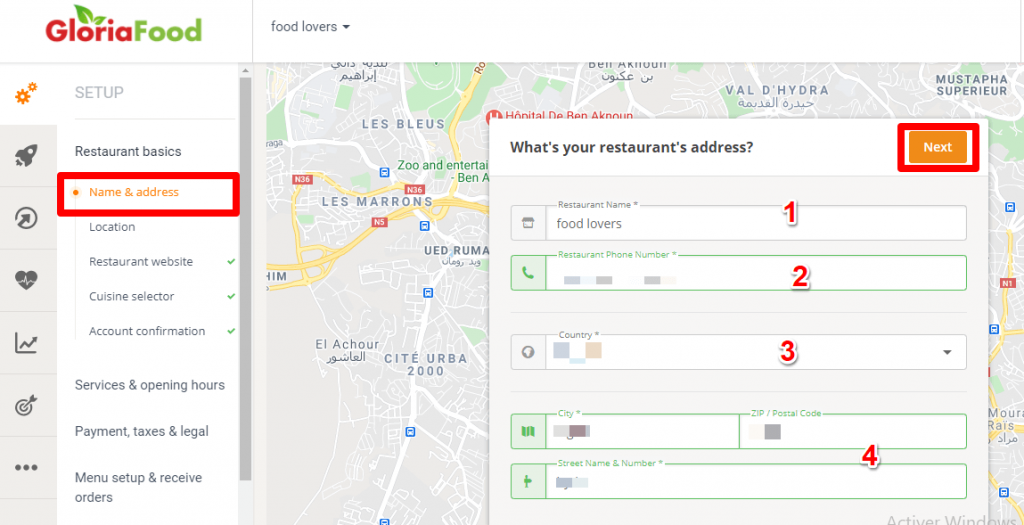
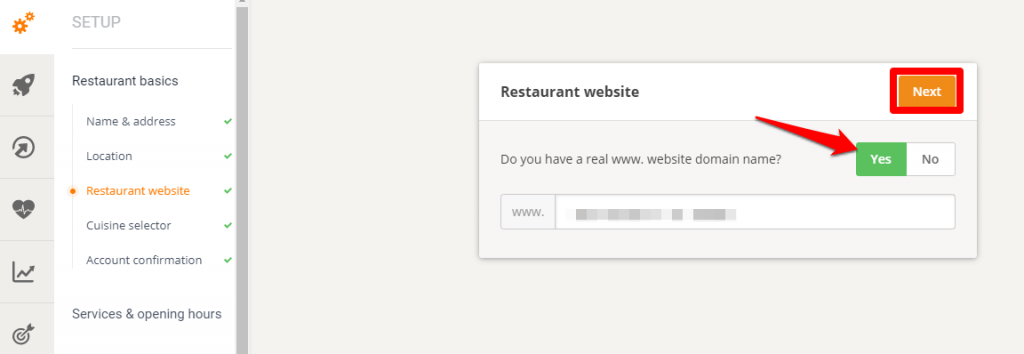
2. Website : Enter your website address. Then click ( Next )
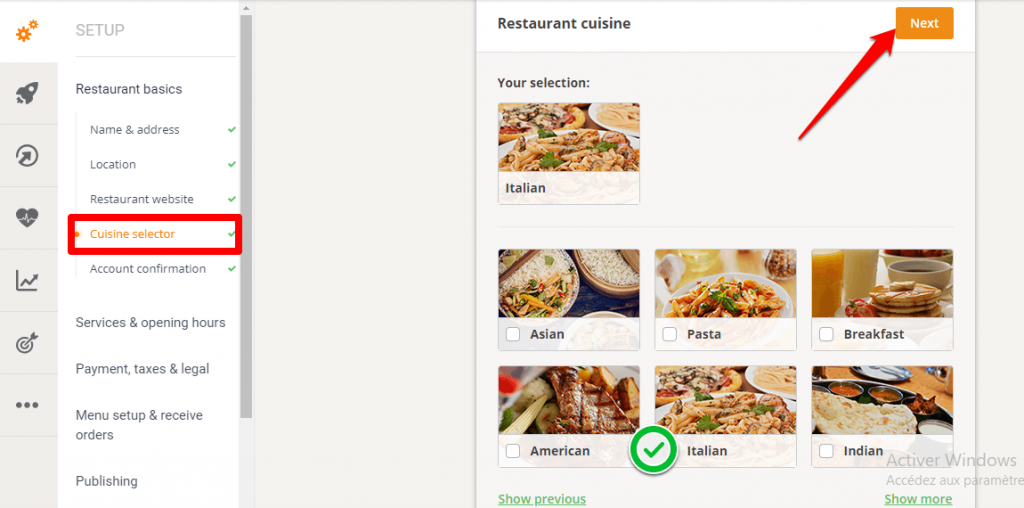
3. Choose the restaurant’s field of specialization: Choose the field of food that your restaurant specializes in
6. Services and working hours
Now we will move on to specifying some other options necessary for your restaurant website, which you will find in the add-on’s side settings menu, which are:
- Pickup: If you provide meal preparation and delivery services to customers. Click (Yes) then Continue (Next)

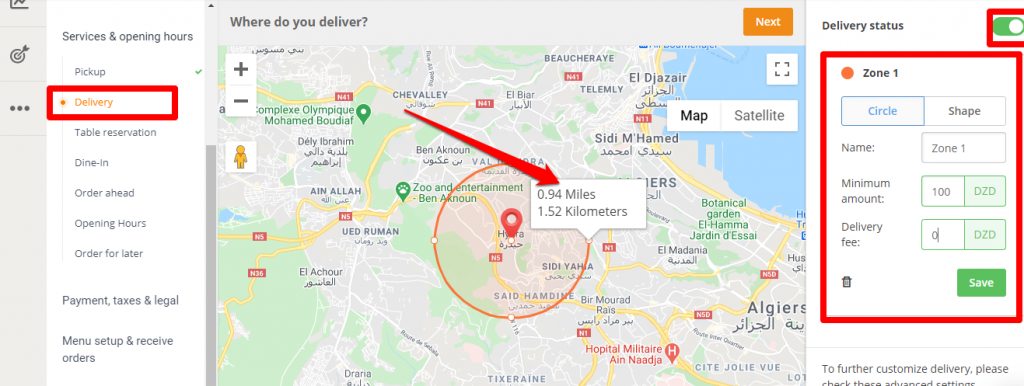
- Delivery: If you offer delivery service, click (Yes) and then continue (Next)

- Delivery Zones: Click on (Add Zone), then select the zone by clicking on the circle and dragging to the extent you want, then perform the following steps:
- Label the first area
- Set the lowest cost for meals, in order to provide delivery service.
- Determine the delivery price.
- Click (Save) to save the settings.
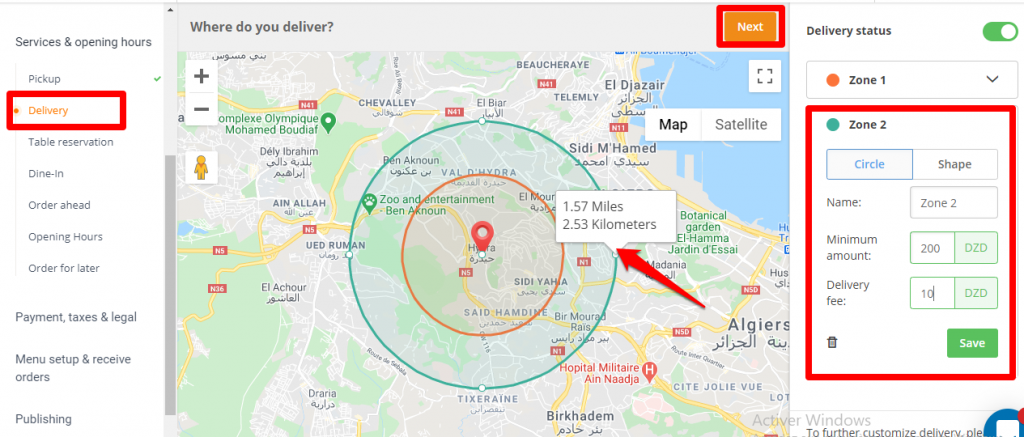
In the same way as the first, select the second and third area…and so on. After completing, click Next.
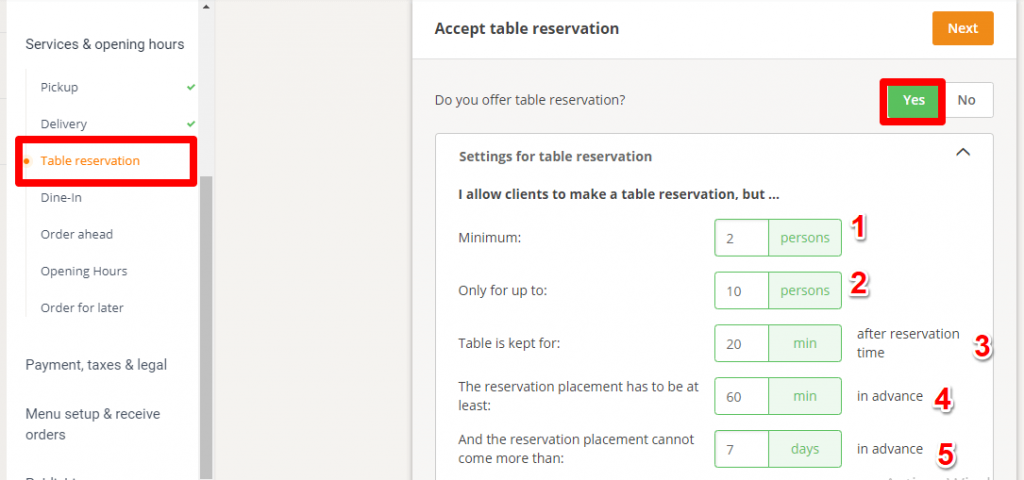
- Table Reservation: If you provide a table reservation service in advance, click (Yes), then specify the reservation conditions and information, which include:
- Fewer number of people
- Maximum number of people at one table.
- The period of time that the reservation continues after the specified time
- Minimum advance booking time (e.g. at least an hour before the appointment)
- Maximum advance booking time (e.g. booking 7 days in advance)
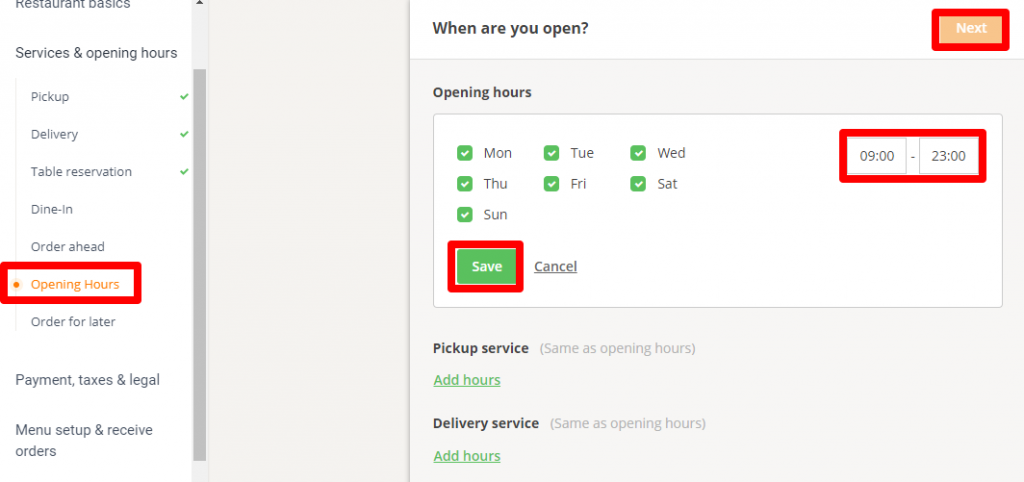
- Working days and hours: Specify the restaurant’s working days and hours, then click (Save). You can set different times for the rest of the services (delivery, reservations, etc.).
7. Payments and taxes
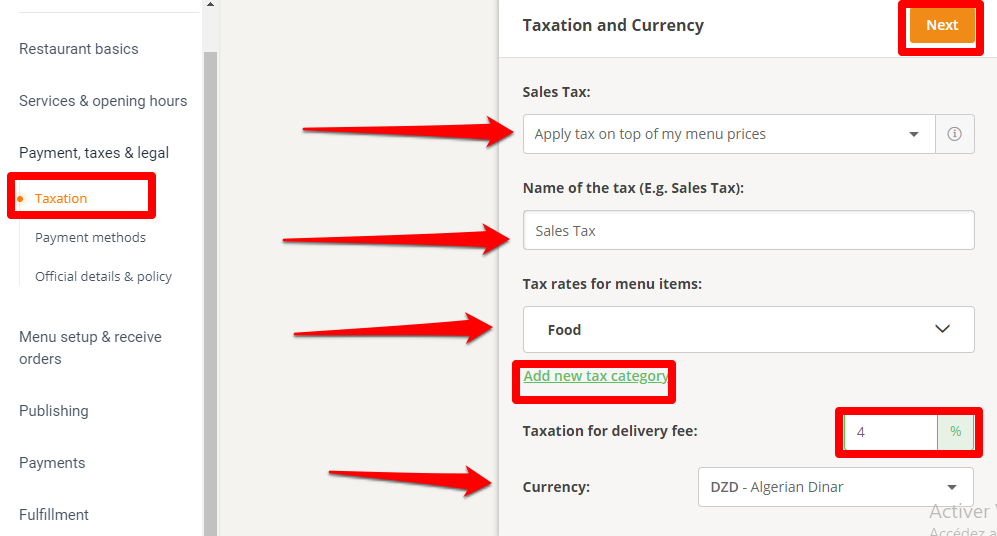
Taxes: You can add the tax to the invoices for all the services you provide through your restaurant. To accomplish this step, you must complete the following tasks:
- The tax is applied at the top of the price list
- Type the name of the tax
- You can create a tax for each menu (if it differs between food and drinks, for example)
- Type the tax rate (depending on your country and city)
- Choose the currency you work with
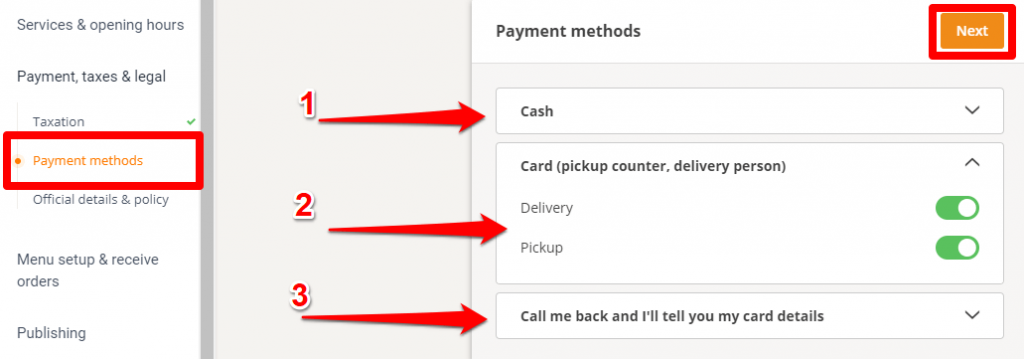
Payment gateways: You can choose between three options:
- Cash
- Credit Card
- Reconnect the customer and give payment information
- You can choose the appropriate payment method for each service (you can choose cash upon pickup, and credit card upon delivery, for example)
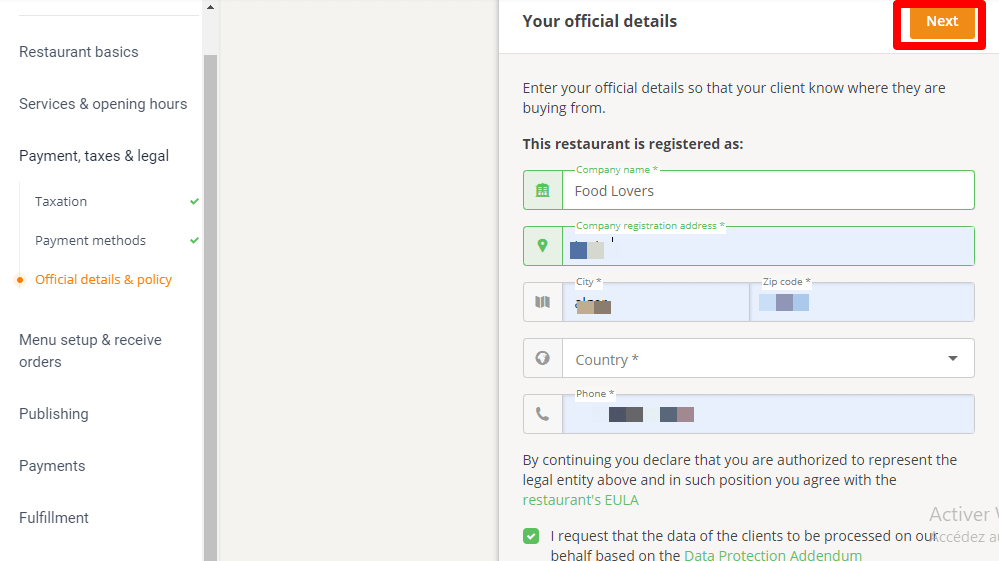
Official details of the restaurant: Now you must fill out the legal and official information for your restaurant, shown in the following image.
8. Request application
After completing the previous steps, we will now move on to adjusting the settings of the smart application that will allow customers to order food through it. The settings include the following:
Receive Orders : Here you must choose the device on which you will receive orders. Will it be a tablet or a smartphone.
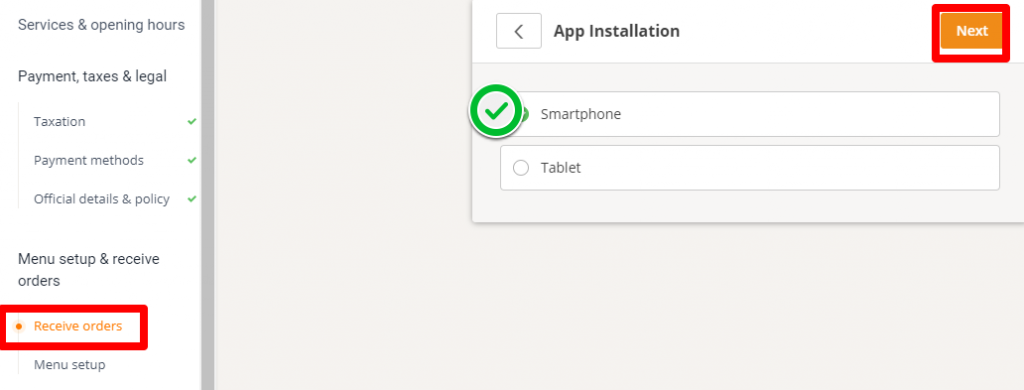
Enter the phone number of the person responsible for receiving requests, and you can use email instead of the phone number
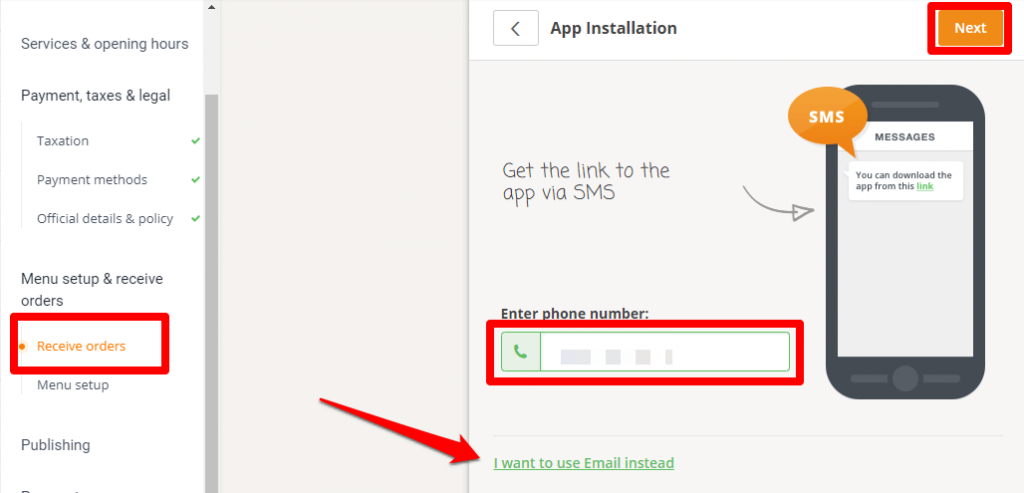
You will receive a message on your phone number containing a link to download the application along with login information to the application. Instead of clicking on the download link within the message, you can download the application directly from the Google Store or Apple Store under the name (Gloria Food).

9. Menus
Within the application, you will find some lists and products that have been added as practical examples, which you can modify or replace. Or delete them and create lists from scratch, according to the following steps.
Adding lists: Click on the “Add Category” option, then write the name and description of the list, then click on the “Save” option to save the list. Then click again on “Add Category” and add the lists that you wish to attach to your site and application.
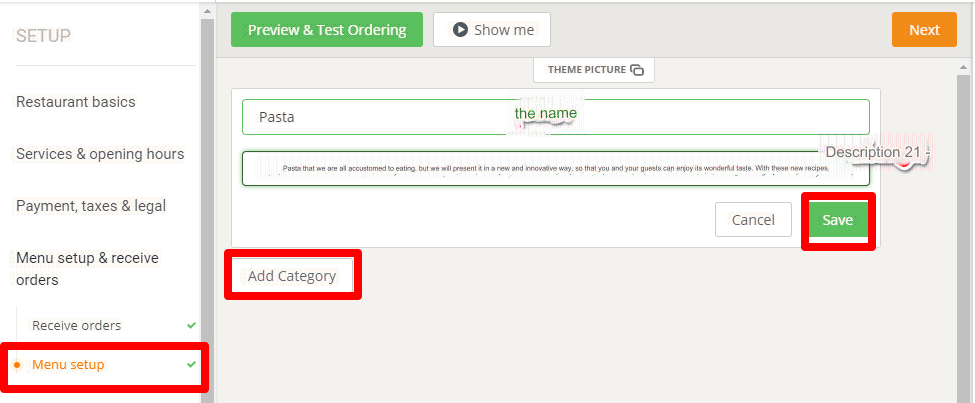
Note : You can change the list image by clicking on it and choosing from the suggested images, or uploading the image of any other image you choose from your device.
Add items to the list (items):
After saving the list, you will see the option to add the items that fall under this list, or by clicking (Add Item To).
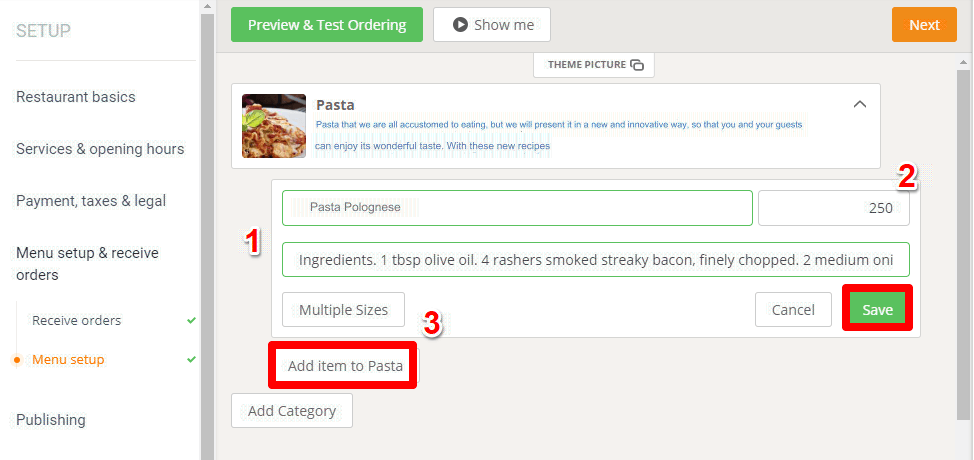
In the same way as before, add the name and description of the item (item) and add the price of the item as well. You can divide this type of food according to size or quantity, by clicking on the “Multiple Size” option.
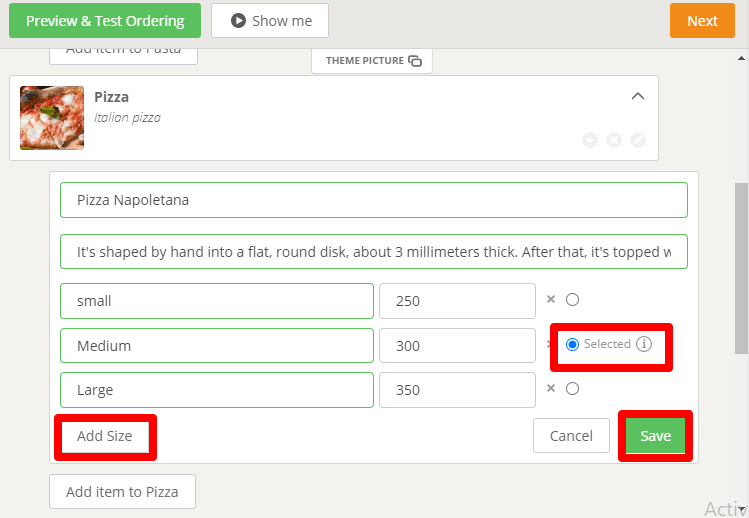
Note : The (Selected) button indicates that the option attached next to it is the one that appears on the interface to customers.
Specifying options and additions: You can provide your customers with special requests based on their desire or taste in food, such as providing the option of little salt, or a lot of cheese, etc. to customers when they order their meals from your restaurant through the website.
To accomplish this, you must do the following steps:
- Click on the (Add Group) button
- Add the available option for extra, for example: cheese, minced meat, onions, sauce, hot sauce…etc.)
- Add the available option for extra, for example: cheese, minced meat, onions, sauce, hot sauce…etc.)

Note : You can add additional fees to any meal customization option you offer to the customer by clicking on the “Add Choice” option under the same heading, as in the picture.
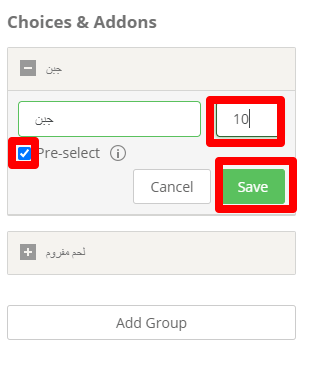
After completing the additions and options that you want to offer to your customers, add them to the categories that we have created through the drag and drop process.

Additional settings for food items: There are some other distinctive options that you can exploit to provide a distinctive user experience through your restaurant website, which are:
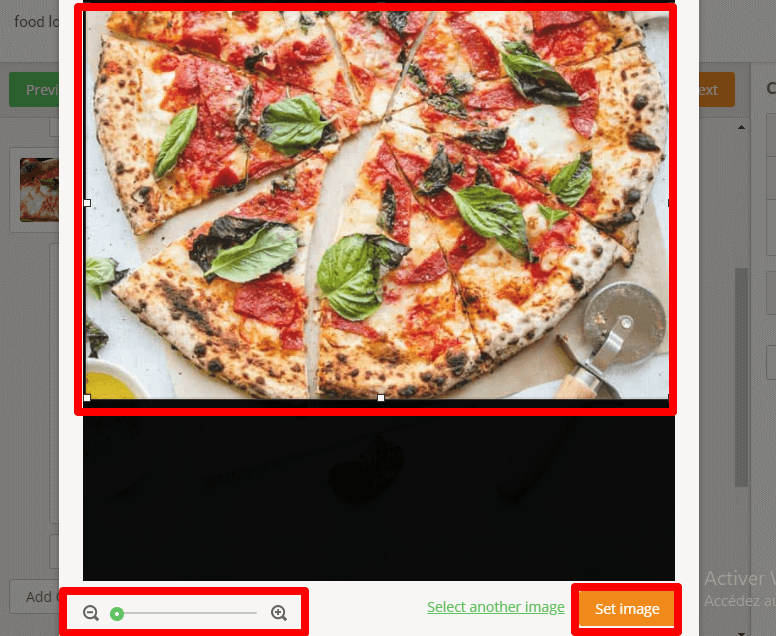
- Add photos : Click on the location of the photos, and upload them from your device. You can customize it and change its size as you wish.
2. Hiding feature:
Click on the Customize button (shown in the image), and you will see three options:
- Hidden From Menu
- Hidden Until
- Show only from (Show Only From)
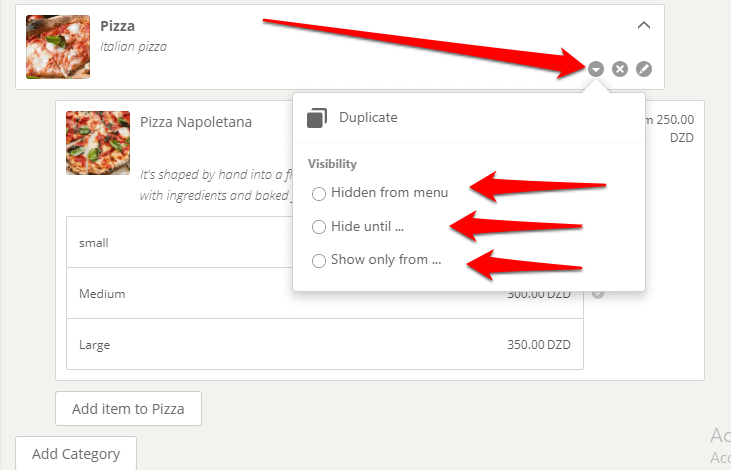
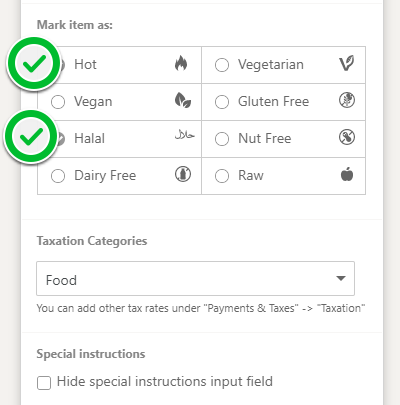
3. Label the items: You can place a special label for each item, such as: “Halal,” “Hot,” “Vegetarian,” and others. You can also choose the tax classification for this item, as in the following image.
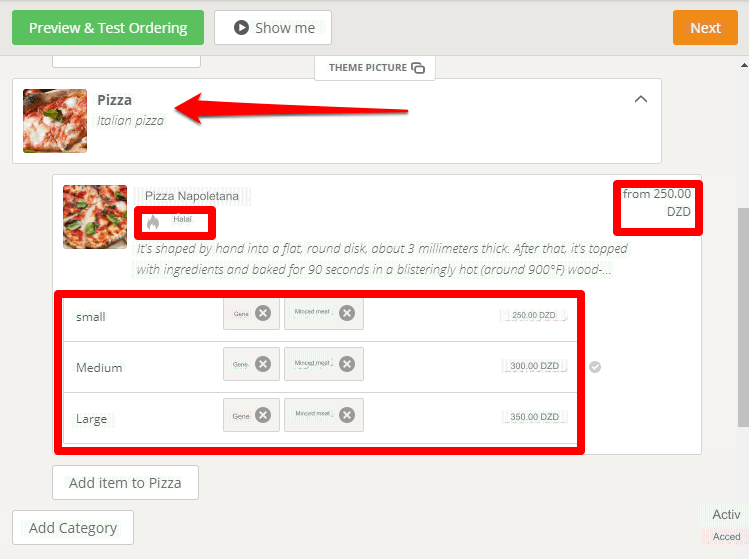
After completing all of the previous features, you will receive a distinct list with name, description, and picture, and at the bottom is a list of items, with name, description, and picture as well, with divisions, appropriate prices, additional options available, and tags assigned to each type of food and item, as in the picture.
Now you have to create all the menus, foods and their types that you want to present to customers on your website in the same way, then click on the “Next” option.
10. Publishing & Payment options
The next step will be to prepare the site for publishing and accepting orders on social media, especially Facebook, where you can publish menus on your restaurant’s Facebook page. You can also create a store on Facebook and accept orders through it.
We will move to the “ Publish to a Legacy Website” option. This is the option that interests us now that we are building a custom website. All you have to do is follow the following steps:
- Click on (Yes), then on (Next)
- A window will open for you to send an email if you want someone else to post on your site. Click on the “I’ll do this Myself” option.
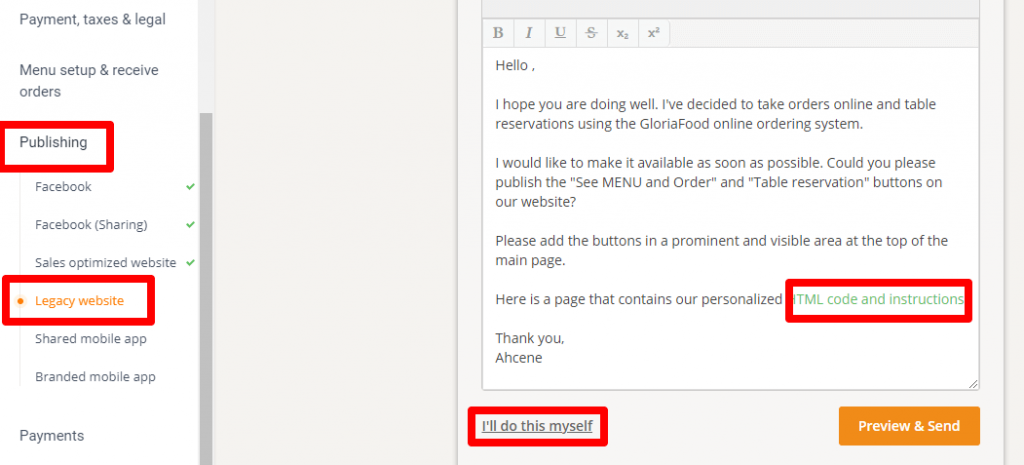
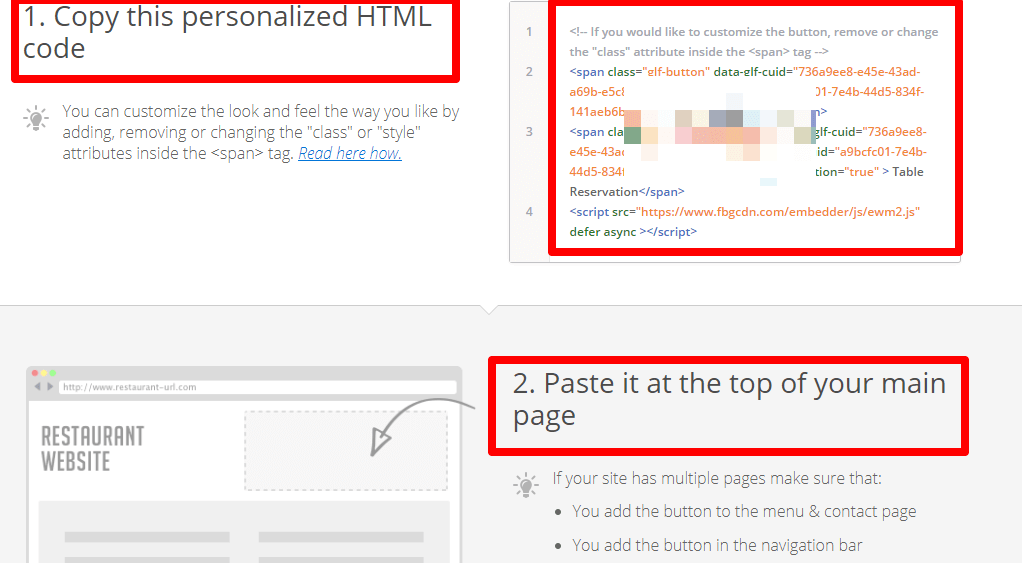
All you have to do after that is copy the HTML code and paste it on your site on the home page, as in the following image.
Payment gateways: You can link your account from here with various payment gateways such as PayPal, Stripe, and other payment methods that you will make available to customers through your site.
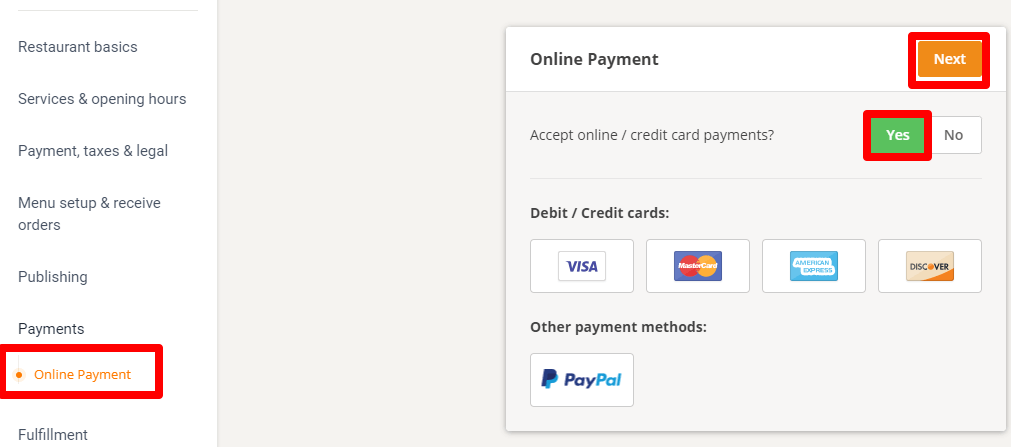
For example, we will choose to add the payment method “PayPal”, click (Yes) to accept electronic payment, then (Next).
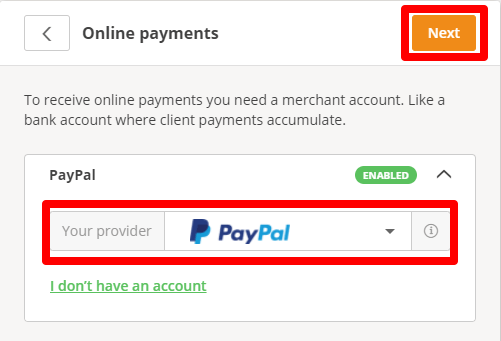
If you do not have a PayPal account, click on (I don’t have an account) to create a new account. After completing the restaurant’s settings, we will return to the site’s interface to complete building its artistic appearance.
11. Building basic pages
You can rely on any add-on to build and customize basic pages , and let us take an example by adding Elementor in order to modify and add the appearance of the site and other visual elements within it.
Add an Elementor: From the UI sidebar, click Appearance, then “Starter Template.”
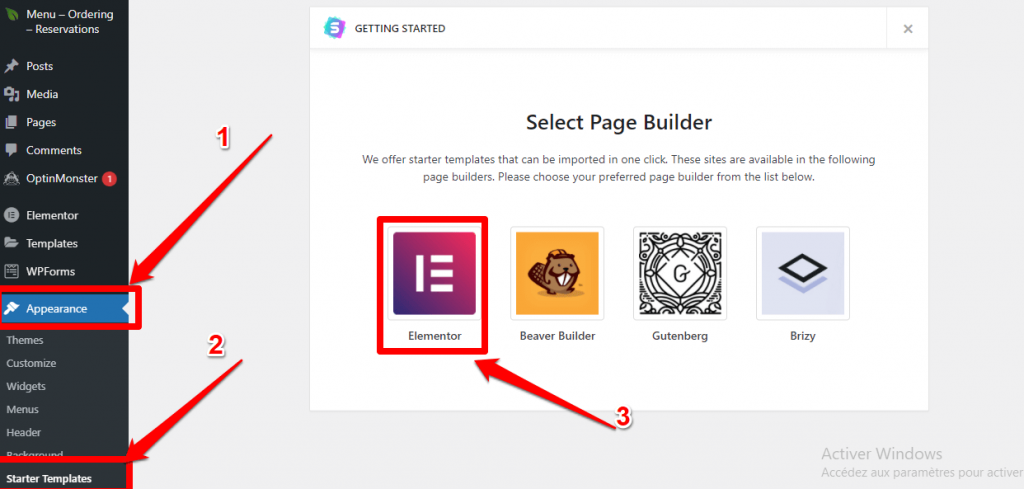
You will see several options from Page Builders, click on (Elementor).
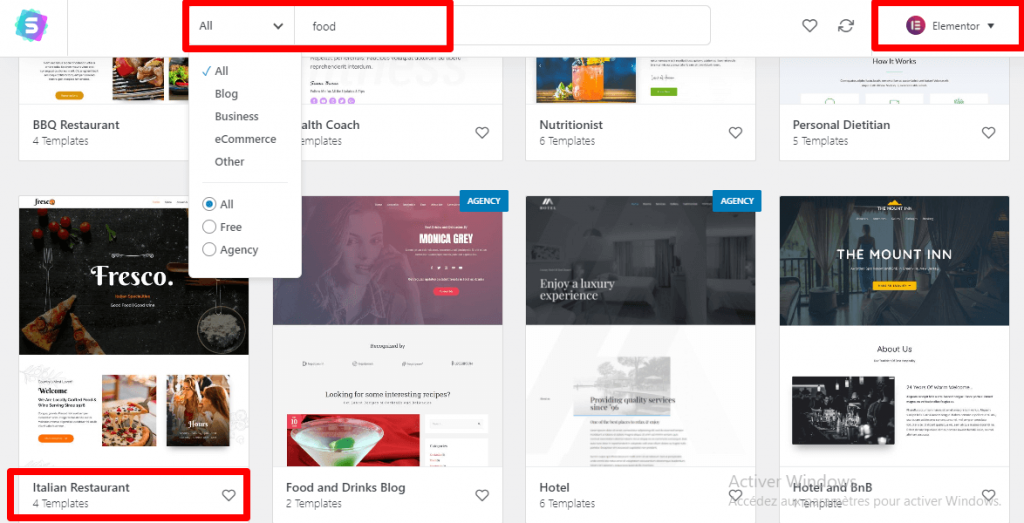
Choosing a template: You can choose the appropriate template for you by typing the keyword (Food) in the search box, and choosing from the results that will appear to you. In our example, we will choose the Italian restaurant template shown in the picture.
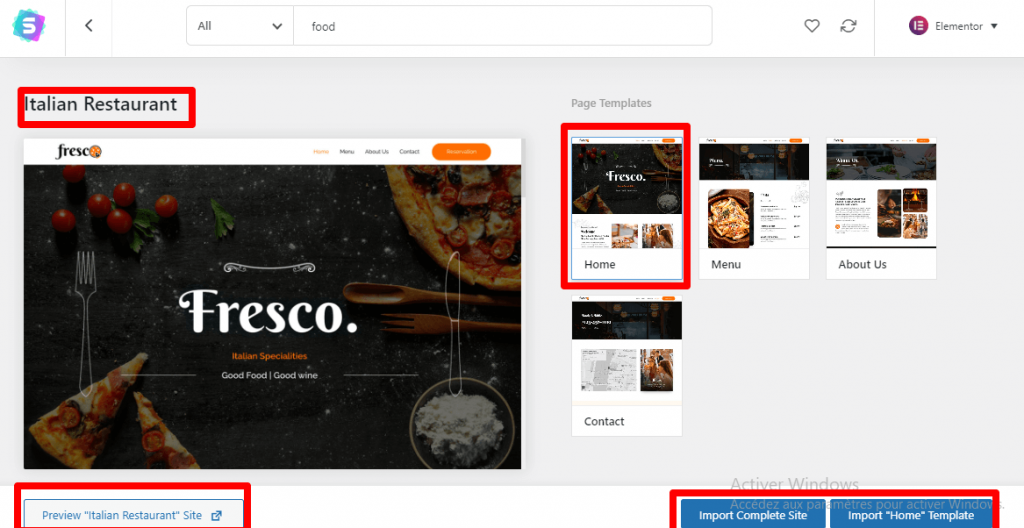
You can choose to download all the options available in the Italian cuisine template, which contains 4 options, by clicking on (Import Complete Site), and modifying them as shown in the image above. You can also preview what the site will look like according to this template by clicking on the “Preview Site” option.
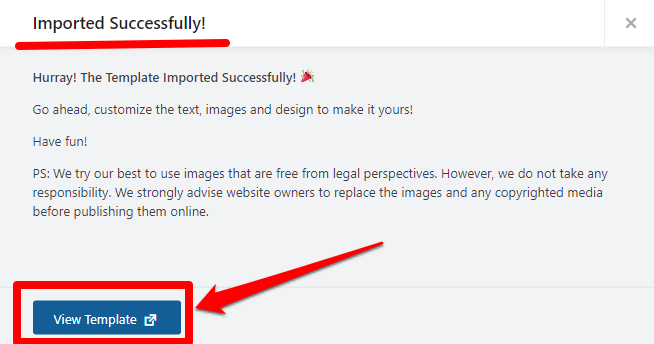
After the template is downloaded successfully, a message will appear informing you that the template has completed downloading. Then click on “View Template” to modify the template to suit your restaurant and your taste.
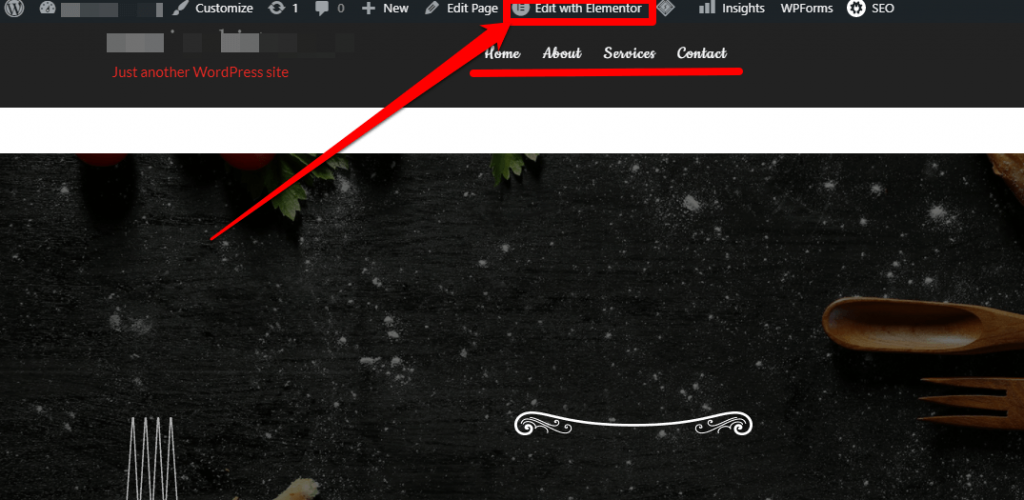
Building the home page: To make modifications to the home page, click on the “Edit With Elementor” option.
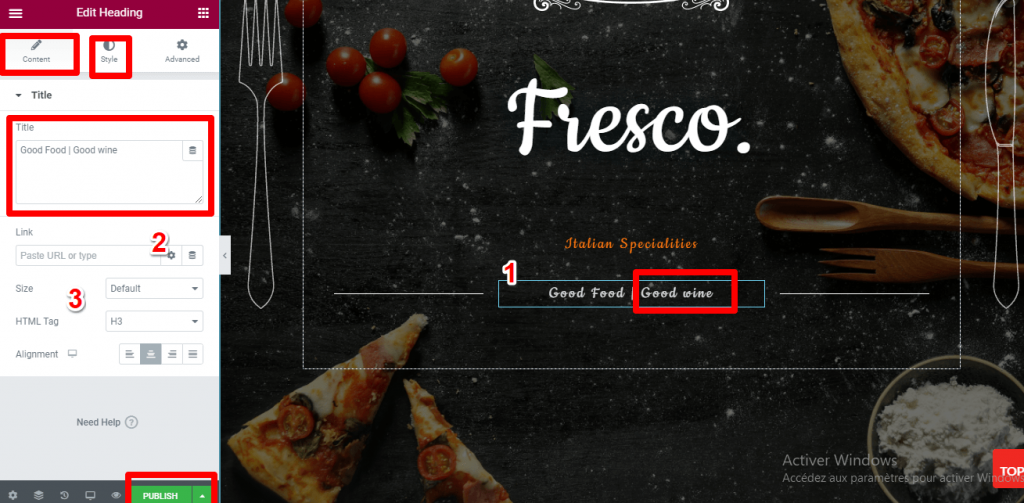
Editing is very simple. All you have to do is click on any part of the page you want to modify and the available options will appear on the sidebar. Among these options are:
- Content: Where you can modify the text and its size, add a redirect link to another page, change the image, etc.
- Style: You can modify the color of the text and the shape and size of the buttons.
- Advanced: Beginners do not need it most of the time. In the example in the picture, we will change the title of the wine “good wine” to “Good Drinks,” for example, and increase its size to H2.
After completing the modifications, click on the “Publish” option to save the modifications you made and apply them to the site.
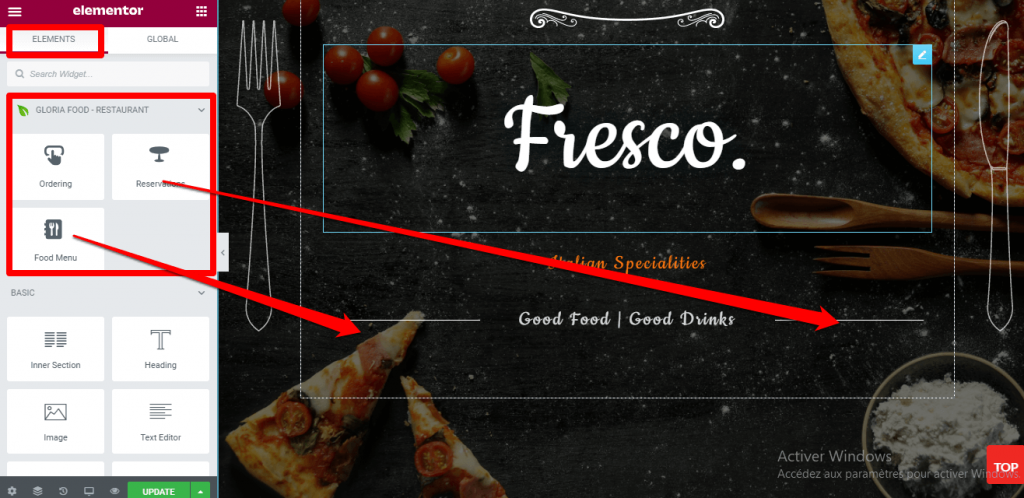
Adding buttons (Gloria Food): There are many ways to add interactive icons to the site, including:
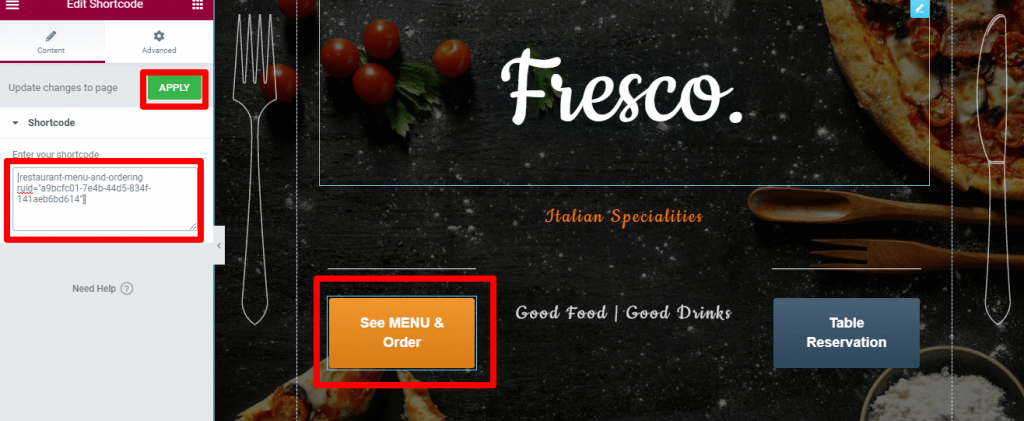
The first method: This is by adding (Gloria Food) to the items after linking your site to it. This makes it easier for you to add all the items that you previously worked on while preparing menus, reservation settings, etc. by dragging the button to the appropriate place and leaving it (Drop and Drag), as in the picture. .
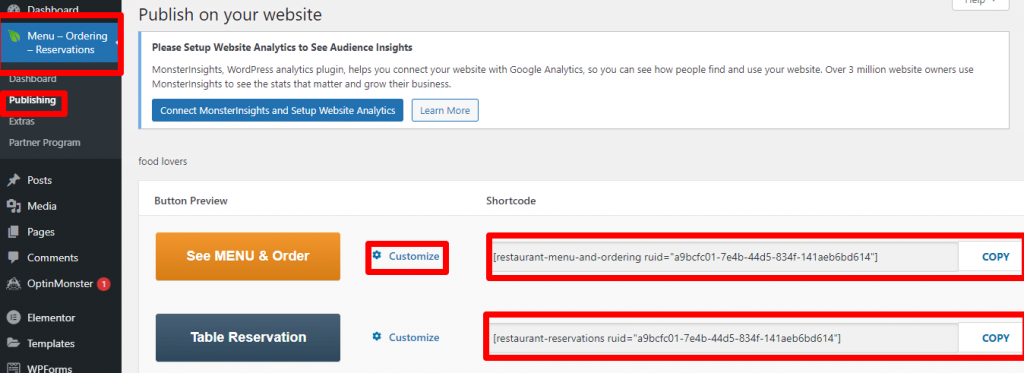
The second method: We will return to the extension (Gloria Food) in the sidebar of your site and click on the “Publishing” option, after which we must copy the short link for each of the menus and table reservations.
Note : You can change the button title, color, and size of the buttons by clicking on the “Customize” option.
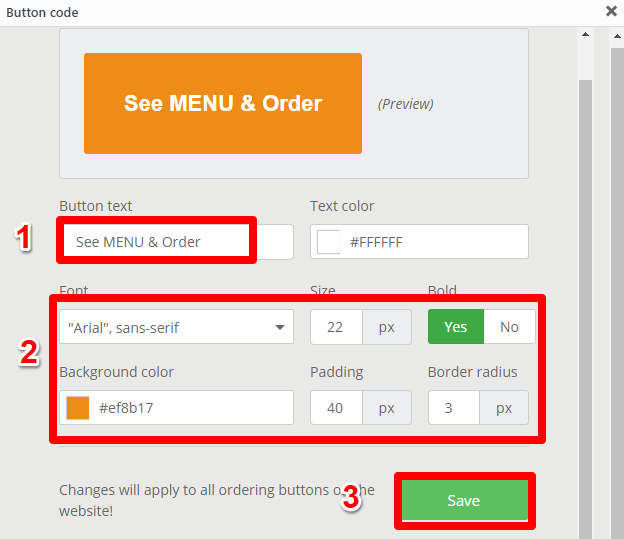
Click on the “Save” option after completing the modifications.
Now we will return to the home page. In the Items section, search for ( Shortcode ), then drag it to the place where you want to show the button, then paste the shortcode in the description. Finally, click on the “Apply” option and we will get the same result as in the first method.
Note : In the section related to “Information about the Restaurant” (About Us), the image may not be suitable for you, and you can change it and upload another suitable image instead.
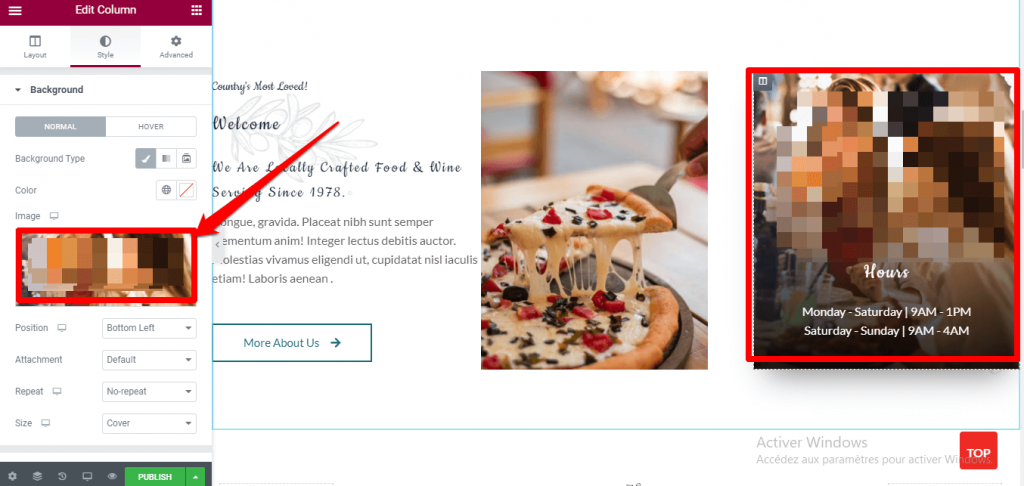
After completing all the modifications and reaching the look you want, click on the “eye” icon next to the “Publish” option to see the final look of the site and try it.
12 . The final appearance of the site
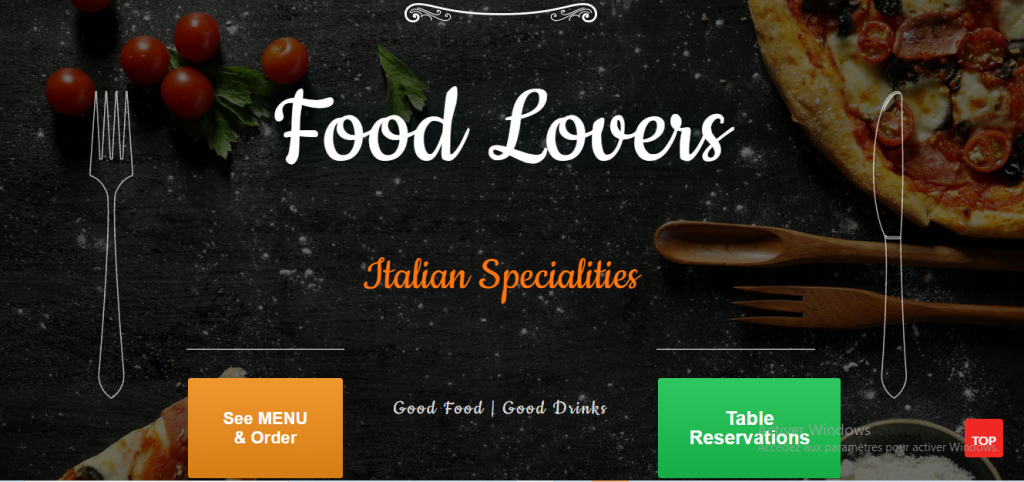
Preview menu and orders
After we have prepared and completed all the previous settings and customizations, we will move on to previewing the site and testing the efficiency and suitability of the settings we have chosen. Our first step will be to click on the menu to make sure that all the data is present and active, as in the picture.
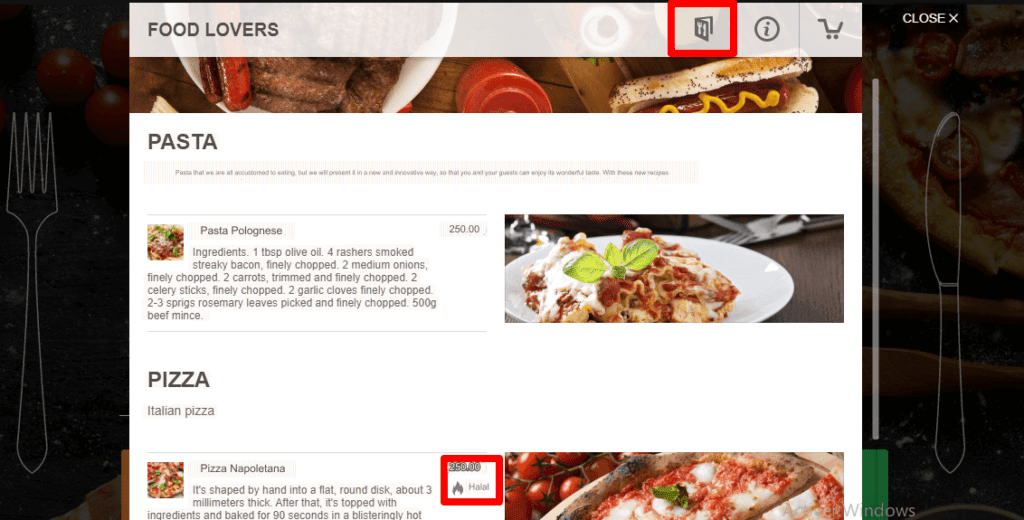
Then we will click on one of the meals in the list to view the settings and options included within it.
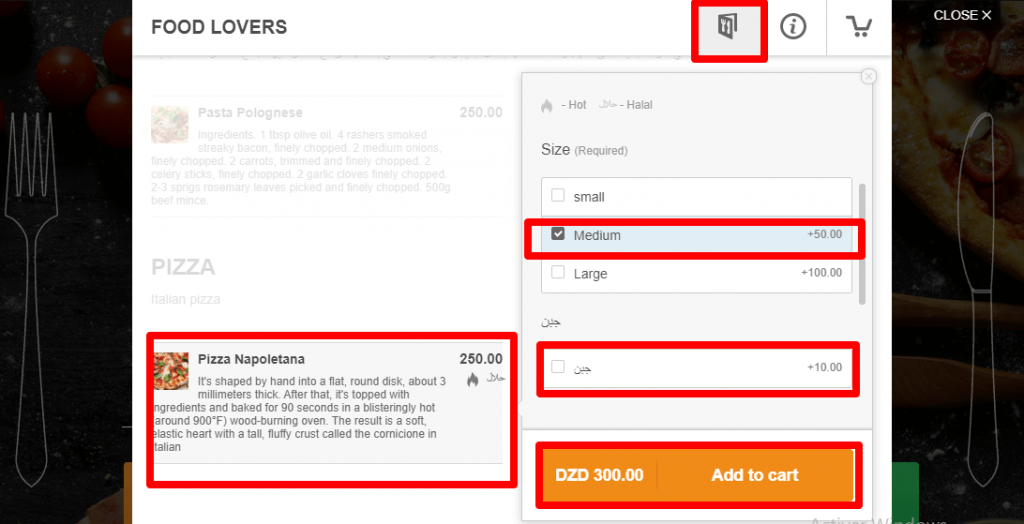
Everything is available, description, photo, sections, additional options (cheese, minced meat…) and most importantly the add to cart button.
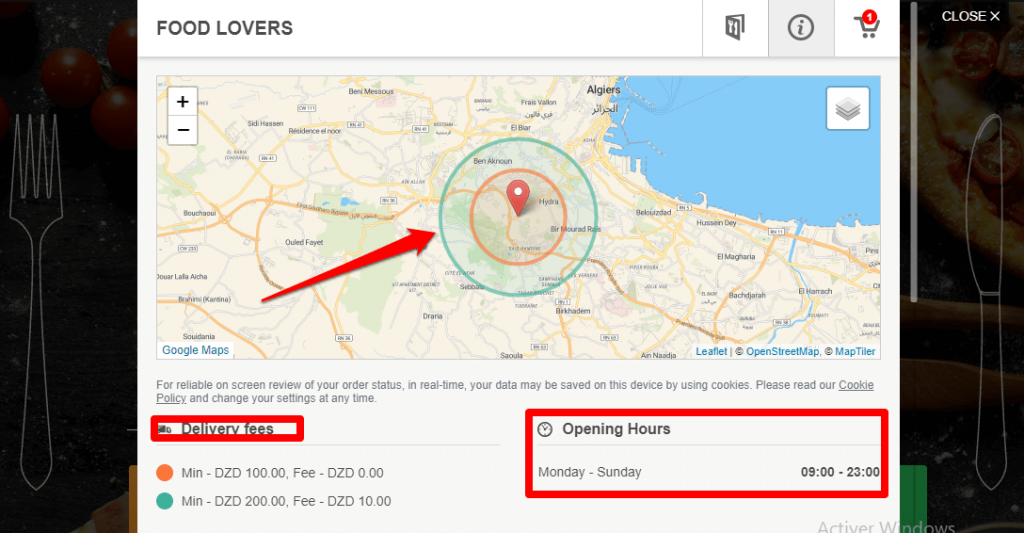
We must also ensure that the restaurant’s location data, delivery data, working hours, etc. are also available and effective.
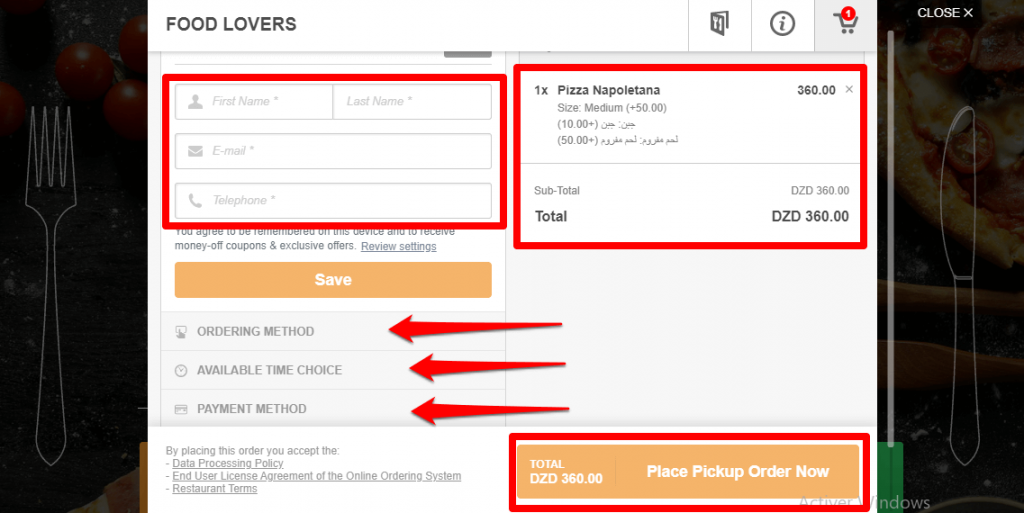
Also check the following options and items:
- shopping basket
- A designated place for customer data
- Choose the ordering method (delivery, or pick-up from a restaurant)
- Choose the timing
- Choose a payment gateway
- Complete the order
Test the option to reserve a table: Click on the “Table Reservation” option from the home page.
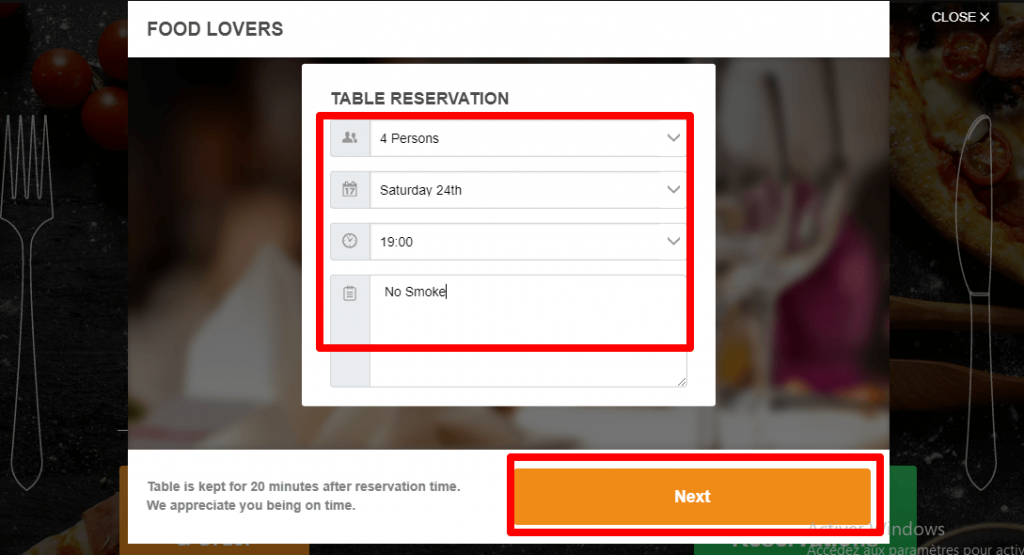
Fill out the basic information within the order and attach a special request to try out the option of additional special orders and options we have prepared previously. Then click Continue.
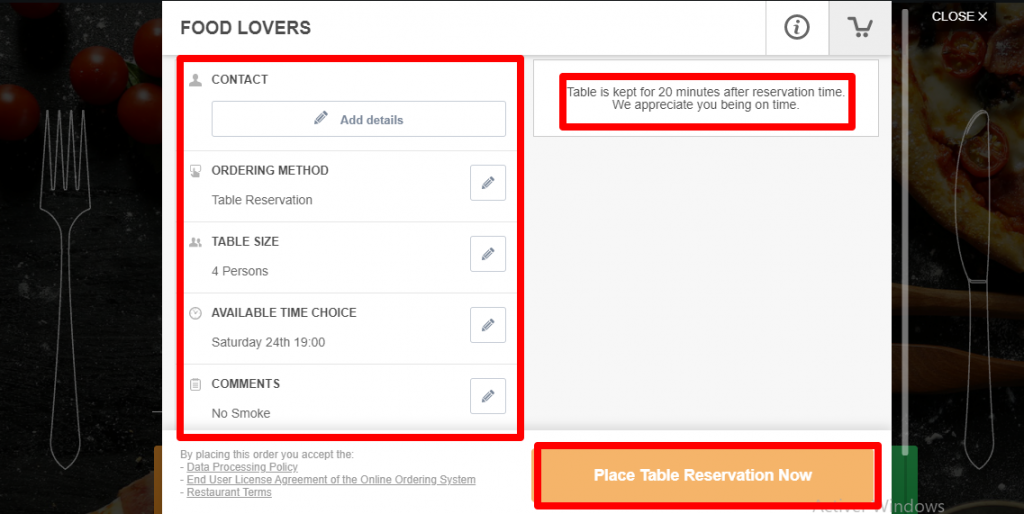
Fill in the customer’s data and choose the payment method. You will notice that an alert appears regarding the time available to keep the reservation after the specified period has elapsed. Finally, test the effectiveness of the booking confirmation option.
Now, after this comprehensive guide to the steps for creating a meal website using WordPress, you will be able to build a professional and distinctive website for your restaurant, with all the features that customers may want, and provide all the additional options that will attract customers and facilitate the process of selecting and ordering food from your restaurant, and if you encounter any difficulty in implementing the steps So put your question in the comments so we can answer it, God willing


Leave a Reply