ost businesses and commercial activities need to be present and appear online today, so making the decision to build a website is a necessary step to enhance your access to a larger segment of your customers who are interested in your services and products. It’s not as difficult as it used to be, but it’s easier than ever using WordPress.
During this article, we will take you on a practical journey to create a website for your business online with ease, starting from purchasing hosting, installing WordPress on the hosting, then installing the template with which you customize the look and design of your site, and even creating the internal pages of your site and customizing the list of pages and moving between them. Then in the end, we learn together some marketing tips to reach your potential customers and interact with them.
Benefits of creating a website
In a world full of competition and a great acceleration in technology, every business owner needs digital experience to keep up with these updates, and the website is an essential step among the steps of this transformation, because owning a website provides you with many advantages, including the following:
- Continuous electronic presence and the ability to display products and services to your customers 24 hours a day, which strengthens the relationship between you and your customers.
- Enhancing the credibility of the business, so that customers have greater confidence in companies that have a professional website that expresses the brand image
- You can customize the site to sell your products directly and complete payments through your site without the need to visit your workplace
- The ability to expand your business and reach larger segments of customers in more than one geographical area, as they can reach you easily via the Internet
- Your ability to analyze customer behaviors through your site using some analysis tools such as Google analytics , which helps you provide the best services and products of interest to your site visitors.
- Ease of announcing a new service or product that you have added, by sending marketing messages containing links to new services or products that are likely to be of great interest to your customers online.
Steps to create a website for your business easily
Let us now begin the practical and applied steps to create your own website in simple steps, and at the same time meet your needs perfectly, as we will design the website and launch it on the Internet through four basic steps:
- Buy hosting and domain
- Installing WordPress and plugins
- Choose the appropriate template
- Website page design
- Marketing for the website
These are the basic steps, which we will talk about in detail below
1. Purchase hosting and domain
The first step to having a presence on the Internet is to own hosting and a domain for your site, because hosting is the service that allows you to upload and store all the files and data of your website, and we talked before about how to choose the best hosting for your WordPress site.
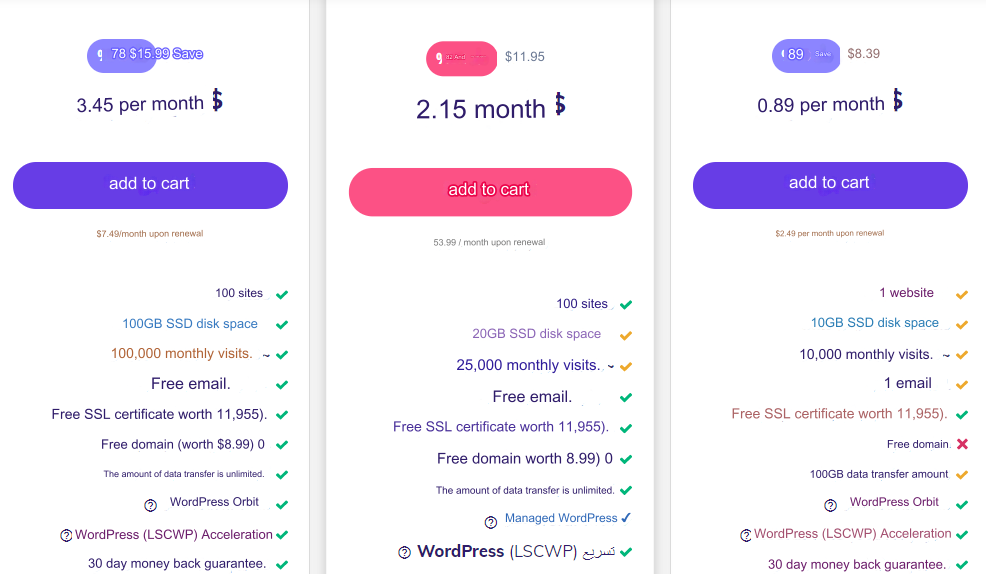
You will find many website hosting plans from various companies that provide hosting services so that you can choose from them what suits your needs for your site, or even to start with free hosting , and thus you can determine the first step to obtain the appropriate hosting so that you can install WordPress and complete the rest of the steps of customizing your site.
2. Install WordPress and the necessary plugins
The second step after purchasing the hosting and domain is to install WordPress on the hosting, start designing and creating the internal pages of the site, and start displaying the services and data of your business activity within the website to visitors.
We talked before about ways to install WordPress on hosting , through which you can easily install WordPress so that your site is ready to work and begin to fully customize it to suit the nature of your business.
Let us assume that you purchased the hosting and domain, and also installed WordPress on the hosting, which will look approximately like this:
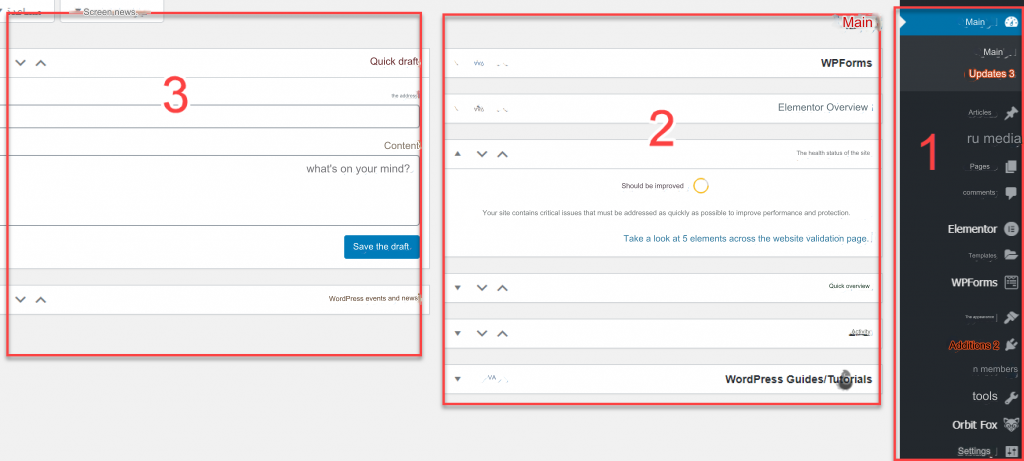
You will see an image showing the front end of the WordPress control panel, which is divided into 3 main parts, as you can see:
- The first part : It is the most important, as it shows a list containing the tools and controls for the entire site, which we will talk about the most important features required in the next steps.
- The second part: It contains some statistics and information about your site, where you will find reports on your site’s performance that can benefit you.
- Part Three: In it, you can write drafts and memos that are on your mind to implement on your site later.
Then let us move to the third step, which is the step of installing the template, which will help you customize the appearance of your site in the appropriate interactive way.
3. Install the WordPress template
Now let us continue the explanation, in which we will move to the next steps, which is the step of installing the template (theme) , as it is what helps you design and produce your site in the form and display method that you want to be the final form of your site, and of course there are many free templates as well as paid templates with higher features from which you can choose The best format for your site.
You can install the template you have chosen in more than one way , and we choose the easiest method by entering the WordPress control panel, then going to: Appearance << Templates << Add New , then you go to the search for templates box and write the name of the template you want to install on your site. If you are looking for a simple template for a website that expresses a business activity, we recommend the Sydney template for you . It is a simple and easy template that displays the basic pages that provide information about your company in a simple manner.
So you will type in the search box: Sydney
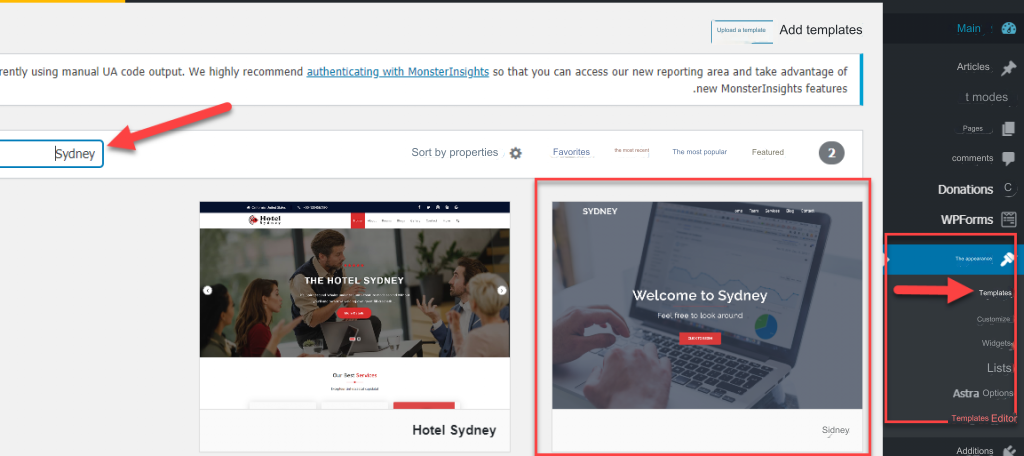
Note that after writing the name of the desired template in the search box, it will appear directly in front of you, so you can choose to install it by clicking on the “ Install ” button until the process of installing the template on your site begins.

Then, after a short time, all the template files will be installed on your site, so you can click on the “ Activate” button, which enables you to display the template on your site and you can rely on it to completely customize the appearance of your site.

What distinguishes the “ Sydney ” template is that it provides you with many ready-made designs that you can choose one of to install and activate on your site, in a ready-made form without the need to make many technical modifications.
You can import ready-made designs from the Sydney template, by entering the WordPress control panel, then going to the (Appearance) tab , to find below it a sub-tab, which is ( Theme dashboard ), through which you can go to the Starter sites option.

The template will start importing many ready-made designs that you can choose from, as it will show you free designs with the word Free in front of them , and other paid models with the word Pro next to them.

You do not have to initially choose a paid template, but you can choose one of these free templates to choose one that is suitable for you by clicking on the Import button , which completely imports the template and applies it to your site.
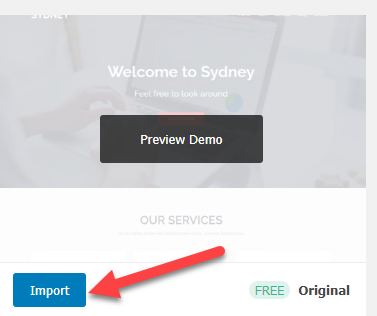
After choosing the design you prefer and clicking Import, you will find that the form and contents of the template have been completely applied to the home page of your site.
You will find that the template has imported the form with the same default contents as it, so we will need to change the text content and images in that ready-made design to the content and images of your business.
First, we will change the content of the upper part of your site, including the basic data of your site, by clicking on the ( Customize ) option located in the upper toolbar on the home page of your site.
After that, you will find the customization page at the top of the site, on which you can click on the editing pen icon next to each item, to open the window for changing texts and images, where you can change them to your own texts and images as you want.
Then, you can edit the site’s content and internal design, by clicking on the ( Editing with Elementor) tab located in the toolbar on the site’s home page.

Then after that you will be able to edit the page content using the visual editor using drag and drop and you can make many modifications such as:
- Change the written texts within the design
- Change the appearance of the elements in the design horizontally and vertically
- Change photos and replace them with your own
- Change and redesign the buttons as you wish
- Make all the other modifications you prefer within your site.
All of these modifications can be made easily through the visual editor built into the template, so you can make the required modification and watch its activation instantly.
4. Create and design the internal pages of the site
After you have designed the home page as required, it will be your turn to create and design the basic pages that most business website owners need, which are (our services – contact us – about us).
To create internal pages for your site, you can access the WordPress control panel and then go to: Pages << Add New to open the window for creating a new page on the site.
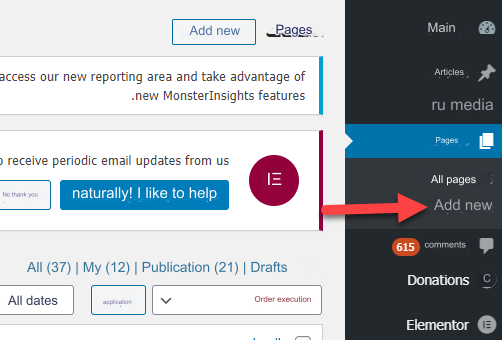
The Add a New Page window will open for you, where you write the page title, then you can click on (Edit with Elementor) to open the design window for you using the Elementor add-on in a drag-and-drop manner or using the default WordPress component editor to review the contents of your site’s pages (this depends on the type of content to be displayed in your pages)
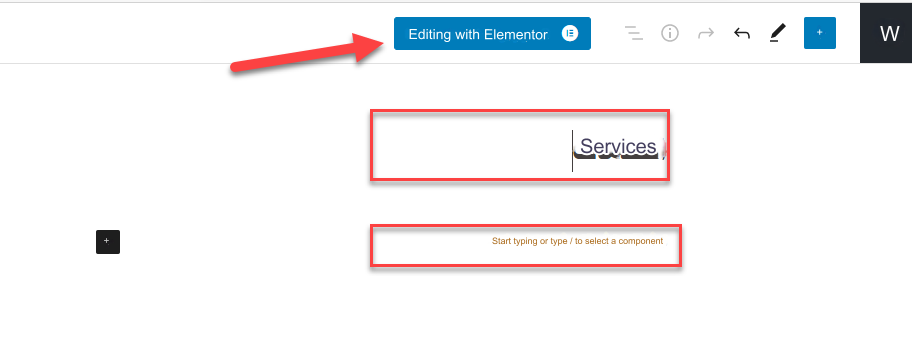
In the same way, you can create and design any number of pages you want within your site.
Custom menu design
After you have finished building the basic pages of your site, you can now create a main list that contains the names and links of the internal pages that you created and designed, so that you can review the complete list that displays those pages.
You can create a custom list by going to: Appearance << Lists , then clicking ( Create a new list)

As you can see in the previous image, when you click on “Create a new list” and then write a name for the list, for example “Main List” and then click on the (Create List) button , an empty list will be created that you can use to add the pages mentioned.
After creating the list and adding the pages, we will need to make the list of pages appear in the top bar of the site by choosing where to display the primary menu, then click on Save List as in the following image.
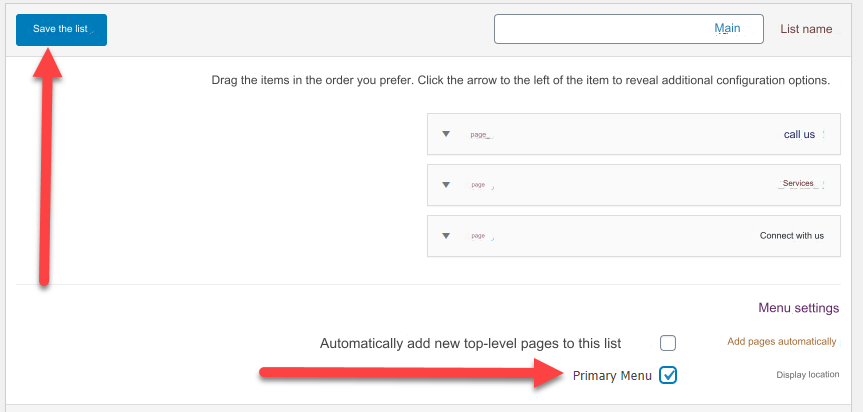
Then, if you preview your site’s home page, you will notice that the main menu appears at the top of your site’s pages.

Create a contact form to receive customer messages
Now that you have reached the stage of designing the home page of the site, as well as the internal pages, and also creating a main menu at the top of the site in order to provide the visitor with a better experience, let us show you how to create a contact form in order to provide the opportunity for site visitors to communicate with you and send their inquiries smoothly.
To create a contact form, we will use one of the WordPress plugins that will help us do this in a few minutes, and one of the most popular of these plugins is Contact form .
You can install the plugin through the WordPress control panel, by going to: Plugins << Add New , then in the search for plugins box, type Contact form 7 to appear in front of you as follows.

You will install the add-on by clicking on the (Install Now) button , and then click on (Activate) until the add-on is activated on your site.
After activating the plugin, you will notice that a new tab appears in the main menu within the WordPress control panel, which is the (Contact) tab . Through it, you can create a new form by clicking on the tab that branches from it (Add New) to create and design a new contact form and include it on your site.
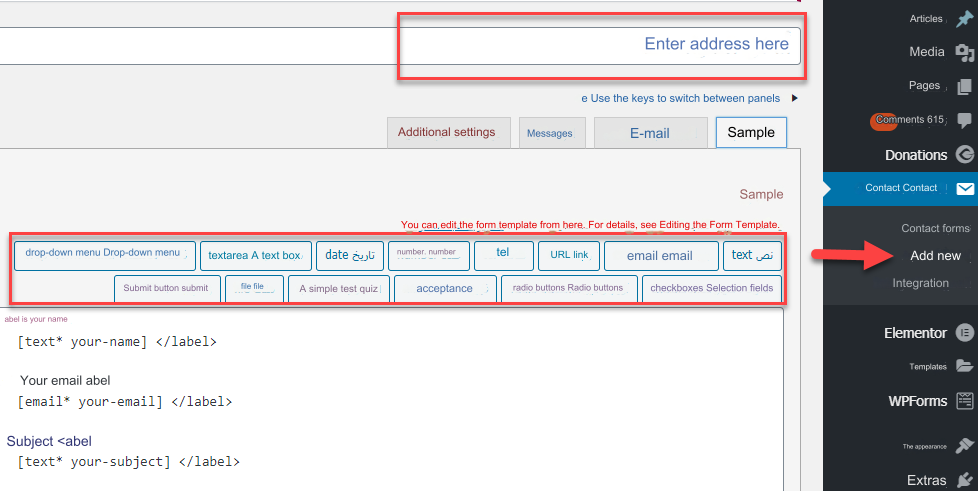
After you finish creating and designing the contact form as required and saving it, you will see a short code that you can copy and paste into any page where you want the contact form you designed to appear:
Thus, you have an integrated website for your business that clearly highlights your brand online, and all that remains is to complete the website content, add all the services, display your products appropriately, and reach the target segment of your potential customers.
Promote your site via digital platforms
After you finish designing and launching your own website, the marketing step for the website’s content comes in an attempt to reach the largest possible segment of customers interested in the website and the services it provides. You can market the site through many different marketing channels, including:
- Social media platforms such as Facebook and YouTube, where you create pages in the name of your business, begin publishing your site’s content and the services it provides on your page, and conduct promotional campaigns for the page’s posts to reach large numbers of interested people.
- Advertisements on search engines, such as Google Ads, which help you find customers who search search engines for the services you provide.
- Email marketing: By building a dedicated mailing list and sending them periodic messages with the most important news and developments about the products you provide to them.
We have talked in detail about e-marketing methods and strategies in the article: The Comprehensive Guide to E-Marketing
Conclusion
It has become clear to us that creating a website for your business or private business has become an essential matter for providing a high level of service to your customers, regardless of their location. There are some important factors that you must take into consideration while designing your own website, the most important of which is that it should be an attractive, user-friendly design. It provides him with an ideal experience, and all the contents of the site are displayed appropriately for him


Leave a Reply