Among the problems that some WordPress site owners face is the problem of the uploaded file exceeding the maximum limit (Resource Limit Is Reached), which hinders uploading files to the site.
Through this article, we will learn about a group of solutions that enable you to solve this problem.
Explanation of the problem: The uploaded file exceeds the maximum limit
The problem of the file uploaded exceeding the maximum limit (Resource Limit Is Reached) appears when files are uploaded to the WordPress website. These files can be media such as video clips, images, or audio, and also appear when installing large plugins and templates .
But it is frequently encountered by owners of sites that download large files such as e-books, programs, etc.
When you add the file, the problem appears in red and looks like this:

The main reason for this problem is the maximum file upload limit on the site, which is determined by the hosting company. Or automatically through WordPress. Do not think that this problem is a purely negative problem.
But the problem of the uploaded file exceeds the maximum number of positives, as it prevents malicious programs from being uploaded to the site if it is hacked. It also serves as insurance on hosting resources to prevent users and website owners from uploading large files.
This problem may be due to the server and the file upload size specified by the hosting company. In this case, it will be necessary to contact the service provider, or modify the site files. Also, the matter may be due to some settings in WordPress, and here the solution will be to modify these settings through some Extras. Now, let us learn how to solve the problem of the uploaded file exceeding the maximum limit (Resource Limit Is Reached).
Know the maximum file upload limit
Because the maximum file upload limit represents the main reason for the problem of the uploaded file exceeding the maximum, it is necessary to know it in order to determine whether the problem is from it or from something else, so that you can take the correct steps without consuming a lot of time.
You can find out the maximum file upload limit for your WordPress site by going to your WordPress dashboard, and clicking on the Media > Add New option.

Then you have to look at the bottom of the window to find the maximum upload limit option, and in the site I used this is 64MB.
Solution to the problem of the uploaded file exceeding the maximum limit
After discovering that the problem is caused by the maximum file upload limit, it is possible to solve it through a set of simple steps, and you will need to access the site’s control panel in addition to the site’s files.
1. Use the Wp Maximum Upload File Size plugin
Using the Wp Maximum Upload File Size plugin, you can solve the problem of the uploaded file exceeding the maximum limit (Resource Limit Is Reached), but only in one case, which is when the problem is caused by WordPress and not by the hosting service provider.
For example, the add-on will not work or provide any benefit if the service provider’s file upload limit is 64 MB, so the add-on will not be able to increase the file upload limit more than that.
If you want to know the file download limit provided by the hosting company or available on the server, you must go to the WordPress control panel.
Then click: Tools > Site Health , then select the Info option at the top of the window.

After that, scroll down and click on the server option, and then you will see the maximum file upload available on the server, which in this site is 128 MB, which means that the addition will not help you if you want to increase the maximum to more than 128 MB, and we will learn about a group The steps to solve this problem are in the following steps.

In the first method to try to solve the problem, you will install and activate the Wp Maximum Upload File Size plugin through the known steps, by going to the WordPress control panel, and clicking on: Plugins > Add New . Search for the name of the plugin, click Install, then Activate, as we explained in the steps to install and activate a WordPress plugin.

Now, you will find that the Wp upload Limited option has been added to the right menu of the screen. Click on it. The addition has provided an option to modify the file upload limit. Click on it and then select the appropriate file size for you.

2. Editing the .htaccess file
If the previous method does not work, in this case you will have to move to another stage of the solution, which is modifying the .htaccess file , which you can access through the control panel by clicking on File manager or using FTP programs. Then select the file and click Edit
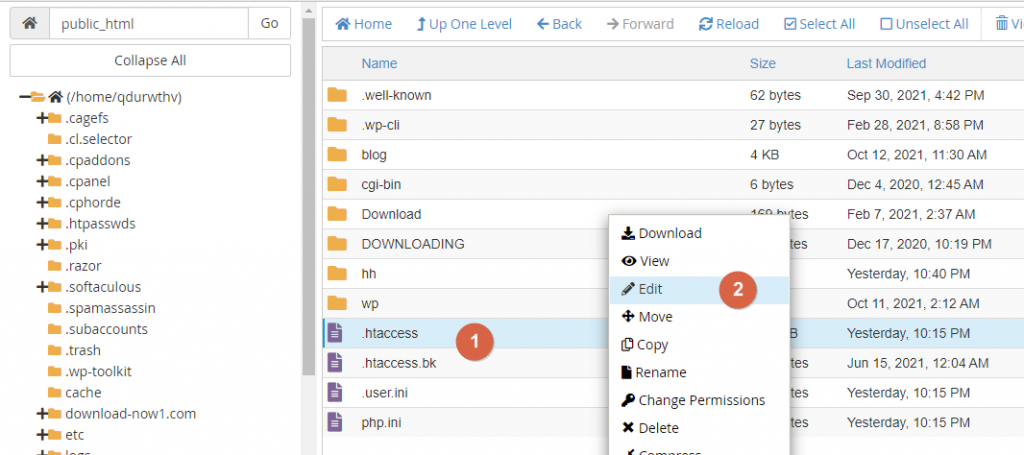
Then copy the following code and paste it into the .htaccess file, modifying the values in the code as you see fit. Don’t forget to click Save Changes at the top
It will look like the following

3. Change options by changing PHP options from the control panel
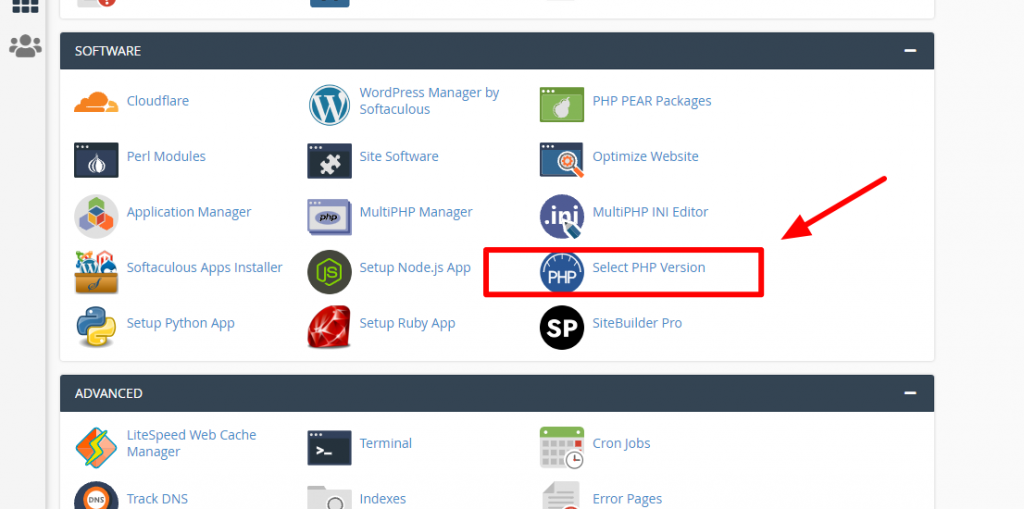
If the hosting company provides you with a cPanel control panel, you can change the PHP options, to solve the problem of the uploaded file exceeding the maximum limit (Resource Limit Is Reached), by increasing the maximum file upload limit. In order to do this, you will have to go to the control panel and click on Select PHP Version
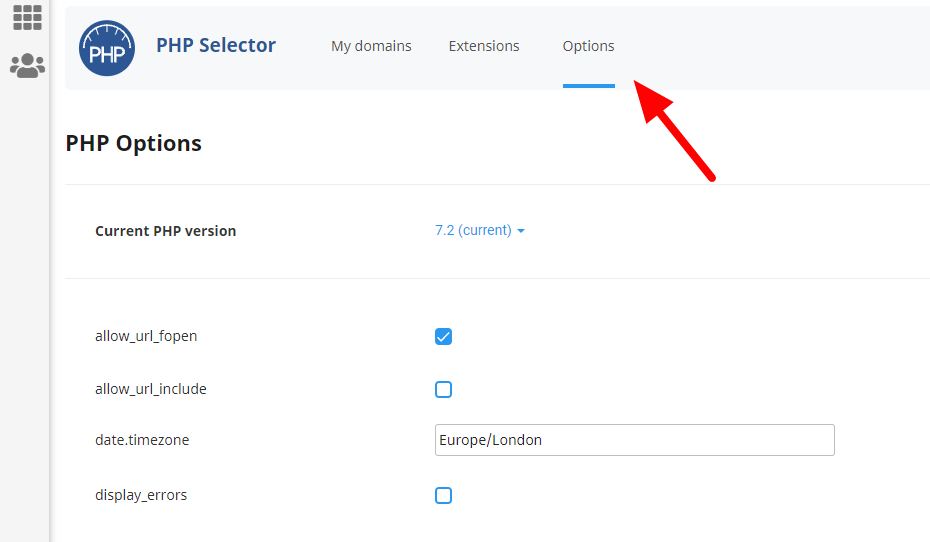
Then click Options
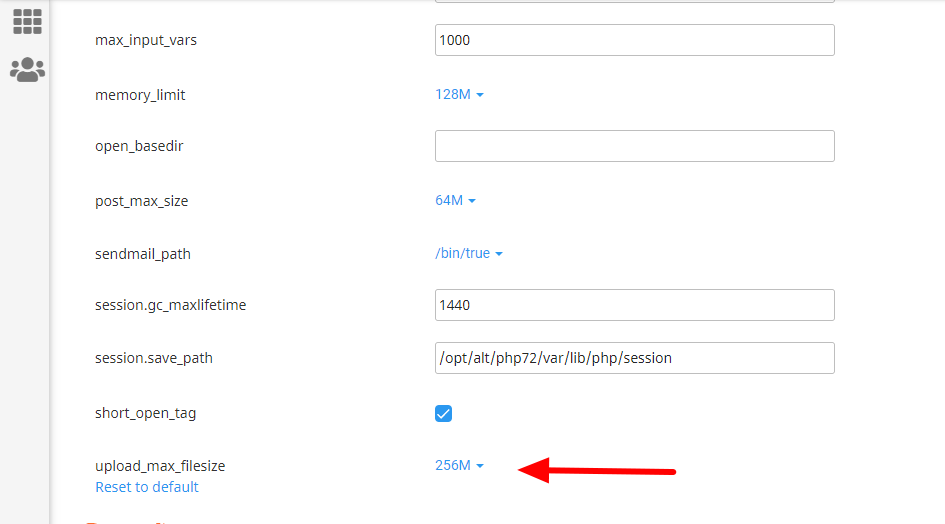
Then scroll down, click on the upload_max_filesize option and select the appropriate file size from the list that appears and the changes will be saved automatically.
All you have to do is go to your site and try uploading the file again, and if the problem is not resolved, you must proceed to the next step.
4. Edit the php.ini file
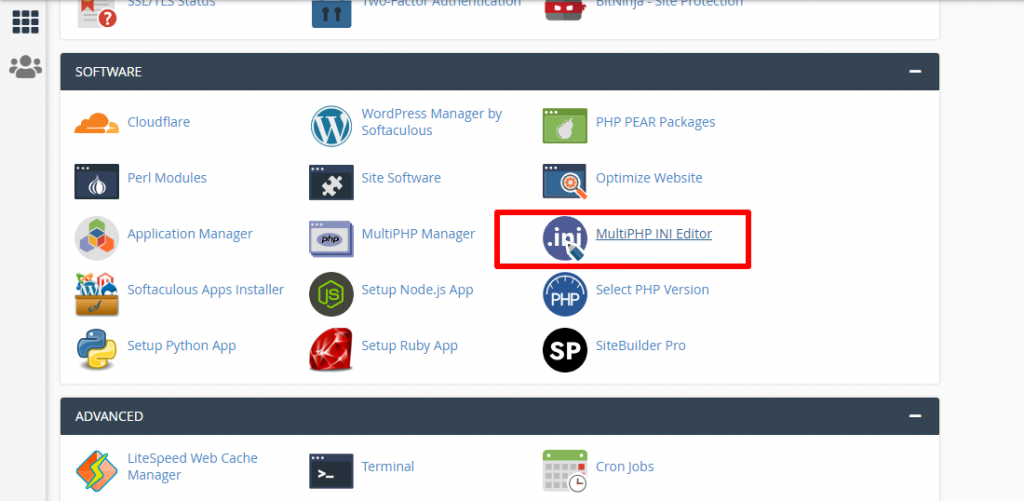
From the site’s control panel, click on MultiPHP INI Editor under the SOFTWARE section
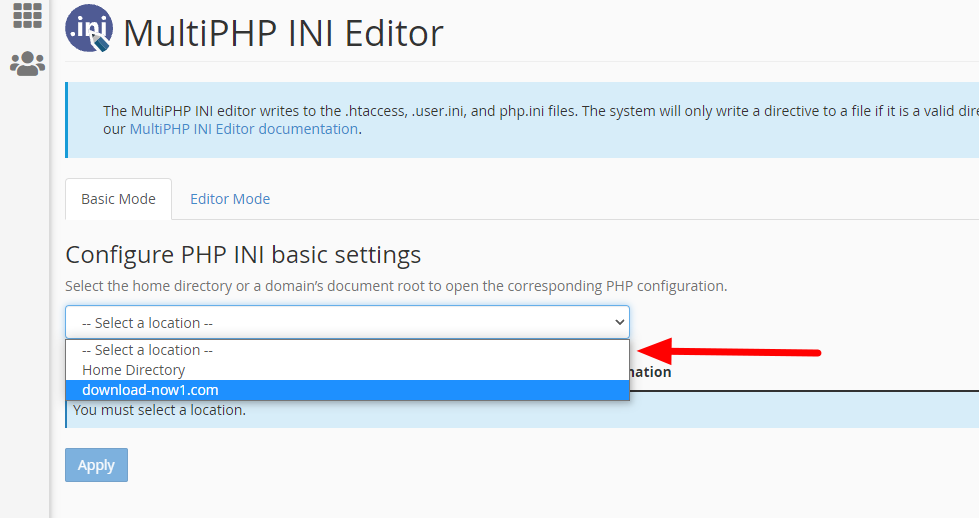
Then select your site domain
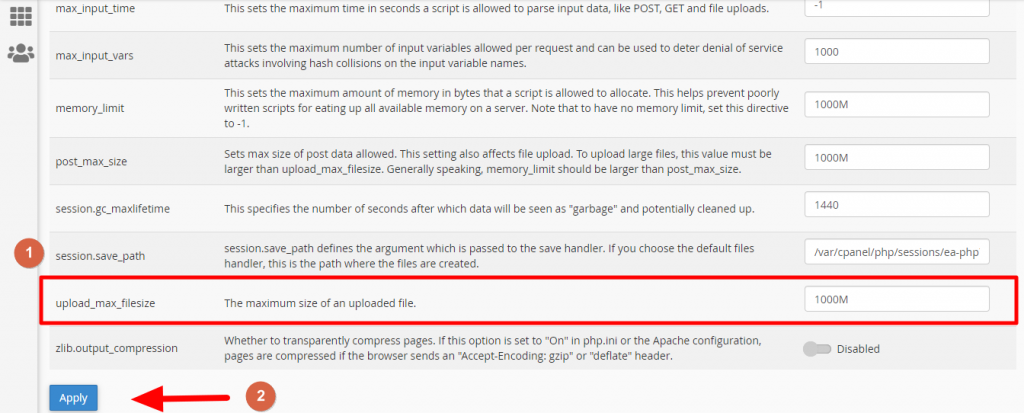
Then, scroll down to upload_max_filesize, add your appropriate file size, and click Apply.
Now, go to the WordPress website to find that the maximum file upload limit has been increased, and the problem of the uploaded file exceeding the maximum limit (Resource Limit Is Reached) has been solved.

5. Contact the hosting company
If the previous methods did not work in solving the problem of the uploaded file exceeding the maximum limit (Resource Limit Is Reached) or you do not want to modify the files yourself, in this case you can contact the hosting service provider for assistance.
It is worth noting that most hosting companies provide technical support available 24 hours a day, and you should also take into account that there are some hosting plans that do not allow you to increase the maximum file download limit, such as shared hosting.
In the end, as you have seen, increasing the maximum file upload limit is very easy, and what you only need are some simple steps that you can try one after the other. It is not necessary to implement all of these solutions, but rather the problem can be solved after implementing the first or second solution only.


Leave a Reply