The WPForms add-on allows you to create different forms without writing code, but the forms are created using a drag-and-drop method to create form fields, such as fields that ask the user to fill out his name, email, phone number, and even a donation form and other information that the user fills out.
WPForms offers several forms, such as a contact us form, a questionnaire form, and a subscription form for newsletters with the latest events, along with many other services, such as linking with other add-ons, such as Mailchimp, which is used to send bulk e-mail to many customers, and it is the best means of electronic marketing. In this article, all available information will be explained. About this add-on with an explanation of how to install, activate, prepare and use it.

Benefits and uses of the addition
Perhaps the most popular is using WP forms to create communication forms between you and users, but there are many forms with various ideas that you can build using WPforms and customize to suit your needs. Here’s a list of some form ideas you can create using the plugin:
- Questionnaire or opinion poll forms (for example, to ask the user about the effectiveness of the product and provide all suggestions)
- You can create popups which are an effective way to display your forms in front of your site visitors and can be used to draw attention to a contact form or sign up form for an email newsletter.
- You can create forms to reserve your services, such as a hotel room reservation form or employment applications, as the add-on provides the feature of uploading files or images by the user, which helps you collect the required data effectively.
- You can also create recommendation forms to collect reviews and ratings from your customers after purchasing your product or service, and you can benefit from these ratings to enhance the new customer experience.
- You can also create subscription forms and send automatic emails by linking and integrating with email services such as Mailchimp, ActiveCampaign, AWeber, GetResponse, and others, which enhances your email marketing efforts.
- You can create multi-page forms, which are forms that are filled out step by step. When you finish one form, you move to two forms, and so on. You can also create forms based on conditional logic, where fields are shown and hidden based on the visitor’s first answer.
Therefore, the WPforms add-on provides you with many effective options that help you build an effective communication form, and is a reliable add-on to rely on. In the rest of the article, we will explain the steps to install and activate the add-on and use it to build some experimental communication models.
Installing, activating and setting up WPForms
You will first need to install and activate the add-on in order to create your first contact form. This can be done through easy steps by going to your WordPress site’s control panel , then going to the “Add-ons” tab, then “Add New ,” to reveal the window that allows you to install the new add-ons.
You will type wpforms in the search box and then the add-on will appear. It has received +4 million installations so far, so you must click the Install Now button.

Then you activate the add-on by clicking on the button : Activate

How to add a contact form
Now that you have installed and activated the plugin, let me explain how you launch the first form to users, by going to the WPforms tab and then clicking on Add new.

A selection of form template will appear for you to choose from which suits you according to the required custom form, which you will present configured with custom fields for the required purpose of the form. For example, let’s choose: Newsletter Singup form
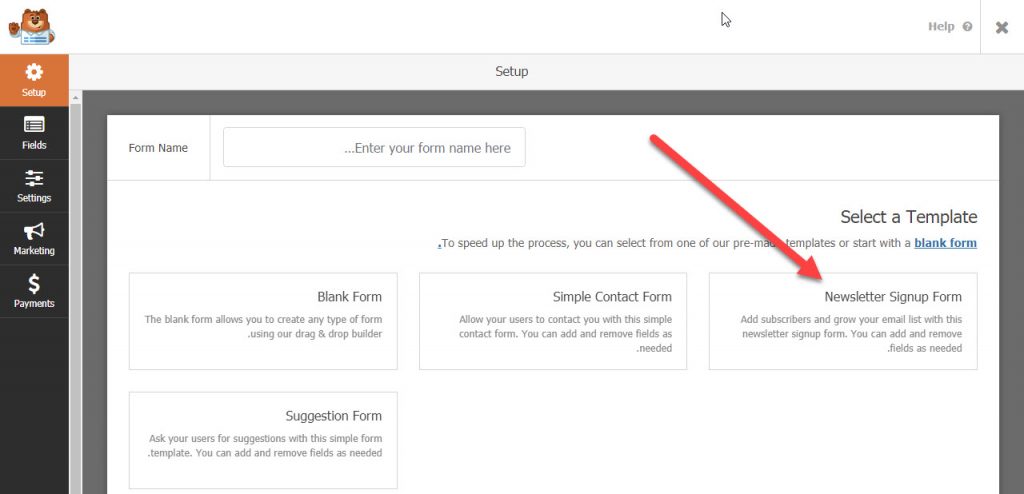
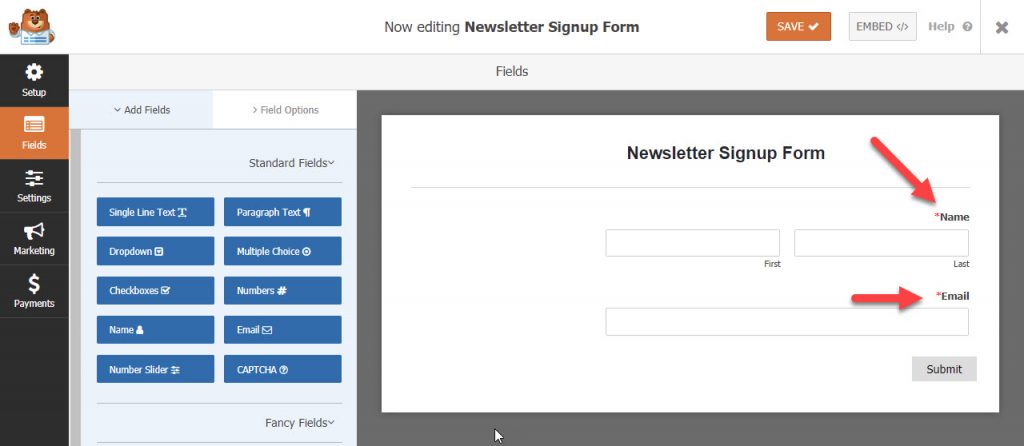
The form will appear to you with custom fields according to the desired use, which are: Name, Email, and the Submit button.
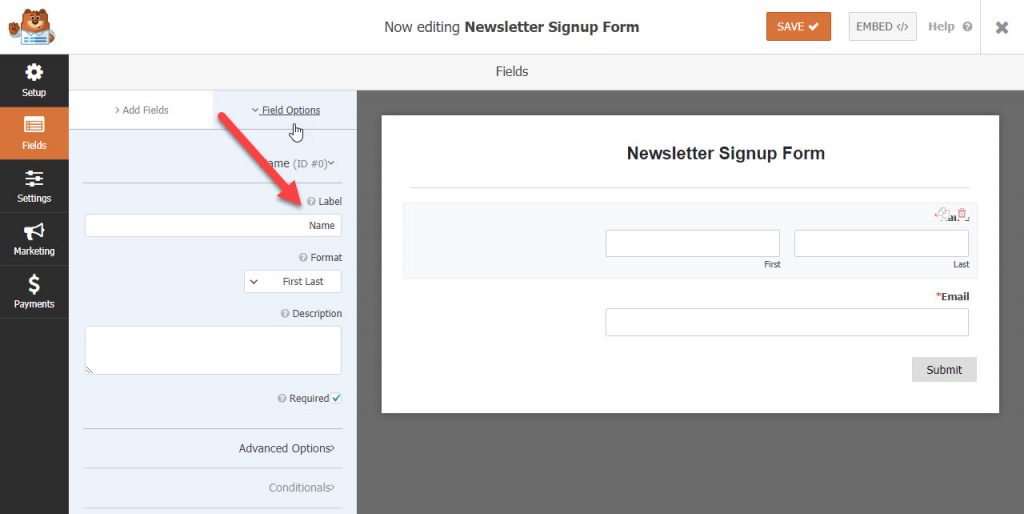
Click on the custom field you want to modify, for example: Name field
It will show you the properties of the field that you can modify. For example, let us modify the word Name to an appropriate Arabic name that expresses the field. Let it be : Name.
The same applies to assigning the email right and the send button.
The following figure shows how to change the rest of the fields to names in Arabic
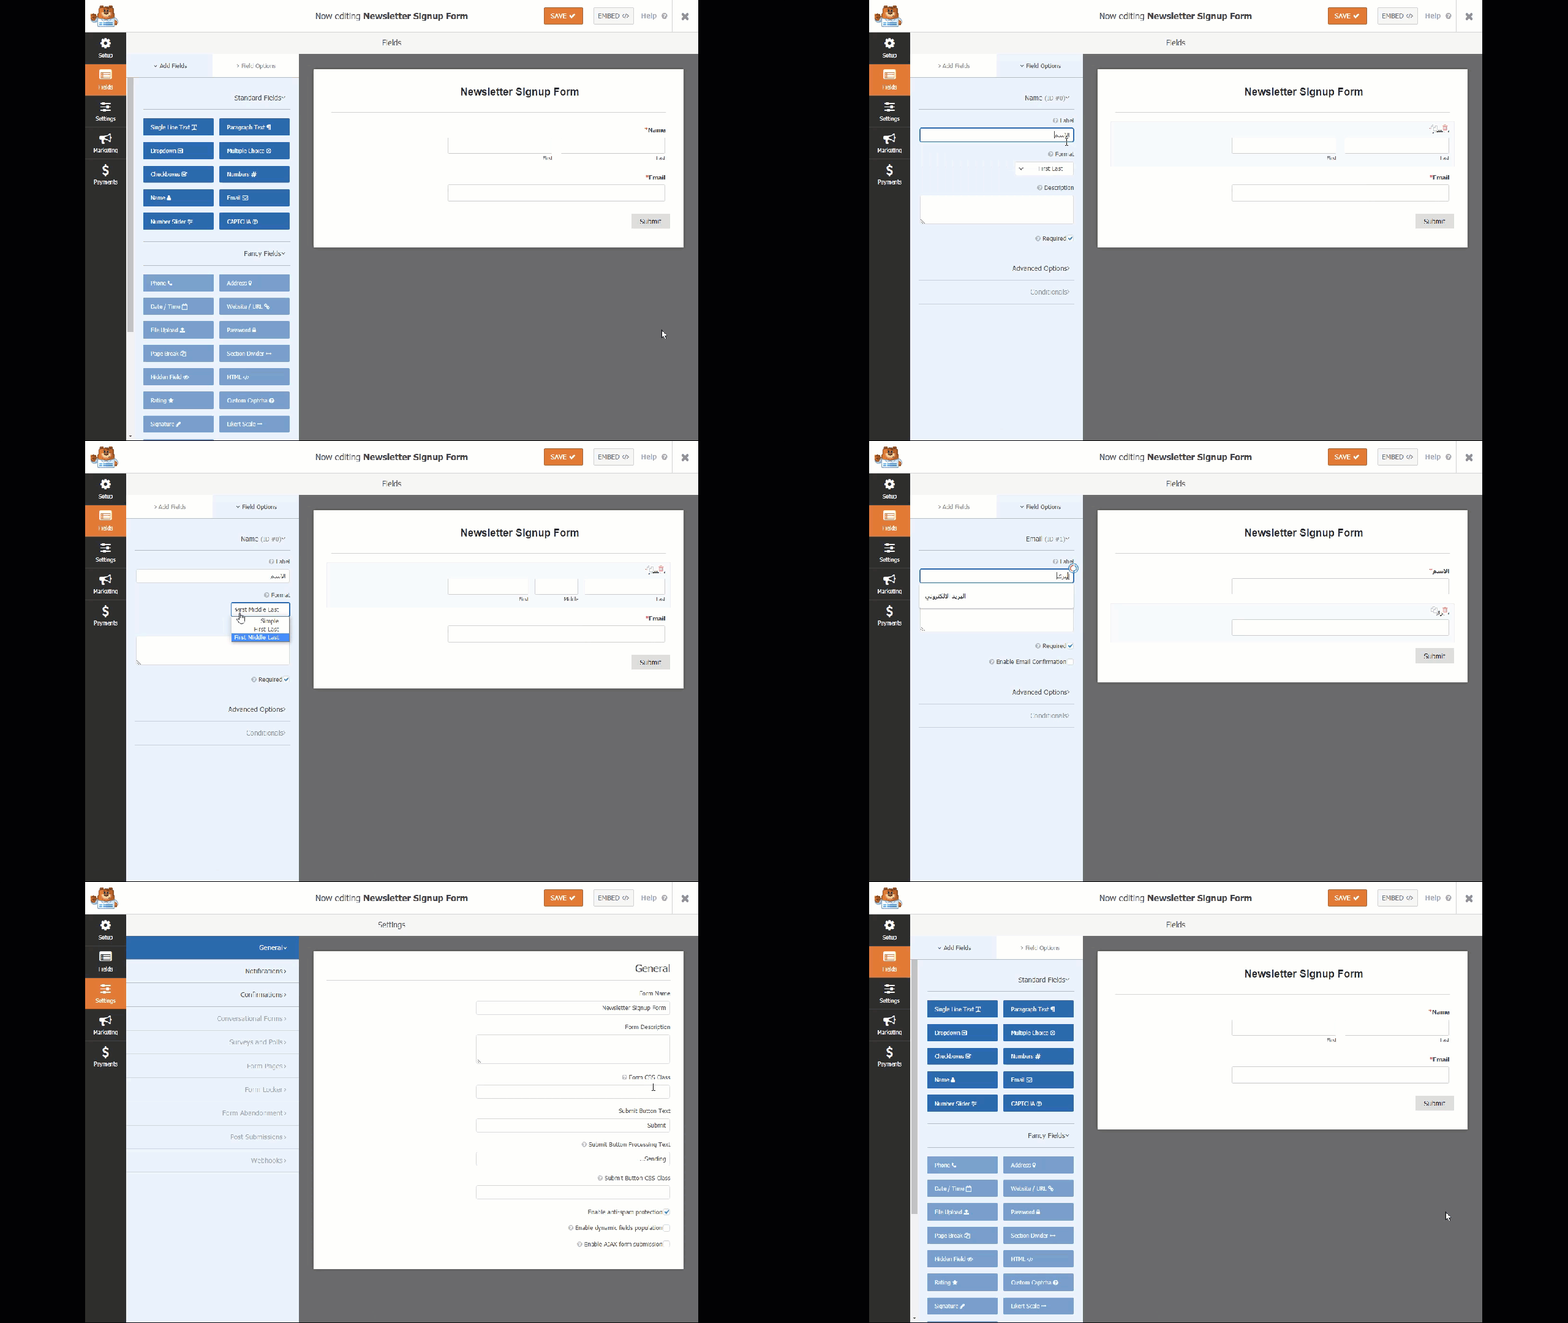
To change the title to Arabic, do the following procedures as shown in the figure
Thus, the form is ready and you can use it in the designated areas on your site. The user fills out the form and the filled-in data comes to you.
After that, there are settings, analytics, and other functions that the extension offers you that are important to keep in mind, and we will talk about them in the next part of the article.
Statistics – Analytics
Of course, one of the most important pages whose visitors you want to track is the form page, and knowing the analyzes and statistics of the visitors who interacted with it is useful to ensure that you are on the right path.
To activate and use analytics, go to the WPForms tab and then choose Analytics

On the first screen, you will see a request to connect with a very famous add-on in the world of analytics, which is MonsterInsights . If you want to connect the add-on, click the Install MonsterInsights button.

With our MonsterInsights addon, you can easily track the form and visitor entries and whether they are satisfied with the form by tracking the numbers that leave or fill out the form.
Settings – Settings
The next part of the plugin tools that you need to take care of is the settings part, which you can manage by going to the WPForms tab located in the sidebar of your WordPress site, then choose settings from its submenu in order to make the basic settings for the plugin.

In the first screen that appears to you, under the “ General ” tab, through which you can activate the Pro add-on if you have a license key, as well as include the CSS file, which is for user interface designers, and you can activate troubleshooting for the add-on to correct it later, and GDPR can be activated, which is General Data Protection Regulation (regulation of the European system for the protection of users)

Then we move to the next tab, which is Email, which is used to set up messages that are sent by email in response to what is entered in the forms from users.
To send a personalized e-mail after the process of filling out the form that you will add, where you can choose the form of the sent form. Do you want it in the form of plain text or in the form of an HTML web page? You can also add an expressive image above the text, as well as make the background of the form a specific color, and whether you want to show the e-mail address. Sender or not.

Now go to the automatic verification method “ Captcha ”, which is a method used against people who use spammers with the aim of promoting some random links.
You can add a Google verification method and choose the verification version. There are two types for version 2 and one type for version 3 (it is better to choose the second version, CheckBox reCAPTCHA v2). It only requires choosing the check box and makes it easier for the user to enter, but it adds some extra work to the site administrator to remove spammers or bots. (Annoying programs) ( This link is for how to get the two link keys from Google ),

Then comes the next tab in the settings tabs, which is the Validation tab, from which we will create verification messages or clarification messages for form fields (such as messages that show the email entry field if a correct email is not entered, and other messages). Messages are written upon incorrect entry and you can write them in the language Arabic for easy user understanding
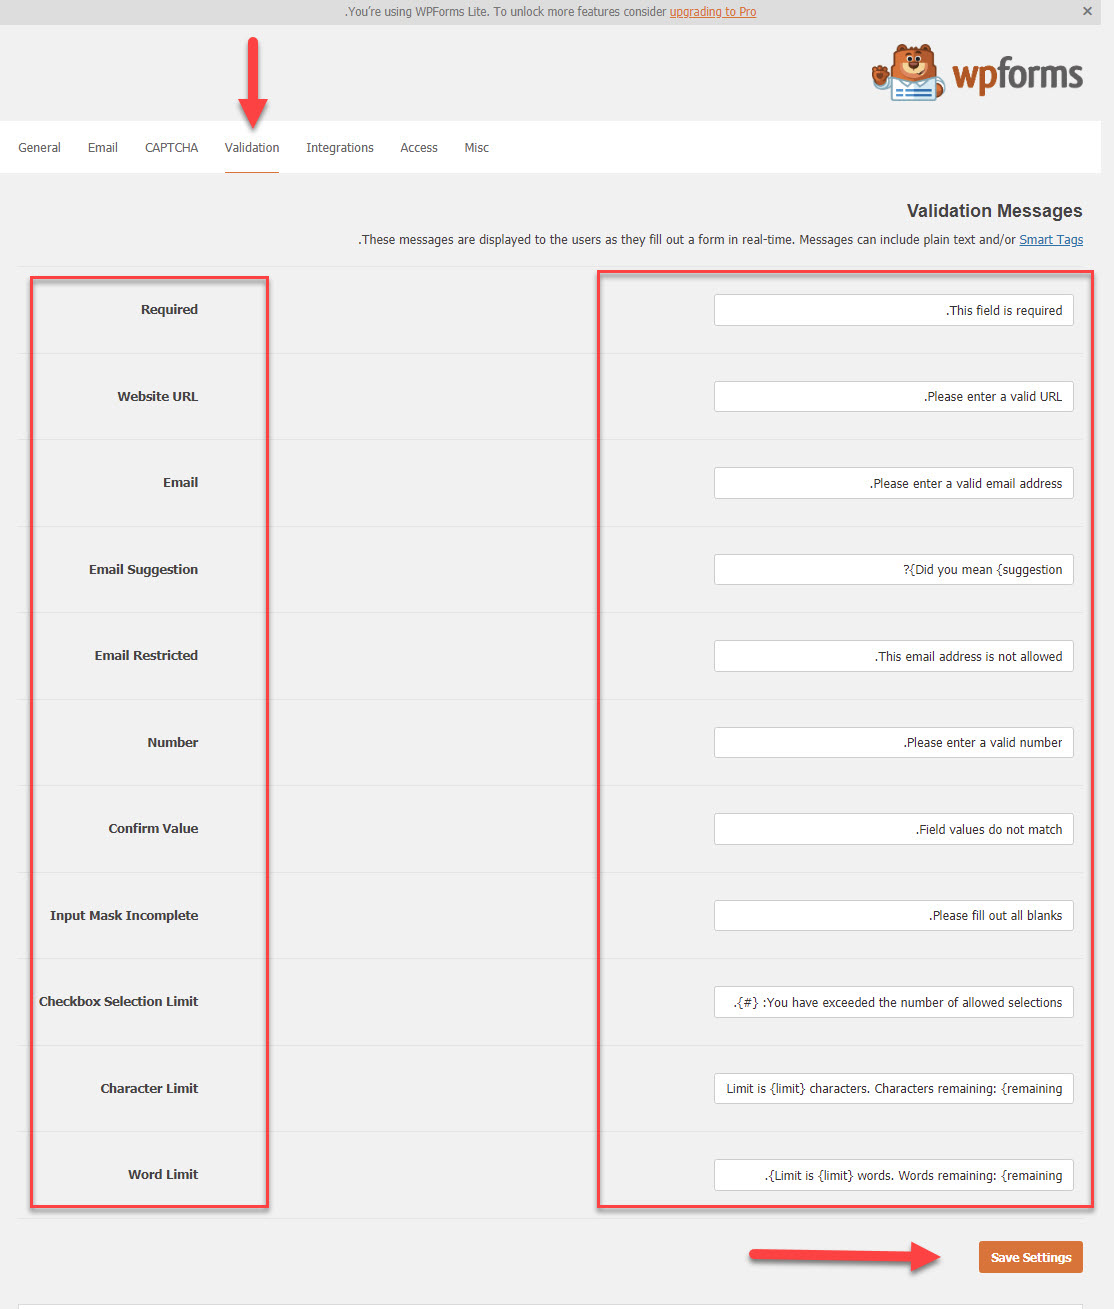
Then comes the next tab, which is the Integration tab .
This tab is used to manage and integrate the popular email add-on Mailchimp with the WPForms add-on, in order to send personalized emails, as well as some other tools that can be integrated with WPforms.
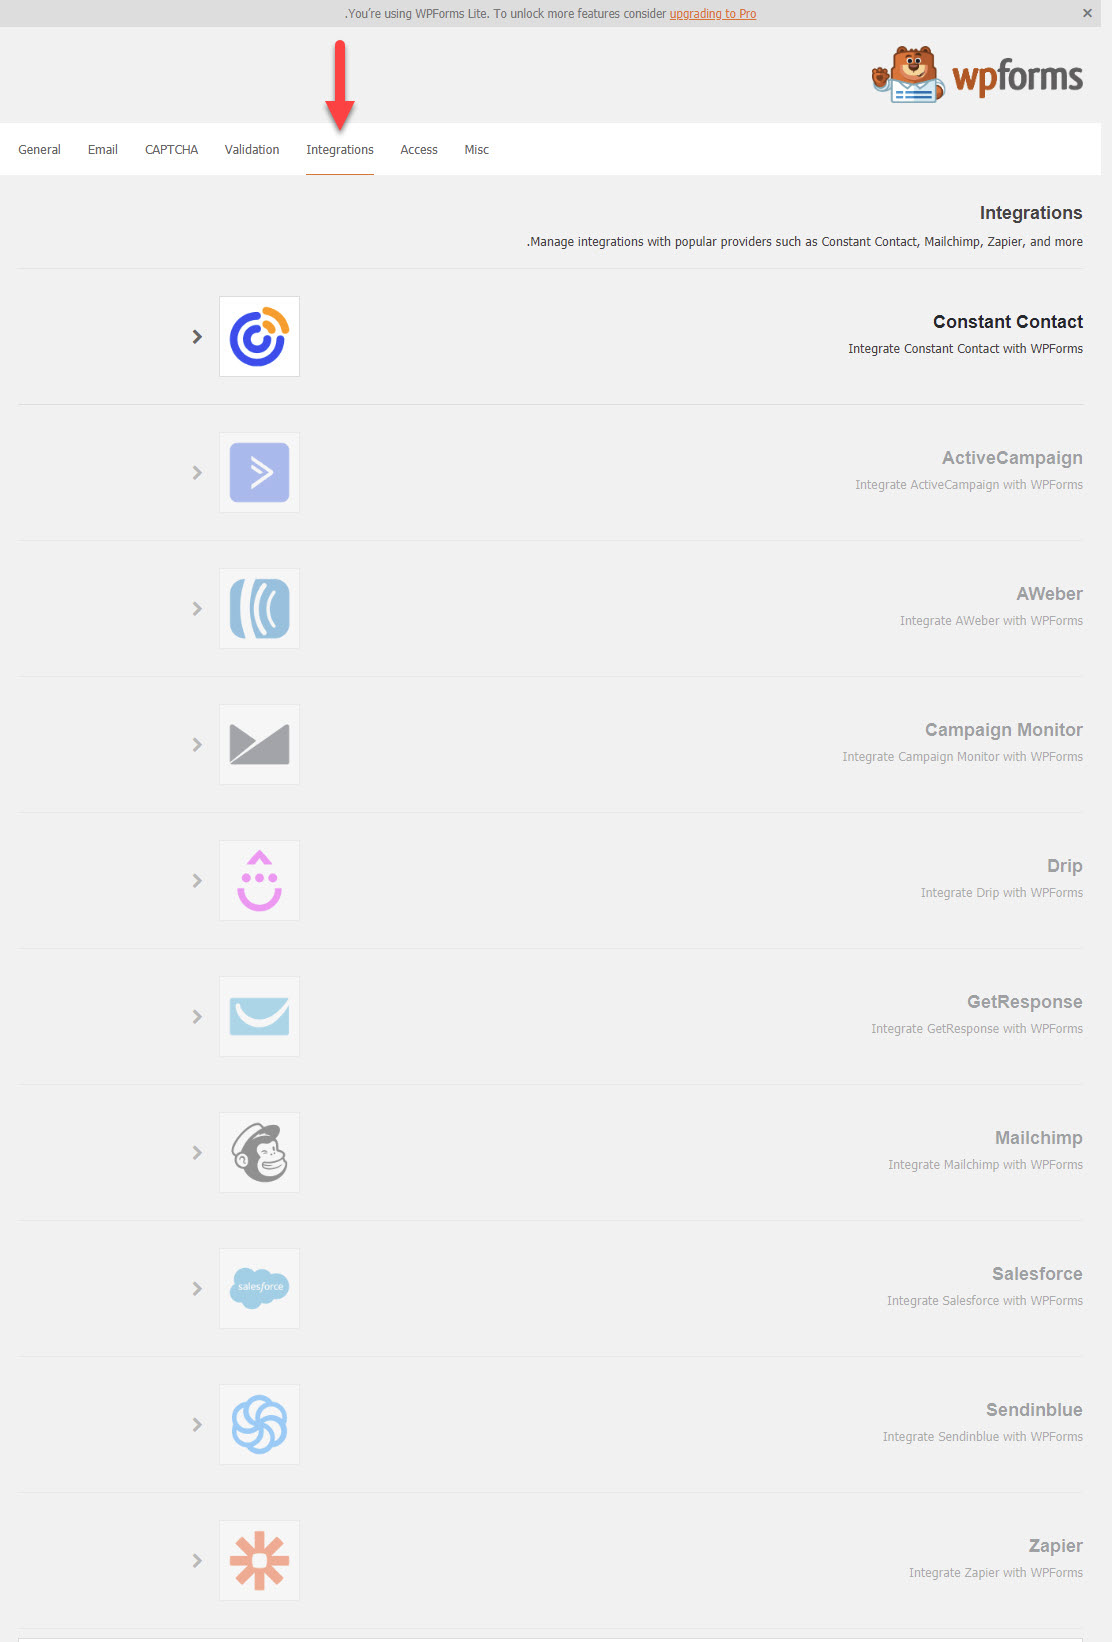
Then we move to the next tab, which is for some other miscellaneous items ( Misc )
This tab is used for some miscellaneous settings that you manage additionally, such as:
- Prevent advertisements and update details from appearing by add-on developers
- Prevent the WPForms plugin menu from appearing in the WordPress top bar
- Clear all data if you want to remove the extension permanently.
- Prevent any information about you from being sent to the extension developers
- Prevent receiving any e-mail from the add-on developers
All of these settings are activated through the Misc tab, where you choose your preferred settings and then click the Save Settings button.

Tools
The tools provided by the plugin that you go to come through the Tools tab , which contains some important things in using the plugin

You will find that the tools are available on 4 tabs:
- Import
- Export
- System Info
- Scheduled actions
- logs
We review the explanation of these tools as follows:
First comes the Import option , which allows you to import forms from any previous add-ons, or even from ready-made forms prepared by WPforms on another site and you want to import those forms completely. You can do that through this option

Then comes the Export option to export any form you have made and saved to any other site. The WPForms add-on system is based on it. You can also export in order to save the forms on your computer to use as a backup copy later to avoid wasting your effort.

Next comes the System info option, which contains a set of details about your site, such as memory limit and PHP version, which can help determine the cause of some server-related issues.

Then in the Scheduled Actions tab, you can perform some actions in a scheduled manner, which is specific to developers and allows them to discover the events that occur and is useful in the event that errors appear.

Then you will find the Logs tab, which is also an option for developers and support to make any correction if an error appears in the add-on.

It is worth noting that you can also use the WP Mail SMTP by WPForms option, which helps you facilitate sending emails to users through the built-in service in addition to,

Thus, we have talked about how to create forms using the WPforms add-on, as it is one of the famous add-ons that you can rely on to build forms on your site. We have explained many of the features that the add-on provides with other integrated services that you can benefit from to enhance your site’s marketing efforts, whether you are a store owner. An electronic website, blog, business website, or any other type of website


Leave a Reply