you have skill or experience in a specific field and want to make yourself known among interested people, creating a Portfolio site to display business models and express yourself is important in your online work journey. Whether you are a designer, programmer, illustrator, writer, marketer or do any work on the Internet, the first thing you should think about is highlighting the gallery of your work.
Today, you can easily design your business gallery using WordPress and customize the site to market your various skills and services, so that it becomes the interface that expresses you and the voice that you use to spread and succeed, and we can summarize the benefits as follows:
- Put all your previous work in one place, so you can market it better.
- Ease of sharing, as you can share your work gallery easily by just sharing the link, anywhere you want.
- Making a Portfolio will help you gain more business and followers and thus be able to improve your sales.
In this article, we will talk about how to create a portfolio using WordPress. Starting from purchasing the appropriate hosting and installing WordPress, then how to choose the appropriate template to create a business gallery, through to the add-ons that help you in your work.
Steps to create a business gallery using WordPress
Let us now talk about how to design and customize your business gallery through a step-by-step practical explanation that does not require programming experience, while explaining all the tips and procedures you need to create your business gallery in an appropriate manner and launch it to users. We can clarify the work steps that will proceed as follows:
Step 1: Choose hosting and domain
In the beginning, when you want to create any website, whether for your business exhibition or other types of websites , the first thing you need is a hosting service , which allows you to upload and store your website files and make it publishable on the Internet, as well as a domain name that enables you to reserve a name for your brand.
There are many hosting service providers and famous brands such as: Siteground, DreamHost, Bluehost, Hostinger, which come with different plans and different prices and provide features that suit different sizes of sites, as well as providing domain reservation services. However, in general, when selecting the appropriate hosting, you need to ensure the performance of the hosting as well. Support, security and future scalability options.

In order to know how to choose the best WordPress hosting for you according to your own budget, we advise you to read the following guide: The best WordPress hosting, recommendations and advice to determine the best option, in which we talked in detail about the most famous service providers and how to determine the right option.
Through the providers of these services, you can also choose a domain, which is usually provided to you for free for the first year, or you can reserve a domain from another company and then connect the domain to the hosting as an additional step, but if you are a beginner, we advise you the easier option, which is to purchase the domain and hosting from the same service provider in particular. Most of them provide the service to you free of charge for the first year, as we explained.
Then, after completing the process of obtaining hosting and domain, you will move to the second step, which is installing WordPress.
Step 2: Install WordPress
After obtaining hosting and a domain, you will find many content management systems that you can rely on, but in this article we will rely on the WordPress system , as it will provide you with many features that facilitate the process of creating a professional website for your business exhibition with ease, and you will find the following in it:
- You can create and design a website for your business yourself, without the need for previous technical experience, due to the ease of the system and its tools.
- You can create a gallery of your work on WordPress, on a limited budget, and customization options come with different templates.
- Component editor ( Gutenberg ), which helps you create and design.
- The possibility of expanding your site in the future, adding new pages or new services (for example, adding a blog attached to the site, or selling your products and services )
- WordPress provides you with many ready-made templates that you can work on directly and design your site, such as the portfolio-web template , Neve Portfolio , RT Portfolio .
- Many add-ons that help you create a gallery of your work or create a private gallery for your photos or video clips, such as add-ons ( Portfolio & Gallery , TLP Portfolio plugin )
Therefore, after choosing the hosting and domain, you must start installing WordPress on the hosting, and the installation process will differ slightly depending on the hosting company that was previously chosen, but in general, most hosting companies provide the ability to install WordPress with one click (One Click Install), with ease and within minutes. .
You will need to enter the control panel ( CPanel ), search for the option to install WordPress, and then install it (you will need to enter some information such as your username, password, description of your site, etc.), and we talked in detail about installing WordPress on hosting in the guide: Downloading and installing WordPress On hosting .
After installing WordPress on the hosting, you will find that the appearance of WordPress is as follows:

After installation and installation, we will move to an important step, which is knowing the templates and plugins that must be worked on to create and design a distinctive and professional business gallery website.
Step 3: Choose a theme and plugins
In the third step of creating a business exhibition website, you will need to choose the appropriate template . There are many free templates dedicated to business exhibitions, which come with great customization capabilities that help you display your work in a wonderful way, the most famous of which are the following:
- Infinite Photography (contains demo models, which you can download and modify)
- Perfect Portfolio (contains demo models, which you can download and modify)
- Clean Portfolio
- Timber Lite
Read also: The best free WordPress templates for designing a business presentation
You can choose any template suitable for you, but we will continue this explanation in this article, the Infinite Photography template, which comes with some ready-made designs, which you can download and modify as you wish.
Install the Infinite Photography template
In order to install this template, you must go to the WordPress control panel, then to Appearance << Templates << Add New

After that, we type the name of the template in the search box, then choose the specific template and click the ( Install ) button, then (Activate)

After that, click on Get Started With Infinite Photography to activate the ability to obtain ready-made designs to work on and modify their content.

You will find a new window appearing showing you to choose the design available to you, and import it by clicking on Import. You can also preview the design through Preview.

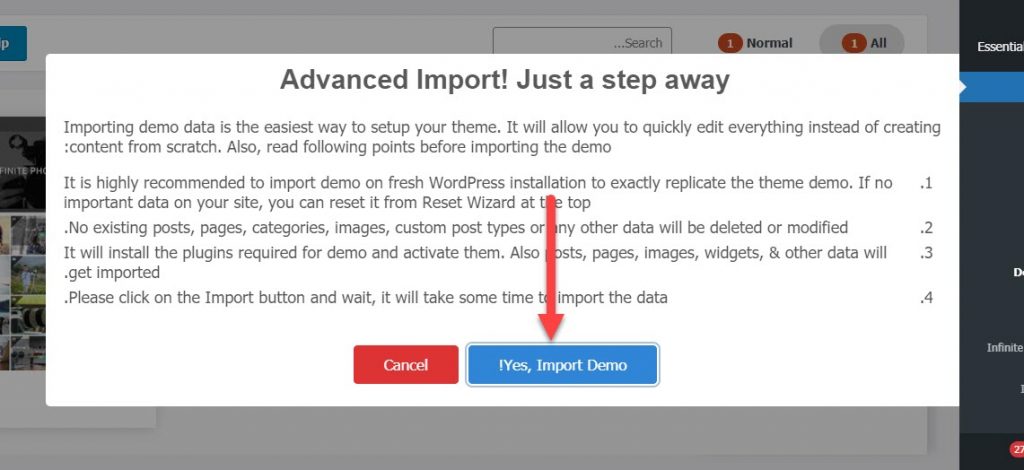
A window will appear containing some instructions, and you must click on Yes, Import Demo

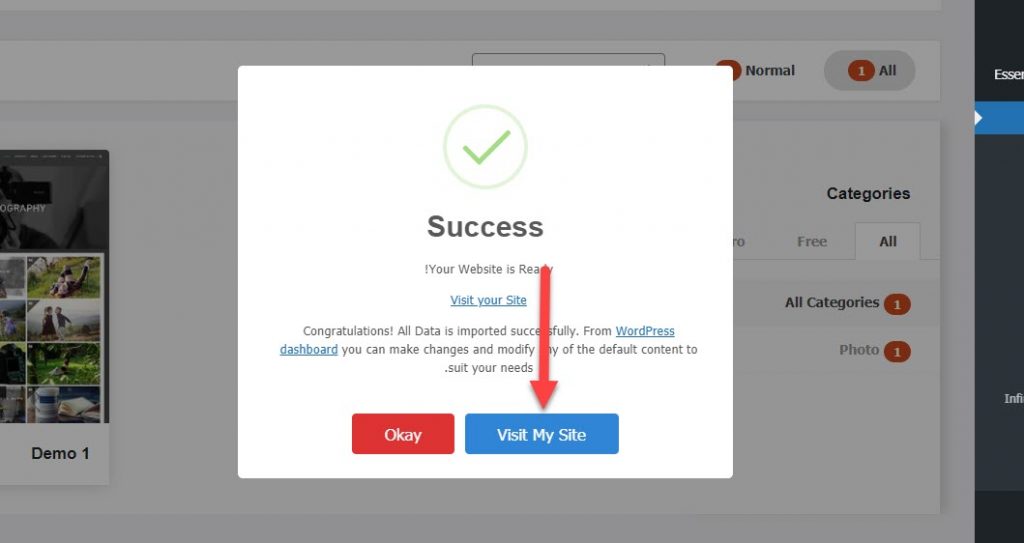
After that, a message appears, stating that the data has been retrieved correctly, and you can start browsing and modifying your site

You can preview what your portfolio looks like by clicking on Visit My Site , so your portfolio will look similar to the following animation. You will notice that sometimes an error can occur while importing some images.
So far, we have installed the Infinite Photography template, as well as installed and imported a design ready to work on it. Now we will choose some suitable plugins that will help you create a distinguished business gallery website, and you can choose one of the following:
Read also: The 16 best WordPress plugins that every website owner needs
In this explanation, we will use the Portfolio Gallery add-on , which is one of the distinctive add-ons to create a business gallery or photo gallery in a simple and easy way.
Install the Portfolio Gallery add-on
From within the WordPress control panel, you must go to Plugins << Add New , then type the name of the plugin in the search box and click Install Now.

After that, click Activate to activate the add-on

After that, you can see the plugin, inside your WordPress dashboard, integrated into the toolbar as follows:

Then, use the add-on and create a business gallery or photo gallery, by following the following steps:
First , you have to go to the Filters option, where we can add some categories, in order to create some navigation and filtering options within the gallery.

Simply write the name of the new category, and click Add New Category
Secondly, you must create a new gallery, by going to Add New Gallery

Where you can add photos to your work gallery, as in the following image


After that, you have to click on Publish to publish the gallery of work that you added

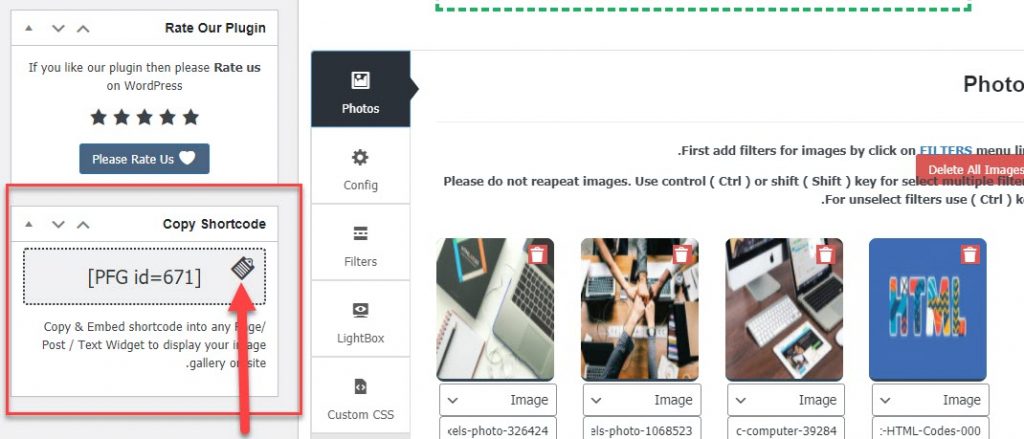
Then you have to copy the short code located at the bottom left of the page

Third, after adding the photos, publishing the gallery, and copying the short code, you still have to create a new page and put the code inside it, so that your photo or work gallery becomes online. You can create a new page by going to: Pages << Add New, where a new page will open for us, We put the short code inside it and publish it.

After that, you can click on Preview to preview the gallery.

The result will be as in the following animation:
Fourth, the add-on gives you many features to control the gallery and how to display images, texts, etc. by going to the Config option

At this step, we have an installed template for our website with a ready-made design, and we also have an add-on to add a beautiful photo gallery. Now if you are thinking or need further modifications to your site, you can start by customizing your site or customizing the template.
Here are some quick tips as you build your portfolio:
- It is recommended to list all your previous projects that you have worked on (you should choose only the best), in order to have a diverse gallery of work, and thus gain more clients.
- It is recommended to include the opinions and evaluations of previous clients, so that the visitor can judge for himself the quality of the work you provide, thus adding more credibility to your business.
- You should make good use of videos and photos in your gallery so that users will interact more
- Create a special section in which you talk about yourself, your vision, your goals, and your experience, so that visitors can get to know you better
Step 4: Customize the website and portfolio
The Infinite Photography template, chosen in Step #2, offers us many options for editing and customization. Where you can customize your site as you want. To customize the template, go to Appearance << Customize

A page will open for us to customize the site, as in the following image

Here you can access the available options and modify your site as you wish. Some options in the picture
- Header Options, to modify the header ( header of the page ).
- Feature Section Options, to modify the large featured image on the site.
- Footer Options, for modification at the bottom of the page, or as it is called footer
- Layout/Design Options, options related to page design and appearance
- SinglePost Options, options related to the appearance of articles and how they are displayed
- Gutentor Options, options related to the editor being used
There are also many options available, which you can work on to design your own business gallery website.
Now you have a distinctive business gallery website that displays all your work in a unique way and introduces you perfectly. You can now publish this gallery among people who are interested in the services you provide to them and show your expertise in a way that strengthens your personal brand. If you do not have any questions about something that is not clear, post it. In the comments, we will answer you, God willing


Leave a Reply