You represent an Islamic institution or the owner of a charitable organization or non-profit organization that needs donations to continue its work and expand its assistance to the largest possible number of people that the institution serves, then creating a website helps you reach more people to donate to your organization who want to support it. Your efforts and contribution by donating to you.
Also, if you have a special project that benefits society and you cannot obtain financial support from funding bodies, you can also create a website to share your idea and obtain financial support from strangers who believe in your idea and in the good that can be achieved through your achievement.
In this article, we will learn about the most important features and features that you will get from creating a donation website using WordPress, and using one of the plugins designated for that, step by step.
Examples of fundraising sites
Fundraising sites vary depending on their purposes and founders, and we will present the most important types spread across the web, giving an example of each type
Charitable societies: In every city of every country there are many diverse charitable societies that provide different services in the Islamic, food, scientific, health or other fields. Most of these institutions depend entirely on donations. She began creating websites to expand the circle of donors and make it easier for them.

Non-profit organizations: You have likely encountered a paid advertising campaign for an international non-profit organization asking you to donate to help the poor. Such as the World Food Organization, which obtains its funding through donations, and one of these ways to donate is its official website.

Supporting projects and innovations: It is considered one of the most important innovative ways to support owners of projects and innovations that did not obtain financing through traditional methods through banks and investment institutions, and provides them with platforms to display their projects and innovations in order to obtain financing through donations from interested parties. Some of them are loans that can be recovered and reused for other projects, while others are considered grants with the aim of supporting social projects.
Basic rules before building a donation website
Your chances of getting donations increase if you do proper preparation before building a fundraising website. As part of good preparation, you must perform the following tasks:
- Clarifying the project or goal
: You must choose a specific project and clarify it (spreading Islam, caring for orphans, supporting some groups of society, helping students…) whose implementation will lead to achieving measurable goals and objectives, and that this project should provide services that the target groups need. Because donors want to support others through you.
- What will you do with the money?
One of the things that will make it easier for your site to receive donations is your clarity in defining the areas in which the money will be spent, and having feasibility studies and advance invoices that clarify the doors through which these donations will be spent. In general, the more specific your organization is, the better its position in requesting donations.
- Obtaining accreditation from official bodies
is not a requirement for building a fundraising website, but it is an essential step in building credibility and trust with donors. Accreditation gives a positive image of the seriousness of your site and confidence for donors that what they give will definitely go to the advertised entity. - Determine the type of donors
After completing the preparation of the project proposal, it will be easy for you to identify the donors whose interest and areas of specialization this project falls within. You will also have a rough idea of the amount of funding you need, and thus you will know the target group of your site if they are natural persons with small donations, or You need to reach large organizations and companies that will support you with huge donations.
Objectives and benefits of creating a fundraising website
Creating a fundraising website has many benefits, the most important of which are:
Expansion and spread: The most important thing that this digital world is known for is the huge number of users, which made the saying “the world has become a village” circulated globally since the 1990s. You can reach millions of people through a website for people who want to give and are happy to make donations that improve The lives of others, even if they are in the other part of the globe.
Collecting huge sums from small donations: For example, if the number of visitors to your site is 100,000 visitors per month, and 10% of the site’s visitors donate, and each visitor donates $1, then you can collect $10k, and you can calculate the number of possibilities depending on the number of visitors and quantities. What is expected from the donation, especially since the donation process has become easy with one click.
– Expanding the area of activity: If you are actively serving a small area of the needy group, after receiving a donation, the scope of your association can be expanded. For example, you can expand from a local association serving the people of the city to a national or international association, by allowing the participation of more volunteers and opening more From the branches. Easily by subscribing to your site as volunteers.
Communicating your ideas to a wider extent : With the same principle that the Internet provides you with in spreading, and through the same fundraising site, you can also communicate your ideas to a larger number of people. For example, if you represent an Islamic association, you collect donations to take care of orphans, and spread the importance of that in religion. Islam using Qur’anic verses and Prophetic hadiths.
In the following lines, we will explain practical steps that you can implement yourself to create a donation site based on the WordPress system. If you want to hire someone to build the site for you, you can create a new project on an independent site , requesting all the requirements for your site so that someone can do them for you.
Steps to create a donation website
1- Determine the goal of donations
First, you need to determine the goal of the donation process. As we mentioned previously, you must clearly define the idea and goal of creating this website and the services it will provide after collecting donations. These are basic points that you should clarify on your website:
- General message : This is the ultimate goal that you are working on through this website, and this activity, for example: to provide a decent life for Muslim orphans.
- Objectives : They are part of the message, but they are time-bound and measurable. Example: To sponsor 100 orphans during the year 2021. This includes sub-goals such as: Building an orphanage in the first half of 2021.
- Values : These are the standards that govern our goals, such as: good treatment, Islamic education, education…
2- Obtain hosting and a domain
WordPress is considered an open source content management system that is installed on hosting, and your choice of hosting site depends on your own vision of the contents of your site (if you want to add articles, videos, user accounts…) and your needs for the features that each site offers, such as storage capacity, data transfer speed, security, And other features
There are many famous international hosting companies that can be relied upon, such as ( SiteGround ), ( Bluehost ), ( Hostinger ), and others. These companies offer a different set of hosting plans that vary in cost and available resources.
The domain or domain name is the address of your website, such as google.com. It is very important that you choose a name that gives a preliminary understanding of what your site is. You can get a free domain name in some hosting packages, such as those mentioned above. Or you can buy it from websites dedicated to selling domains.
3- Install WordPress on the hosting
After completing the hosting reservation and domain name, you will install WordPress on the hosting through easy steps. Some hosting companies enable you to install WordPress automatically once you finish registering for the hosting service, meaning that if you reserve your hosting from these companies, there is no need to install WordPress manually. Rather, you can install it with one click. We have previously explained how to install WordPress on the hosting service provider.
4- Choose the appropriate template
There are thousands of different templates depending on the type of site you want to create, including free and paid. You can choose and install whatever you deem appropriate, after searching and browsing on the website www.Wordpress.org , which contains more than 3,900 templates. By changing some characteristics such as color and font type, you can reach more than 8,000 templates.
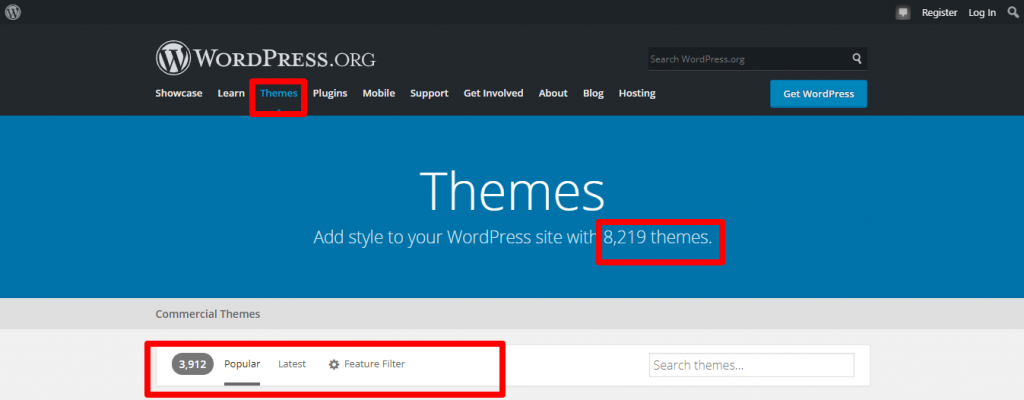
You can also obtain other templates from dedicated online stores, such as: Themeforest , Evnato , and Mojor marketplace .
Read also: How do you choose the best WordPress template for you? 8 practical steps
5. Install a custom fundraising add-on
In the next step, you will need a custom add-on to help you develop an integrated system for receiving donations, instead of coding the system to process payments and receive donations from contributors. There are many add-ons that fulfill this purpose, so let us explain among them the Give WP add-on , as it is the most famous add-on for creating a fundraising website. With ease and many features. It has been installed more than 100,000 times, and received a rating of 4.9 out of 5. The add-on contains a free version as well as a paid version with higher features. The addition features the following:
- Multiple payment gateways: You can choose a payment gateway from among the 15 available gateways, the most famous of which are (Paypal) and (Stripe).
- Show the goal of the donation: and follow it on the website. As an example, you can show that the goal of the donation is to reach $10,000, and show progress toward achieving this goal through the amount or percentage achieved.
- Various and adjustable display styles: There are many display styles with adjustable properties, such as buttons, color, etc
- Complete statistical data: You can obtain all the data from the number of donors, payments, number of clicks…etc. automatically.
- Recurring donation subscriptions: You can allow donors to sign up to donate on a recurring basis, (e.g. monthly donations)
- Integration with marketing tools: You can add different marketing tools such as (Mailchimp) to get better results.
You can install the plugin from within your WordPress site by going to your site’s control panel. Then click on the ( Additions ) section and then click on ( Add New ). Type the name of the add-on in the search box (GiveWP) to appear among the search results, then click on Install Now , then Activate.

Then, after activating the add-on, the phrase (Givewp Test Mode Active) will appear, which means that the experimental system for the add-on has been activated and means that it is installing the add-on to receive donations experimentally and not in real life.
Add-on settings
You can go to the add-on settings through the section that has been added to the sidebar of your site’s control panel under the name ( Donations ).
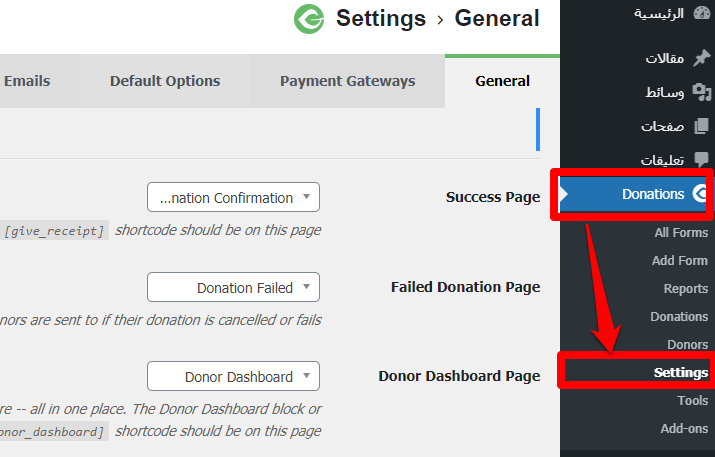
General Settings
It has sub-settings:
- General : When you enter the general settings, and under the subtitle (General), you will find that the settings for the special pages were done automatically, such as :

- Success Page: A corresponding Donation Confirmation page has been automatically created. It is the correct setting, and it means that when the customer makes a correct donation, he is taken directly to the donation confirmation page.
- The Failed Donation Page corresponds to the Donation Failed page, which is the page that the customer automatically goes to if the donation process fails.
- Donor Dashboard Page: This is the data interface page for donors where they find all their data
- Skip the old donation management page: (Enable), meaning use the donor page instead of the old donation pages
Leave these settings in this order, because the plugin has automatically added pages to your site that contain codes specific to each page. You can find it by going to the Pages section, then clicking on All Pages

Then let’s complete the rest of the general settings by going to the bottom of the page
- Currencies
The second sub-setting is for the general settings. You can access it by pressing the ( Currency ) button and modify it as follows:
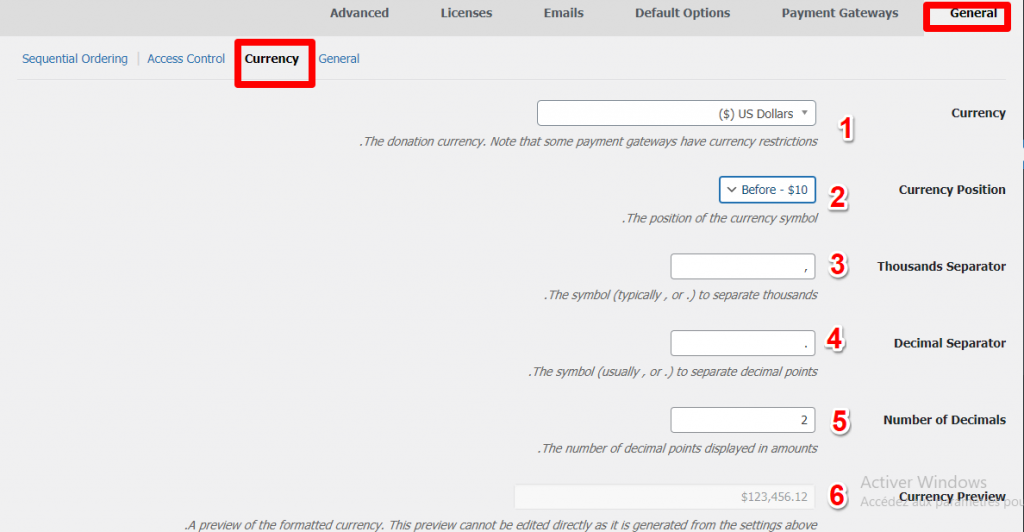
- Choose the type of currency you would like to receive donations in
- Do you want to add a currency symbol to the right or left of the value ($10, $10)?
- What do you want the commas after the number 1000 to be?
- What do you want the separators for decimal numbers to be (1.00) or (1.00)?
- How many digits are after the comma?
- See the shape of the number after the previous settings
Then click on Save Settings
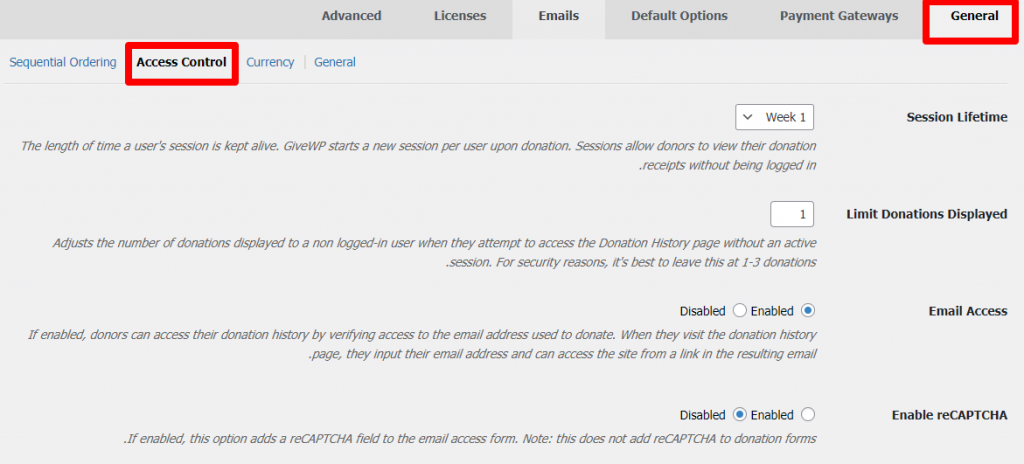
- Access Control
The login permissions settings relate to the donors’ access permissions to their pages, such as the number of times the donation appears, access to the email… (It is better to leave the automatic settings)
2.Payments Gateways
Sub-settings are included under it
- Gateways : You can choose the payment gateways you want to use by placing a check mark in the corresponding box under Enabled.
You can change the name of the payment gateway to what suits you under (Label)
(Initially choose Test Mode or Test Donation to test the site and payment settings, then change it before launching the site live)
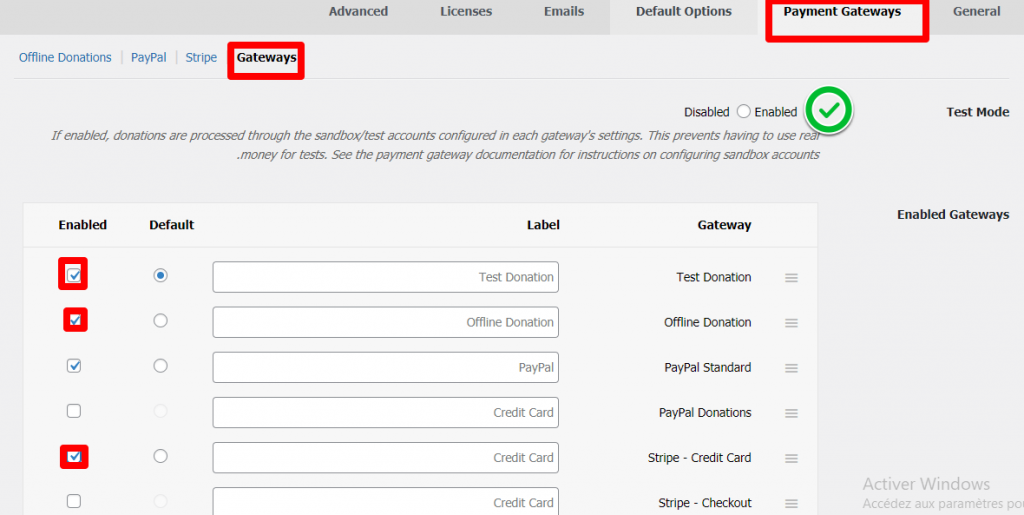
Then you will find that the payment gateways listed are as follows:
- Stripe : Link your site to a Stripe account by clicking on (Connect With Stripe), then adjust the account settings.
- PayPal
- Enter your PayPal account email
- You can create a PayPal page, or leave it blank (automatic setting).
- Transfer Type (Paypal Transaction Type): Choose (Donation)
- Shipping and billing address: Select this, if you have a billing address
Then do not forget to save the settings by clicking Save Changes
3. Automatic features (Default Options) : It is better to leave the automatic settings, because they require technical knowledge to make changes without compromising the effectiveness of the addition.
4. Emails It is one of the important settings for e-mail messages, and it includes the donor email (Donor Emails) and the basic messages that reach donors from your site have been added.
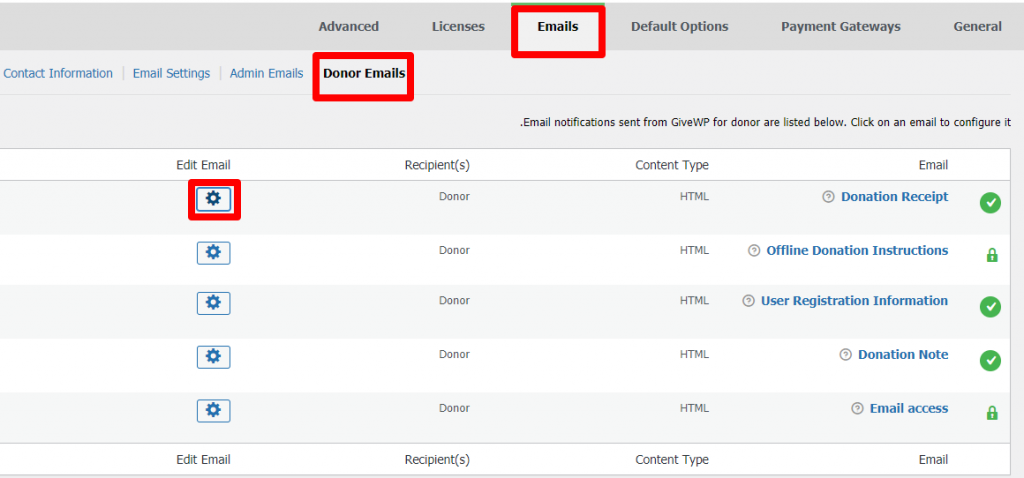
You can click Edit below the title of each message. Or the edit mark at the end of the line to modify the email address and text. Without changing the exact arrangements for the name, transfer value…etc
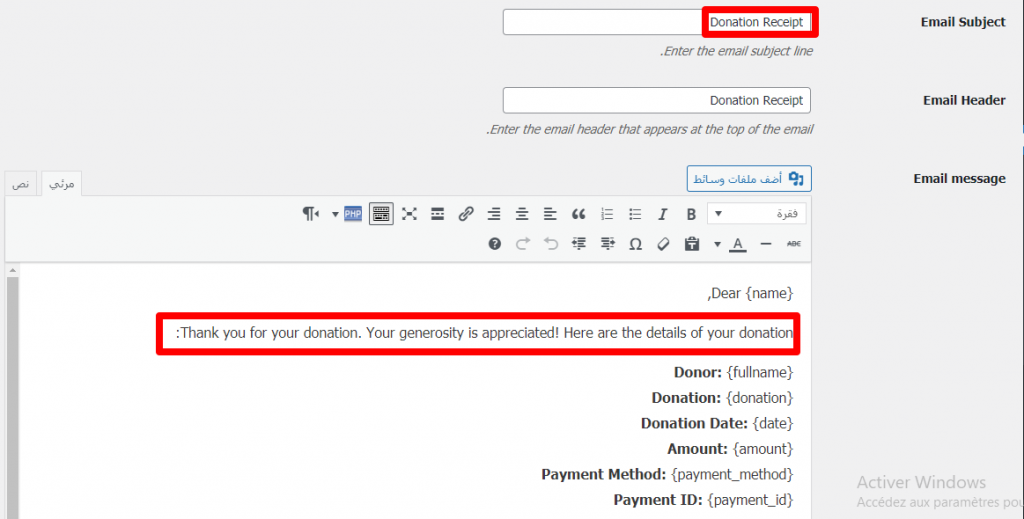
In the same way, you can modify the e-mail messages that reach the site manager (Admin).
5. Licenses
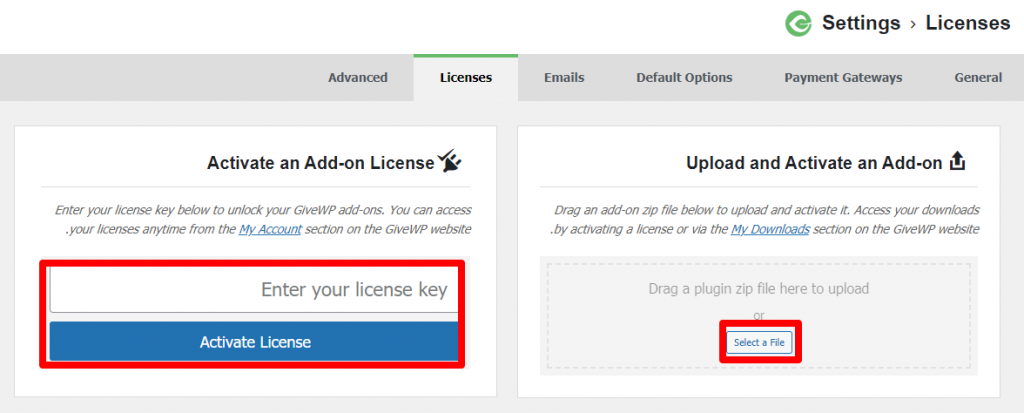
If you purchased a paid version of the add-on and want to activate your license, you can activate the license through this tab by entering the license code in the designated field, then clicking on Activate License or uploading the license file in the Upload and Activate an Add – on box.
- Add forms:
After completing the add-on settings, we move to the next step, which is adding the donation request form, through the sidebar of the control panel. Click on (Add Form) under the (Donations) section.

- Choose a title for the form
- Click (From Template) to work on the suggested templates
- You can browse more models after upgrading your registration to paid packages
- The Legacy Donation form is intended for individual donations. Click on Activate
- The Multi Step Donation form is for recurring donations. Click Activate if you want to give customers the option of recurring donations (monthly, for example).
We will initially work on the individual donations form by activating that form and clicking on Activate. Then, after activating the form, a window will open for you below it to choose the general form shape, the buttons, the areas in which they appear, and the name of the button.
In the (Display Content) option, you will be able to upload an image or video as the interface for the donation form

Donation Option
- Set Donation: By specifying a single amount for the donor, and with the possibility of leaving a space for the donor to specify the amount himself.

- Specify the amount
- Allow the donor to allocate the amount
- Determine the minimum and maximum donation values
- Add a title to the amount allocation space
You can also specify a multi-level donation by selecting the (Multi-level donation) option.
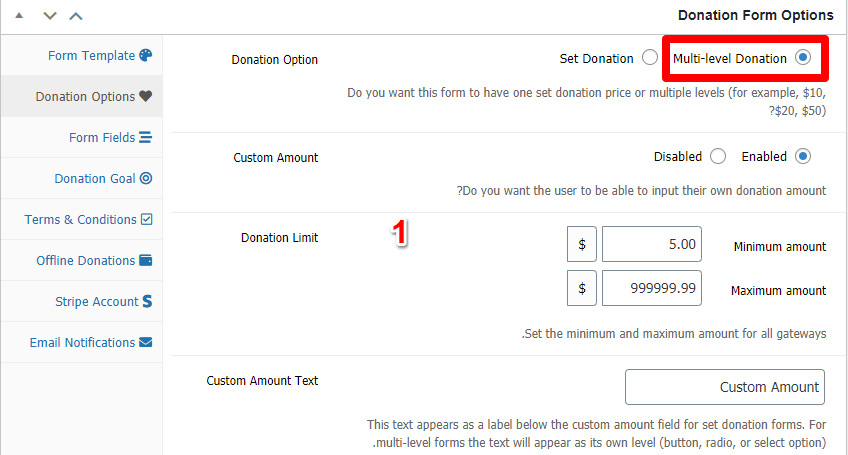
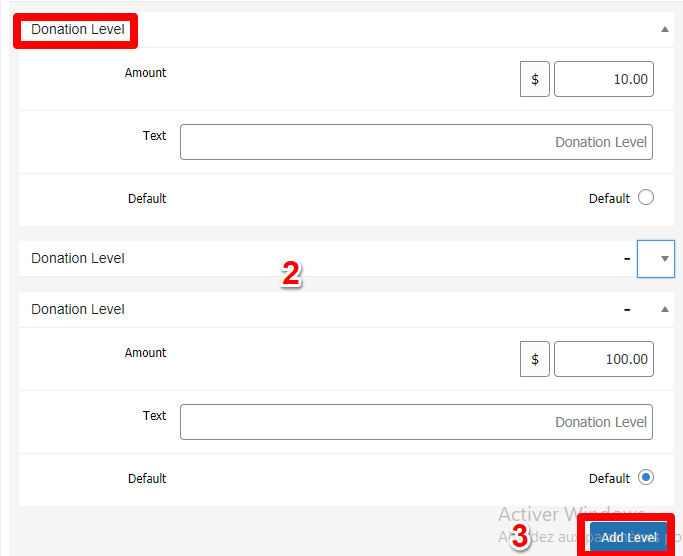
- The same options td set donation limits and the possibility of allocating to the donor
- Adding several levels of donation, specifying the amount and name for each level. And the option to automatically appear.
- You can add a new level by clicking (Add Level)
Form Fields
Choose the fields that will fill out the form, from several options:
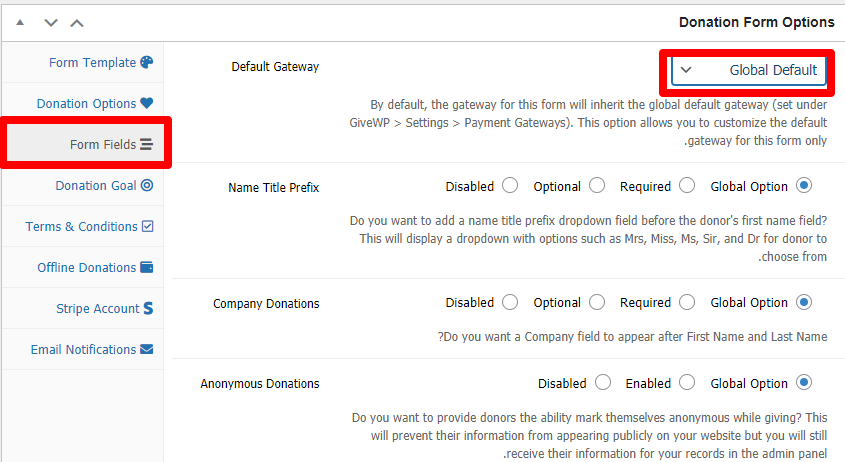
- Global Field: Includes all settings and all payment gateways
- Test Donation: Show a test payment gateway
- PayPal Standard: Show PayPal
- Stripe: Show the stripe
- Donation Goal
If you want to show the goal you want to reach from the total donation, or a specific donation, and show progress towards achieving this goal, adjust the following settings:

- Enabled target
- Format How do you want to show progress towards the goal? (Percentage, amount achieved, number of donations, number of donors)
- The goal to be achieved (amount in numbers)
- Ribbon color
- Close the donation form once the goal is achieved
These are the basic settings you need for your donation form. You can modify the rest of the settings, such as policies and procedures, and email alerts if you want
after completing all the settings. Click Publish

To view the final form, click on (View Form) or on the permanent link that will take you to the donations page

You will find that the final model contains the basics


- Form title
- Progress column in achieving the goal
- picture
- Donation types are clickable
- Payment gateways
- Donor information
- Donate button (Call to Action)
Of course, you can work on the technical aspect to improve it as much as possible through the distinctive template and appropriate customization of it. But so far, I have created a donation site that is practical and 100 percent effective
To further confirm its effectiveness, make a trial donation and make sure you reach the Donation Confirmation page.
5. Marketing tips for donations website:
After you finish building the donation site and launch it on the Internet, you need to use several marketing methods to deliver it to potential customers and motivate them to donate to your site. and the most important:
- Creating a blog : One of the advantages of WordPress is that it allows you to add a complete blog to your site, through which you write articles on topics related to the site, and by using the correct methods of SEO, you can improve your site’s ranking in search engines. And reach more customers interested in your site’s field
- Share your activities and achievements achieved due to donations : You can upload many photos, videos, and news about what has been achieved through the donations collected on your site. This gives high credibility, and a strong incentive to re-donate from previous customers or from new donors. They want to participate in these achievements
- Launching paid advertising campaigns: You often need to launch paid campaigns, especially when launching, to save time and quickly reach potential customers. This is a method followed by even major international organizations (perhaps you have encountered their advertisements on social media platforms).
- Mailing campaigns: The form that I created contains a special space for donors to add their data, the most important of which is email, which enables you to retarget them through various and recurring email messages.
- After purchasing a license for the Givewp add-on, you will be able to benefit from the marketing methods they offer
- Giving a free gift: Giving and taking are two sides of the same coin. Just as giving is unanimously considered a source of happiness, taking also satisfies the donor and gives him additional happiness. Therefore, it is very important to give a gift, even if it is simple, such as a video clip, a book, an art painting, a letter of thanks… (Be creative in presenting)
If your nonprofit or cause relies on donations, you want to treat your donors right. Don’t send them through a shopping cart or kick them off the site to a third-party platform. GiveWP simplifies the giving process by allowing donors to complete their donations directly on your website using an easy-to-complete donation form. As an administrator, you have the customization options, reporting, and donor management features you need to run successful giving campaigns.
You may have had difficulty using WordPress donation plugins in the past; Dealing with the lack of features, documentation, and support can be a real pain. There is a better way. Now you have GiveWP and an entire support team by your side


Leave a Reply