WEordPress website and blog managers sometimes need to hide the data of articles published on their websites or blogs from the visitor, such as the name of the article’s author, the date it was published, and its classification. On the other hand, the WordPress system does not provide this feature by default, but there are many ways that enable you to do this by adding some code, modifying the code, or changing some settings without using any additional components.
In this article, we will highlight the reasons why we might want to hide various article data from the visitor, and explain the best ways in which this data can be hidden and re-shown.
Why might you need to hide post data in WordPress?
In fact, there are many reasons we could remove and hide WordPress article data from visitors and users, and these reasons range from weak to very strong, such as when author protection is needed.
These reasons vary depending on the information to be hidden from the article data. The reasons for the need to hide the name of the writer differ from the reasons for the need to hide the date or classification. Because the site manager will certainly know when he needs to hide the data of his site’s articles, we will mention here the most important reasons, but not all of them:
- Visually simplify article pages to make them easier to read , as the presence of article data may be a little distracting for the reader.
- When more than one person collaborated on writing the article, you will need to remove the writer’s name, as showing the name of one writer would not be fair.
- If the article discusses or contains controversial ideas , such as political articles that take sides, you will have to remove the name of the article’s author to protect their reputation, work, or even themselves.
Ways to hide article data in WordPress
The methods for removing article data that succeed in performing the task differ from one site to another depending on many criteria, including the template used and the plugins installed. One method may work on one site and not work on another, but we will explain to you here two proven methods that work on all templates. With WordPress, you can almost hide various article data from the visitor, in addition to a third, non-technical method that works on all websites, but can only be used to remove the author’s name.
1. Manually hide article data using CSS
Using CSS, you can easily hide the author’s name, date, or any other article data from site visitors, as you only need to apply a few simple steps. This method can be applied to almost all WordPress sites, but it does not completely hide the article data, as the data will still be present in the site code, but it will disappear from the front interface that appears to the visitor.
To hide post data in WordPress using CSS, carefully follow these illustrated steps:
- Open one of your site’s articles using the Google Chrome browser, then open the ( Elements ) tab in the developer tools in the browser by clicking on an empty place on the page using the right mouse button, then choose (Inspect) from the drop-down list that appears and click on it, Or instead of doing all of that, press the “F12” key or the “Ctrl + Shift + I” keys on your keyboard after opening one of the site’s articles (the Elements tab will open in half of the screen, while the page will be minimized to occupy the other half).

From the (Elements) tab, find the HTML element code that includes the information you want to remove from the article data and its icon. If you want to hide the writer’s name, you will find the element code that contains the writer’s name and the writer icon. If you want to hide the classification, you will find the element code that includes the classification and the classification icon. .
You can find the code of the element that you want to hide by passing the mouse cursor over the lines of code in the (Elements) tab. When you place the mouse cursor on one of the element codes in the tab, it will be completely shaded within the page, and therefore when the element you want is shaded, you will know that the The mouse has its own code.
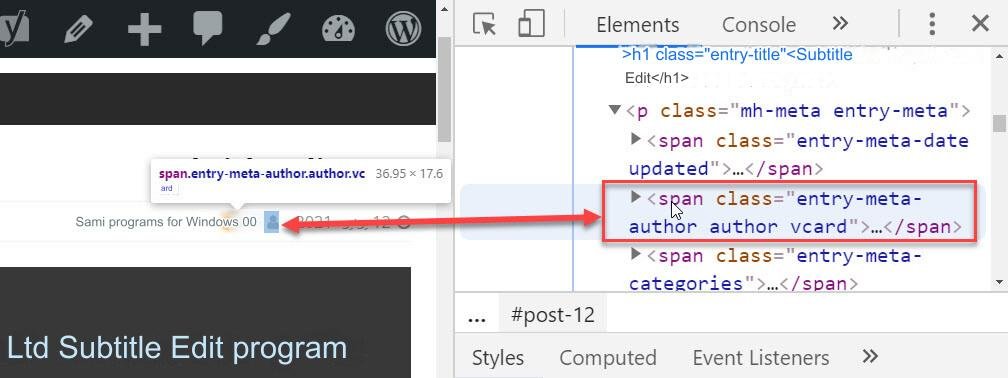
Note: The process of finding the part of the code for the element that includes the writer’s name or any other article data does not differ depending on the WordPress template used, but the code for this element may differ greatly from one template to another, that is, the code for the element that contains the writer’s name may not be the same. You have the same one as the one inside the red rectangle in the previous image, but the method for finding that code is the same as the method used in the previous step.
The code that you will find at the beginning after the first word (which is usually span or div) will contain a statement of this form (class=ST), where the letters (ST) stand for any text phrase enclosed in quotation marks. The following image illustrates this idea.
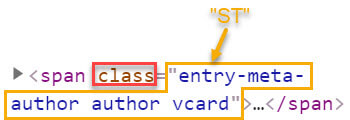
To hide the article data for which you found the element code, all you have to do is use the value of the class (i.e. the text inside the yellow shape in the previous image without the quotation marks) to assign the value (none) to the display property of this element by using the following CSS code:
Note: In the place of (ST) in the previous code, we place the class value of the element we want to hide, or only part of it, from the beginning of the value until reaching the first space (which is better), after which the code is ready for use. In our example here, the code will be as follows:
Or as follows (use this format, it’s better):
After creating the appropriate code, you must enter it into your WordPress site. To do this, copy it, then go to the WordPress control panel, then place the mouse cursor on ( Appearance ), then click on ( Customize ) in order to go to the page for customizing your WordPress site.

On the site customization page, you will find a tab called “Additional CSS.” Click on its name to show it.
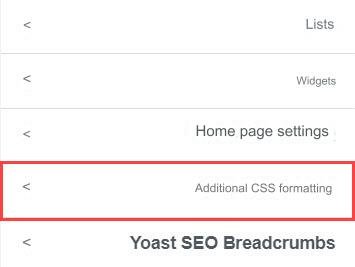
Now paste the code you copied into this tab, then click on the ( Publish ) button.

Open any of the articles on your site, and you will notice that the author’s name (or date or classification according to the element for which you created the code in the previous steps) has disappeared.

It is worth noting that this method does not hide the writer’s name or date (or other data) from the archive pages, nor does it hide articles from the authors’ article pages, but you can follow the same previous steps to hide data from the different archive pages, each one separately, Or you can disable author pages from appearing in search results using the All in One SEO plugin , so no one will be able to access them unless they own their links.
Note: If you change the WordPress website template to a new template after hiding the author’s name, date, or any other article data, the changes will not remain in effect on the new template, and you will have to repeat all the previous steps to re-hide the article data. However, if you change the template to If you have hidden the article data while using it, there is no need to re-apply the steps, as the modifications you made to the article data in this way will be applied automatically.
2. Manually remove article data by modifying the code
This method for removing article data in WordPress is considered better than the previous method because it hides and removes the article data from the page code, meaning that the element containing the article data will not be present within the page code, and will not appear to the visitor even if he reads the code. It also works on all WordPress templates, but their implementation is a little difficult and requires modifying the code of the WordPress template files used.
Note: Make a backup copy of your website template files before starting to implement the steps of this method, as this will help you restore the template and return it to its original state in the event that errors occur during or after modifying its files.
In order to remove WordPress post data by editing your template files, you will need to find and delete the code responsible for displaying the post data (or just one of them). It is easy to delete the code after finding it, but unfortunately it may be difficult to find sometimes, so here we will explain the best way to search for the article data code, but we cannot guarantee 100% that you will be able to find it with it.
Go to the support page for the theme you are using if you are using a free theme available in the WordPress theme store, then search for a post related to article data by entering the word (Metadat) or (Author) or any other related words in the search box, then clicking on the “Metadat” key. Enter”, then try to find the article’s data code by reading the posts.
Example: A website uses the MH Magazine lite template, and we want to remove and hide all article data for this website from the visitor. Although the first method works perfectly, we would like to remove data from the code of article pages as well, so we will use this method. We went to the theme’s support page on WordPress.org, entered “Metadata” into the search box, and the following results came up.
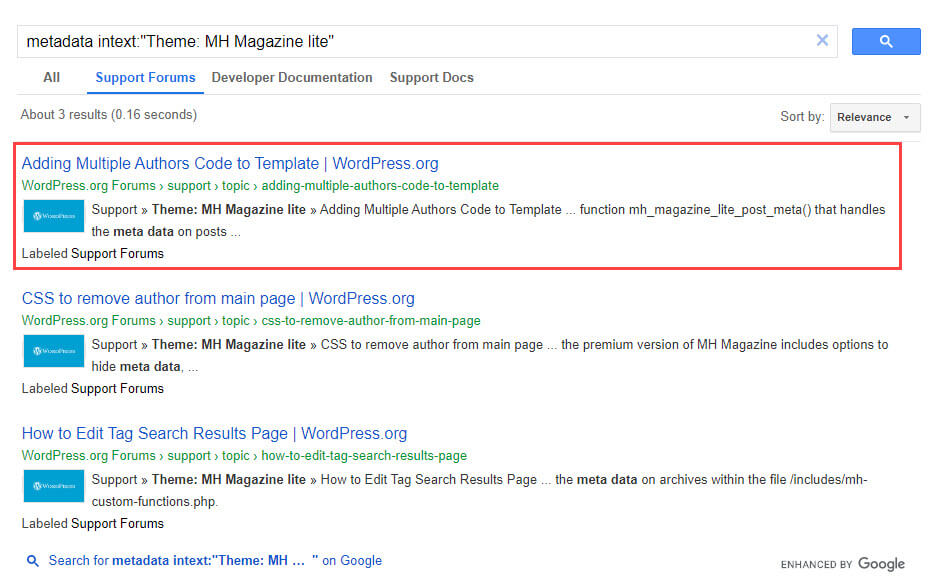
We browsed the results and chose to click on the first result (add multiple authors code to the template), because we logically expect that to add more than one author to the template articles, we must know the code to show the author, which is one of the article data, and therefore when we know the code to show the author, we will also be able to know the codes. Other article data. One of the first search result posts was like this image.
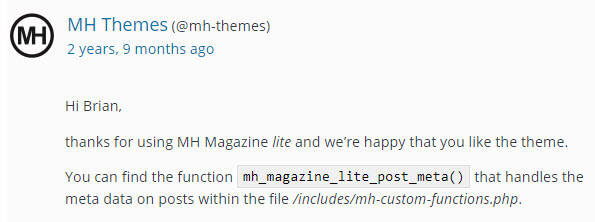
This post had a direct reference to where the article data code (metadata) is in the template files, where it was stated that the function that processes the article data is
mh_magazine_lite_post_meta()
It can be found in the mh-custom-functions.php file located in the ( includes ) folder. We went to the aforementioned file by going to ( Appearance ), then ( Template Editor ), then to the mh-custom-functions.php file , and searched it manually. About the function mh_magazine_lite_post_meta() , and we already found it in it.

Now that we have found the article data code in the template files, we can delete it completely to remove and prevent all data from appearing to visitors, or we can delete parts of it to remove specific data, such as the name of the writer only, or the date of writing only, or other, and we can determine the part of the code responsible. About each piece of data by reading it if we have a little experience in the PHP language, or by seeking the help of an expert in this language.
The following image shows one of the site’s articles before and after the article’s data code was removed from the file and updated.

Important note: When deleting the article data code, we do not delete the job name, but only what is written in parentheses after it. In our example, the code looked like this after deleting:

If you are unable to locate the code by searching and browsing the posts in the support section of the WordPress template, ask in that section about the function responsible for fetching and displaying the article data and the location in which it is located, then after you are notified by the developer, delete it. If the WordPress template you are using is not available in the WordPress template store, ask the site from which you obtained it about the job and its location. If you cannot do that, you must seek the help of an expert to find it for you through one of the freelancing sites .
3. Hiding the writer’s real name by using a pseudonym
This method can be used to prevent the real writer’s name from appearing on WordPress article pages only, and it cannot be used to hide other data, as it depends on using a pseudonym different from the name of the article’s real writer. If you want your name not to appear as the author of an article you write, you can write it after logging in from Through the pseudonym account, or you can write it from your account and then change the author of the article to the author’s pseudonym.
You can also change the author names of all the articles currently on your site to an alias if you want, easily with a few clicks, but you cannot simply undo the changes, as you cannot easily return the author name of each article to what it was before changing it to the alias, and you will have to Change the names of the authors of each group of articles that have the same author individually.
Here we will explain how to create a new writer with a pseudonym, and how to change the names of the authors of articles on the site to this writer.
Create a new writer with an alias
To create a new writer on your WordPress site, follow these steps:
In your WordPress site’s control panel, place your mouse cursor on (Members), then click on the (Add New) option from the drop-down menu that appears.

Fill in the required fields on the page that appears as appropriate. Use a fictitious username and an email address that is not linked to anyone, and put the first part of the alias in the field next to (First Name), and the second part of the alias in the field next to (Last Name), and set the member rank to ( Editor ), then click on ( Add a new member ) button .

Now click on the ( Edit ) button that appears when you place the mouse cursor on the new writer that you created, as the following image shows.
Change the settings as you wish, and don’t forget to choose an appropriate option from the menu next to (Display name publicly as).
Click on the ( Update Member ) button located at the bottom of the page to have the changes you made approved, and you will thus complete creating a new writer.
How to change the name of the author of articles on the site to a pseudonym
After creating an author pseudonym, you may want to change some or all of the names of your website’s article writers to it. To do this, you must follow these steps:
Go to the All Posts page in your WordPress dashboard.
On the ( All Articles ) tab, click on ( Screen Options ) at the top, then change the number in the field next to the phrase “Number of items on the page” to (999), then click on the Apply button in order to show all or a large number. of your site’s articles on this page, and quickly change the names of their authors.
Select all articles whose author you want to change to an alias. If you want to select all articles appearing on the page, click on the box next to the word (Title).
Choose the “ Edit ” option from the drop-down list , then click the “ Apply ” button.
In the part that appears after clicking on the ( Apply ) button, you will find a drop-down list next to the word ( Writer ), from which choose the pseudonym of the writer you created, then click on the ( Update ) button.

The author names of all articles you have selected will now be changed to an alias, and visitors will not see the real author name when they browse your site’s articles, and articles will not appear on authors’ pages either.
Note: If the number of articles on your site is more than 999 articles, and you want to change the names of all their authors to a pseudonym, you must repeat the process described above on all pages ( all articles ), each one separately, that is, you must implement this on the page The first, then you move to the second page, and do it as well, then to the next, and so on until all the pages are finished. You can go to the following pages by using the buttons at the bottom of the ( All Articles ) page.
Show article data in WordPress after hiding it
In most cases, you will not need to show article data without hiding it first, because WordPress templates usually show article data by default, but you may need to re-show the data after hiding it in one of the ways we explained above.
The appropriate method for resurfacing article data depends on the method in which the data was hidden. Basically, to re-show article data in WordPress, you have to undo what you did to hide the data. If you hid the data by inserting CSS code as in the first method, you must remove this code, and if you hid the data by deleting the code that shows it from the files. Template, you have to rewrite it in the place where you deleted it.
But if you have hidden the names of article writers by changing them to a pseudonym, you cannot easily return them to what they were, but it may be useful for you to create a different pseudonym for each writer whose real name you want to hide from the articles he publishes on your site (or some of them). Therefore, when you want to return the real writer’s name, you can go to the All Articles page for the writer’s pseudonym and change the name of its author to the real writer’s name in a manner similar to what we explained in the previous paragraph.
Here we finish explaining how to show and hide article data in WordPress, including the author’s name and date. In conclusion, we point out that there are plugins that can do this task, but they do not work on all WordPress templates, so it is better to use the methods that we explained in this article, or Hire someone who is an expert in WordPress to hide your website article data for you.


Leave a Reply