this article, we will learn how to add carousel sliders to your WordPress website, which is a distinctive way to display images, articles, and products on your website.
This enables you to organize content, make optimal use of space, and most importantly, attract visitors’ attention by displaying content in different ways.
What is the Carousel Slider?
Carousel Slider or carousel slides is a feature for displaying content in the form of sequential slides on any part of website pages. This content may be images of products arranged according to prices or ratings, promotional images, site introductory images, or even articles or videos. .
Therefore, this feature improves the appearance of the website and provides a powerful marketing tool. It can be easily added to your WordPress website through external plugins, as we will explain to you later.
Carousel Slider Marketing Benefits
Carousel slides have many benefits for visitors and website owners, the most prominent of which are:
View products and discounts
The Carousel Slider serves as a tool to display the products and services sold by the website, through its home page or other pages.
This in turn ensures that many products are displayed at the same time, and it can also be used as a tool to compare products with each other, or compare discounts and offers.
Facilitating access to content
One of the marketing benefits of the Carousel Slider is that it improves the overall user experience, whether on regular or commercial sites, by displaying a variety of images, videos, products, or articles in one place.
It also enables users in online stores to shop on the same page without having to move from one page to another, and we find this used on the Amazon Saudi Arabia website:

It is worth noting that the carousel slides can be displayed anywhere and can be displayed in the Hero Section, which greatly contributes to gaining the attention of visitors immediately upon entering the sites, and thus gives you the opportunity to introduce the company or site.
Mostly, these segments work to reduce the bounce rate by keeping visitors on the site for as long as possible. Which in turn improves the site’s ranking in search results.
Suitable plugins for creating Carousel Slider
There are many WordPress plugins that enable you to add carousel slides to your website, which differ in terms of their features and prices. The most popular of these plugins are:
Carousel Slider
This add-on enables you to create carousel slides on your site, which include search engine-compatible images that can be added through your media studio or through links, in addition to videos, logos, and products. The add-on also contains a Lazy load images feature to speed up the website, and it is free and you do not need to pay any fees. It is also supported in all browsers.
Logo Carousel
If you are interested in adding slides to display the different logos of a group of companies on your website, then this addition is the appropriate addition, as it is useful to you when trying to display the logos of companies or sites that you have previously worked with, or with which you have a partnership. With the ability to customize logo slides, such as specifying the distances between them, adjusting the switching speed, the ability to stop them or make them animated, and make them compatible with mobile phones.
WordPress Carousel
This add-on offers the same options as the Carousel Slider add-on, but it comes with more functions, which include full control over the slides and the ability to stop them or make them run automatically, with the ability to stop the switching option through the mouse. It also allows you to add an unlimited number of slides per page, with support for popular browsers such as Google Chrome, Firefox, Safari, and others.
Post Carousel
This add-on is suitable for anyone who wants to add slides to display their articles and pages. It allows you to display articles on the site according to multiple settings and options, starting with choosing the display format and selecting articles by author, keyword, or classification.
Product Slider
This add-on is specific to commercial websites that display product slides to visitors, with the ability to display them in articles, pages, and in custom templates. It provides full control over the slides, displaying and hiding the product name, price, and rating, and customizing them by changing the font color and size. With compatibility with search engines.
MetaSlider
This add-on is comprehensive, as it enables you to add slides of images, products, articles, videos, and slides in the HTML language, with integration with many sites to facilitate the process of creating a Carousel Slider on your site pages, such as integration with the UNSPLASH site for free images and with the YouTube and Vimeo sites for videos, It comes with a free version and a paid version starting at $39 per year.
Steps to add Carousel Slider
In this paragraph, we will explain how to use the MetaSlider plugin to display carousel slides on a WordPress site. This is because it offers many features that start from supporting different types of carousel slides, such as photo, video, and product slides.
Follow with us the following steps to create a Carousel Slider to display images on your WordPress site:
Step 1: Install the MetaSlider add-on
This is the usual step when trying to add a new feature to a site. To make the site able to display the Carousel Slider, we will install the MetaSlider plugin as follows:
Go to the WordPress control panel, then choose Plugins and click Add New, and from the window that appears, enter the name of the plugin “ MetaSlider ” in the search field located on the left part of the screen. After the add-on appears, click on the Install Now button that appears next to it, as shown in the following image, then activate the add-on.

Step Two: Create the Carousel Slider
After activating the plugin, go to the WordPress control panel, and you will find that a new tab has been added to it called MetaSlider. Click on this tab and then choose MetaSlider from the menu that appears as shown in the following image.

Now the window for setting carousel slides will open, through which you can click on the +Add Slide button to add a new slide.

After clicking this button, the window for adding images will appear, which gives you three different options:

- Upload files: To add images from your computer’s storage.
- Media Library: To use images added to the WordPress media library.
- Unsplash Library: Add photos from the free stock photo site Unsplash .
After you determine the method you want to use to add images, select the images you want to display as slides and then click the Add To Slideshow button .
After you select the images you want to add to your Carousel Slider, scroll down until you reach the How to Use section on the left side of the screen, then copy the code shown highlighted in the image in red by clicking on it.

Then go to the page or article where you want to add the Carousel Slider, then select the appropriate place, click with the mouse button on the “+” icon highlighted in blue in the following image, located in the upper right part of the screen, and then click on the short code icon [/ ]
Or you can use the “+” button that appears within the article to add a short code block.

Paste the code that you previously copied from within the extension settings in the short code field. Then click on the Update button shown at the top.

Then click Preview, and you will find that the Carousel Slider has been successfully added to the article at the position you specified previously.

Step 3: Customize the slide show
You can customize the slides in the way that suits you from the same place where you created and added these slides, through the following options:
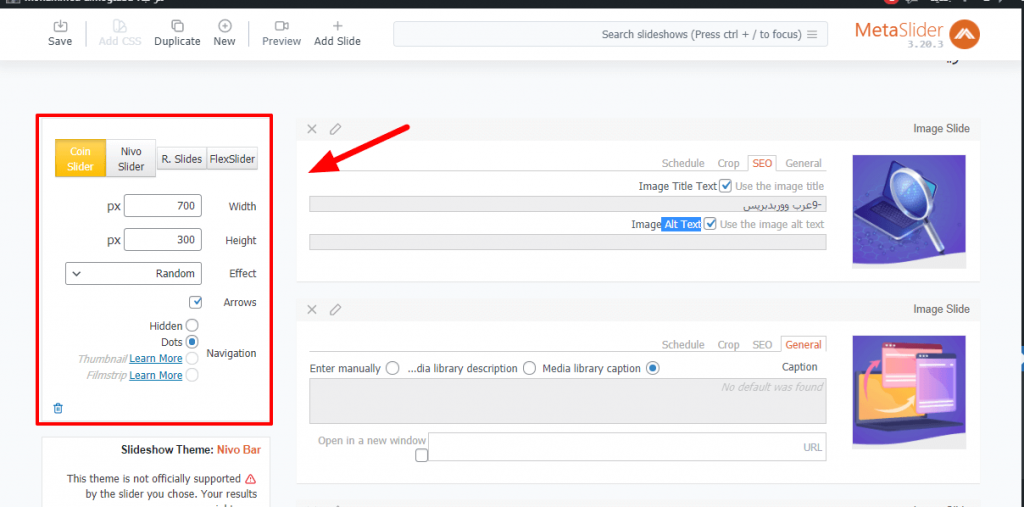
Customizing images : Any image you add to a slide deck has many features and options that enable you to add a caption to the image, link it to a URL of your choice, and add a title and alternative name to it so that it is compatible with SEO.
There is also an option to crop and schedule the image, and you can find these options on the left side of each image separately, as shown in the following image:

Customize the slide show : On the left side of the Add Slides window, you will find a section dedicated to controlling the way the slides you have added within the slider are displayed, through the four tabs at the top that provide four designs: (Flex Slider, Responsive Slides, Nivo Slider, and Coin Slider). Below you will find options to control the length and width of the Carousel Slider and the ability to add a specific effect through the Effect drop-down menu.
(The effects available in this list vary depending on the design you chose above). From here you can also determine whether you want to add a navigation section that appears in the form of small icons under the images or not.

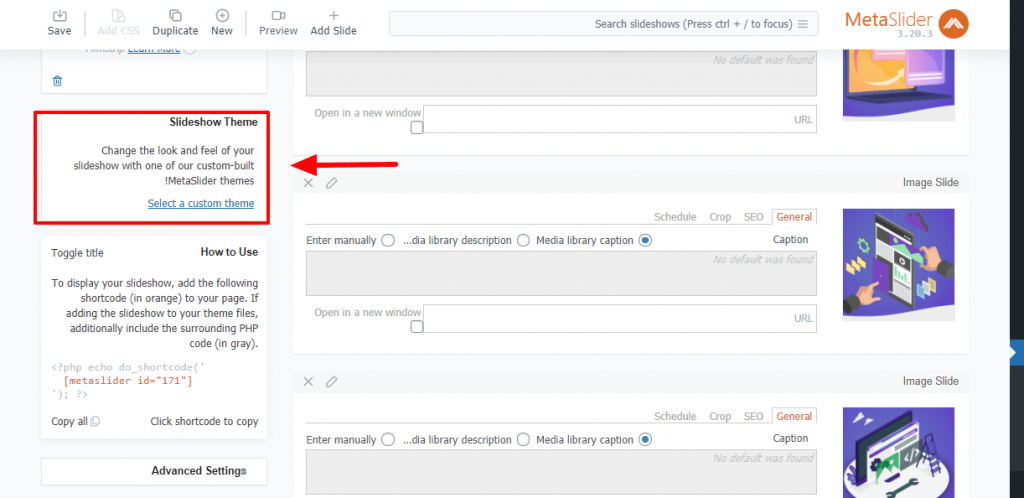
Ready-made templates section (Slideshow Theme) : If you are thinking of using the default templates for the add-on, you can do so in this section, which provides you with professional slideshow templates. From the same section, you can also create your own templates.

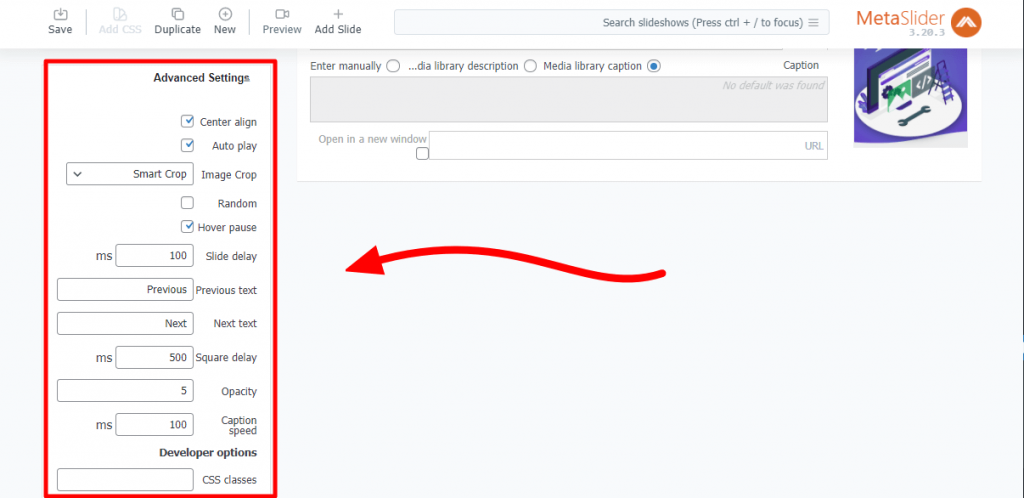
Advanced Settings : The options in this section allow you to turn on automatic slide switching, in addition to turning on or off cropping images or converting them to smart cropping, specifying the estimated time for switching between slides, customizing the texts that appear on the slides, and adjusting the transparency of the title. With a dedicated option for developers to add CSS classes.

As you can see, creating a Carousel Slider is easy in WordPress through the many plugins that provide this feature, and in today’s article I learned how to use the MetaSlider plugin in its free version, which allows you to add carousel slides and offers many customization options, and enables you to add titles to images, and choose from Among different display methods and a set of ready-made templates, it is also available in a paid version, Carousel Slider Pro, which enables you to add video slides and custom Html slides with technical support and many other advanced features.


Leave a Reply