Favorite icon (Favicon) means the mini icon of the site that appears to the user in the visitor’s browser tab next to the site name, which essentially expresses the site and is considered an essential part of the site’s visual identity. For example, in your browser tab you will find the logo of the site (WordPress ). ) in this way:
The visitor may be able to recognize your site through that icon, and also embed your brand in his mind among the many sites that he navigates between in his own browser. Therefore, it is important that you make sure to place your logo in this place, and today we will explain to you the importance of adding the Favicon icon, and the appropriate dimensions, How do you customize your website logo in that icon?
What is the importance of the Favicon?
We also explained that the favicon icon has an effective impact in consolidating the commercial identity of your site. In addition, it also has an influential role in the appearance of your site in search engines, such as Google, which places the favorite icon next to the site address in the search results, which gives a good mental impression to the visitor during the search. Its search process as well as the selection of results based on its relevance to your brand.
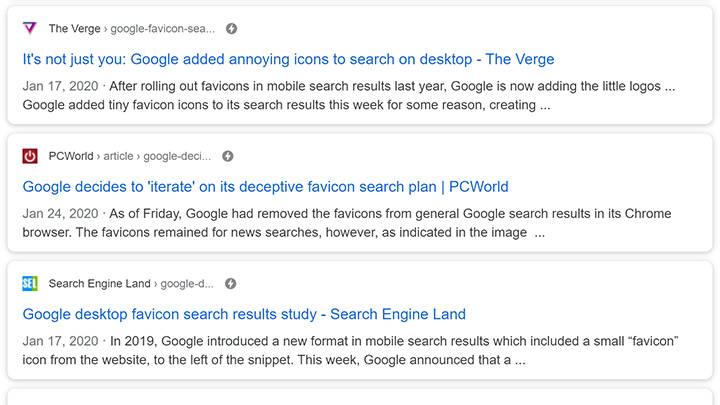
Therefore, this gives a good impression to the user during the search, as well as a positive impression if the user opens more than one tab on the same browser, which may hide the name of your site, but the logo of your site remains visible in the place of the icon to draw the user’s attention to the tab of your site.
Likewise, you are targeting visits from the phone. A user may shorten the link to your site as an icon in the list of applications on his phone. In this case, the visible icon for shortening the site link will be the thumbnail icon of the site, which expresses your site’s logo. Now let us talk about the practical steps for adding a favorite icon. On your WordPress site.
Favicon dimensions
First, you need to know the recommended favicon dimensions so that it appears in its ideal shape and clear size in the browser, using dimensions: 512 x 512 pixels, if you upload the image to your WordPress site, so that it is not sized incorrectly.
You can change the dimensions of the icon before uploading it to your site using graphic programs such as Photoshop, Illustrator, or GIMP. If you do not have experience using these programs, you can rely on the free resizeimage website to change the dimensions of the icon.
You can do this procedure by going to the website: resizeimage , then clicking on the (Upload image) button. A pop-up window will appear asking you to upload the uploaded images, preferably without a background (transparent) so as not to affect the appearance of the image on different browsers.

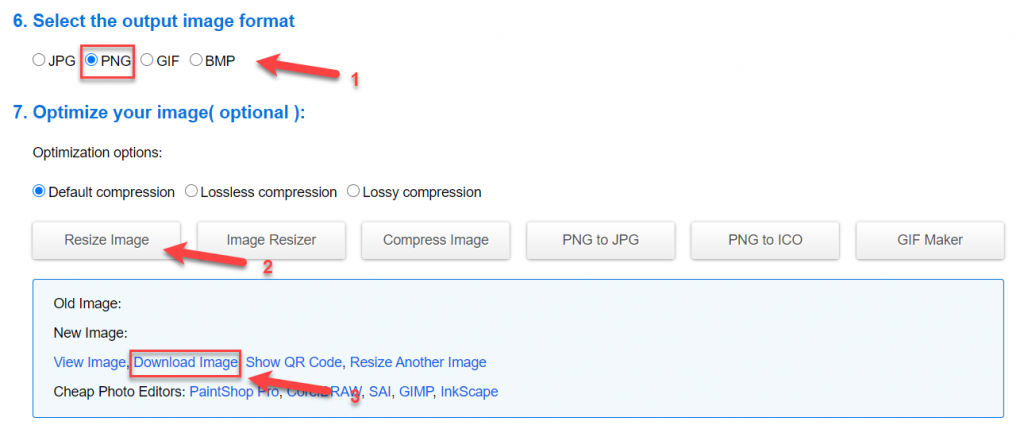
Then, after uploading the image, you select the Fixed Aspect Ratio option and specify the dimensions of the icon as 512 x 512 pixels.

- After that, in the (Select the output image format) option, you will select the PNG image format in order to preserve the transparency and quality of the image, then click Resize Image.
- Then from the drop-down menu, choose the (Download Image) button. The icon will be downloaded to your device and ready for use.
Uploading a favicon in WordPress
After that, you can upload the Favicon icon to your WordPress site in more than one different way, and some of these methods differ from one template to another, as some WordPress templates put the feature of changing the Favicon icon directly in the template settings options, but the majority of templates enable you to upload the image from Through the (site identity) option, or by using one of the add-ons designated for that.
Manually change favicon in WordPress
You can change the WordPress thumbnail icon manually by modifying the site identity, which is a simple and easy method that you can do as follows:
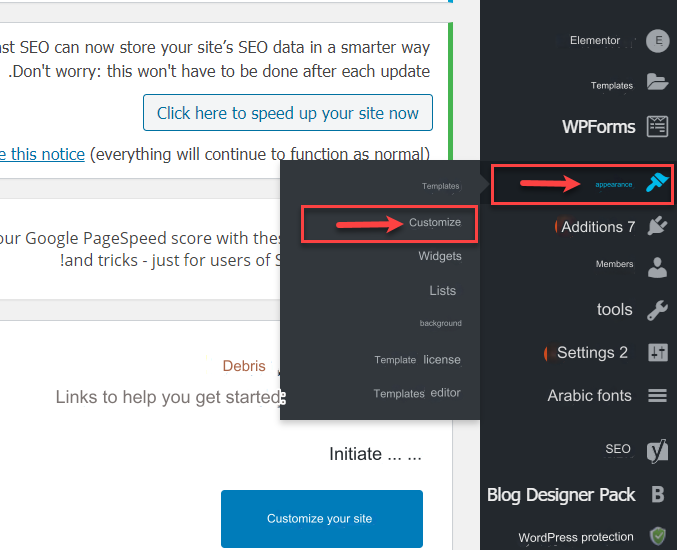
- Through your WordPress site’s control panel , you click on the (Appearance) tab , then from the drop-down menu, choose the (Customize) option.
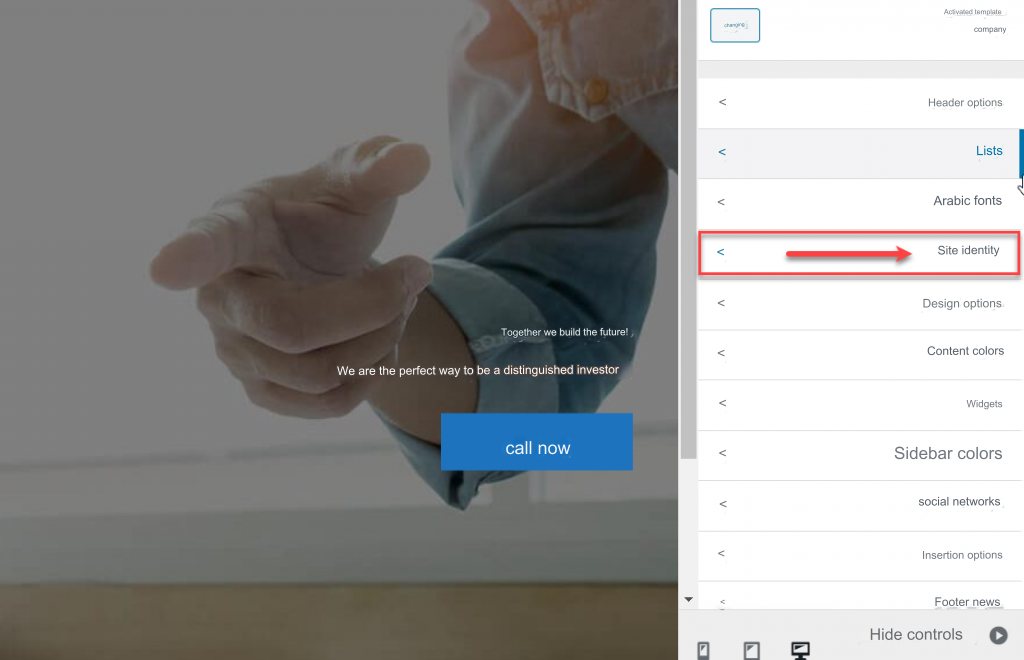
2. You then click on the Site Identity option from the interface customization options that appear
3. Then you click on the Change Image button, and your site’s media library will appear. Either the preferred image is already there and you choose it, or if it does not exist, you upload it to the site’s media library and choose it after that.
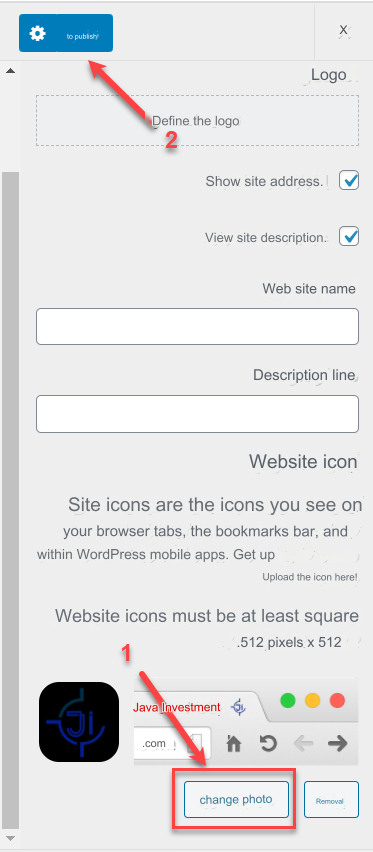
4. Then finally, you click on the (Publish) button to save the settings, and change the Favicon icon on WordPress.
However, if this method does not work on your WordPress site due to a modification by the programmer, any private property rights, or any other reason, you can rely on the Favicon Rotator add-on , which helps you in this task through easy and simple steps by going to your WordPress site’s control panel and then tracking The following steps to install and activate the add-on:

- You select the (Add-ons) tab from the WordPress side menu.
- You will choose the (Add New) option from the drop-down menu
- You type the name of the add-on “Favicon Rotator” in the search box
- The add-on will appear for you so you can click on the (Install Now) button to install the add-on, then after installing it you will click on the (Activate) button , until the add-on is activated on your site.
After that, you select the ( Favicon ) option that appeared under Appearance options, through which you can upload the image of the icon by clicking on the Add Icon button so that we can upload the icon from your computer, and then you click on the Save Changes button .
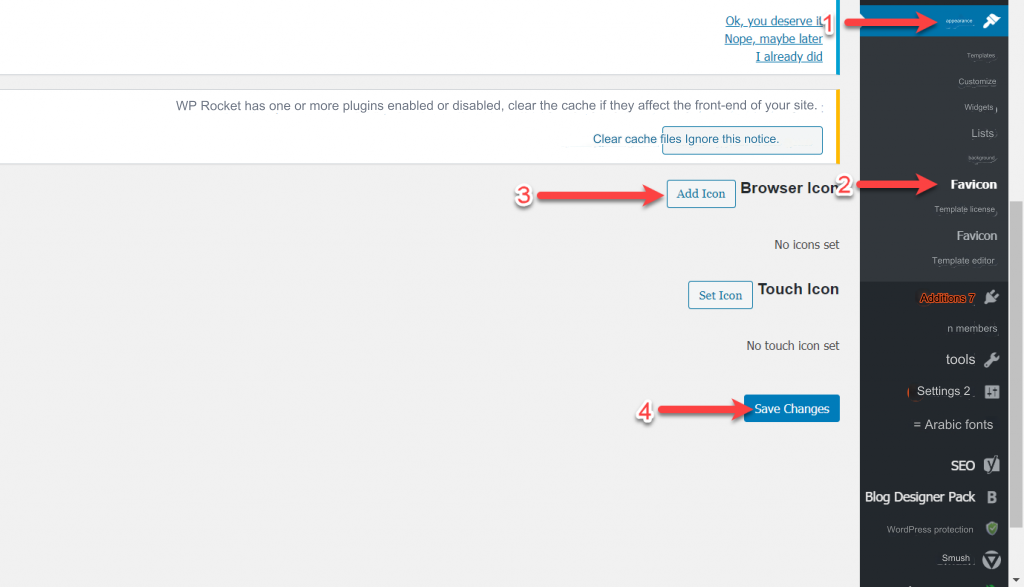
If you remove the Favicon Rotator plugin from WordPress, this will cause the thumbnail to be canceled and it will return to being empty as it was before. Therefore, we do not recommend using these plugins, and it is best to upload them through the template options.
In this way, we have reached the conclusion of today’s article after we explained to you the importance of the Favicon icon and how to determine the dimensions of the icon and upload it to the site in an easy way. If you have a question, do not hesitate to comment below the article so that we can help you with any problem you face


Leave a Reply