Many businesses today need to design data entry programs with the aim of entering and managing data related to the nature of work between companies and their customers (or what is known as CRM), as a lot of business data needs to be stored and preserved, such as customer data, products, or other data. of data to be recorded using digital platforms, instead of recording data manually through traditional paper notebooks.
Obtaining a data entry and management program may cost you a lot of money, but in this article we will show you a solution that is better for you and easier using WordPress, and therefore less expensive. In this article, you will learn how to use the Wp DataTables plugin to create an integrated and professional data entry system within your WordPress site.
Why is it important to create a digital data entry system?
Behind every business around the world is a lot of huge data, so storing, managing and organizing data has become one of the things that facilitates successful decision-making to manage and organize this data effectively for easy use later. For example, the following types of companies can benefit from creating a data entry system:
- Real estate marketing companies
are among the businesses that most need to create a data entry system. They are real estate marketing companies, as these companies need to design spreadsheets in which real estate and residential unit data can be stored, whether requested properties or those offered for sale, as it is easy to enter data for those properties into organized tables. To access it at any time easily, the same applies to the data of potential customers and current customers of the company.
- Shops and retail companies:
Many shops and showrooms that sell goods and products need a data entry and management system to record the available items, as well as data on those items, such as their prices and specifications, for easy access and easier calculations.
- Owners of electronic stores and large websites:
If you are the owner of an online store or a large website that holds a lot of visitor data, and some information is shared from your site visitors, then you definitely need a system to enter, store, and manage that data, in order to be able to analyze that data and provide the best solution for them.
Of course, there are many other activities and businesses that may need a data entry system to manage their business successfully and the ability to access that data easily at any time.
During the following article, you will learn how to design and create an integrated data entry program using one of the add-ons that helps you create a data entry system in an easy way that does not require some advanced skills. It also enables you to enter information or data related to your work or commercial activity, and refer to it and modify it in Anytime you want.
First, you will need to: create a WordPress website and activate the necessary settings , then start using and installing plugins designed to create spreadsheets, which we will talk about in the following lines.
Use the appropriate plugin to create a data entry system
There are many add-ons that can be relied upon to design and create an integrated data entry system within your site in easy steps. The most popular add-ons that help you in this task are the following:
1 . Ninja tables

The Ninja tables add-on is one of the add-ons that can be used to create and design data tables, connect them to MYSQL databases within your site’s hosting, and view those tables and their data within your site’s various articles and pages.
2. table press

The Table Press plugin helps you create spreadsheets on your WordPress site, and it contains many options that facilitate the process of creating tables. You can upload an Excel file and convert it into a spreadsheet within your site, and you can also add and view tables anywhere on your site.
3. Wp Data tables
The Wp Data Tables plugin is considered one of the most important WordPress plugins that can be installed and its settings used to create a data entry system consisting of a very large number of data tables into which you can enter data, and refer to them at any time you want, whether if you want to modify that data at a later time, Or even adding new data.
This addition is one of the distinctive additions for this purpose, and we will complete our explanation by relying on it, and we will explain it in a practical way to create an integrated data entry system in WordPress, because it contains some features, including the following:
Advantages of adding Wp data tables
- The addition provides an easy user interface so that it can be handled by all categories of users, even those who have not dealt with data entry systems before.
- Ready-made data can be imported and uploaded to the site through Excel, CSV, PHP, or other extensions.
- Ease of inserting tables into articles and website pages.
- The add-on provides ready-made templates and designs to choose from to design the spreadsheet as desired.
- It provides the feature of converting the table into a mobile-responsive display.
- Ease of creating, modifying and deleting columns and rows within tables in a very easy way.
- Ability to add media files such as images to spreadsheet cells.
- The ability to search within the data of a table easily.
- The ability to export tables and download them in PDF or Excel format, or even print them directly.
- Editing and editing mode on tables can be set by specific site administrators.
Install the plugin and use it to create spreadsheets
The first step is to log into the WordPress control panel, then go to (Add-ons) << (Add new), then type the name of the plugin in the search box: Wp data tables

After the add-on appears, we will click on the install button and activate the add-on on the site. ( Read also: How to install a WordPress plugin )
After activating the plugin, its own icon will appear in your WordPress control panel. When you enter it and then enter Create Table, a window containing 6 types of tables will appear before you, from which you can choose the type that suits you as follows:

- Create a simple table that contains a number of columns and rows, and its appearance, shape, and data type can be customized with ease.
- Create the table yourself as you want and in the order you want, where you can create the number of columns and rows you prefer. Also, in this type, the data entered is stored inside spreadsheets in the hosting’s Mysql databases.
- Create tables by writing queries to WordPress databases.
- Create a connection to tables that already exist within the site’s databases.
- Uploading and importing data from ready-made files in multiple formats such as Excel and others, and then modifying and managing that data.
- Creating and sending instructions using SQL language codes, which is a programming method for programming and coding specialists.
You can choose the type of table that is appropriate for you, then complete the steps for creating the table in the next stage. For example, we will choose the first type (Simple table) :

After that, it will request the data of the table to be created:
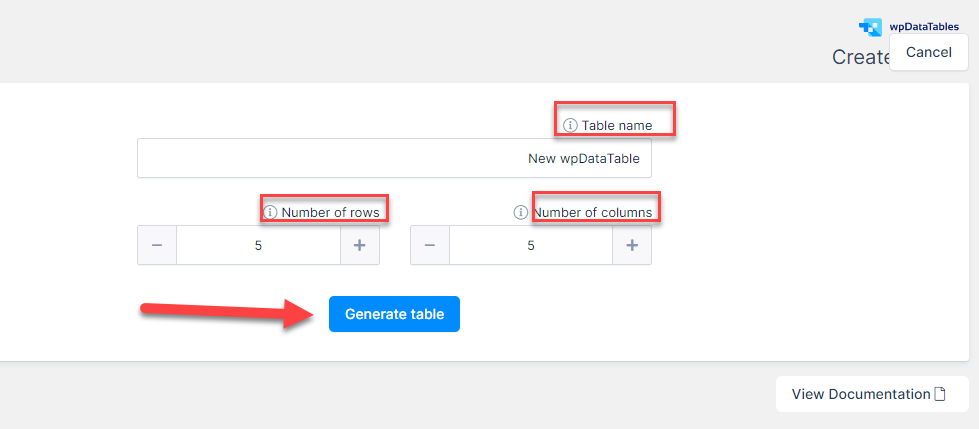
As you can see, it will ask you to enter the name of the table, the number of rows to create, and the number of columns.
After you put a name for the table and the number of rows and columns you want to create within the argument, click on Generate table to have the table created based on the data you entered.
After that, the spreadsheet editing page will open, which consists of 3 main parts:
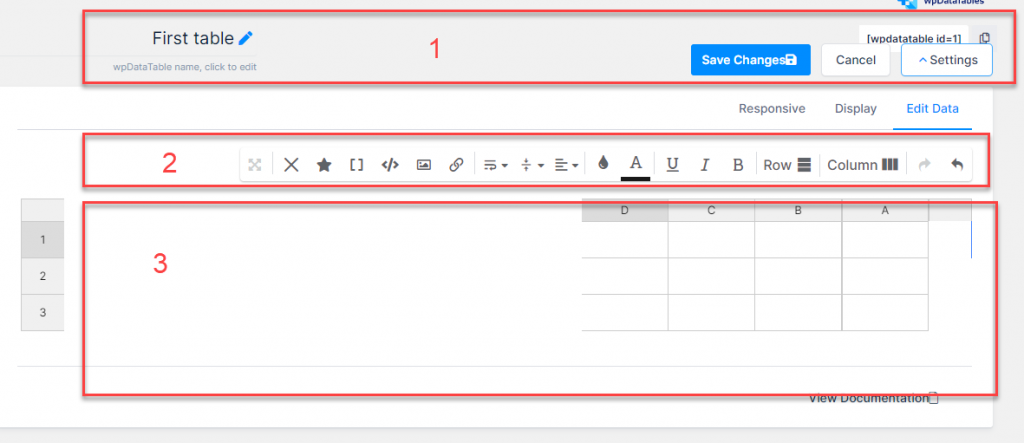
- The first part: It contains the table title box, which you can change at any time, and there are also buttons to save the table and enter its settings.
- The second part: It is a ribbon that contains many text editing tools, such as changing the font type of the entered data, colors, and backgrounds, and through it, images and media files can be inserted into the cells of the spreadsheet.
- The third part: This is the part in which you enter the table data however you want, and the following animation shows you how to add data to the table easily.

View data tables within website pages or articles
After completing entering the required data, you can now add and review the table that you created on one of the pages or articles of your site through the short code for the table, which contains its ID number, which you can find on the table editing page:

To add the table to one of the site’s pages or articles, you can easily add it from within the page or article’s edit page as follows, while changing the ID number of the table you want to add:
Now when you visit the page link, you will find that the table is displayed correctly:
In this way, you enter all the required data and organize it in an easy way that you can view and preview later. Let us move to the next step, which is to test the compatibility of the tables of contents with the mobile phone. Do not be satisfied with the appearance of the table on the desktop, but you must ensure that the table appears responsive on the mobile phone, in the next step. :
Tables compatibility with mobile
In the next step, we will make sure that the table is responsive to different screens, such as mobile phones and others, through the table settings page. You will go to the (Responsive) tab.

You will find the table display setting window, from which you can select the Enable responsive mode option , which adjusts the table display method to suit mobile phone devices.
Extract, print, or modify data
In the previous method, we explained how to create a spreadsheet that does not allow the use or printing of data, and in order to do that we need to create tables of the type:

This type of table allows you to have many options that give you greater control over the table and the data that is entered into it. For example, you can extract the table data in the form of an Excel file, and you can also set the editing mode and add data from the table review page within the pages and articles of your site. .
When you choose this type, a window will open for you to fill in the data for the table you want to create, as you can see:
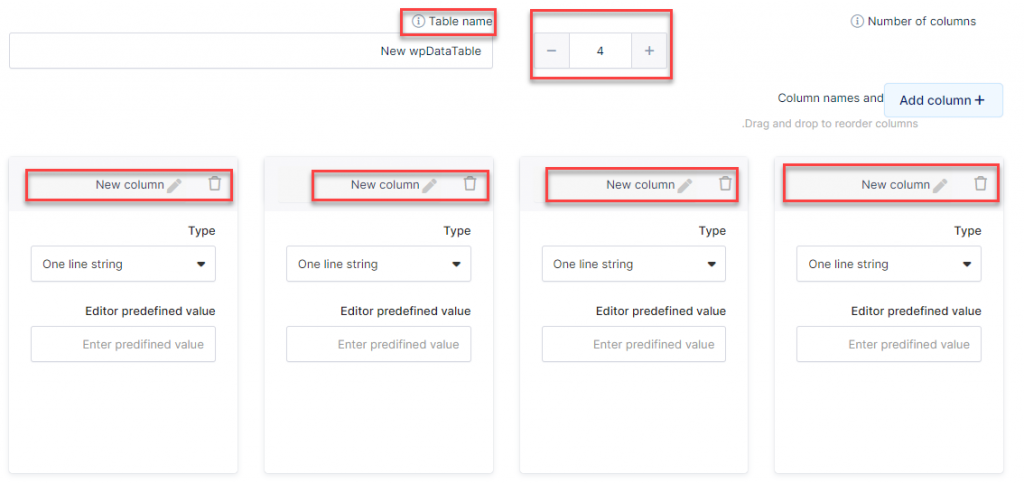
As you can see in this window, you put the data for the table you want to create, such as the name of the table and the number of columns, and you can also change the title of each column of the table.
Then, after filling in the data, you will be directed to the table editing page as follows:

As you can see, inside the table editing page, you will find editing tools through which you can extract the table data in the form of an Excel file or something else, and you can also print the entire table, which was not available in the first type of tables that we explained previously.
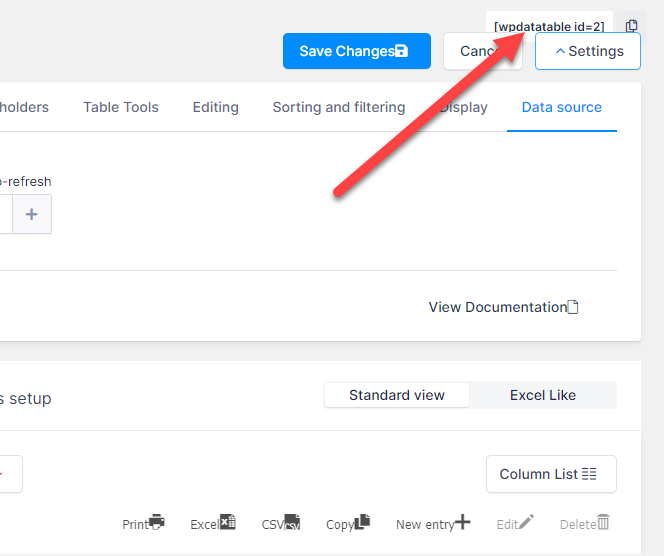
Also from this editing bar you can add a new query to the table by clicking on new entry , and you can also add the table to one of the pages or articles of your site in the same way that we explained previously, which is by placing the table ID number inside the article editing page, which you will always find at the top of the table editing page. :
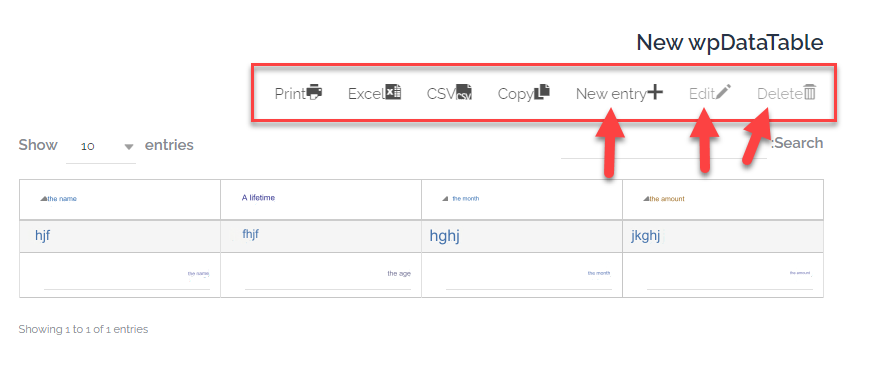
When you add the table to one of your site’s pages or articles, you will notice that data extraction buttons appear on the front end as follows:

You can also activate the ability to modify the table from the front end of the site without the need to enter the WordPress control panel. Through the table editing page, you can access the Editing options and then activate the Allow front-end editing option :

Now when you enter the table review page on the front end, you will find that the options for editing and entering data for the table have become available on the front end:
Add new members to edit data tables
If you have a team that helps you with the data entry process, you can add new memberships and give them permissions to manage the specified data, through the WordPress control panel by going to the Members << Add New tab. You will be asked for the information of the new member that you want to add, as well as specifying the member’s rank. Which determines the member’s powers within the site, as follows:
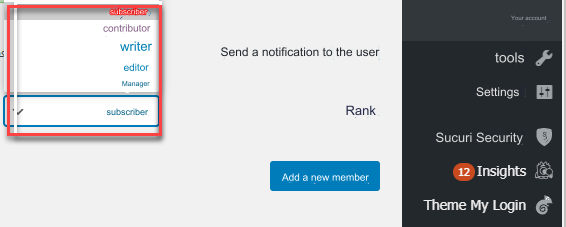
As you can see, you can specify the authority for the new member, whether he is a contributor – writer – editor – manager – subscriber. The rank of “manager” is the highest in terms of powers, as the manager can make any modification in any part of your site without restrictions, while the editor is at a lower rank, and so on. Therefore, you need to determine the required authority, then allocate only certain tables and allow some members but not others to modify those tables.
In order to specify the permissions of the members who are allowed to modify a specific table, you can open the table within which you want to specify the permissions of the members, then on the table settings page, then enter the Editing box :

When you click on Editing, you will notice that the Allow editing option appears, which you must click on and activate. Then, after activating the option, a box will appear for you enabling you to choose the members allowed to modify the table according to their rank on the site:
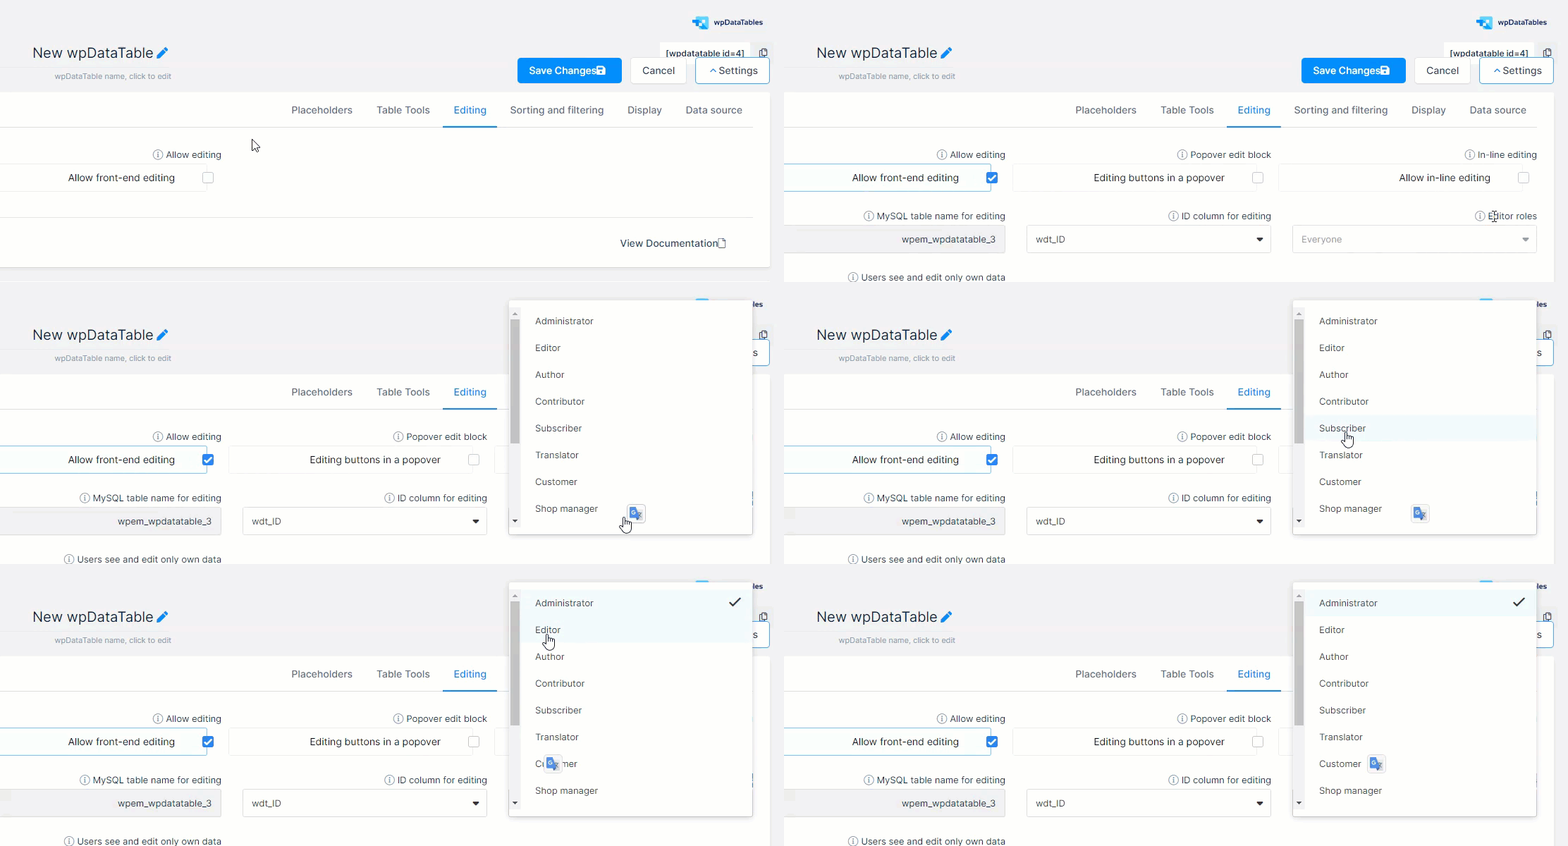
As you can see, only members who hold the rank of Manager or Adminstrator can be appointed to modify the table, or you can choose some other ranks such as Editor or other powers that appear in front of you and choose from them whatever you want so that those members selected according to their rank on the site are given the opportunity to modify the table without From other members.
Thus, we have completed this previous educational explanation, and as you can notice, a complete data entry can be created with this addition, which we have clearly explained how it works. You can rely on this method to create the data tables that you want to create without having to do many programming commands, and therefore this system helps you create tables that help you manage your data on the Internet


Leave a Reply