In recent years, most people have YouTube channels, or accounts on social media channels such as Instagram, Facebook, etc. Perhaps millions follow them on these social sites and through them they broadcast live video clips to their followers.
But in most cases, if a person wants to add a kind of professionalism, he moves to the step of establishing a website for video communication with his audience. Because the website, in addition to adding more professionalism to communication, also attracts more followers, increases audience interaction with it, and also through it the website owner can save his content in an organized manner and on his own hosting. Therefore, it is an important marketing step for professionals.
In this article, we will discuss how to make a live broadcast through your WordPress site. We will explain two scenarios for live broadcasting:
- Make a live broadcast through the YouTube channel and broadcast it at the same time on your website.
- Live broadcast on the same website without YouTube.
Live streaming feature
Live streaming is a type of streaming media represented by video, which is broadcast and recorded over the Internet at the same time in live form. In live streaming the data is uploaded and played back at the same time (real time).
In this type of broadcast, the server that displays the broadcast does not contain the entire original video, so it is not possible to watch the video in a way (downloading and playing) as is the case with regular video.
Rather, the content is played in intermittent batches or so-called streams.
This type of broadcast has become famous on various social media platforms such as YouTube, Facebook, and Instagram, and today it is considered one of the most important means that influencers and entrepreneurs resort to to increase interaction with customers and target audiences on communication channels and website pages.
Why is it important to live stream from your site?
To demonstrate the importance of live broadcasting, let us imagine the following situation:
One of the influencers created his own website using WordPress . He wanted to broadcast live from his YouTube channel, and at the same time he wanted this broadcast to appear on his website so that he could attract more followers, and he could record this broadcast to keep it later automatically on his site and under a specific classification.
Perhaps he may later want to develop his plan to provide a special offer to his regular visitors, so that he broadcasts directly on the site exclusively to them, without broadcasting via YouTube.
In this case, live broadcasting provides the person or business in general with many benefits, the most important of which are:
1- Building a strong relationship with followers and target audience. When you repeatedly share data about your activity with your customers in the form of realistic video clips through live broadcast platforms, receive immediate feedback from them, and directly answer their questions, you will be able to strengthen your relationship with them further.
2- Live video clips convey the message to the audience more easily and effectively, increasing their rate of following the content, compared to whether this content is presented in the form of a recorded video, or in the form of text, or still images.
3- Building greater trust and loyalty to the brand, because live broadcasting creates a kind of personal relationship with the target audience (especially for business owners) and is more realistic and spontaneous than ready-made, pre-recorded videos.
4- An element of attraction and excitement. Followers will tend to continue watching to find out what will happen at the end of the broadcast. Thus, you will have a greater opportunity to present the information, products, or questions you want from your followers on the broadcast.
In today’s article, we will explain to you how to embed the live broadcast feature on your site easily and without the need for advanced programming skills.
How to configure your WordPress site to accommodate the live streaming feature
In the following paragraphs, we will discuss the most important aspects that must be taken into consideration to prepare your site to include the live broadcast feature on your site in the best possible way:
- Live streaming platform or provider
- The template used on the site
First: the live streaming provider
We can say that the Live Streaming Platform/Pro is a tool through which you can activate the broadcast feature on your site. This performs the recording and broadcasting process at the same time, using the camera and microphone on your computer.
In the case of broadcasting from within a WordPress site, the provider will be a plugin that you can simply activate and use to broadcast from your site.
The 5 most popular live streaming service provider add-ons
Below we will review the most important live streaming plugins for WordPress. Note that most of these add-ons require special hosting requirements to manage live interactions and video streams, and there are paid and free ones.
1- WebinarPress
By using the WebinarPress add-on, you can activate the live broadcast feature, or create a webinar directly from your website or via YouTube or Vimeo.
This add-on includes a free version with basic features and a paid version with professional features. One of the advantages of this add-on is that it is easy to use and you will not need any technical knowledge to activate and use it on your site.
In the practical section of the article, we will explain in detail how to livestream from YouTube on the WordPress website using this plugin, so read on to learn the detailed steps to do so.
2- wpstream
Wpstrea m is a free plugin that has been downloaded more than 5,000 times. This add-on works with various types of browsers and enables you to broadcast live with just the click of a button. It also works with WooCommerce by recording your stream and saving it as a product to sell later.
If you want to create a WordPress website that offers paid training courses, we advise you to read how to create a platform for selling educational courses online (such as Udemy) step by step.
3-Broadcast Live Video
By using this to add Broadcast Live Video, you will provide a unique advantage to your site users, which is the ability to broadcast live from your site while controlling access to live broadcast content, without relying on external platforms and adhering to their terms. Users can also follow the broadcast while browsing various web pages on your site or other sites, by minimizing the screen while browsing the broadcast.
4-Modern Audio PlayerW Wrdpress Plugin
This add-on differs from the previous add-ons in that it offers the live broadcast feature for audio clips only. You can also publish the broadcast via SoundCloud. This feature is not available in the previous add-ons, because SoundCloud works on audio clips only.
You may be somewhat surprised at the possibility of making a live broadcast with only audio clips and no video, like radio, but SoundCloud has a large audience that can be attracted to your site.
5- Twitch for WordPress
If you own a gaming site, you definitely need to add Twitch streams .
It is a live-streaming platform designed specifically for live game enthusiasts to enable them to create a community while broadcasting live games. The free version includes 100 available games that you can choose from.
The most popular templates that suit live streaming services
There are several WordPress templates that are suitable for live streaming websites, and here are the most popular of them.
1- Hello Vloggers : The Hello Vloggers template was specially prepared for YouTube users and other people interested in creating content through videos, films, and photos. It is suitable for websites whose content is primarily video based.
2- Video pro : The Video pro template is designed for video sites only, so you can make livestreaming and record it on the site with ease. You can also embed any video from external content and add it to your site.
Read also: How to embed a video into a WordPress page in an easy and simple way.
Launch a live stream with WPstream
Now we will move on to the practical application part. In the following paragraphs, we will learn how to launch a live broadcast from your site directly on WordPress using the WPstream plugin.
As well as launching a live broadcast through your YouTube channel and at the same time on your WordPress site. Using the WebinarPress plugin as follows:
1- Go to the WordPress control panel on your site and click on Plugins.
2- A new page will appear for you. Click on ( Add New ) to be able to search for the WPstream plugin from the WordPress plugin library.
3- Type the name of the WPstream add-on in the search box, and the add-on will appear.

Make sure that the plugin is compatible with the current version of WordPress, then click on Install Now, then click on Activate.
4- After activation, you will find the WPstream add-on in the side toolbar in the control panel, click on it. The login page will appear.
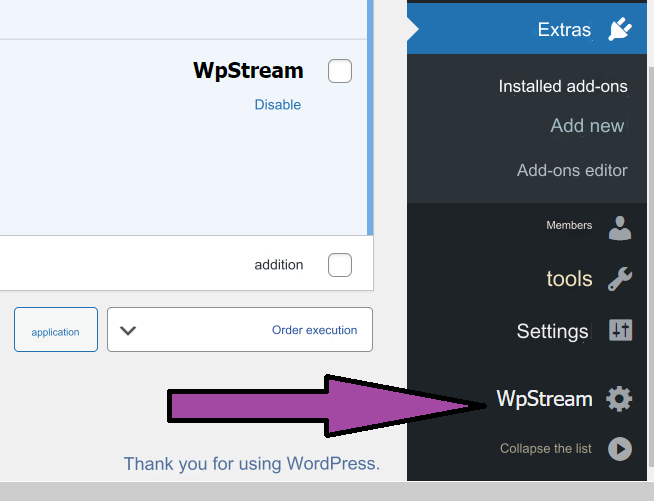
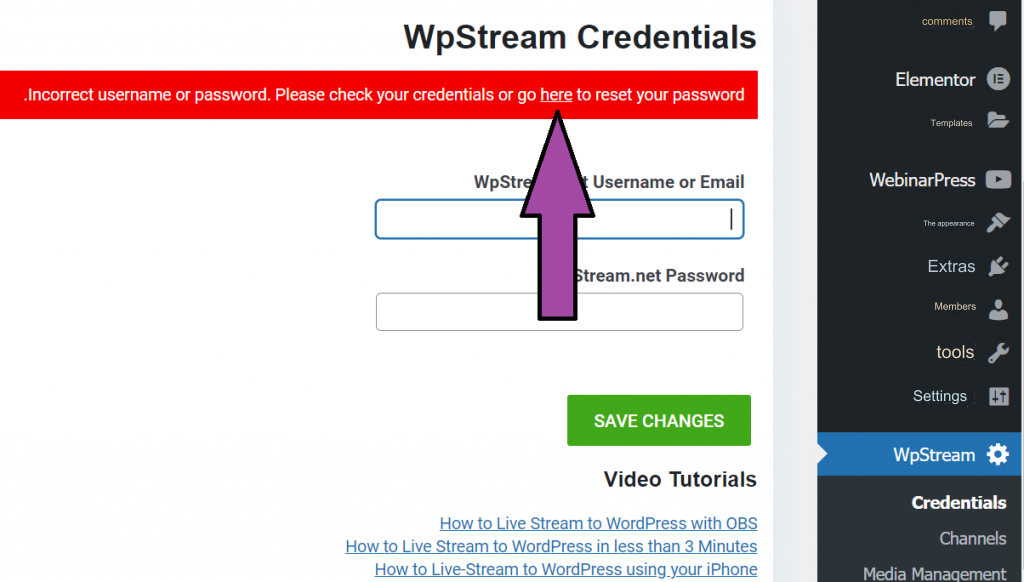
5-If you are using the WPstream add-on for the first time, you will need to create a new account. Click on the here link from the red bar shown as shown in the following image.
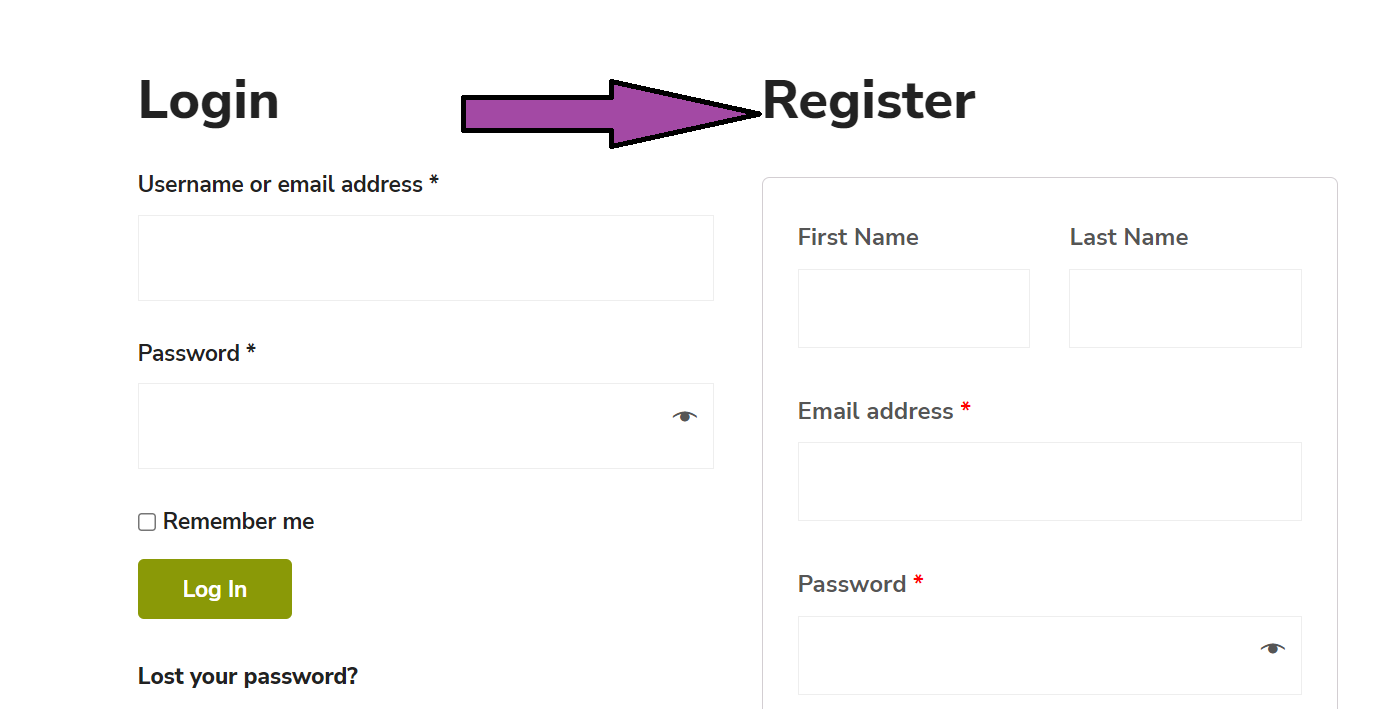
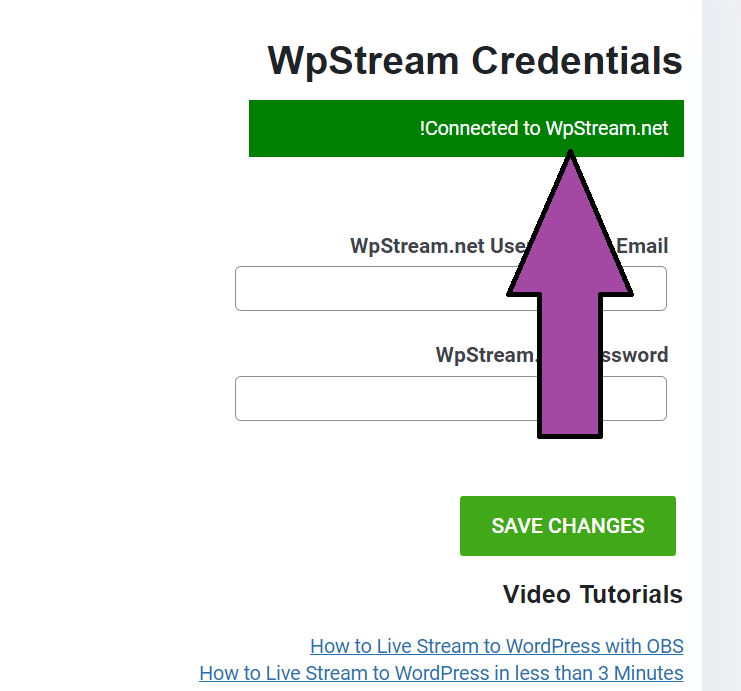
6- A new page will open for you on the wpstream.net website. Write your basic data in it and click Register to register, then return again to the site’s main control panel page. You will now find a green bar connected with wpstream.net indicating the success of the connection to the wpstream add-on.
7- Now that we have registered a new account, we want to launch a new channel for live broadcasting, and on the WordPress website, this channel will be one of your site’s posts. Click on the link create new free channel.
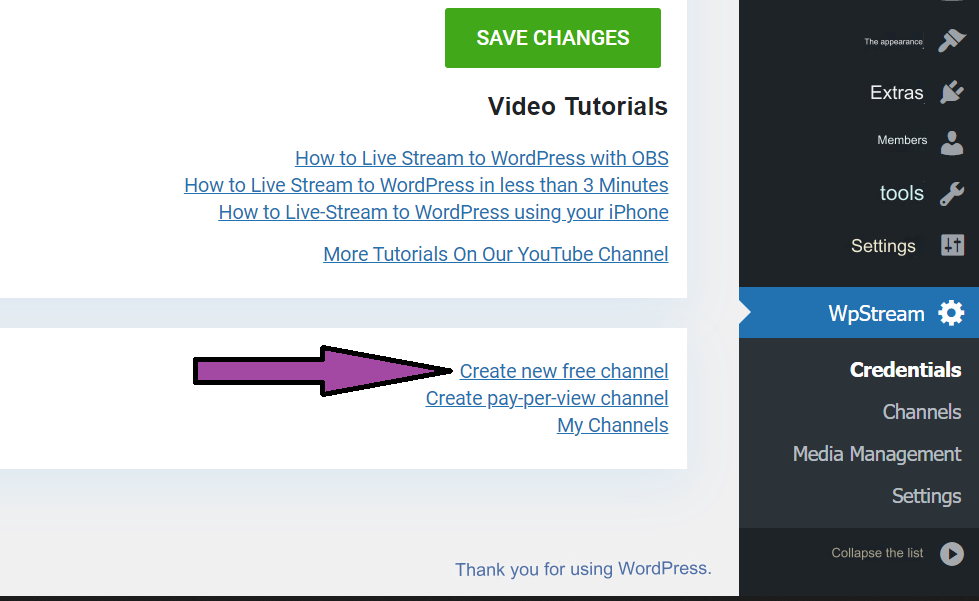
Note: There is another option under the previous link (create pay-per-view channel). This option enables you to launch a broadcast and earn money for viewing, but this option only works with the WooCommerce add-on.
8- A new page will now appear. Write the live broadcast title and description in the description box. Then click on the Start Live Event button
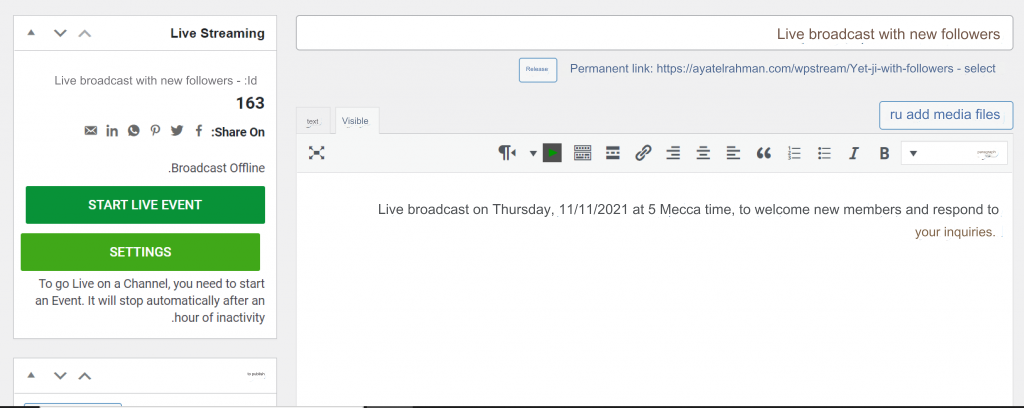
9- A message will appear to you that the broadcast takes one to two minutes to start. In the meantime, you can share the broadcast on your social media platforms to get more viewers during the broadcast.
10- Then you will see three options for broadcasting, choose Go Live From Browser so that we can launch the broadcast through the browser.
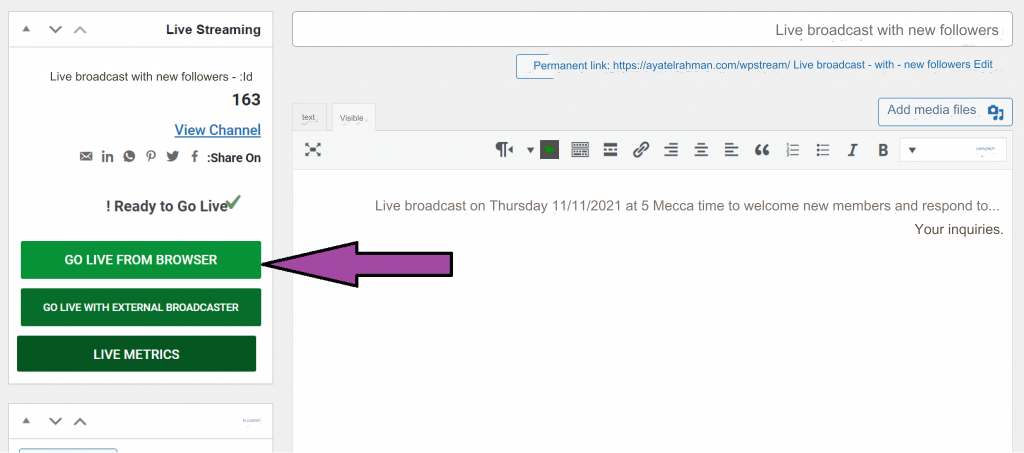
11- A new page will open for you in a new tab to launch the broadcast, then adjust the camera and microphone options and then click on Start Broadcast
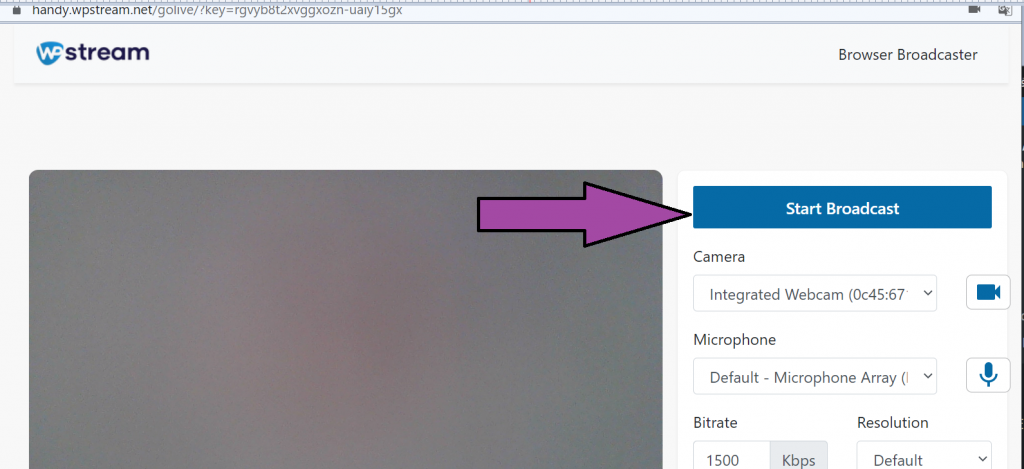
12- Now you are actually live broadcast with your followers and they can participate with them with comments during the broadcast and interact with them. When you are finished, you can click Stop Broadcasting
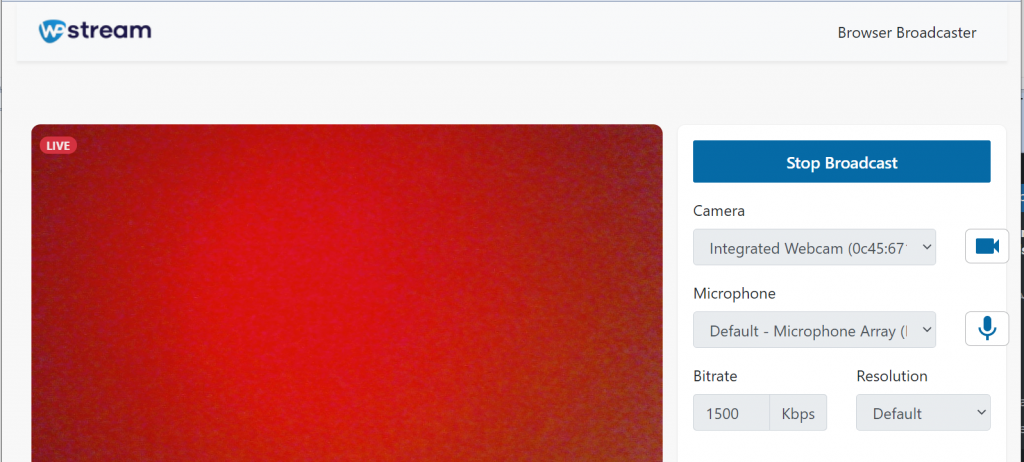
13- If you want to know how the live broadcast appears to followers, you can return to the broadcast launch page and click on the View Chanel link
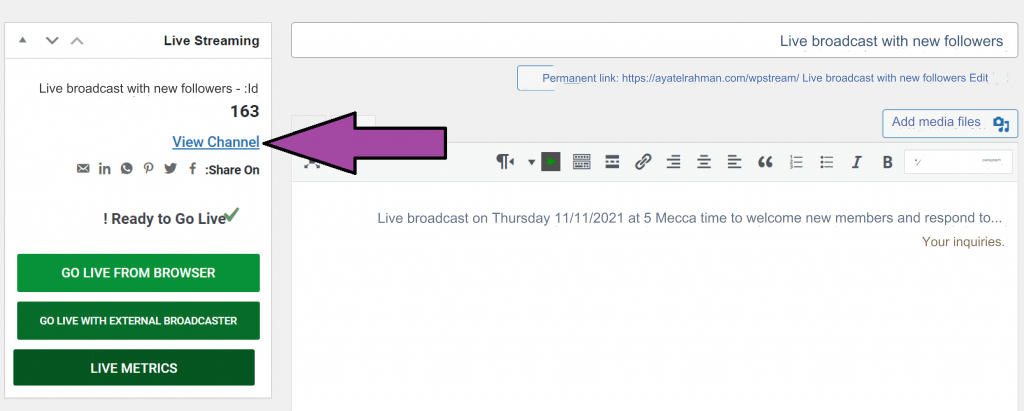
The live broadcast will appear to you in a separate article on your site, with the number of followers and all the details you previously entered as follows.
Launch a live stream from your YouTube channel on your website using webinarpress
1- Install and activate the Webinarpress add-on by following the same first steps that we mentioned in the previous paragraph.
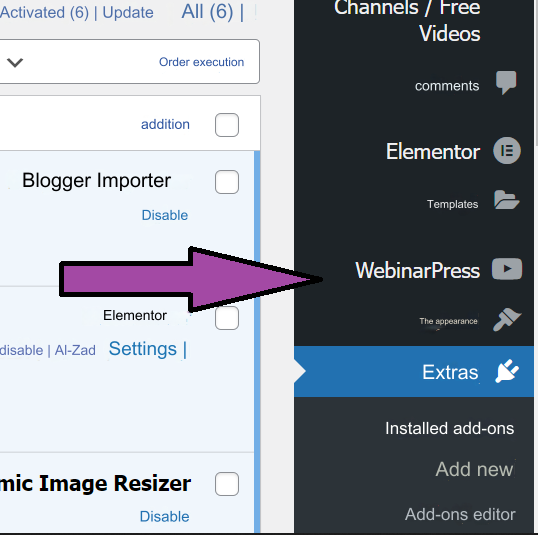
2- After installing and activating the add-on, its name will appear in the side menu of the site’s control panel.
3- Click on the name of the webinarpress add-on from the side menu, then click on New Webinar to start a new webinar.

4- A new page will appear to you. Fill in the boxes for the broadcast title and description.
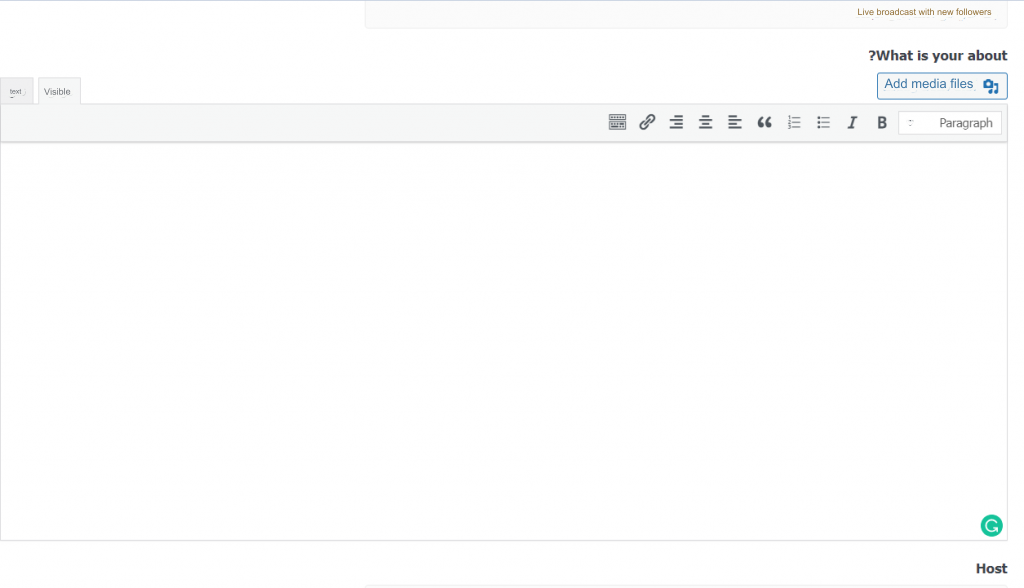
5- In the Host box, you can write the name of the host (in this case, the host is your YouTube channel, and therefore you can write the name of your channel) and also specify the start date of the live broadcast.
6- Adjust the timing settings according to the country of the target audience in the Time zone and duration box, and specify the duration for which the broadcast will continue, as after the end of the period you specified, the live broadcast will end automatically.

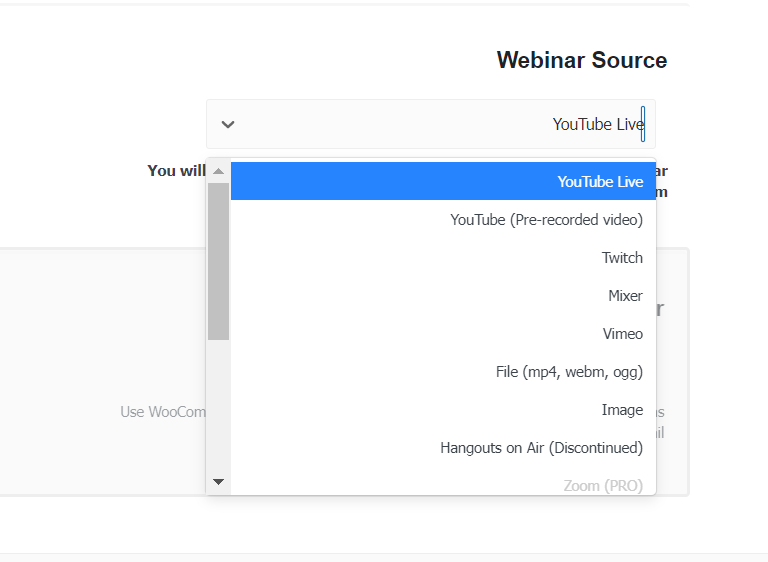
7- You can select the webinar source from the Webinar Source drop-down list that contains multiple options. The add-on gives you two options with YouTube: They are the live broadcast option (YouTube Live), and the option to broadcast a pre-recorded video that you can watch with your audience and follow their comments.
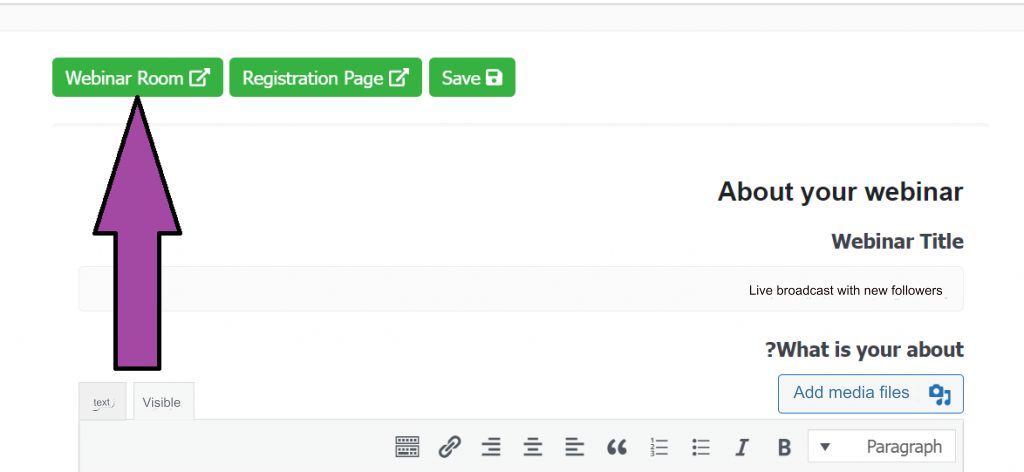
8- After you finish selecting all the options, you can click Save, then click Webinar room.
9-If your choice is a live broadcast from YouTube, then you will be asked to write the link to the broadcast.
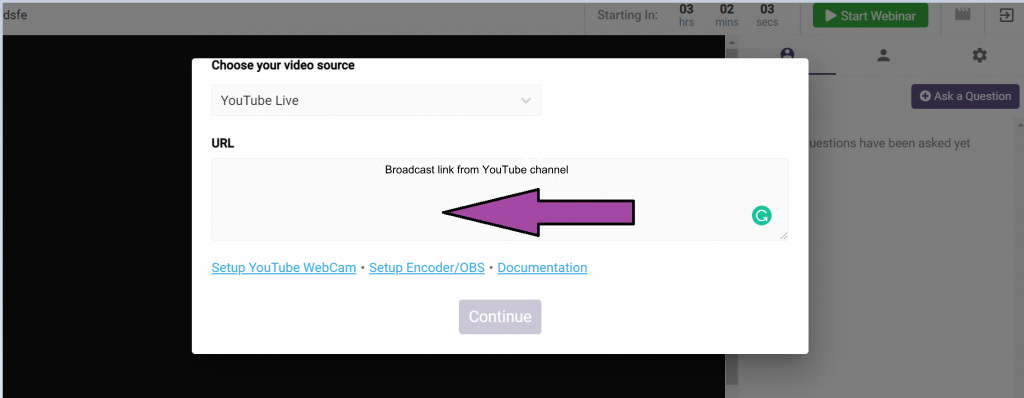
You can get the link from your YouTube channel, and paste it directly into this box.

10- Then click on the Continue button and you will find the webinar room as shown in the following image. You can click on Start Webinar to start the live broadcast at the time you specified previously.

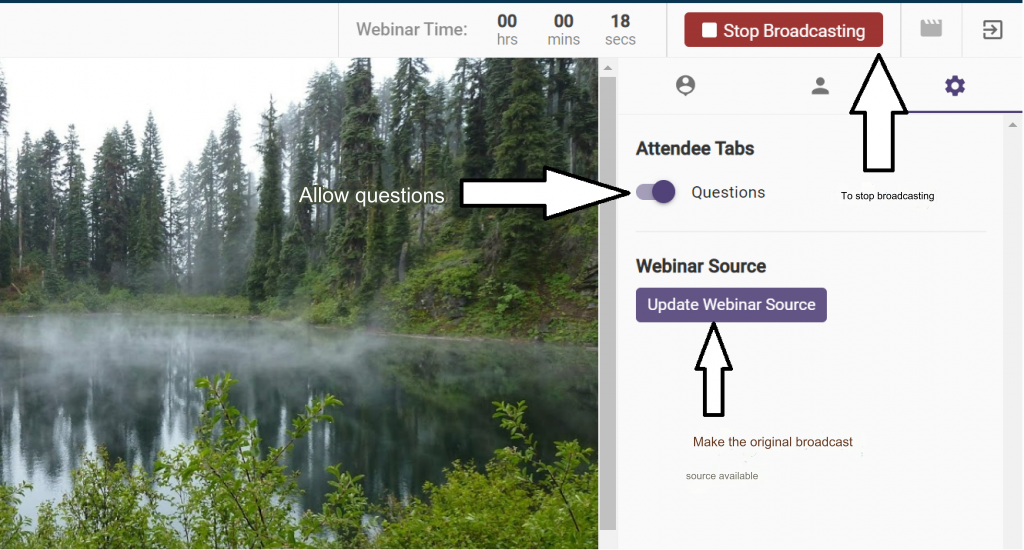
11- After starting the broadcast, your page will look like this. On the right side you will find 3 options, through which you can make questions and comments available during the broadcast or not as you wish. You can also provide followers with the main broadcast source, which is your YouTube channel. When finished, you can click Stop Broadcasting.
Conclusion
In the end, the Livestreaming feature is considered one of the most powerful and effective tools to increase interaction with your audience and increase the number of followers as well. Through this article, we learned about several methods that you can follow to start using live streaming in the content of your WordPress site. Either through the website itself, as we explained, using the Westream add-on, or through the YouTube channel and broadcasting it on the WordPress website at the same time, using the Webinarpress add-on.
Follow the method that suits you according to the steps mentioned in order, and if you encounter a problem, do not hesitate to write it in the comments and we will respond to you as soon as possible. If you use other add-ons for live streaming, share your experience with them as well.


Leave a Reply