You may ask: What is the reason for fast loading of WordPress sites? There are many reasons, including the use of caching in addition to the use of a content delivery network (CDN) and other factors that affect the speed of the site .
Caching is a process through which dynamic pages (generated by PHP code) are converted into static HTML pages. This process is not an easy process, as it requires extreme caution. As for the content delivery network (CDN), it is a group of servers linked together, but Be in different geographical locations.
These servers work together to load content faster and thus bring the server that contains the assets or content that the visitor wants based on geographical location, closer together, assets such as HTML pages, JavaScript files, CSS files, images, videos, etc.
One of the best add-ons used for caching is the W3 Total Cache add-on, which is an add-on that specializes in fast website loading. In this article, we will explain how to install, activate, and set up the W3 Total Cache add-on correctly, and how to integrate it with a CDN service for more speed.
Remember to first check your site’s performance and speed by using specialized tools, such as: Google Page Speed and Gtmatrics , so that you can compare the speed of your site before and after using the extension. It is also worth noting that the W3 Total Cache plugin is approved by many famous sites, such as: AT&T, Mashable, Smashing Magazine, WPBeginner, and others, so we recommend relying on it when building your WordPress site .
Note : Before installing W3 Total Cache, you must make sure that there are no other caching plugins present. If you leave another plugin in the category, you will encounter errors and conflicts between those plugins.
Installing and configuring W3 Total Cache
To install W3 Total cache, choose “ Add New” from the “ Add-ons ” submenu.

Then type the name of the add-on in the search and it will appear as in the following image, after which you must click on ( Install Now ):

After installing the add-on, we must click on the ( Activate ) button for the add-on to start working

Now go to ( Dashboard ) from the ( Performance ) menu that appears to you after activating the add-on

In the first window, you will see a request for permission to obtain data. If you want to allow the ( W3 Total Cache ) add-on to obtain data and details of your use of the add-on in your work to use it to correct any defects that arise while using the add-on.
You can click the Accept button , or you can deny access and continue.

A message will appear informing you that the settings that will be made will be simple and quick, so continue by pressing the NEXT button

Click on the ( Test Page Cache ) button to test the time required for the visitor to type the name of the page on the browser and the speed of the Service Provider’s response to it by sending the first bit (the unit used in the computer). This time is called TTFB . This test gives you the loading speed of pages now and afterward. You can choose to activate some acceleration options.

Then you will see the option ( Disk Enhanced ): This is an option used with shared hosting to improve the speed of pages on the site. You must activate it as follows:

Every loading process for any page on your site is accompanied by a request for a certain amount of data from within the databases of the hosting service providers that you deal with. Therefore, caching databases can help speed up the site. To run a speed test for databases, click on Test Database cache. as follows:

The Disk prompt will appear and advise you not to select it for beginners. Leave it and press NEXT

We will then move to the “Object Cache ” speed test, which is used with complex databases. We do not recommend using it for beginners. To perform the test, click on the “Test Object Cache ” option as in the following image:

You will also see the “ Disk ” parameter, and we also advise, as before, not to activate it for beginners, after clicking on the NEXT option.

After that, you will see the “ Browser Cache ” option, which is responsible for the speed of the browser. Browser caching speeds up your site by enabling the storage of static site data in visitors’ browsers, such as JavaScript files, CSS files, HTML files, images, and other data that loads on visitors’ browsers. This means that users do not have to reload the page when Get out and visit it again. To test the browser’s caching feature, click on the “ Test Browser Cache ” option.

It will appear to you that the browser caching feature is activated within the basic settings of the extension, so you do not have to activate any option in this window and click directly on the NEXT option.

You will then see the Lazy Load option , which is a very useful feature to improve the browsing experience of visitors to your site, and we recommend using it. What this feature does is delay the loading of images and videos on your page, so that it gives priority to written details, such as articles, news, etc., and then the images are downloaded. When the user accesses it instead of downloading it all at once when opening the site.
To activate this feature, place a mark next to the option as in the picture

In the final step, you will see all the settings that have been changed in the add-on, as in the picture. Then all you have to do is finish the settings by clicking on the Dashboard option .

General settings for the extension
Now to examine the practical effect of the settings you modified and in order to have greater control over the add-on features, go to the “ Performance ” submenu, then choose “ General Settings .”

At the beginning of the page you will see “ Preview Mode ”, which is a mode used if you want to test some settings, and at the same time you do not want to damage your site if something goes wrong, so you can enable Preview Mode and change the W3 Total Cache settings without fear of any errors appearing on your site during Use these new settings.
Click Enable to activate it.

In the next window you can preview your website pages without worrying about problems. After previewing, if you want to save and activate what you have chosen, you can press the Deploy button .

Page closed
The “ Page cache ” option contains information for users who have experience in this programming field, so the best choice if you do not have much technical experience is “ Disk Enhanced .” This option handles the caching task in a simple way by creating a stable copy of the web page by modifying htaccess file , which allows your website’s web server to deal with a fixed copy of the pages directly. The caching feature makes the website 2.5 times faster than the normal state of the website.
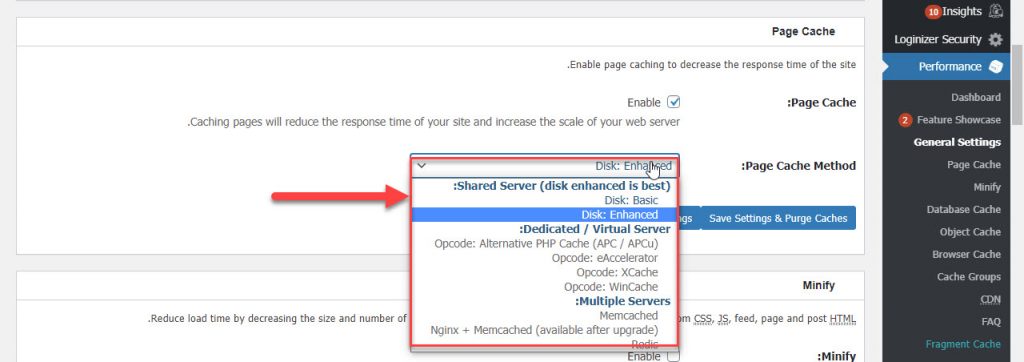
“ Minify ” means minimizing and optimizing CSS, JavaScript and HTML files by removing any unnecessary characters from the source codes of these files, for example separators, lines, extra whitespace and comments are removed. This reduces the size of the code and thus the size of these files and allows you to load a website. Web faster.
Minifying or merging CSS and JS files can give you up to a 10% increase in loading speed, but there is a risk that this will break the site’s design, theme functionality, or plugins. It is worth noting that problems associated with JavaScript code errors can be annoying. It is difficult to solve.
Let’s quickly review the most important Minify settings
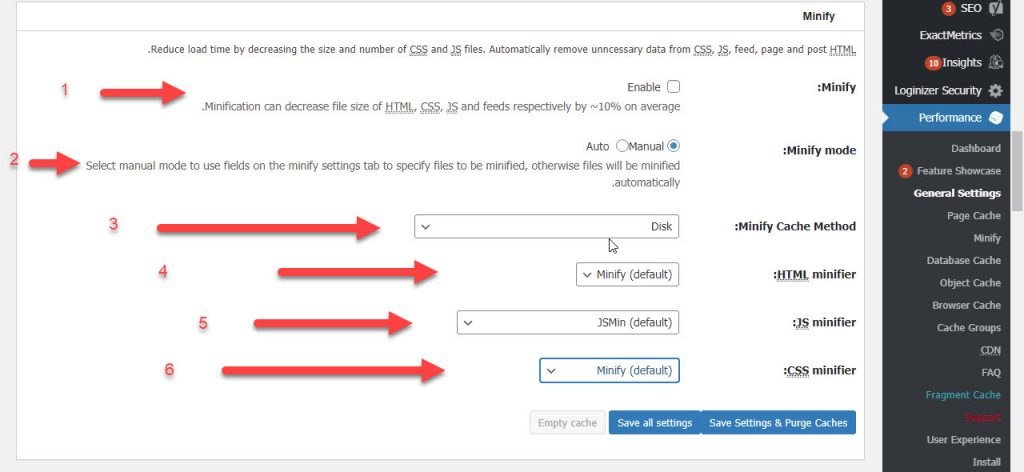
- To activate zoom and merge
- To activate the merge manually or automatically
- To choose the type of caching
- To choose the process of reducing or merging the HTML file
- To choose the minify or merge operation for the JS file
- Choose a minification or merging operation for the CSS file
Opcode cache
WordPress was written in the PHP language, and “Opcode Cache” translates the PHP details and stores them temporarily, making the site much faster. If you are not an expert in website development and how to modify PHP codes, it is better to disable this option, but if you are an expert in these details, this option will definitely benefit you.

Database cache
WordPress primarily uses databases and caching allows for reduced database usage. Database caching can make your site faster if the time needed to get data from the database is longer than the time needed to get data from the cache, so if you are using shared hosting, database caching will not be available to you, if If you are using Shared hosting it is recommended not to use database caching.

Object Cache
The “Object Cache” option allows obtaining data from the database more efficiently. Its mechanism and purpose are similar to the mechanism of the database cache, except that the cache of objects and components is more efficient. It is preferable not to use item cache in case of shared hosting.

Browser Cache
As we mentioned, “Browser Cache” is one of the most effective options, as JavaScript files, images, and HTML pages are stored on the visitor’s browser. After the visitor opens your site on his first visit, he will not need to download this data again if he returns to the same page he visited, and this This means reducing the demand on your site’s server and therefore increasing the efficiency of the site as well, this makes the visitor’s browsing much faster, we highly recommend using browser cache.

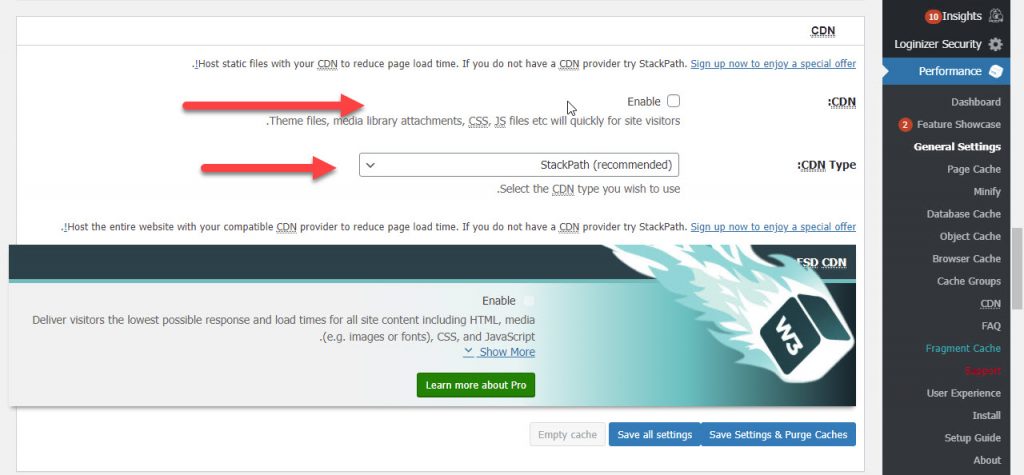
CDN
A CDN improves website performance by storing static files (CSS, Java Scripts, images, download files) on different servers distributed all over the world; This allows to serve your visitors faster by keeping some of your site’s static resources closer to visitors, so it is always recommended to use a CDN.
A CDN depends on many factors, including: the location of your hosting server, the location of your visitors, your traffic, the number of images you use, the size of your images, and the hosting speed of your site, but in general, if your site gets a lot of traffic, The CDN feature will reduce the demand on your site’s static resources and thus make your site faster.
It is recommended to use paid CDN plans (such as Cloudflare ). A CDN filters malicious traffic to your site, protecting you from DDoS attacks and bot hacks, among many other features.
Reverse Proxy
A Reverse Proxy is a proxy server that retrieves resources, such as images, JavaScript files, CSS files, HTML files, etc., from one or several servers and provides the data to a user who visits your website, i.e. it is a server located in a specific geographical location close to you and keeps a copy From your site to bring it closer to the visitor so that it makes your site faster by compressing the entire website content and storing it temporarily in its database.

A reverse proxy stores not only static content, like a CDN, but also dynamic content. A reverse proxy provides an additional level of security for your site, and has many other benefits.
This part is for those who have experience in the technical field. If you are a novice user, leave the W3 Total Cache setting of Reverse Proxy in the default position.
User Experience
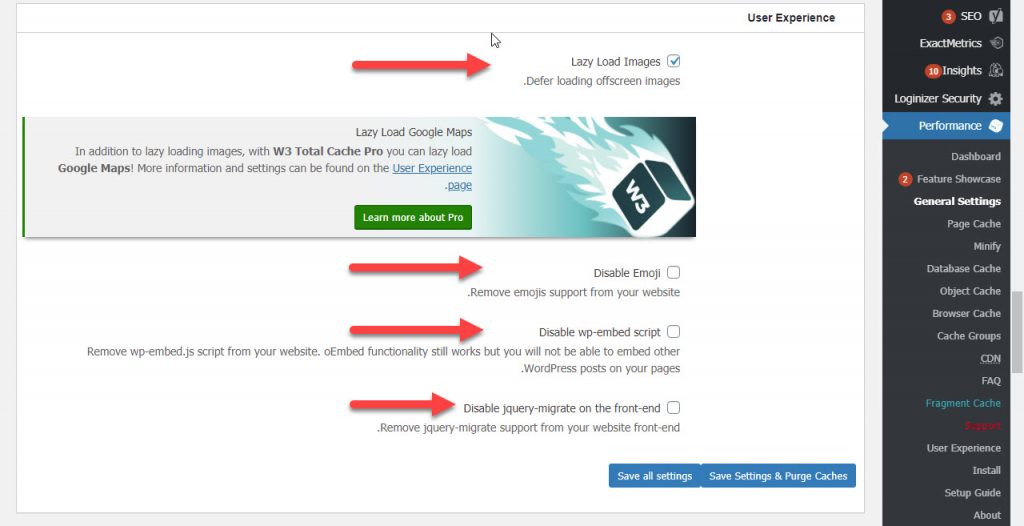
The “User Experience” section reviews some popular features, such as Lazy Load, which we detailed previously, which delays the loading of images and videos. This delay reduces the page size, which makes the page load faster.
These settings also have the option to stop emojis and the option to stop loading the wp-embed.min.js file; It is a file that is downloaded with YouTube files, and it is rather large and sometimes slows down the site’s loading speed.
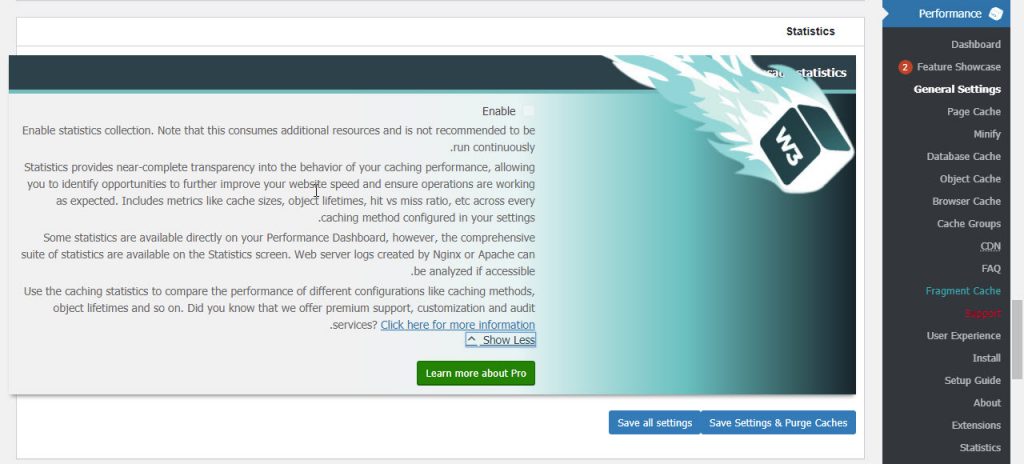
Statistics
Statistics are all the capabilities offered by the paid “Pro” add-on, such as providing statistics, support services, customization, auditing, and other features that you need to purchase the paid version of the add-on to obtain.
Especially for advanced users or developers, this part includes settings for “ Fragment Cache ”, which is an intermediate caching technology that is less than full page caching. The Fragment Cache feature allows you to cache certain parts of your PHP code.
A developer may want to use this feature of caching to customize what is cached, and reduce cache size or time, meaning that a portion of the page remains dynamic, while most page elements are cached. A fragment cache can be used when the entire page cache cannot be used.

Licensing
Used if you purchased the Pro add-on

Miscellaneous
In the “Miscellaneous” section of the W3 Total Cache plugin, it is recommended to leave all settings in this section by default, with the exception of “Anonymous Track,” which can be disabled. This option allows displaying the results of your site’s performance tests within the WordPress dashboard, and among the options is the option to run tests for the site. Using Google PageSpeed Insights (Google’s official website) to test the efficiency and speed of the site.

Debug
The next option is the “Debug” option. This option provides information about specific caches at the end of the source code of your site’s pages. This option is especially useful if you are a website developer or software expert. Otherwise, ignore this option and leave it at default.

import/export settings
The last option is “import/export settings” to add W3 Total Cache to a file, with the ability to import it again if you don’t like the new settings.
You can also use pre-made settings from another party – another site or developer for example – if you don’t want to go through the step-by-step process yourself. There is also a “Restore Defaults” option that you can use if you want to re-customize and modify the settings of the W3 Total Cache plugin from scratch.

In the end, the W3 Total Cache add-on is one of the best specialized add-ons to speed up browsing your site, and you should take it into consideration if you want to provide a distinctive and fast browsing experience for your visitors, as it raises your site’s rating in Google due to it improving the speed of your site, but you must be careful in dealing with it. With this addition, it may cause you some technical problems if you do not handle it carefully


Leave a Reply