you are planning a unique launch and a strong start for your site , then the site must be as perfect and free of errors and gaps as possible at the beginning of its launch. Of course, it would not be good for your customers or visitors to your site to encounter errors on their first experience with the site, right? Here comes the importance of creating a WordPress website on the local server.
Creating a WordPress website on a local server (Localhost) helps website owners test the site before launching it, in other words, you can try out all the plugins, features, and elements that you want to put on your site. You can think of this strategy as pre-practice before the final presentation.
If you own a website or blog on WordPress and want to try out your site and experience the features and how the various plugins and templates work, or you are a beginner trying to learn your first steps in the journey of creating your own website, then your best option is to learn how to install WordPress on the local server via your device.
In this article, we will explain to you, step by step and in an illustrated manner, how to create a WordPress website on the local server, while reviewing all the tools that you may need for the website to work on your device before you launch it on the Internet.
The importance of creating a WordPress website on a local server
The process of installing or creating a WordPress website on the local server is a common and essential step for developers. Through it, you can conduct tests on the site and try it, as well as learn the various functions of additions and tools without risk to the site.
You may be wondering what is the difference between a local server and a real website that is on the Internet? Well, the local server will be installed on your personal computer, and no one except you will be able to access the site. On the other hand, the real site will be stored on the Internet (cloud storage) and therefore will be available to all visitors and users to access it.
Also, before we review the steps explaining how to create a WordPress website on the local server, it would be good for you to learn about the most prominent fruits that you will reap from this process:
- If you have errors on your site, only you will see them.
- You will not be required to connect to the Internet.
- Great speed of work, because you will not upload (upload) any data to the server on the Internet.
- You can try whatever you want without any fear of problems.
- Completely free, and does not require you to pay anything, other than obtaining online hosting or a domain .
Local server concept
You must have heard before the term hosting companies , which host websites on the Internet. In the same concept, the local server does not differ much from hosting sites. The main difference, as we mentioned, is that the host in this case will be your personal computer.
You can install WordPress on your computer by turning it into a host, that is, as a server, and therefore you need server simulation software, such as (XAMPP, MAMP, and WAMP).
Server simulation software – XAMPP
XAMPP is a software package that includes all the settings and conditions you need to set up a local server environment on your PC. To create a local WordPress site, you need to set up web server software (Apache), PHP, and MySQL on your computer.
PHP is a programming language and MySQL is a database management program. You need to install both components to be able to host and run WordPress on your device.
- Xampp, works on all systems.
- Wamp, works on Windows.
- Mamp, works on Mac devices.
- Lamp, works on Linux machines.
Steps to create a WordPress website on a local server
In this explanation, you will learn how to create a WordPress website step by step without the need for any previous technical experience. In this explanation, we will use the Xampp program, through:
- Download and install Xampp on your computer.
- Launch Xampp with basic settings
- Download WordPress.
- Create a database.
- Install WordPress on the local server (Localhost).
This is the general idea, and let us review the construction steps in detail in the following lines
1. Download the Xampp program and install it on the computer
To download the program, you must go to the official website , and then choose the operating system of your computer (Windows, Linux, or Mac) on which you will work. We will complete this explanation using the Windows system by clicking on the download icon as in the picture, and the program will be downloaded directly.
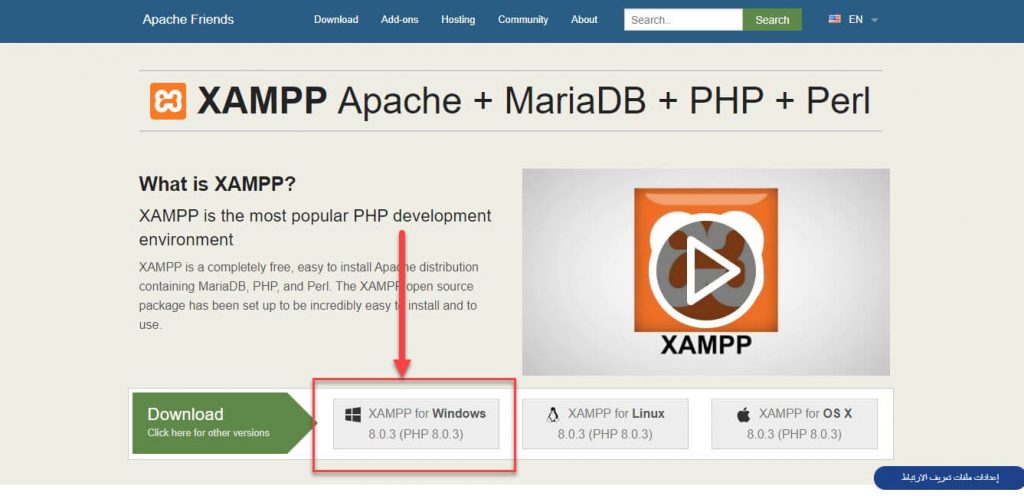
The file size will be approximately 110MB. After that, you have to move on to installing the program on your computer. After downloading Xampp on your computer, you must install the program, by going to the place designated for storing the downloaded files, where you will find the program in the form of a compressed file, which you must open and run, to begin the installation process.
The first screen will be the welcome screen and you have to click on Next.
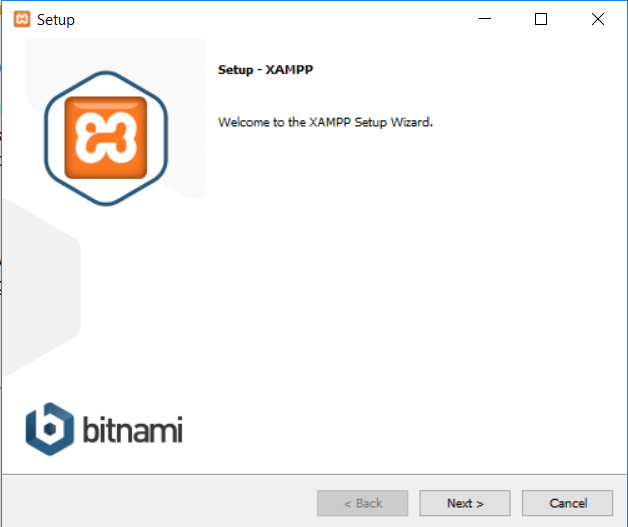
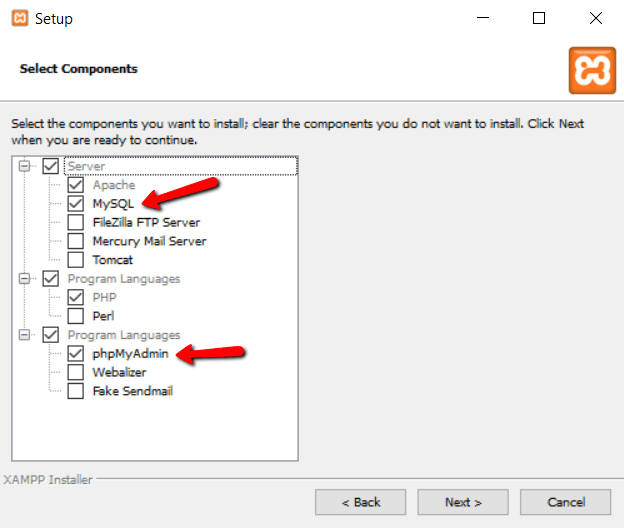
2. On the next screen, you choose the components that you want to install on your device. Make sure to check MySQL, PHP, and phpMyAdmin, as indicated in the image below.
3. Then choose the path where you want to save the files on your computer
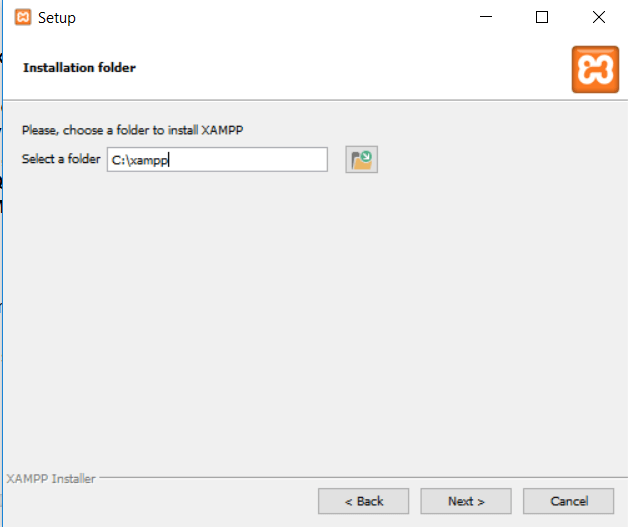
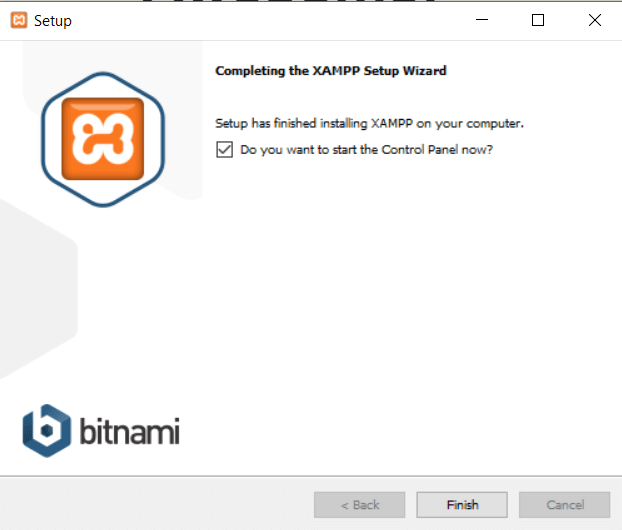
4. Then you continue to click Next to configure the settings and download the program, until you reach the last screen and click Finish
2. Run the Xampp program on the computer
After completing downloading and installing the program, you can start running the program, open it, and the program interface will appear to you as follows:
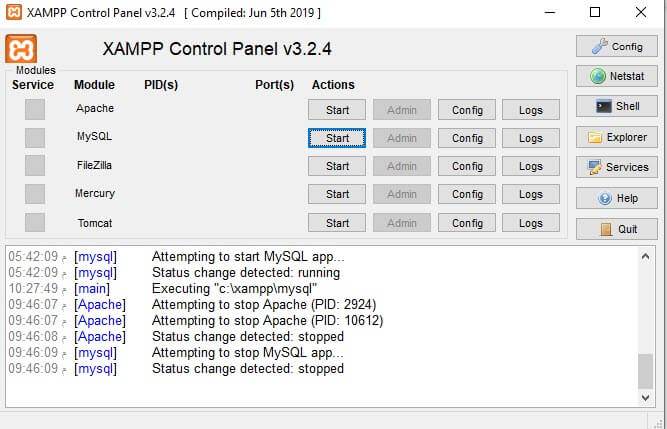
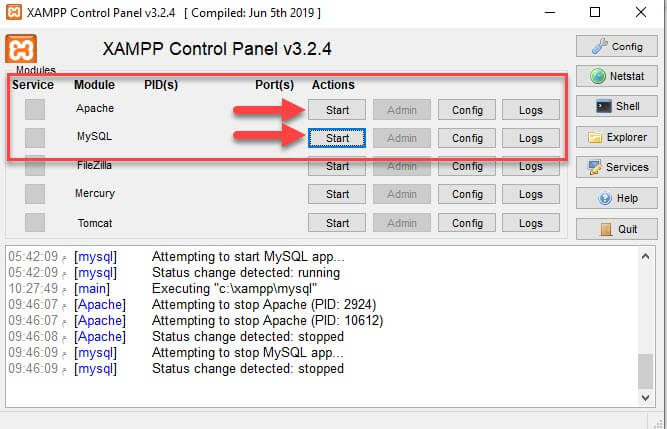
What we need here in our example, in order to run WordPress on the local server, is to activate both the Apache and MySQL options, by pressing the Start button.
Note : In some cases, you may encounter some errors while running the program, for some reason, there may be a conflict with the version of Windows or due to problems with the port used or other.
Solve port problems
Sometimes during the installation of Xampp, problems related to the port appear. The cause of these problems may be that, for example, you downloaded a program on your device and this program used or reserved the same port that Xampp uses.
For example, I downloaded Skype, which uses port 80, which the host also uses, so a conflict and problem occurs when running Xampp.
When you run Xampp, you will see a message like the following:

To solve the problem, you must change the port or port that Xampp uses, as follows:
1- Click on Config, then httpd.conf

2- The Notepad file will open for us, where we must search for the port in order to change it
3- You have to search for (Listen 80) and change it to (Listen 8080)

4- You have to search for (ServerName localhost:80) and change it to (ServerName localhost:8080)
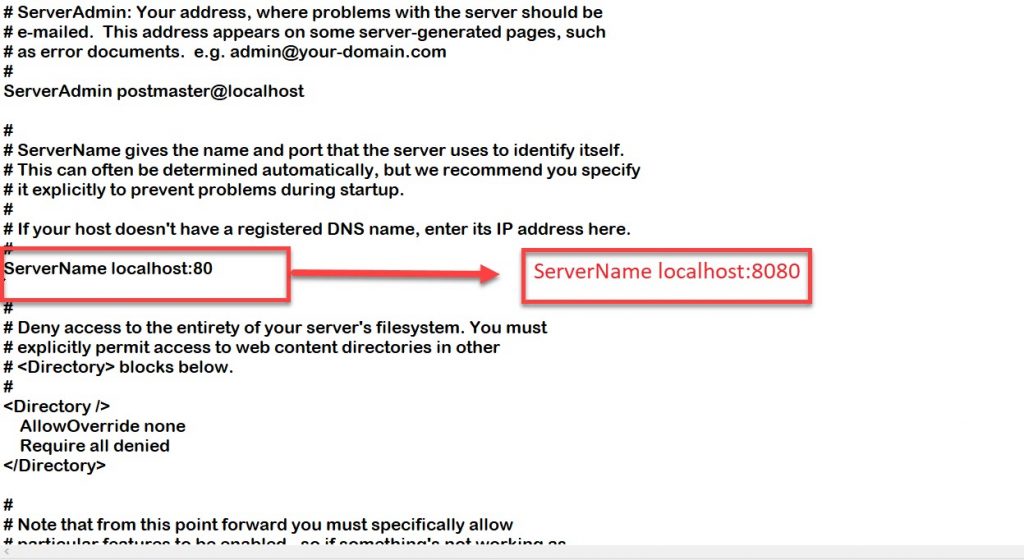
Thus, the common port problem has been solved, and you can restart Xampp again and try it
If things are working correctly, your image will look like this:
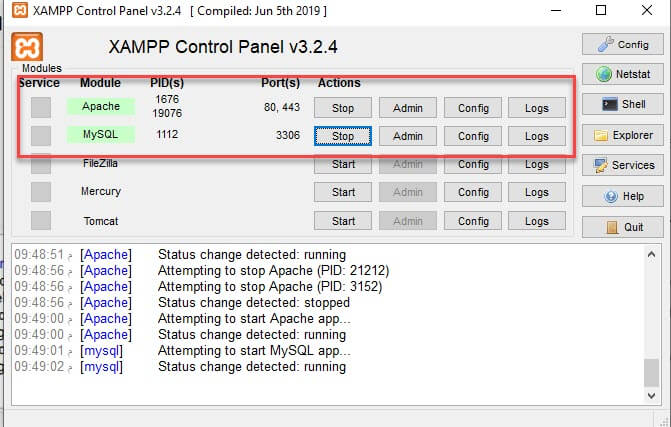
Now you can verify that your local server is working, by going to your browser and typing http://localhost/ in the address bar within your browser.
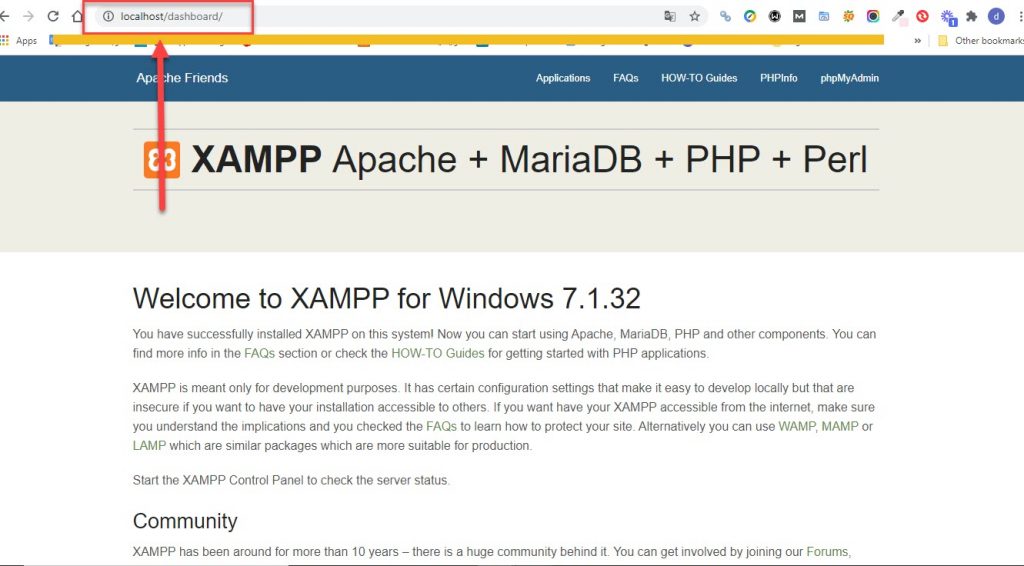
Now, you have a local server running on your computer using Xampp. The next step will be to install and run WordPress.
3. Download WordPress
To download WordPress on your device, you must go to the official WordPress website , and if you want the Arabic version, you can click on the word Arabic, as indicated in the following image.
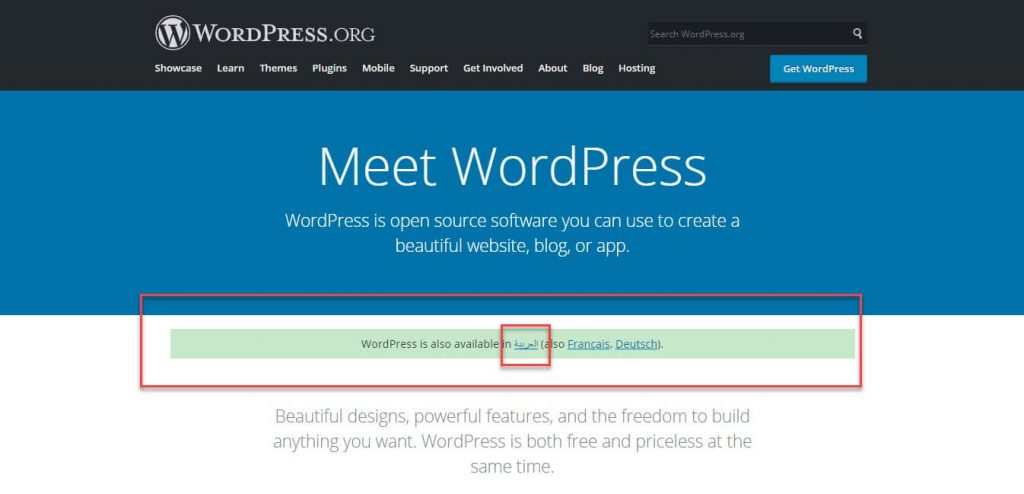
The site becomes in Arabic, and then you have to click on the “Get WordPress” icon as in the picture.

On the next page, where you can download the latest version of WordPress to your device, you have to scroll down until you come across the “Download WordPress 5.7.1 (or any other recent version)” icon.

After the download is complete, you will have finished downloading WordPress, and you will have a compressed file (WordPress.zip) on your device that contains all the necessary files to install WordPress on your computer.
Now you have to go to the folder in which you installed Xampp, which is usually ( C://xampp) and then search for a subfolder inside it called “ htdocs”, as shown in the picture.
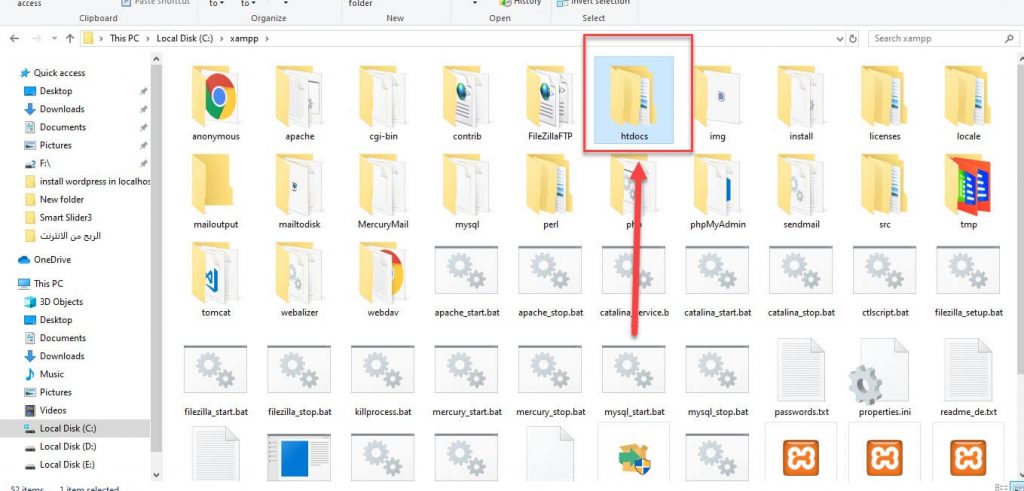
Then you must copy the WordPress zip file that we downloaded previously (WordPress.zip) and place it inside this folder.

Then we unzip the WordPress file and rename it, for example (TestSite).

After the decompression process is complete, you can enter the WordPress folder, which we called (TestSite). You will see all WordPress files located under this folder.

Here you will have successfully downloaded and run the Xampp program on your device, as well as downloading, configuring, and linking WordPress with the Xampp program on your computer. Our next step will be to create a database for our WordPress site.
4. Create a database
In order to activate WordPress on the local server on your computer, we need to create a new database. To do this, you must access the PHPMyAdmin database management page and then create a new database through it.
You can run the PHPMyAdmin page in two ways:
- By going to your browser and typing http://localhost/phpmyadmin/, the database management page will open for you.
- Through the Xampp program, by clicking on the Admin icon, as shown in the image below.
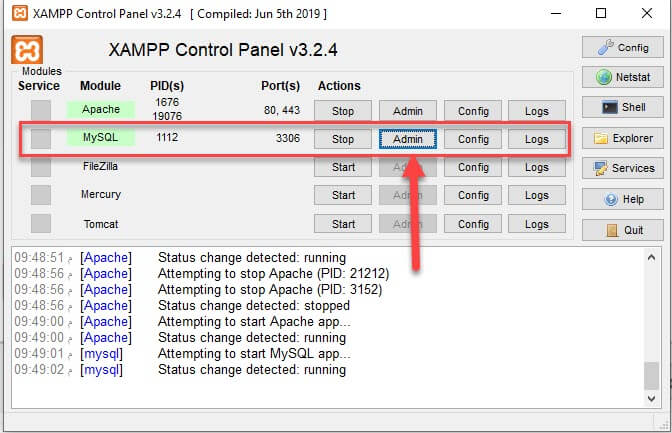
Regardless of which method you used, a database management page will open and will look like this:

To create a new rule, you must click on the NEW icon, indicated in the red box in the following image.

Then write the name of the new database, for example (wordpress11, test, etc.), and press the “ Configure” button.

Now you will have successfully created a new database, and you are just one step away from finishing.
5. Install WordPress on the local server (Localhost)
This is the last step, in which we will install WordPress on the local server, and then start using WordPress.
To install WordPress, you must go to the browser and write the address of the folder that we created previously, which is (TestSite). What you must write in the search box in the browser is: http://localhost/TestSite /
To open the next page for us.

You must now click on the subfolder within it, located with arrow number 2 in the previous image, in order to begin the WordPress installation process. The settings will be displayed in English and you can choose the language you want for WordPress (and you can change it later). Then you have to click the continue button.
On the next page, a message will appear telling you that you need to configure some information. To complete the process, you must click on the “Start Now” button.

After that, a new page will appear, in which we need to enter some important information:
- Database name : We put the name of the database that we created at the top, which was called (wordpress11).
- Username : Type (root), which is the default username for the database. You can write any name you want
- Password : We leave the field blank

- Hostname: as is (Localhost)
- Table prefix: We also leave it as is
After filling out the previous data, you must click the “Submit” button as in the following image:
A new page will appear. All you have to do is click on the “Start the installation process” button.

On the next page, we will enter the data for your site, which includes:
- Site name: You write the name of the site that is appropriate for you
- Username: You enter the username to access the site
- password
- Visibility to search engines: Do you want your site to appear or not?

After completing the data, you must click on Install WordPress and wait a little while until the installation process is completed. You will receive a message informing you of the successful installation process, as well as the user name.

When you click Login , a new page will open, asking you to enter your username and password to enter your site.

After that, you will be transferred to the WordPress control panel. Thus, you have run WordPress on the local server on your computer.

In this way, you will have successfully created a WordPress website on the local server using the Xampp program, and you can start testing the website directly.
You can write new articles or download any plugins or templates you want to try out. You can do whatever you want within the site, and no one but you will be able to see these changes.
NB:
- In order to access the site, you must use the path you designated, in this case it is: http://localhost/TestSite/wordpress /
- To access the control panel directly: http://localhost/TestSite/wordpress/wp-admin /
In the end, whether you are a beginner or a professional in the field of website development and creation, you will need to create a WordPress website on the local server, so that you can learn, train, try out plugins and templates, or develop them before you apply them to your own website on the Internet. To avoid any potential problems, we advise you to try this option and adopt it. during testing


Leave a Reply