The famous 404 error page encounters many users and visitors while browsing many websites. It’s rare to find a site that doesn’t show this error page to visitors at least once. This is a common occurrence that occurs on various sites, regardless of their size, popularity, and different types of content that they provide to users.
The appearance of a 404 error page does not necessarily indicate that there is a crisis or a major problem on the site, but rather that the link that the visitor is trying to access does not exist, or that an error occurred in the link when it was moved or written, and when the visitor clicked. The error message 404 will appear, which means that the transferred link does not contain content valid for display on the site.
In this article, we will explain to you everything you need to know about the 404 error page and how you can reverse the bad experience that users feel when this error page appears by customizing and designing it in a way that helps increase the length of time the visitor stays on the site and does not leave it after being exposed to this error page.
What is the 404 error page and how does the visitor reach it?
There are many reasons that lead to a 404 error page appearing to visitors to your website, but there are two reasons, which we can say are the main reasons, for the error page to appear, and they are:
- Either the site manager deleted some of the site’s pages without redirecting the deleted links . In this case, when the visitor accesses the link to the page that has been deleted, a 404 error page will appear in front of him, informing him that the page he is trying to access does not exist.
- Or the source of the visit itself is wrong; Where the visitor writes an address or link that does not exist on the site he is trying to access, such as writing example.com/note and there is no page with the note extension written in the link. This happens if the visitor writes the link himself or when he transfers or copies it from another site, and the link is written incorrectly. In this case, a 404 error page will appear in front of him, informing him that the link is not available on the site.
Read also: Solution to the problem: Page not found – 404 Error
The image above shows the appearance of a 404 error page on a WordPress website in Arabic when you type an incorrect link. You may have seen it before more than once when you tried to access a link that does not exist. Notice in the previous image how the 404 error page has been exploited and many links have been added that help the visitor return again to browsing the site instead of a blank page appearing that leaves the visitor no choice but to exit it permanently.
The following image shows an unassigned 404 error page that only contains a message that the page does not exist, and does not contain any links that direct the visitor back to the main site to browse it again.

From the above we can see the difference between customizing the 404 error page and not customizing it well. Below are the most important benefits and positives that you will get when you customize the 404 error page:
- It is possible that you or one of the individuals operating the site delete one of the pages or articles on the site without converting that link to a new page. In this case, if a visitor accesses the link to this page or article, it will be important to show them a dedicated error page containing links that will help them stay on the site or at least return to the home page to continue browsing.
- The most important function of the 404 error page is to gain the trust and satisfaction of visitors, because the appearance of a 404 error page causes general dissatisfaction with visitors. Therefore, it is a good idea to dedicate a 404 error page and attach a tactful apology to them, along with some links that might grab their attention so that they do not leave the site completely.
- Sometimes a 404 error page can help you make more sales if your site sells products or services. Where you can place promotional offers and discounts on some services or products within your online store, which encourages the visitor to continue and enter other sections and links of the site.
Ways to design a 404 error page in WordPress
If you already own a website on the WordPress platform , most free and paid templates have a pre-designed 404 error page, but most of the time it is a simple page and does not contain many elements that may suit the visitor, such as the site’s top navigation menu, the footer , and other elements that contain Links and elements that help the visitor return again to the pages and sub-sections of the site instead of leaving the site completely.
There are actually two ways to edit the error page on your WordPress website. The first method is done by modifying the code of the ready-made error page in WordPress, while the second method is done by using one of the WordPress plugins specialized in this matter.
With both methods, you can add multiple elements, such as images, links, or navigation menus, to your site’s 404 error page. In the following paragraphs, we will explain to you the two most popular methods for modifying error pages on WordPress websites.
1. Modifying the 404 error page and designing it using plugins
There are many specialized plugins available that help you design and customize the 404 error page in WordPress in a very easy way and without the need to modify the code or the source code of the WordPress template files that you use on your site. The 404 page
extension is one of the most popular free extensions that helps you customize the error page on your site and set any page you want to appear instead of the traditional error page on the site.
To get this add-on, you can go to the WordPress control panel, then the “ Plugins ” option, then “ Add New . ” We will write in the search field the name of the add-on, and after it appears, you must install it and then activate it, as in the following image:

After installing and activating the plugin on a website, we will go to its settings page via the WordPress control panel, as in the picture:

When you open the settings page for the extension, a box will appear for you. In this box, we will put the name of the error page that we want to customize to be the 404 error page on your site. Of course, you can choose from the pages you designed previously, as in the picture:
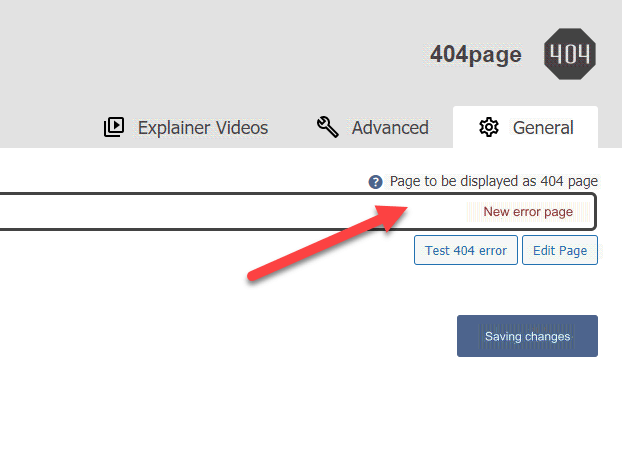
You can also create a new page within your site and set it as a 404 error page from within the plugin’s settings page. To create a new page, all you have to do is enter the WordPress control panel, then “ Pages ” << “ Add New ,” and design the page as you want.
You can add any elements you see fit, such as a title, text, images, and links. After completing the design, you can publish the page.
The image above shows a very simple page we designed. Now we will enter the settings page for the add-on and choose this page to be the 404 error page on the site, as in the image below:
After saving the changes, the content of this page will be displayed on the 404 error page on your site:
We advise you to read the guide: Creating a web page, with some practical examples .
Add Seedpord to design the 404 error page using a drag-and-drop method

The Seedpord add-on offers a slightly different feature than the previous add-on, which is the ability to design the error page using a drag-and-drop method. Which helps you design the page in a more flexible way.
The add-on is available in a free version that contains limited options, while in the paid version you will get many options in addition to ready-made templates for error pages that you can choose from.
You must first install and activate the plugin from within the WordPress control panel, as in the previous plugin:

Then, after installing and activating the add-on on your site, you can use it to design the 404 error page easily by dragging and dropping elements into it.
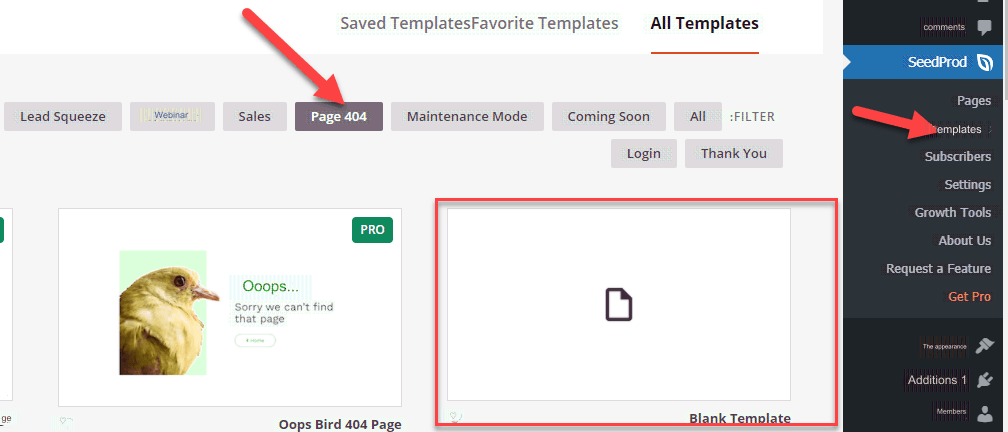
As you can see in the image, we first went to the add-on page and then to the “ templates ” tab, in which you will find among the available options the “page 404” option. When you access this option, you can choose from ready-made templates for error pages. This option is only available in the paid version, as we mentioned, but in the free version, you can click on the “Blank template” option to create a page from scratch yourself.
After clicking on blank template, a window will appear in which you write the name of the page that you will create, as well as the link that you want to assign to the page within the site, as shown in the following image:

After writing a title for the page and setting its link, you will be transferred to the design page, and from there we can begin the stage of designing the page with the shape and elements you desire through the simple drag-and-drop mechanism. The animation below shows the drag-and-drop mechanism and how to use it to add various elements to the error page. New.
After you finish the design you want and insert all the elements, including texts, buttons, images, etc., you must click on the save button , then click on the arrow next to the save button , and finally click on the publish icon in order for the page to be published. After publishing the page, the extension will save this page in the list of error pages under the “page 404” option in the extension’s settings.
Now go to the add-on settings page, then click on the 404 page option and write in the field shown in the image the name of the new page that you designed so that it will be designated as the 404 error page on the site.
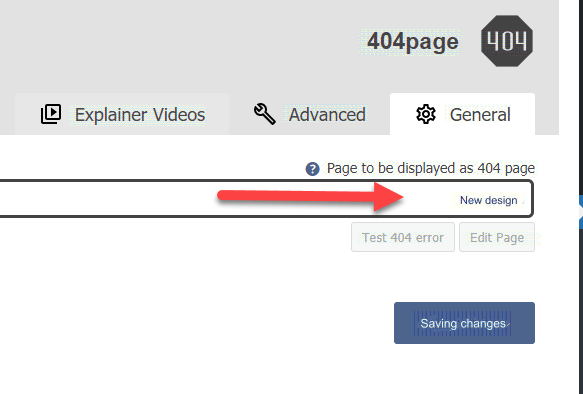
After saving the changes, the new page will be published as the error page on the site.

In this simple way you can create any design you want for the error page using the plugin features depending on the free options it provides you.
Experience designing 404 error page using seedpord
So far, we have learned how to use WordPress plugins to design a 404 error page in a completely free way and without the need to purchase paid plugins. In the following paragraphs, we will explain to you a practical example of how to design a professional 404 error page like famous websites, so that it is attractive, eye-catching, and reflects a good user experience for your site visitors.
Before we begin the explanation, it would be good to see some examples of error pages used by some famous sites when visitors try to access an invalid or non-existent link within those sites.
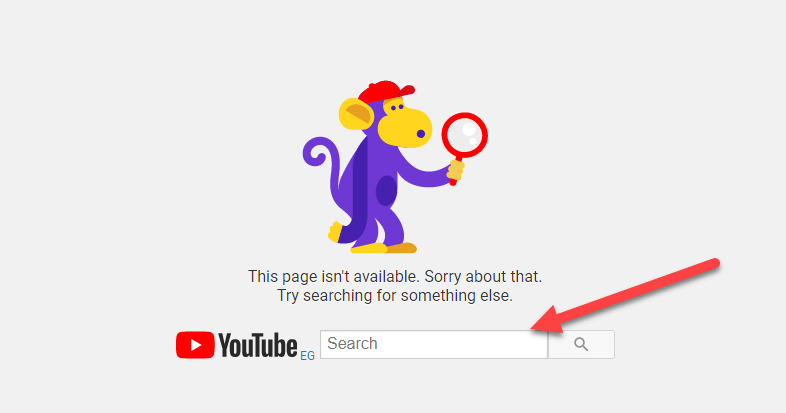
The following image shows the error page on YouTube , which is the page that appears in front of you when you type an invalid link on YouTube.
We also note that the page is simple, but suitable to alleviate the dissatisfaction of the visitor who may reach it, as a search box has been placed on YouTube, so that it helps the visitor who reaches the error page to try to search again on YouTube for the videos he wants to access instead of leaving the error page outside the site. .
The following image also shows the error page on the famous Behance website, and it is also a good example of professional error pages. We can see that some attractive and eye-catching links have been added to the site, which may attract the attention of the visitor who reaches the error page. Therefore, he can click on any of these useful links to return to browsing the site again normally instead of exiting it.
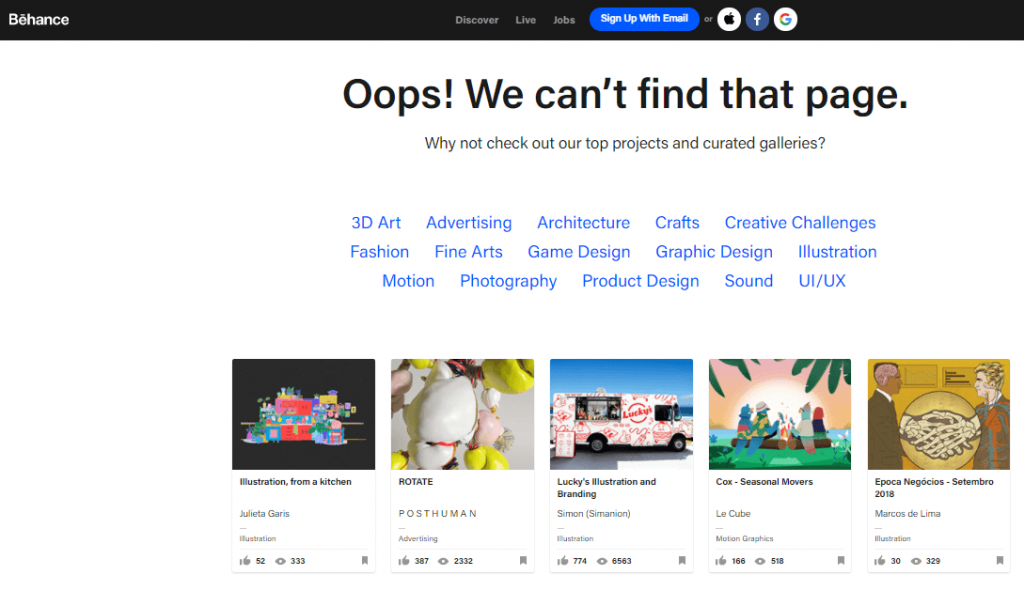
What we notice from the previous models is that designing the error page in an attractive and diverse way that helps the visitor return to the site again is essential for your site.
The following image shows a bad example of an error page on a website. This form is not suitable because it only contains a text message informing the visitor that he has reached a non-existent page or an incorrect link on the site, but it does not include any other links that help the visitor return to browsing the site again, and this means losing that valuable visitor in most cases. .
Now we will go through the experience of designing a good and appropriate error page for our website from the beginning to highlight some golden elements and tips. We’ll be using the seedpord plugin we described earlier.
The first step is to start designing a new page through the add-on settings, as we explained. The page design will be done using a drag-and-drop method, where we choose the elements we want from the toolbox that the add-on provides for free, and we continuously click on it and move it to the desired place in the adjacent page template, as in Next picture:
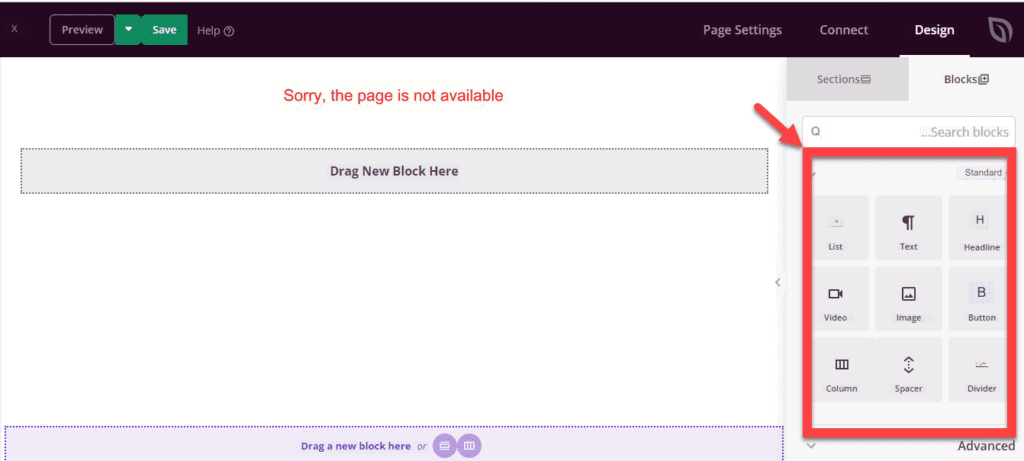
As the previous image shows, the extension provides us with a set of elements that we can choose from and add to the page. For example, we will drag and drop the following elements in the manner we explained previously:
- A headline at the top of the page tells the visitor that they have landed on an error page.
- Then an image expressing sadness due to arriving at an error page, to share with the visitor his feeling of dissatisfaction
- Then a text title telling him that he can still browse some useful links and pages
- Then we place some links to useful pages or sections within the site that people can go to instead of leaving the site
The previous image represents a very simple illustrative example, and you can add more elements, links, and different texts that you think will be appropriate for visitors to your site who end up on the 404 error page. Choosing the elements that you will add to the page is related to the type of audience you have and knowing what will be useful or appropriate for them. More after they reach the error page.
For example, if you run an online store, you can place links to some attractive offers, perhaps seasonal discounts or a big discount on some special products.
2. Editing the 404 error page manually
You can modify the error page manually without the need to install various add-ons, but the options remain limited, especially if you do not have a background and great knowledge of the code of website programming languages, such as HTML, CSS, php, and other code of code that can be used. Inside the code pages in WordPress to design and modify the look and feel of WordPress pages on your site.
To manually edit the error page on your WordPress site, you must access the page that contains the code for the 404 error, which is already present within the files of the template you are using.
You can access the code for the error page through the WordPress control panel, then “Appearance,” then “Theme Editor,” and you will see many code pages for the template used. Among them, you will find the 404 error page, as you can see in the image:

We can see in the previous image what the code page for displaying the 404 error message to your site visitors looks like. You can modify it however you want, of course if you have the programming knowledge and sufficient experience to deal with the source codes of WordPress templates.
For example, we will write a small and very simple code in the PHP language whose function is to print the sentence, “Dear visitor, sorry, this link is no longer available on the site.” The code will take the following form:
The code will be written using the echo function, which is used to print texts and elements on the screen. Any code must be written before the PHP closing tag indicated in the following image:
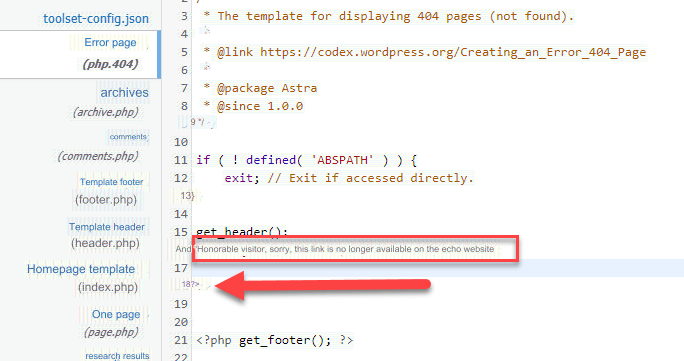
We notice in the previous code the presence of the get_header function, which is the function responsible for displaying and displaying the header and the upper part of the site, which usually includes the logo and the top navigation menu on the site.
This is what the error page on the site will look like after adding these codes:

In the same way, in the php.404 error page, you can employ your programming skills and create the design you want for the error page on your WordPress site. Therefore, you can use this method if you have some programming skills.
In the end, there are many methods and add-ons that are used to design the error page on your site, but we have highlighted the most important easy way that does not require purchasing any paid add-on and you can rely on it to design an attractive, professional error page within a site easily.
Designing the 404 error page in a striking and attractive way, in addition to attaching useful links to the visitor, is essential to gaining the visitor’s trust and drawing his attention to your site again instead of leaving and moving to one of the competing sites


Leave a Reply