WordPress menus are added to improve visitor navigation on the website. A default menu is usually added when installing WordPress on the hosting, installing the template, and launching the site. However, the default menu may not be exactly suitable for what you want, and therefore you may need to modify it or add a new menu in a way. All to the site.
Therefore, in our article, we will take a look at the concept of menus in WordPress, then we will explain how WordPress menus can be added to the site or online store. We will also highlight how to edit and delete menus, as well as how to specify their location so that they appear at the top of the site, footer, or sidebar.
The concept of menus in WordPress
Menus in WordPress are tools that make it easier for site visitors to navigate between its various parts. Each menu in WordPress includes a set of elements that appear to the visitor. When clicking on one of these elements, the visitor is taken to a specific place (web page) located on the WordPress site itself or on… Another site.
There are multiple forms of menus on WordPress sites, and it is not necessary for a single WordPress menu to be added to the site. Rather, multiple menus can be added to WordPress sites, as the system supports inclusion and display of more than one menu, and the menus can be similar or different depending on You want.
The WordPress template activated on the site determines the places and manner in which the WordPress menus will appear, but the template usually provides several options for specifying the location of the menu and the form in which it will appear, especially paid templates and high-quality free templates.
Read also: The best Arabized WordPress templates suitable for different types of websites
Add WordPress menus to your site
WordPress provides the ability to add menus to the website very easily through a dedicated administration area that allows performing various operations on the menus. We will explain in practice how to add WordPress menus and perform various operations on them through this administration area, but we will first take a look at the elements that are added to the menus. In WordPress.
Items that are added to WordPress menus
The elements that are added to menus in WordPress to facilitate visitor navigation on the site vary depending on many factors. Although any page can be added to WordPress menus, there are specific elements that are recognized as being included in the menu.
For example, elements that lead to the home page, important classifications , the forum, and important pages on the site are usually included in the horizontal list that appears in the header of the site, while the list that is inserted in the sidebar can include all main or non-main site classifications. that.

Technically, WordPress provides the ability to add various elements to menus, where you can add pages, articles, custom elements, classifications, or a combination of these. In the following paragraph, we will explain the meaning of each of these elements within the context of explaining how to add WordPress menus in a way. practical.
How to add menus to WordPress
As we mentioned previously, WordPress menus can be added, modified, and deleted through a dedicated administration area in the backend . The process of adding WordPress menus goes through a set of steps that we mention in the following list, and explain in the paragraphs that follow.
- Create a WordPress menu.
- Add items to the list.
- Set the menu combination and save it.
First: Create a WordPress menu
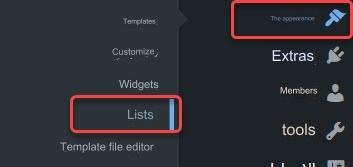
To create a WordPress menu, go to the menu management area by placing the mouse cursor on the (Appearance) option located in the side menu of the WordPress backend, then clicking on the (Menus) option.
If you do not have any menus on your website, a page will appear that enables you to create a new WordPress menu. You can do this through the (Menu Structure) section on the page, as you only have to enter the name of the new menu in the field next to the phrase (Menu Name). ), then select from the list settings the settings that suit you, then click on the (Create List) button.
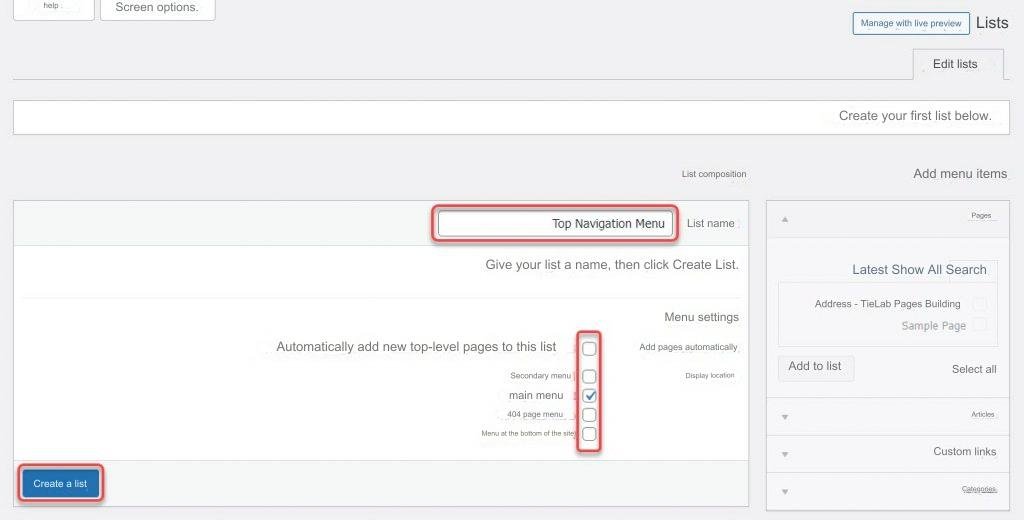
Note: Within the menu settings, your display location options do not have to appear the same as they appear in the previous image. These options are related to the WordPress theme, and your theme may provide different display locations that may be more or less than what is shown in the image.
After clicking on the (Create List) button, a new WordPress menu will be created with the name you specified, and according to the options you specified in the menu settings, and some sections will be activated and added to the page so that you can add items to the WordPress menu that you created and edit them.
You will notice that there are two main sections on the page now:
- The right section provides the ability to add items to the list. It is titled (Add List Items) and consists of four parts, each of which enables you to add items to the list in a different way from the other.
- The left section entitled (List Structure) provides the ability to modify the list, where you can change the order of items in the list, place items within other items to create drop-down lists, and make many other modifications.
Second: Add menu items
Items appear in WordPress menus as words that, when clicked, lead to specific pages. Items are added to the WordPress menu through the (Add List Items) section, which consists of four parts. The first part provides the ability to add pages, and the second provides the ability to add articles. The third provides the ability to add custom links, and the fourth provides the ability to add categories.
Pages, articles, and categories are added to WordPress lists in exactly the same way. From the section dedicated to adding the item in the (Add List Items) section, you choose the items you want to add from the (Show All) tab, then click the (Add to List) button.
If you want to add a group of pages, you choose the pages you want to add from the (Pages) pane, then click the (Add to List) button. If you want to add a group of articles, you choose the articles you want to add from the (Articles) pane, then click Click on the (Add to List) button, and the matter is similar with regard to classifications.

As for the custom links section, it enables you to insert elements that, when clicked, lead to any link that you specify by entering it in a custom field, whether it is a page link to one of the tags on your site, a link to one of its pages or articles, or even a link to an external page. It does not belong to your site’s domain .
In order to use it, you must click on the phrase (custom links), where you will see two fields, one of which is dedicated to inserting the link into it, and the other is dedicated to inserting the text of the link that will appear to the visitor when he visits the site. You must fill in the two fields and then click on the (Add to List) button to add a custom link. You must repeat this if you want to add more than one custom link, as you can add only one custom link at a time, unlike the case in the rest of the parts.
Third: Set the menu structure and save it
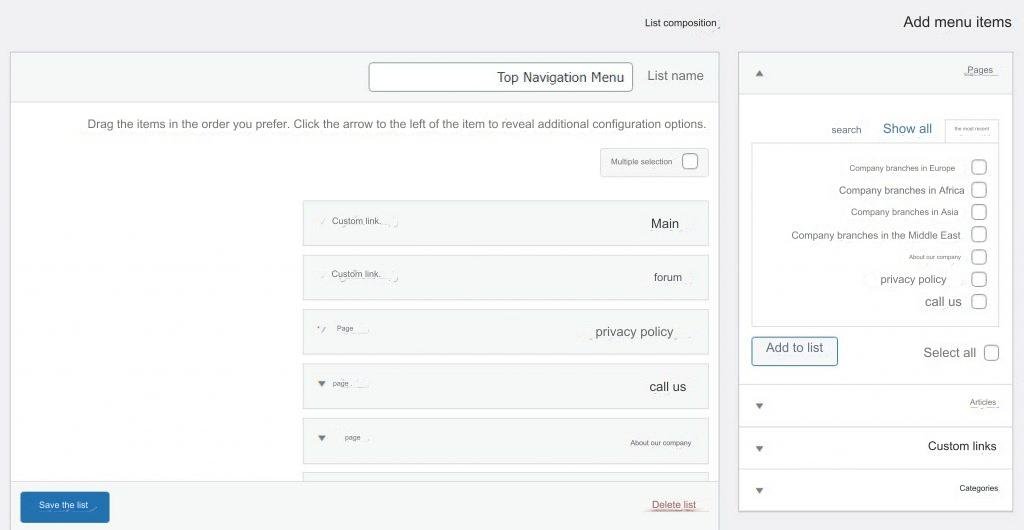
After adding the items you want to the WordPress menu, through the menu structure section, you can adjust how they appear. You can, for example, modify the text that appears to the visitor for each item, change the order of the items in the list, or place some items within other items to create lists. Drop down and so on.
You’ll see all the items you’ve added to the list appear under the List Composition section in a manner similar to the following image.
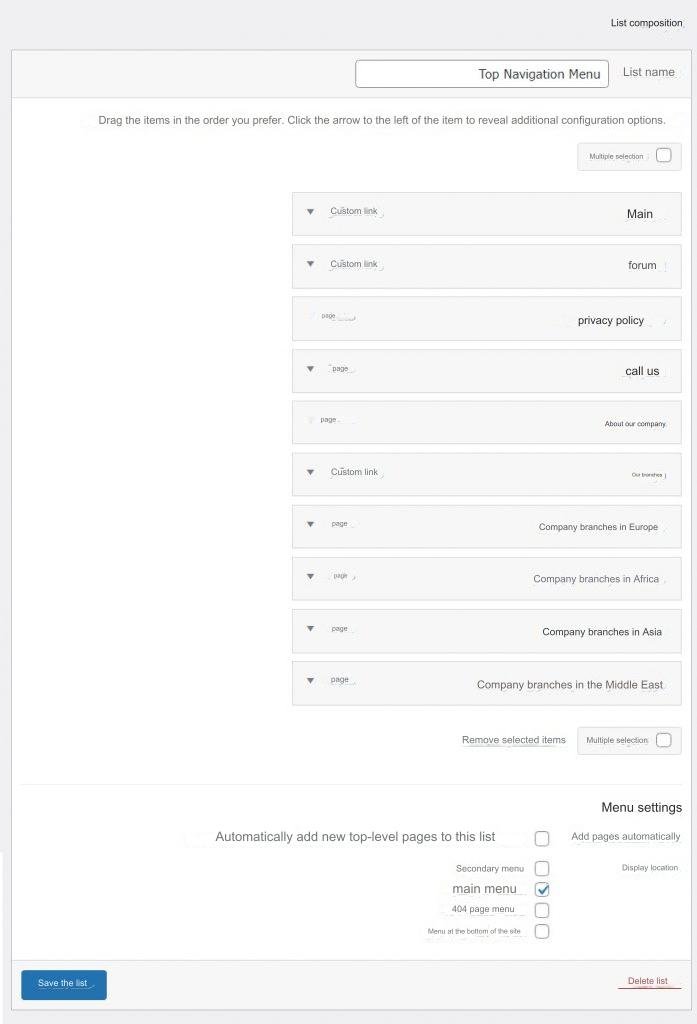
In order to determine how the list will appear according to exactly what you want, you must use various organization procedures that enable you to change the order and organization of the items. Below we explain to you what you can do in the list structure section to organize it as you want:
- The elements appear on the front end of the WordPress site in the same order in which they appear in the menu structure section, and you can change the order in which the elements appear to the visitor by changing their order in this section through drag and drop, where you click on the element with the left mouse button and hold it pressed, then drag it. to where you want to put it.
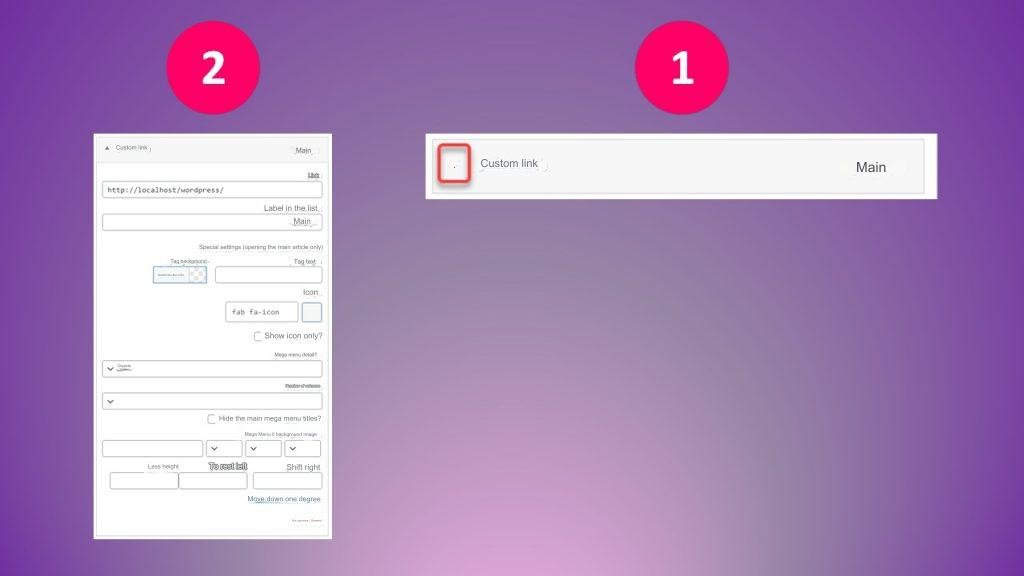
- Many item-related settings can be changed by bringing up options that provide the ability to do so by clicking on the arrow next to the item name, and a section containing these options will drop down.
- You can create a drop-down list by making the item over which the drop-down list will appear when you place the mouse cursor the parent of a group of child items. The child items will form the drop-down list. You can do this by dragging and dropping the items you want to make children onto the item you want to make a parent of. .
Note: It is possible to create more than one drop-down list in a WordPress menu, and a drop-down list can also be created inside another drop-down list in the same way, as the other drop-down list appears when the mouse cursor is placed on one of the elements of the first drop-down list.
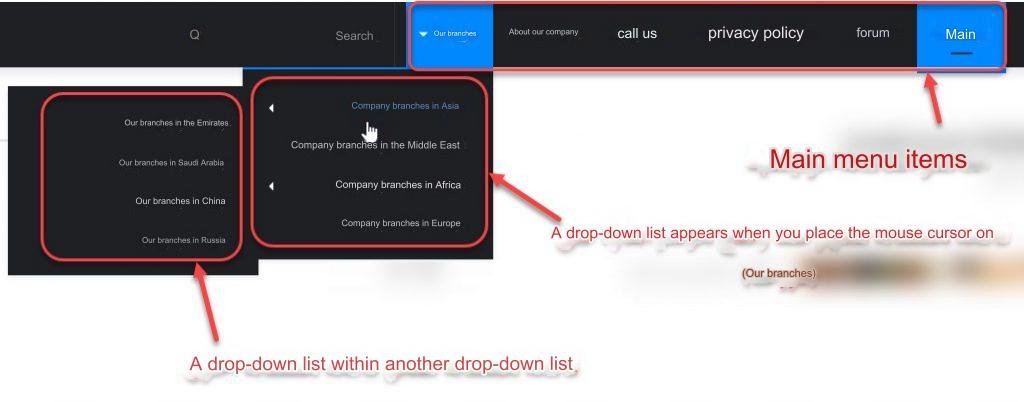
After organizing the menu items and determining how they will appear through the various actions that can be performed in the menu composition section within the WordPress menu management area, you can click the (Save List) button located at the bottom left in order to save and display it on the website.
At the conclusion of this paragraph, in which we explained in detail how to add WordPress menus, we would like to point out that when you have a site with huge content, adding traditional WordPress menus will not suffice, and you will have to add what is called the mega menu that we have known about and explained how to add it in a way. Detailed in the article ( Your comprehensive guide to using mega menus in WordPress ).
Helpful Tips Related to Adding WordPress Menus
Here are some tips and notes that will help you when adding or working with WordPress menus on your website:
- You can create a WordPress menu and save it on your site in the backend without showing it in the frontend, by removing the check mark next to all the display locations options in the menu composition section.
- You can create as many menus as you want in WordPress, but you cannot add more than one menu to have those menus appear in the same display places. For example, if your theme only provides two menu display places, you cannot show more than two menus at the same time to the visitor.
- The list can be shown in more than one display place. You can show a list at the header of the site (header), and show the same list at the bottom of the site (footer), by selecting more than one of the display options in the list structure section.
- If you added a WordPress menu in the backend, and selected one of the display location options (for example, you chose Footer Menu), but the menu does not appear in the frontend, this means that the Footer Menu element is not added to the frontend, and you can add it from the site customization page In WordPress.
How to edit or delete WordPress menus
If you would like to modify the settings of the WordPress menus added to your site, you will also be able to do so through your WordPress menus management area. When you go to the menus management area, you will notice that what appears is very similar to the page from which you added the menu, and you will be able to add elements New to the menu, or change the menu composition as you wish.
If you would like to modify the settings of a list other than the one shown, you can select the list you want to modify from the drop-down list that appears at the top of the page. After you choose the list you want and then click the (Select) button, you will be directly taken to the edit page and the page will be similar To the Edit List page that was visible.

Note that you can add new WordPress menus to your site if there are already existing menus on it by clicking on the phrase (Create a new menu), as you will then be taken to the page for adding a new WordPress menu, and you can create one based on the explanation we provided in this article above. .
If you want to delete an existing WordPress menu, all you have to do is click on the word (Delete Menu) located at the bottom of the Edit Menu page, then click on the OK button to confirm deletion of the menu in the pop-up window that appears in the browser.
Thus, we have finished explaining how to add WordPress menus to websites, and how to edit and delete them. In conclusion, we point out that when adding a menu to your site you must be careful to make it achieve its primary goal, which is to facilitate the visitor’s navigation on the site and facilitate his access to the content. What he wants, as this will help you improve various aspects of your site and contribute to achieving the goals you aspire to.


Leave a Reply