One of the most important factors for the success of online stores is choosing a payment gateway that suits the requirements of the online store’s customers and provides them with many different payment options.
One of the most important options for payment gateways is the Checkout.com payment gateway, which is one of the many payment gateways that provides more than 20 different payment methods for customers and thus provides them with multiple options for completing payment through the online store.
It is worth noting that you will find the Checkout.com portal is the main payment gateway for the largest international platforms and companies, for example, Netflix or the Coinbase wallet, as well as Samsung, Sony, Deliveroo, Hopper, and many others. These platforms are under great pressure in purchasing operations and also need a high rate of security and reliability. .
Therefore, in today’s article, we will provide you with a comprehensive review of the Checkout.com payment gateway and the most important features that made it a major payment gateway for the most important international companies, as well as some of the disadvantages that you may encounter during use, with a detailed explanation of how to create and activate a new account and link with most electronic platforms, so continue reading with us.
What is Checkout Payment Gateway?
The Checkout.com payment gateway is a platform that helps process online payments on electronic stores between the seller and the buyer in exchange for a commission that is a percentage of the total amount paid.
Checkout.com was founded in 2009 under the name Opus Payments by Guillaume Pousaz, with its headquarters in Tottenham in the United Kingdom. After that, the company’s name was changed to Checkout.com, and the company was officially relaunched with the new name in 2012.
After that, Checkout.com’s services began to expand in terms of the number of supported countries and payment options available to customers. In 2013, it was able to become a member of MasterCard International and immediately after that of Visa Europe. It became one of the first companies to provide the option of paying by Visa or MasterCard credit card. Through electronic stores.
It also began to spread in terms of the number of official headquarters, reaching 20 different headquarters around the world, especially in the Arab countries, where it has a headquarters in the Kingdom of Saudi Arabia, and the same is true in the United Arab Emirates.
During the following paragraphs, we will learn about the Checkout.com payment gateway in more detail in terms of its advantages and disadvantages, so continue reading with us.
Checkout payment gateway features
The Checkout portal provides a wide range of features that make it one of the main payment options for online store owners, and the most important of these features are the following:
- Supports countries: The Checkout.com payment gateway supports more than 170 different countries around the world with more than 150 currencies and includes a large number of countries and currencies in sending and receiving money.
- Multiple payment methods : Checkout.com provides multiple payment methods for your online store customers, as it supports 20 different payment methods, for example, payment via Visa, Mastercard, Paypal, Apple Pay, Google Pay, or Wechat, and also supports local payment methods, for example, instant in Egypt, Mada cards in the Kingdom of Saudi Arabia, and many other options.
- Supports cryptocurrencies : Checkout.com supports dealing with all cryptocurrencies, for example, Bitcoin, Dogecoin, and many others.
- Recurring payments : You can rely on the Checkout.com portal to receive recurring payments, for example subscriptions and services, where the amount is deducted from the buyer’s card automatically with the specified renewal date, as well as receiving variable payments, for example donations, etc.
- Direct Transactions : The Checkout.com portal helps you issue invoices directly from within your account without the need for online stores, with the ability to send those invoices via email, phone messages, or share via QR code.
- Preparing reports : Checkout.com helps you prepare comprehensive reports of all incoming and outgoing financial transactions, fees, profits, etc., with the ability to download reports as an Excel file ready for use and direct viewing.
- Compatibility with online store creation platforms : Checkout.com supports linking with most of the basic online store platforms with add-ons that are ready to use directly, for example, the Woocommerce platform, the Bigcommerce platform, the Wix platform, the OpenCart platform, and many others.
- iFrame encoding : Checkout.com provides the ability to embed within your online store through iFrame encoding with the ability to control it and customize it completely to suit the identity of your online store, but it is less secure because the online store’s server will be involved in securing the data transfer.
- Checkout.com application : Checkout.com provides a phone application that runs on Android and iOS through which you can follow all the activities on your Checkout.com account and get notifications when payments are received, as well as sending invoices, etc.
- Knowledge base : The Checkout.com portal provides a huge database that includes answers and solutions to common questions and problems, and a multimedia educational library, as an integrated guide to the Stripe system and how to deal with it.
- Protection and Security : Checkout.com is distinguished by being the safest and most reliable payment gateway as it complies with the PCI DSS Class 1 security standard, which is the highest security standard for financial transactions over the Internet. It also applies multi-layer protection and encryption protocols to financial transaction data to keep payment and customer data completely safe. It encrypts credit card information during its transfer to prevent data theft and processes it on its own network without saving it on the online store’s website to protect the data in the event that the store is hacked. It also provides the 3D Secure service that works to prevent unauthorized access to accounts.
Disadvantages of Checkout payment gateway
The Checkout.com payment gateway also has a set of disadvantages, as it has a list of advantages, and the most common disadvantages are the following:
- Frequent account closure: Most Checkout users face a problem with accounts being closed immediately without warning. This is because Checkout sets a set of strict rules and conditions, and if they are exceeded, it leads to the direct account being closed. This is reflected in the extent of the protection and security it provides to its users as well.
- Technical Support : The Checkout.com portal provides the ability to communicate with technical support via e-mail, phone call, or internal chat, which will also be transferred to e-mail and not direct technical support, but it is taken into account that the response rate to e-mail reaches 48 hours in the same time. Most other payment gateways have now provided technical support via live chat 24 hours a day, 7 days a week. It is worth noting that they provide a team specialized in resolving disputes, fraudulent operations, and refunding payments. Therefore, only the methods of communication and the slow response rate are taken into account.
- It does not support small projects : When registering with Checkout, it reviews the entire commercial project in terms of website, sales, profits, etc., and small projects are rejected. Checkout.com did not specify the criteria for small projects, but most projects did not achieve a profit of more than $10,000 during the year. Previous registration may have a low acceptance rate.
You will notice that most of the disadvantages of the Checkout.com payment gateway are definite defects, especially the registration conditions. When you are able to overcome them, you will find that the advantages are much more than the previous disadvantages, and the basic comparison will be between it and other payment gateways.
Now that we have learned about all the technical points of the Checkout.com payment gateway, we will present to you the most important technical matters in terms of creating and activating a new account and the method of linking with platforms for creating electronic stores, so continue reading with us.
How to create a new account on the Checkout portal
You can create a new account on the Checkout.com portal using some simple technical steps, which we will explain to you step by step in the following paragraphs.
First, you go to the official website www.checkout.com and then click on Get in touch , as shown in the following image:
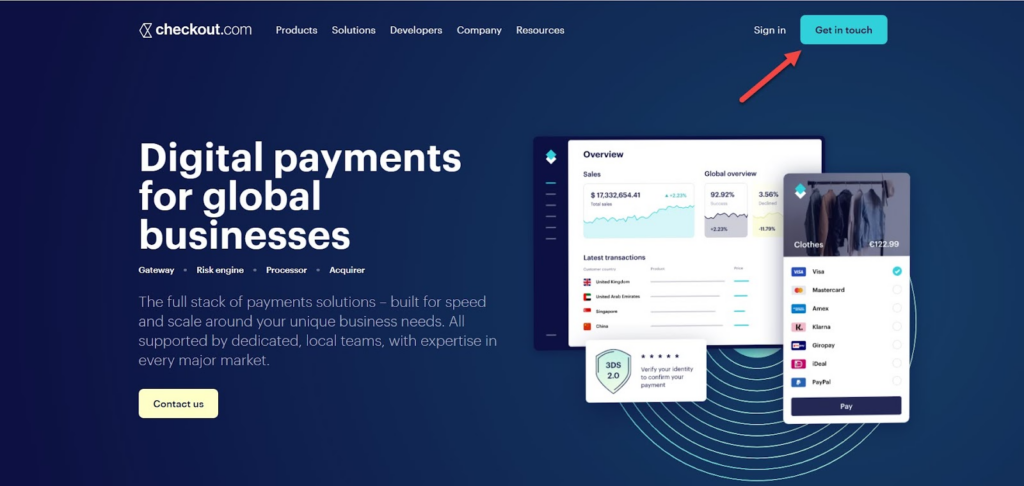
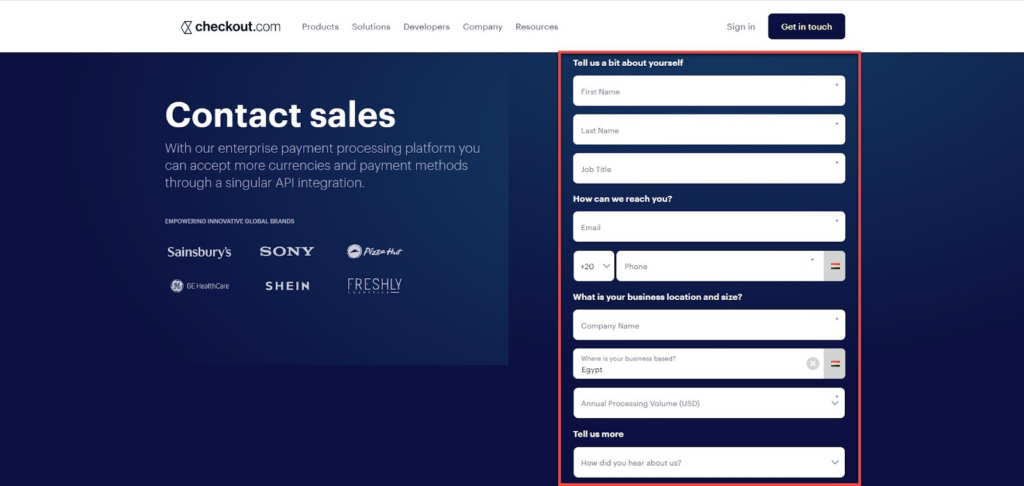
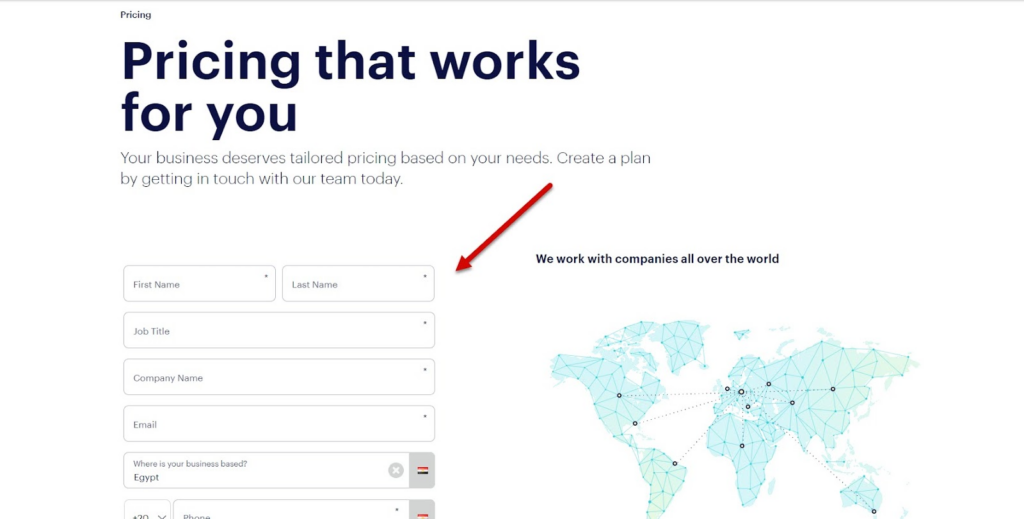
After that, you will be asked to write a form about your business project, where you will be asked to write the first and last name as in the national ID card, then write the job title and phone number preceded by the governorate code.
After that, you write an email, and it must be a business email. The business email must be the official email that includes the name of your electronic project and ends with the domain info.com. Otherwise, the application will be rejected.
The third part of the application will ask you to write the name of the company, the country, the average monthly income for your electronic project, a brief description of the project, and how to identify the payment gateway. After that, you click on Send Inquiry, as shown in the following image:
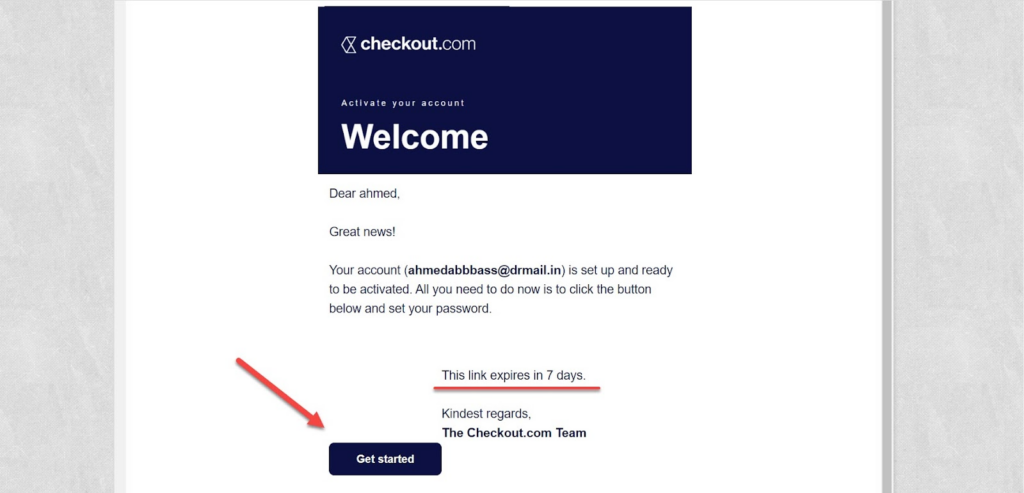
After that, an activation message will be sent to the registered email. You will go to the email and you will find a message from Checkout.com. It is worth noting that the validity of this message is only 7 days. After that, you must re-register from the beginning again, and click on Get Started as shown in Next picture:
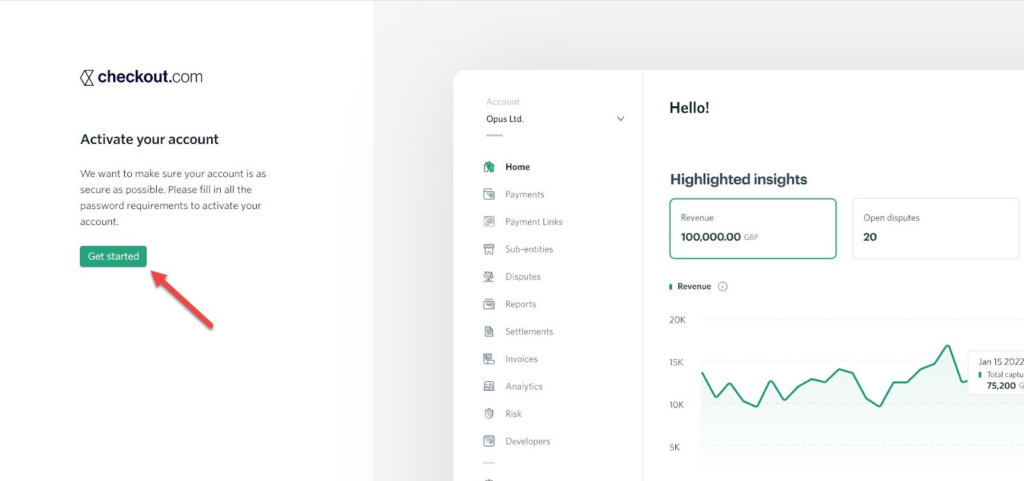
After that, you will be transferred to the Checkout.com website again in order to complete the registration steps, so you will click on Get Started as shown in the following image:
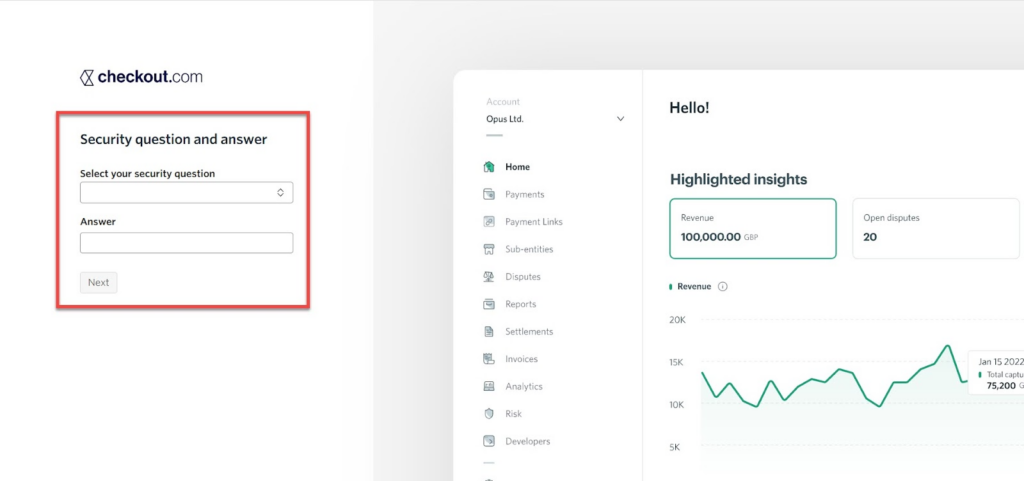
In the next step, you will be asked to write a security question. You can rely on one of the ready-made forms and then write the appropriate answer. You may need to ask the security question and answer after that if the password is lost, the account is hacked, or otherwise. Therefore, you must save them in a safe place, and after that you click on Next As shown in the following picture:
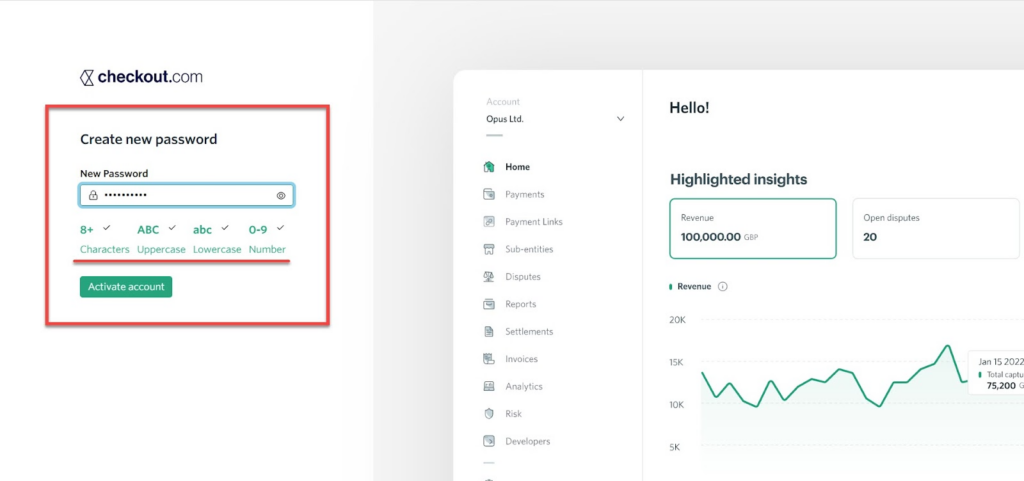
After that, you write the password and it must consist of at least 8 letters and include an uppercase letter, a lowercase letter, and a number. You will find clues under the password if there is a problem with any of the previous points. After that, you click on Activate account , as shown in the following image:
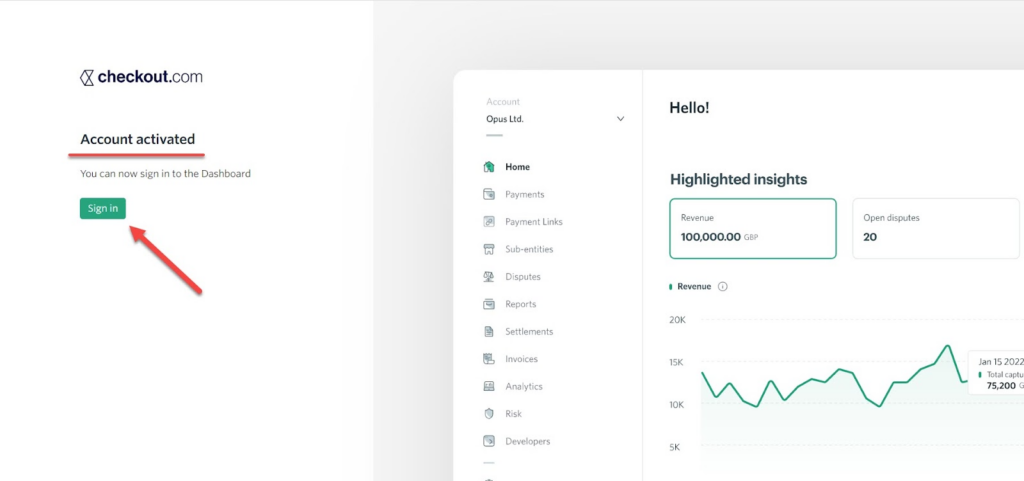
In this way, a new account has been successfully created on the Checkout.com payment gateway. You click on Sign in and write your email and password to log in to the Checkout.com settings page, as shown in the following image:
After entering the control panel of your main account on Checkout.com, you will find the account running on a temporary version with limited powers until technical support reviews the registration request that we made in the first step of registration and communicates with you via email with approval or rejection.
He will also ask you for a set of documents to confirm the information shown in the registration application, then he will review those documents until your account is fully accepted and activated for direct use and linking with electronic stores. Therefore, all registration data must be completely correct and identical to the official papers.
Create a demo account on the Checkout payment gateway
The Checkout.com payment gateway provides the ability to create a demo account with full powers of a real account so that you can experience all Checkout.com services, compatibility and customization on online stores, etc.
The validity of the demo account is unlimited and you can create an unlimited number of demo accounts completely free of charge, but it is also required that the demo account be created with a business email as well.
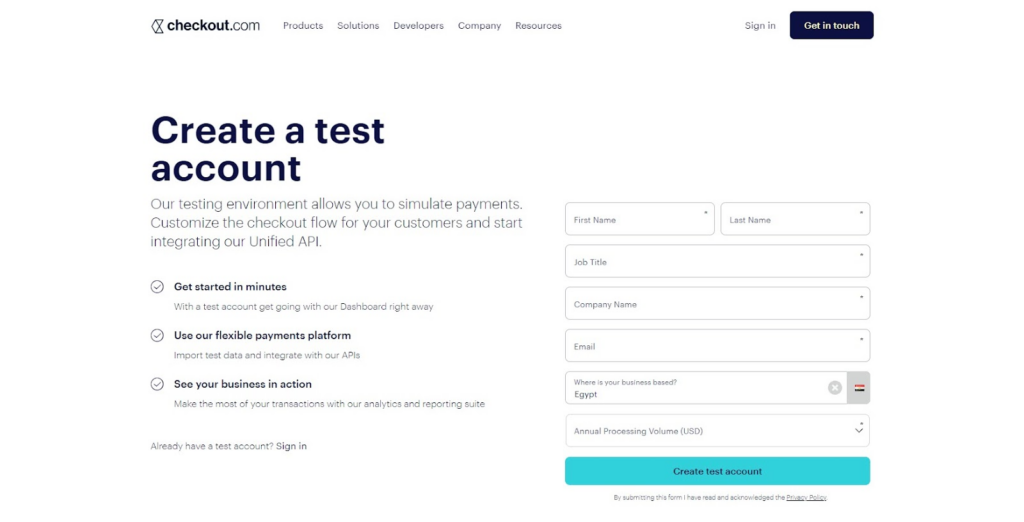
You can create a test account on the Checkout.com portal by going to Get a test account and then entering the required registration information as follows:
- First Name : First name.
- Last Name : Last name.
- Job Title : Job title.
- Company name : The name of the company.
- Email : “Business Email”
- Where is your business based : Company headquarters.
- Annual Processing Volume : The average volume of annual income.
You can write fake data without problems because you will not be asked to confirm that data after that. Then you click on Create test account , as shown in the following image:
After that, you will follow all the registration steps as we explained in the previous paragraph, and the account will be created and activated directly.
Connecting the Checkout payment gateway with the Woocommerce platform
After activating your account on the Checkout.com portal, you can start linking the Checkout.com portal with your online store. You can also follow the same steps when using a trial account and want to try and customize the payment gateway on your online store.
We will apply the explanation to the Woocommerce platform, and the method of linking from other online stores will not differ much from the Woocommerce platform, so you can apply the same steps to them as well.
First of all, we need to obtain the basic link keys that are used to transfer information and data from Checkout.com and your online store, and these keys are as follows:
- Public key
- Secret key
- Token
So we enter the control panel of our account on the Checkout.com portal, and then we choose Developers from the top menu to enter developer mode, as shown in the following image:
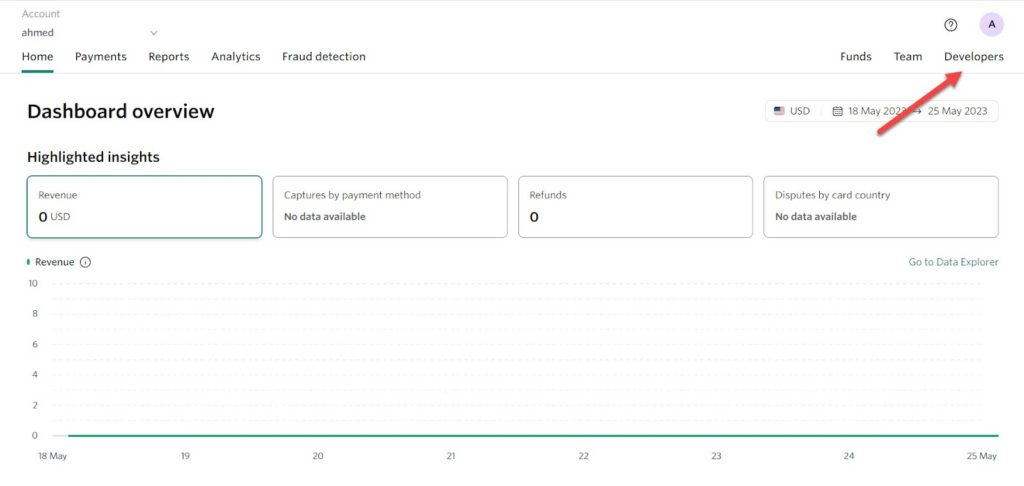
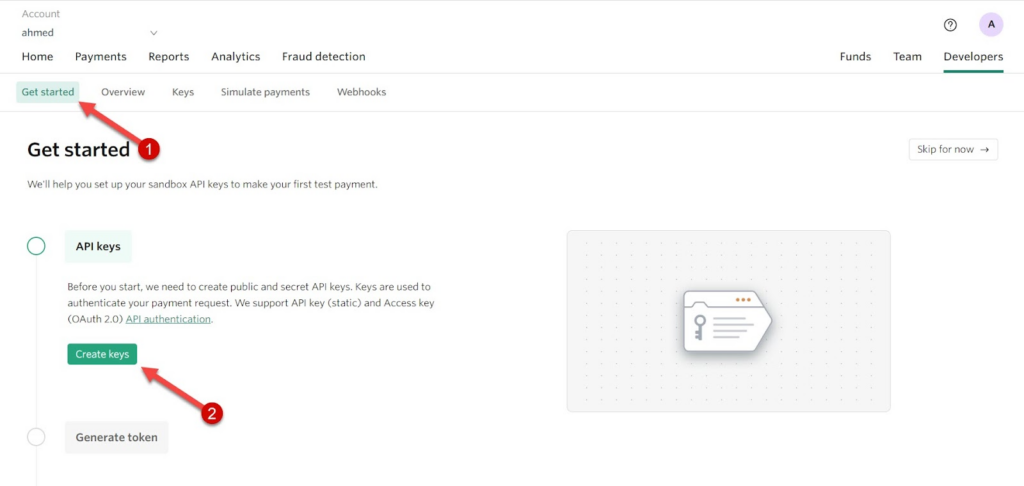
After entering developer mode, you click on Get started to start creating the master keys. After that, the API Keys tab will open for you . You click on Create Keys, as shown in the following image:
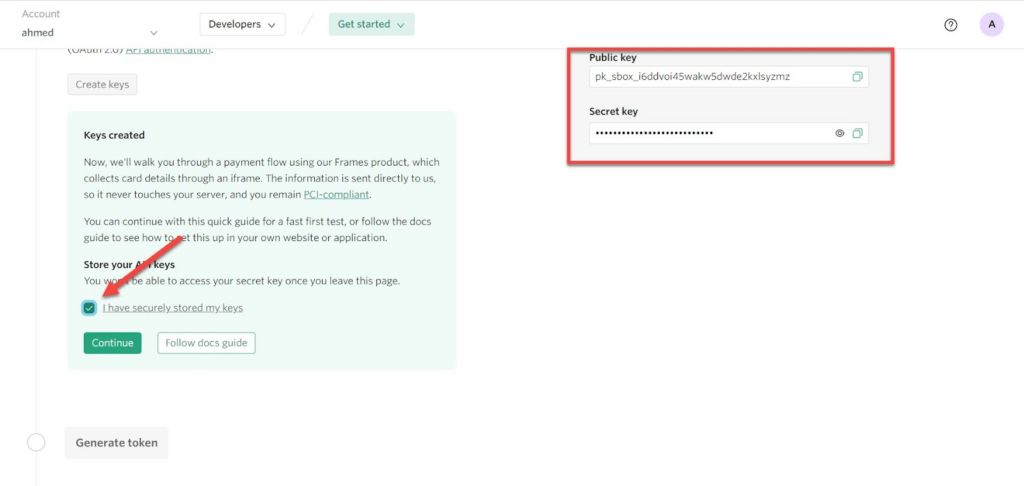
You will find that the Public key and Secret key have been created and appear on the right of the screen. You will be asked to confirm keeping this data completely confidential because it helps you access all the financial details on your account in the Checkout.com payment gateway. So you click on I have securely sotred my keys. Then click Continue to complete the steps, as shown in the following image:
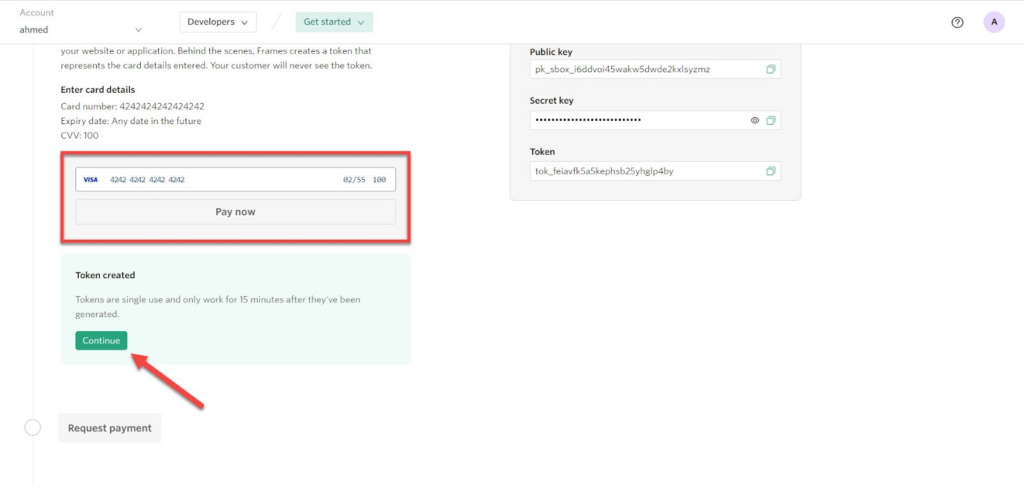
After that, we will create a Token and this code will be linked to the Public Key, so you will be asked to copy the Public Key and copy it into a field titled Enter Public Key. You will also be asked to try a trial payment process with fake card data shown to you as in the following image:
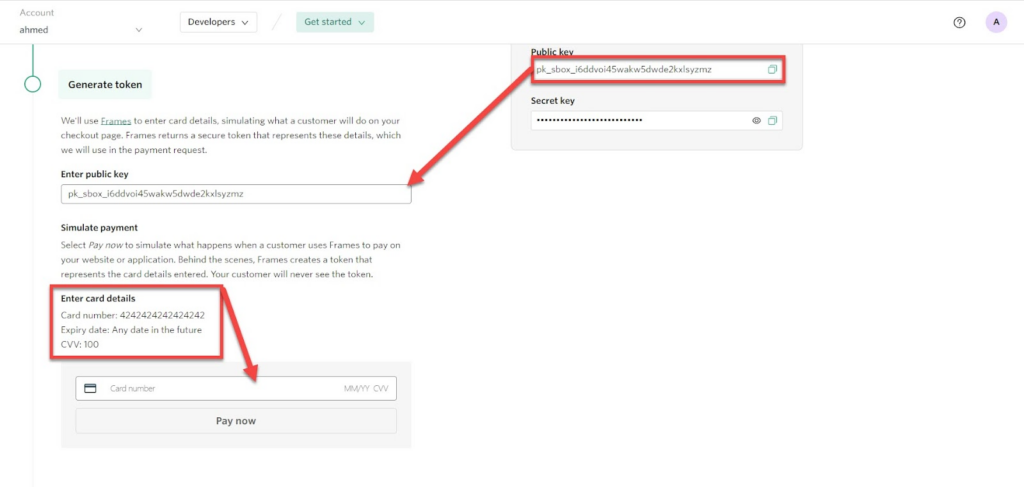
You will notice that the fake card data is the card number and the CVV code, and the expiration date is not specified. The expiration date can be set to any date after today’s actual date. After that, you click on Pay now and that step is to ensure that the Public Key is correct and that the transfer will be made to your account. Without problems, then click on Continue as shown in the following image:
After that, you go up relatively high, and you will find that all the basic wrenches have been released, as shown in the following picture:
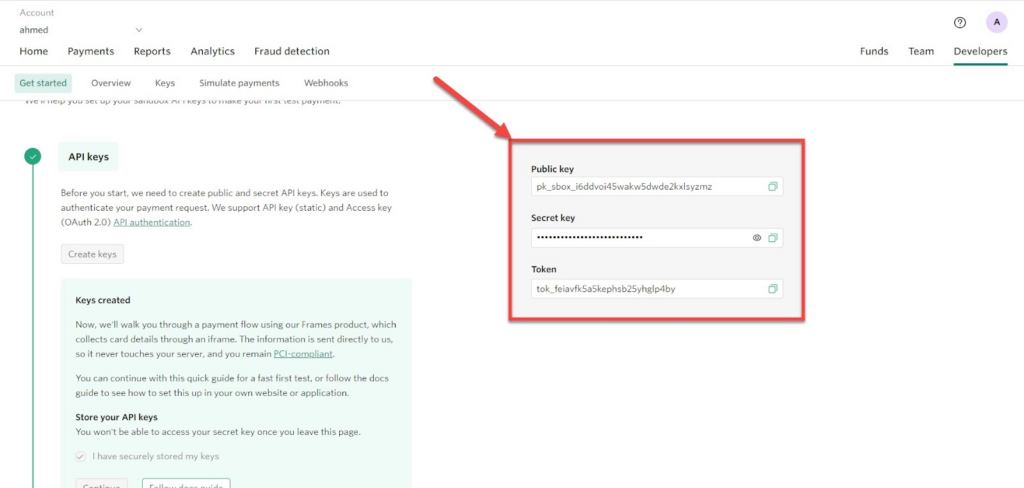
It saves these keys, as they will be used when linking the Checkout.com payment gateway with all the different online store creation platforms, for example linking with the WooCommerce platform.
Connecting the Checkout portal to your WooCommerce store
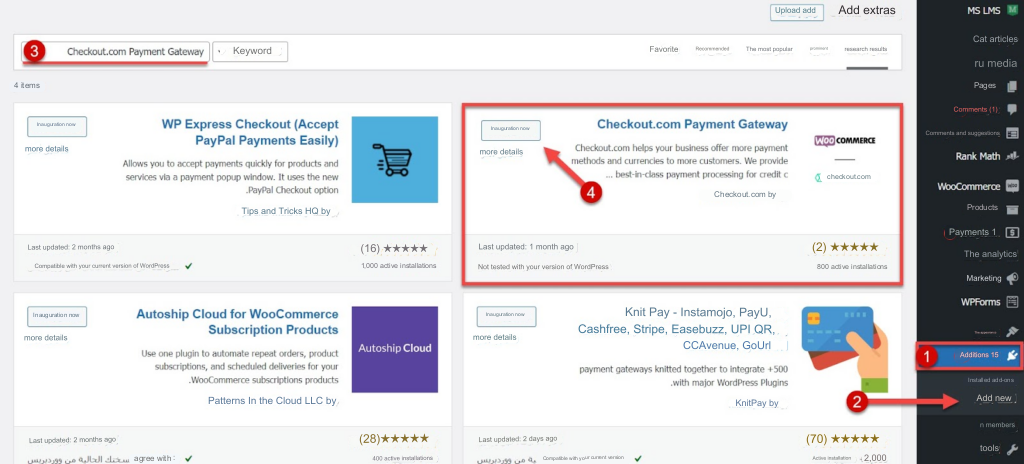
You enter the main WordPress panel for your online store, then choose the Add-ons option from the side menu, then choose Add New until you are redirected to the plugins store on WordPress.
You search for the Checkout.com Payment Gateway add-on and then install the add-on as shown in the following image:
After that, you wait until the plugin is installed on WordPress, then click Activate.
Now we need to enter the settings of the Checkout.com portal after activation, so you click on Woocommerce from the side menu and choose settings from it, and then choose the Payments tab from the side menu as shown in the following image:

After that, you will be directed to the Payments Settings page on WooCommerce. You will search for the main payment option via Checkout.com and then click on Manage as shown in the following image:

After entering the Checkout.com add-on settings, you do the following:
- Activate the Enable checkout.com cards payment option.
- Select the account type from the Environment option, whether a test or live account.
- Specify the sentence that you want to appear on the payment gateway in the Payment Option Title field, for example, payment via the Checkout.com payment gateway.
- Write the secret key that we obtained from the previous steps.
- Writing the Public Key that we also obtained from the previous steps.
Then click on Save Changes, as shown in the following image:

In this way, payment was activated via the Visa or MasterCard credit card through the Checkout.com payment gateway. One of the other payment options can also be activated from the payment gateway, for example, payment via Paypal, as follows:
- Log in again to the Checkout.com payment gateway add-on settings.
- Test the Paypal tab from the top menu.
- Activate the Enable checkout.com option.
- Write the address of the payment method that will appear on the payment completion page in the Title field, for example Paypal.
- Write a description of the payment method that will appear on the payment completion page in the Description field, for example Pay with Paypal.
Then click on Save Changes, as shown in the following image:

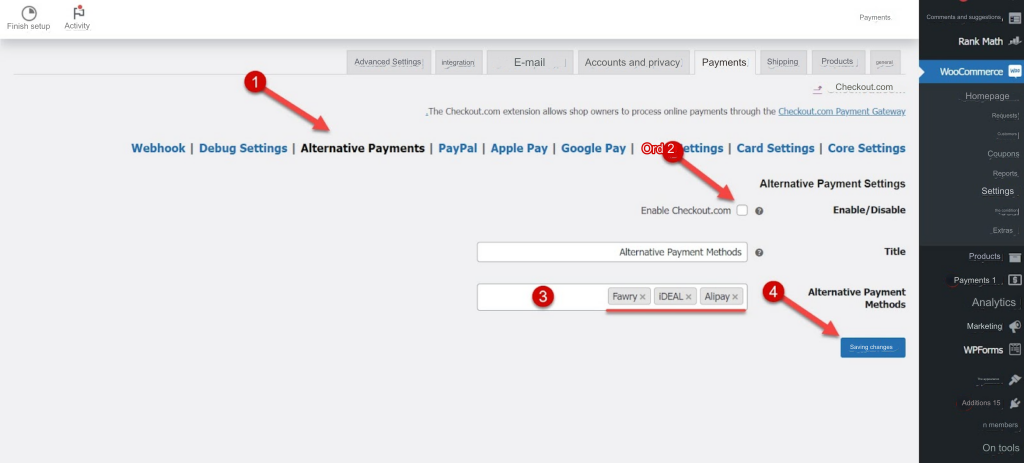
In the same way, you can activate other payment options on Checkout.com, for example, local payment methods, which are Mada card, payment by Fawry, or others, through the following steps:
- Test the Alternative Payment tab from the top menu within the Checkout.com add-on.
- Activate the Enable checkout.com option.
- Write an address for the local payment methods in the Title field.
- Select alternative local payment methods from the available options eg Fawry.
Then click on Save Changes as shown in the following image:
Now you can view the Checkout.com payment gateway on your online store during the purchase process, and the payment options will appear to you as shown in the following image:

In this way, the Checkout.com payment gateway has been successfully linked with your online store on the WooCommerce platform, and you can follow the same steps on other online store platforms.
Read also: Ways to connect payment gateways to WooCommerce stores
common questions
How much does it cost to create a new account on the Checkout.com payment gateway?
You can create a new account on Checkout.com completely free of charge without any fees.
Are there administrative or annual maintenance fees?
The Checkout.com portal follows a fee policy known as Interchange++ which charges absolutely no management or annual maintenance fees on accounts.
What are the conditions for registering in the Checkout.com payment gateway?
Checkout.com imposes relatively more difficult registration conditions than other payment gateways and these conditions are as follows:
- Commercial register for the electronic project.
- website.
- Business email.
What are the Arab countries supported by the Checkout.com payment gateway?
The Checkout.com portal supports most countries, for example Egypt, Saudi Arabia, Kuwait, the Emirates, Jordan, Bahrain, Algeria, Iraq, Morocco, and many more.
What payment methods are available on the Checkout.com portal?
The Checkout.com payment gateway provides more than 20 international and local payment options, the most important of which are the following:
- Visa.
- Mastercard.
- PayPal.
- Apple Pay.
- Google Pay.
- Be happy.
- WeChat Pay.
- Discover.
- TrueMoney.
- Fawry.
- Topic.
What are the fees and commissions for payments via the Checkout.com payment gateway?
The fees and commissions for payments through the Checkout.com portal are relatively complex, because Checkout.com does not exactly advertise the fees or commissions on its official website and does not provide the general average either.
However, online store owners must submit a request with a special form for payments to technical support, and technical support sends all fees and commissions separately for each project through this link .
It is worth noting that technical support will provide you with a form detailing all the fees for each payment method, and these fees are not completely modified throughout your use of the Checkout.com payment gateway.
Conclusion
The Checkout.com payment gateway is one of the most important online payment solutions that provides more than 20 payment options for your online store customers. Thus, you can rely on it to collect all basic payment methods instead of relying on more than one separate payment gateway on your online store, especially since it provides payment via Visa and MasterCard credit cards, which are the most widely used methods in e-commerce.
The Checkout.com portal also supports most countries in the Arab world, but the main problem with the Checkout.com payment portal is exceeding the acceptance limit because it does not support small projects, as we explained throughout the article, but you can try until it reaches the acceptance level.
In this way, we have reached the conclusion of the article after providing you with a comprehensive review of the Checkout.com payment gateway in terms of its advantages and disadvantages, the method of creating a new account completely from scratch, and linking with the WooCommerce platform.
We have also answered the most important frequently asked questions related to the Checkout.com payment gateway. If you still have a specific question or inquiry that is not explained in the article, you can comment below the article and you will be answered by technical support specialists as soon as available, God willing.


Leave a Reply