Since you are reading this article, you want to know the steps for creating a WordPress website, either for a product that you want to sell on the Internet, or you want to create a website for a company that manages a specific activity, or for a personal blog for publishing and writing articles, for various reasons.
In this article, we will provide a comprehensive guide to creating a WordPress website from A to Z.
WordPress website requirements
- Buying
a domain The domain is the address that you use to access the site. For example, the domain for the WordPress website in Arabic is (www.wpar.net). You must purchase a name for your site, and the price is approximately $8 to $10 per year, depending on the company you are purchasing from. - Hosting
is the storage space that you rent in order to place files, images, and contents of the site. You must obtain hosting in order to store the files and images of your site.
Hosting is purchased from one of the hosting service providers such as: Hostgator , Bluehost , SiteGround , FastComet , or any service provider. Whatever the speed provider you will rely on, it is important that it has the following standards:1 – Hosting speed: This will affect the speed of your site
2 – Hosting security, to ensure that your site is secured from any malicious files
3 – Providing an SSL security certificate, so that you do not have to pay costs. Additional
4 – Customer support service is available around the clock to help with any problem you face
5 – Suitable hosting price with your budget
We will continue this explanation by relying on FastComet, and you can follow the same steps with any other service provider
Steps to purchase hosting from Fastcomet
We will head to the official website of Fastcomet
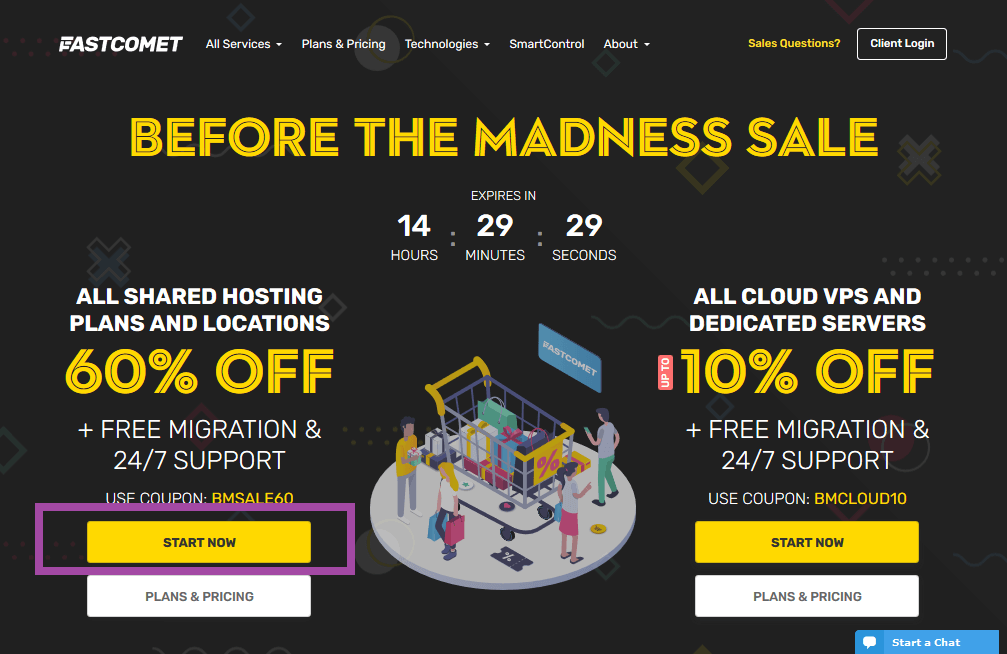
To know the full features of FastComet shared hosting, click on pricing & plans, or to purchase directly, click on start now , as in the picture. Then a page will open with 3 different types of hosting, and the price varies according to the capabilities, size, and number of sites you want to host.
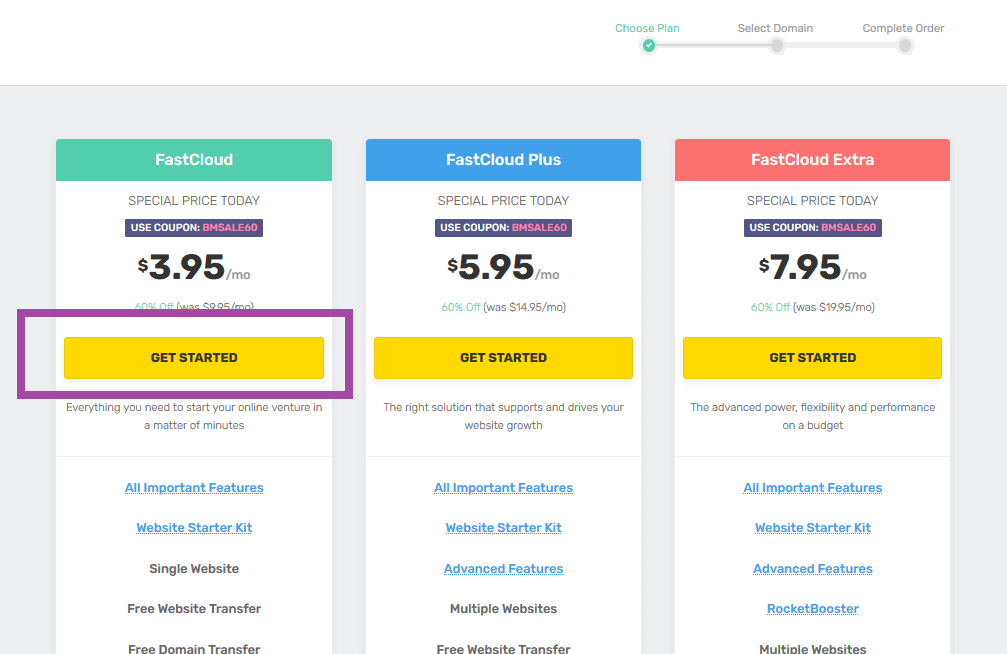
From the picture we notice that there are 3 different prices and to explain the difference between them: –
Fastcloud : This plan is suitable for a new and starting website, and the price is appropriate.
Fastcloud plus: This plan is suitable if you have more than one website and want to host more than one website on the same hosting.
Fastcloud Extra: This plan is suitable for relatively large and large-sized websites.
Note: Prices may change from time to time, but it is important to know the features you get from hosting.
Suppose we will choose the first plan (FastCloud) and then continue by clicking on Get started

After clicking on Get started, a page for reserving a domain will open
Here you can reserve a new domain and save yourself the hassle of purchasing from another company and linking the domain and hosting. If you buy the domain and hosting from the same company, the process of linking the domain to the hosting is done automatically and does not require further settings.

Write your own domain and try to have a name related to your activity
- Write a domain name that expresses your business activity
- (Choose the type of domain (.com, .net, .org), or other, but we advise you to use (.com), as it is the most popular.
- After choosing your domain, click on Use this domain as shown in the image below.
- Make sure that the domain name is available for reservation (for example, a domain named Google.com cannot be reserved, as it is already reserved (the domain, like the ID number, cannot be repeated twice)
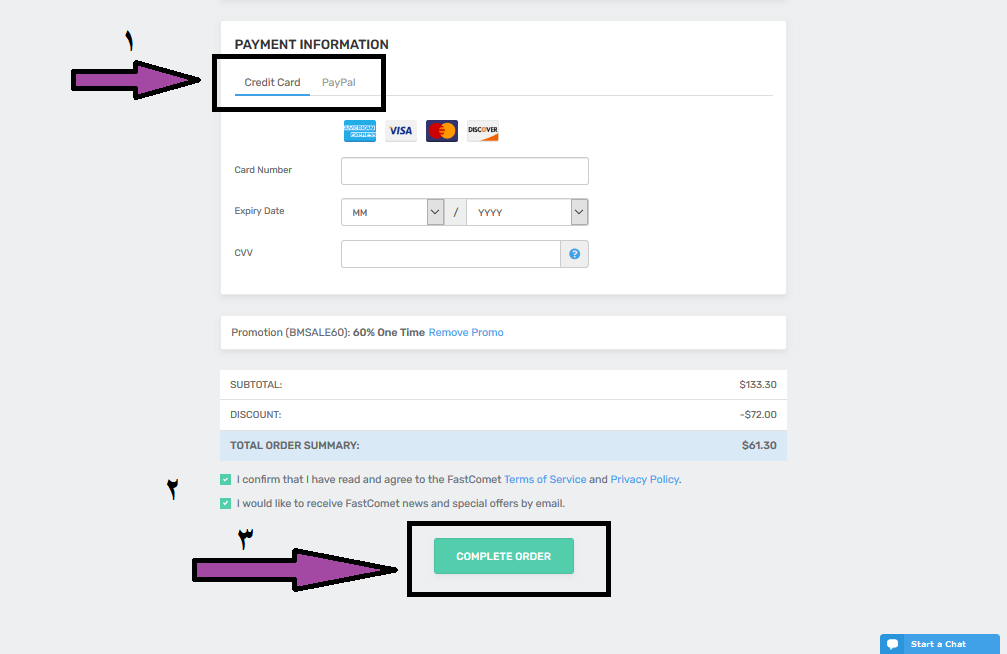
After completing the selection of the domain, you will be told that it is available, and you will be asked to fill in your data and create an account as shown in the image.
Enter your information correctly and try to save it in a safe place for reference when logging in
After completing entering your personal and account information, scroll to the bottom of the page to choose additional tools, if you need them:
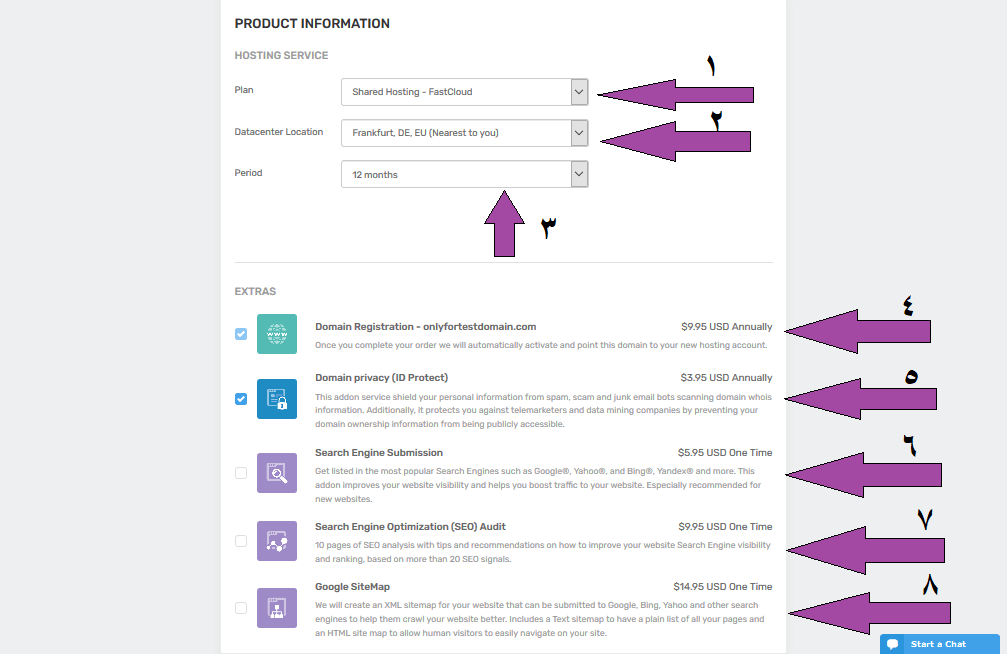
- The type of pricing plan that you chose in the first step.
- The location of the server is chosen automatically according to the place you purchased it from. This is one of the most important features of FacetComet hosting that it has more than one data center and transfers data to you from the center closest to you to ensure speed of data transfer and speed of browsing the site.
- The hosting reservation period, which you choose according to your desire. You can reserve a month, 6 months, 12 months, 24 months, or 36 months at once. Note that as the reservation period increases, the total cost decreases because there is a discount on the large period.
- The domain name that you reserved and its cost is approximately $10
- Domain privacy, which is the advantage of hiding the domain owner’s data from hackers
- Submit your site to various search engines to be archived as quickly as possible
- Prepare a detailed report on the performance of 10 pages of your site
- Creating a site map and sending it to Google
does not require purchasing any of these add-ons now, and you can remove the selection to purchase them later if you need them.
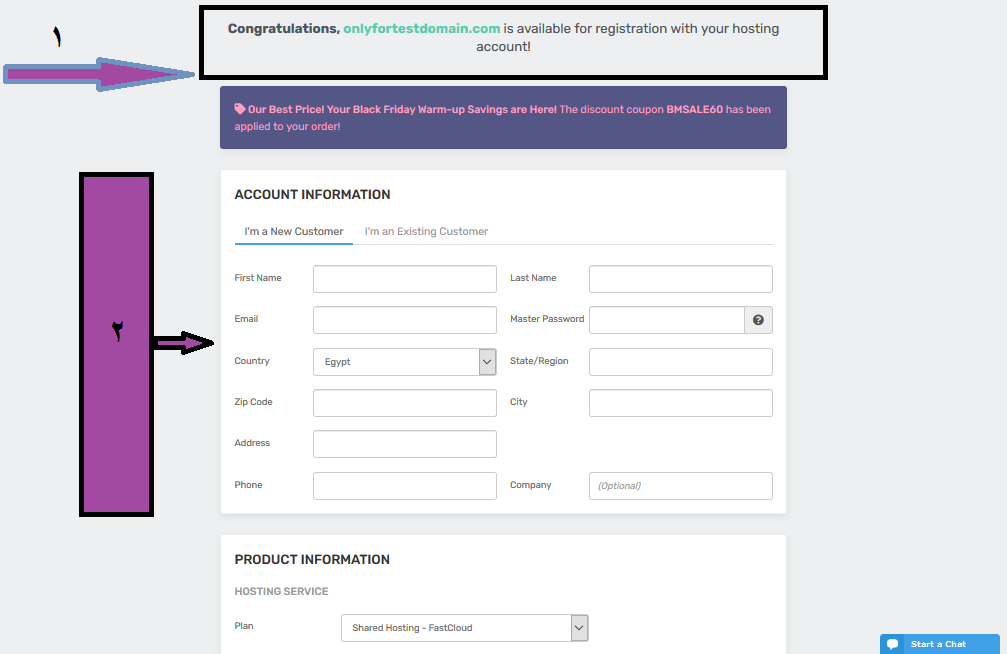
After that, enter your personal data and hosting data, and then we come to the payment process and completing the order: –
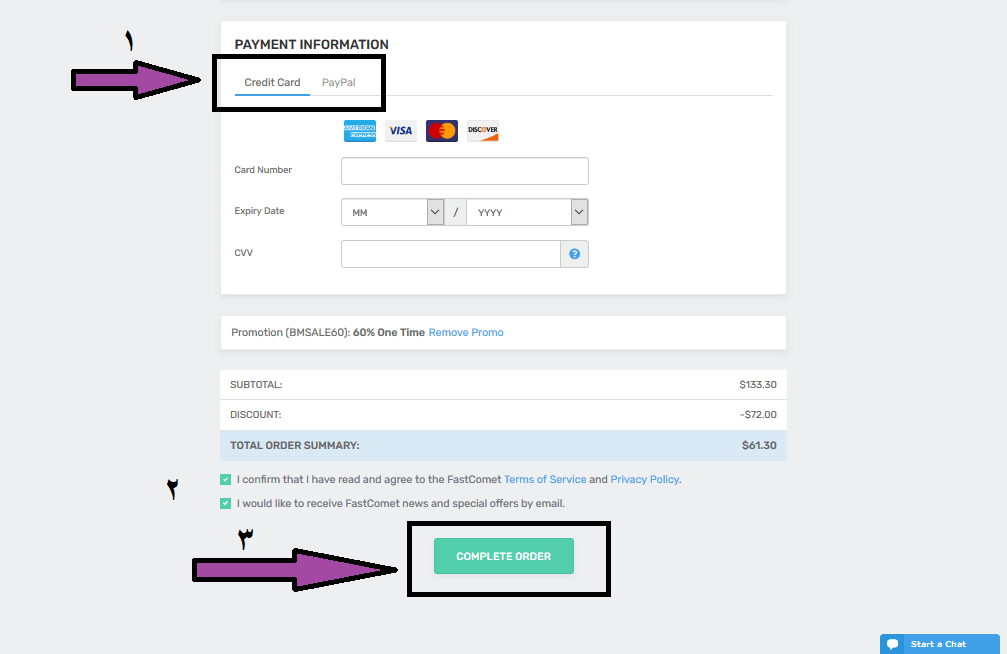
(1) Choose your payment method, credit card or PayPal
(2) Agree to the terms and conditions of the site
(3) Click on Complete Order
Thus, you have successfully completed the purchase, and you can go directly to the hosting control panel.
Get to know the hosting control panel
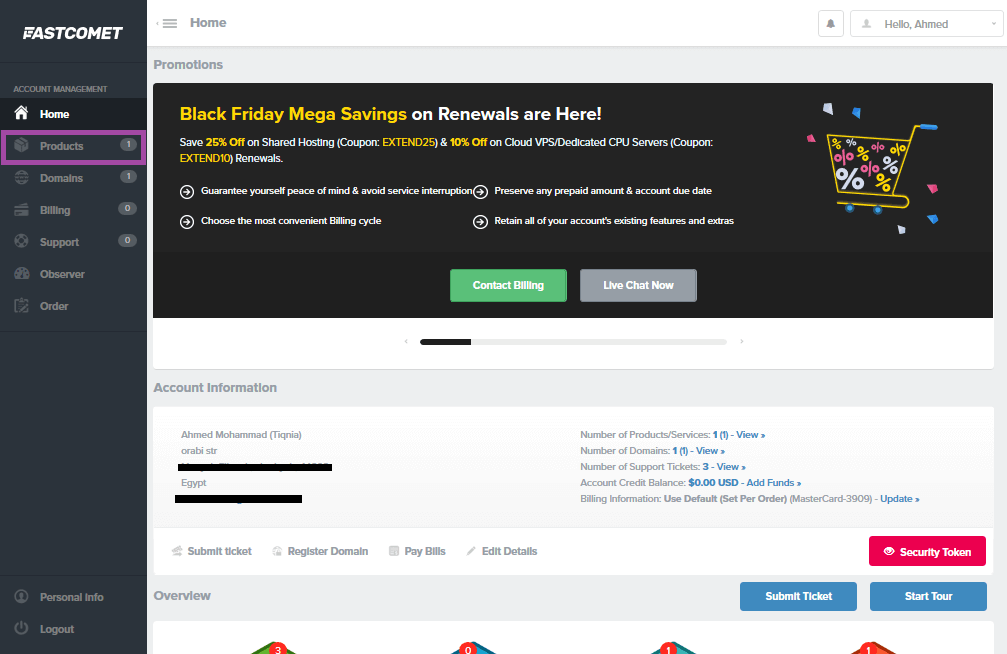
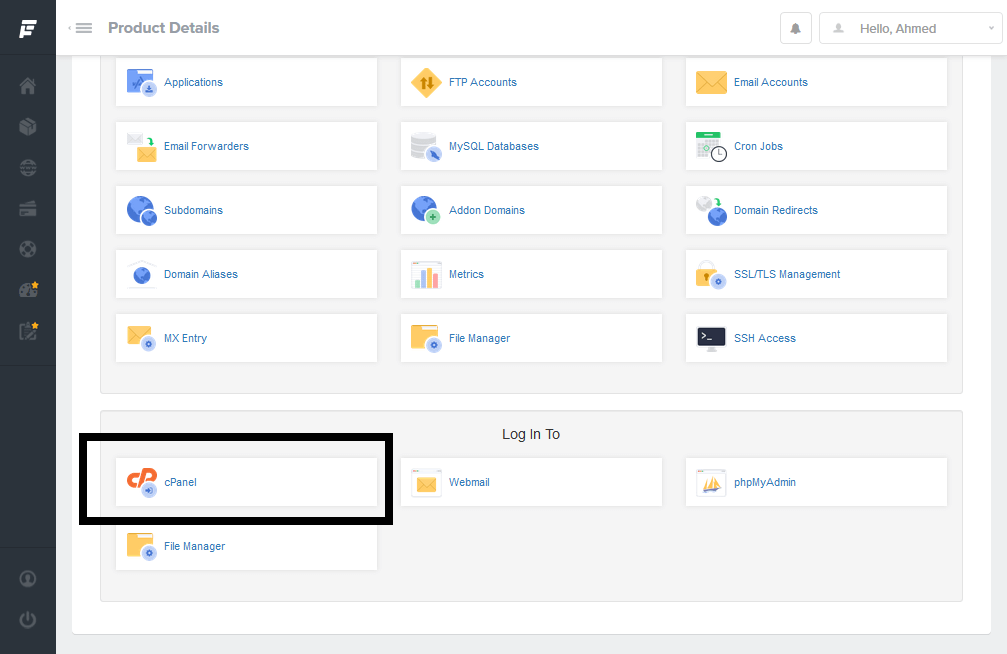
Click on Products to open the hosting control panel, then click on View Details
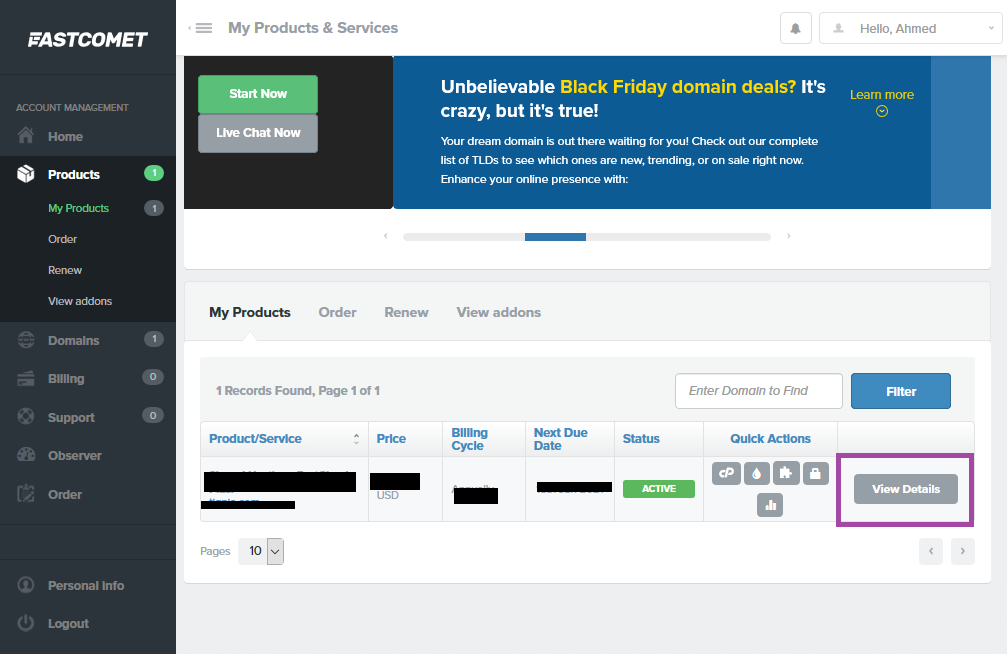
The hosting control panel will appear, then scroll to the bottom of the page and through it you can open the cPanel control panel to install WordPress.
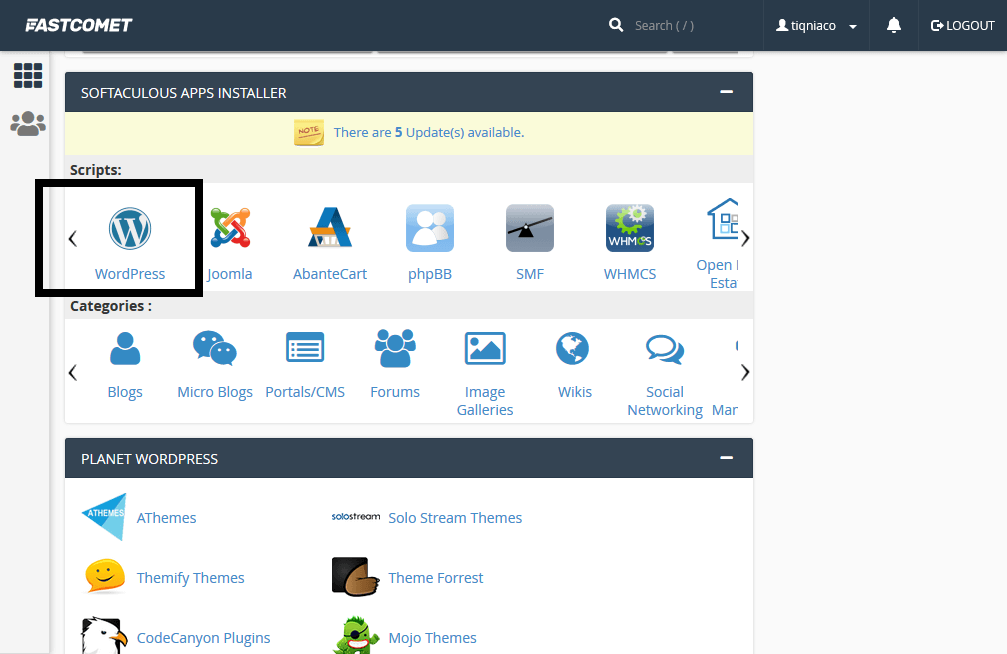
After opening Cpanel, scroll down to the bottom of the page and choose WordPress as shown in the picture
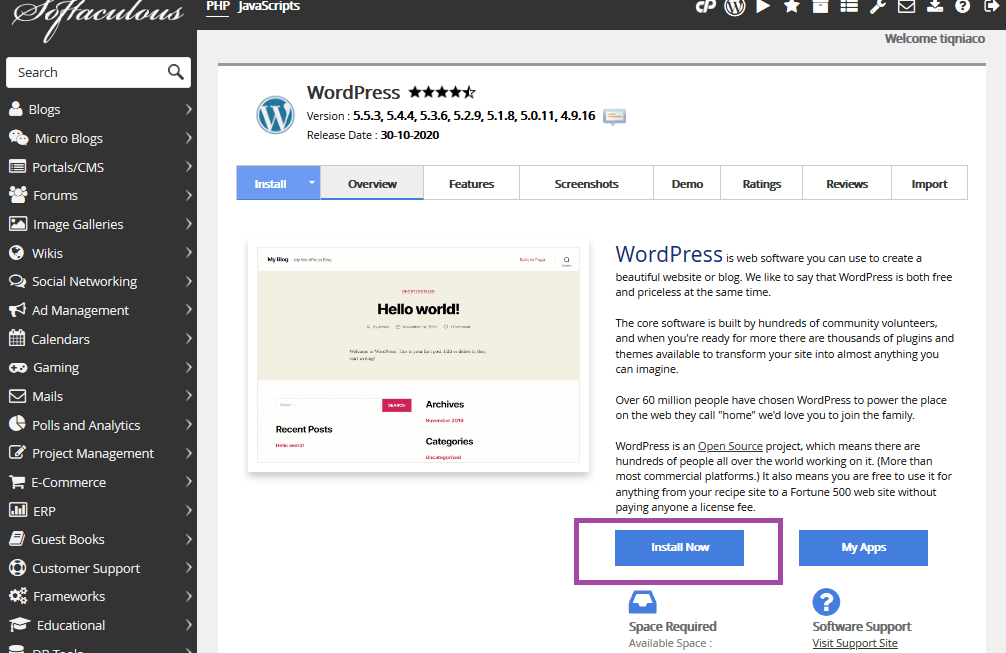
After clicking on WordPress, the page for installing WordPress will open as follows. You will click on Install Now
The data entry page for installing WordPress will open, as shown in the following image:
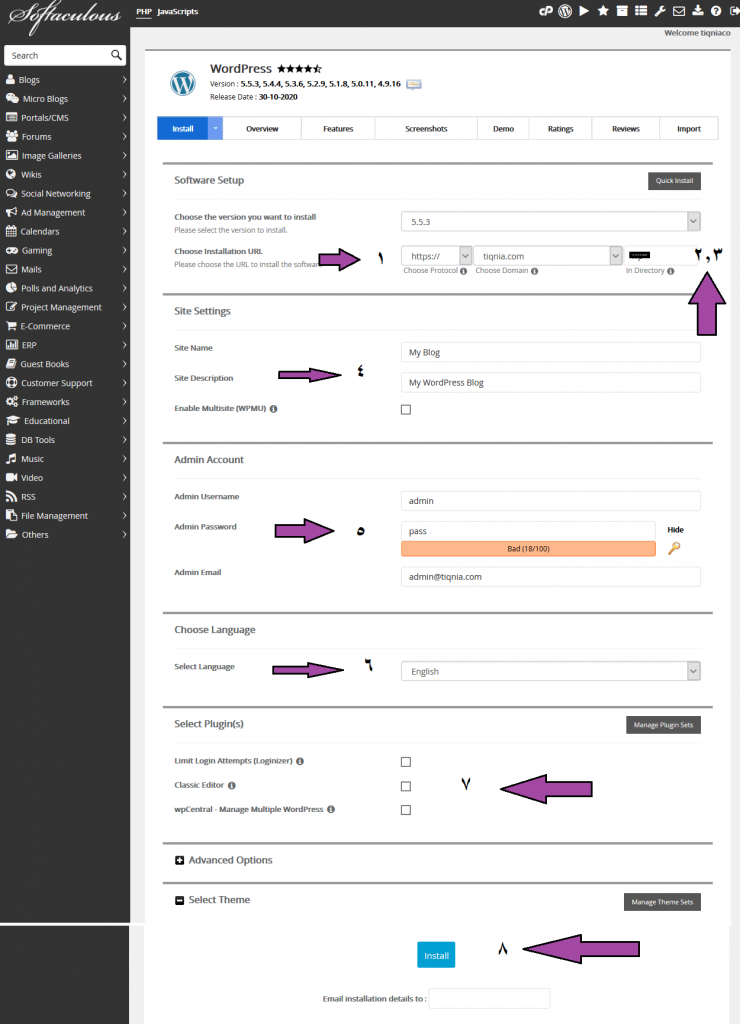
- Choose the domain and choose the format of the website link. Will it have https or not?!
- Choose a subfolder if you want to install WordPress in a sublink of the site.
- Leave this field empty if you want to install WordPress on the main domain.
- Enter the site name, site description…
- In the next step, write your username for the site administrator, your password, and your email to log in to the control panel
- Choose the language for your new website.
- During the installation of WordPress, some plugins are automatically provided, which saves you time later. Mark the plugins you want to install if you wish.
8. After entering all the data and verifying it, click on Install now
At the bottom of the page, you are asked to send an email address to send the installation data to it (optional).
Congratulations now! I installed WordPress on the domain that I chose in the settings.
WordPress installation has been completed, what’s next?
Choosing the right WordPress template
A WordPress template is the design that shows the shape of your site, the shape of articles, and all aspects of your site. There are paid WordPress templates and simple free templates, according to your choice and budget. There are also templates for electronic stores and Woo-Commerce , and there are also templates that support the language. Arabic and English together .
After selecting the appropriate template for the purpose of your site, and from the place that you deem appropriate for you and the purpose of your site, follow the following steps with us.
Through the WordPress control panel (Example.com/wp-admin), you will go to Appearance, then click on Templates, then click New

Click Upload Template

A browsing window will open on your computer . Choose the location where you placed your template, then upload the template, click Install Now , then click Activate.
Now you have the template installed on WordPress, and you can follow the explanations on our website to learn how to customize templates
One of the main features of WordPress is that it provides a large amount of free templates that do not require downloading or uploading in order to be installed, just by searching within WordPress and installing directly.. Follow in the next steps how to install a free WordPress template directly from the WordPress control panel.
Install a WordPress template for free directly from the control panel
You can install a free template directly through the control panel, by selecting: Appearance, then choose Templates, then you will find it showing you many free templates from which you can choose the appropriate template for the purpose of your site and install it directly on your site.

When you hover your mouse over one of the templates shown in the image above, two options will appear for you, the first is details and preview, in order to know the details of the template, the features and support it provides and whether it supports the Arabic language or not, or the second option is installation.
After selecting the appropriate template, click Install to install the template directly on the site

After clicking on install , you wait until the installation process is completed, then the word activate will appear, which you will click to activate the template on the site.
Now we have installed WordPress and installed a suitable WordPress template on your site.
Then we come to the next step, which is adding content to your site, such as description content about your company or your contact information and all your business pages.
Add pages to your WordPress site
Through the WordPress control panel, choose Pages , then click Add New

- As you can see in the picture, a page will open with information that is entered on the page, such as the page title ( for example : Contact us), and you write the content of your page in the following statement.
- After writing the page title and page content, click Publish on the left side
- You can also change the page link before publishing or update it after publishing

Change the general settings of your WordPress site
When creating a WordPress site from scratch, the name and description of the site are a default name and description, and the general settings of WordPress must be changed, such as the site name and description of the site, by following the following steps:
- Through the WordPress control panel, choose Settings
- To change the site name
- To change or modify the site description
- To change the email address of the site administrator
- To decide whether you want to allow users to register on your site or not
- The default rank for new registrants if you decide to allow members to register on your site and participate
- The language of your site: Is it Arabic, English, or another language? Choose from the list
- The temporal region of your site
- The date format that suits you
- The time format in which you want articles and images to appear to site visitors
- Beginning of the week
- To save previous changes, click the Save button

The next step is to add lists to your site. To add a list, follow the following steps with us..
Add menus to your WordPress site
- Through the WordPress control panel, choose Appearance, then Menus from the internal menu
- Enter the name of your list to identify it later by name if you have multiple lists
- Choose where the menu appears, as shown on the page
- Click on Create List

You have now adjusted the main settings of your WordPress site, and we have also added menus to the site..
In the end, WordPress comes with powerful features, such as support for plugins that enable you to add more important functions and powerful features to your website.
Here we have finished creating the WordPress website. If you encounter any problem during installation and configuration, leave a comment and we will be happy to respond to you.


Leave a Reply