Uou may have previously heard a friend recommend creating your website using WordPress as one of the best ways to create websites, especially since nearly half of websites rely on WordPress. But you’re not quite sure if WordPress is the perfect system for your needs or not?
Some consider WordPress suitable for blogging only, and not suitable for other types of sites , and others consider it one of the best CMS content management systems that can be relied upon.
There are many huge technical breakthroughs in 2023. Is WordPress keeping pace with these technologies? Will your website built on WordPress be in line with this massive technical revolution for website visitors? Will you be able to flexibly customize its appearance and features to meet your ultimate needs for creating a website?
Don’t worry, in this article we will get you out of this confusion by exploring the aspects of WordPress as an open source system and how you can use it to create any type of website. Whether you aim to create a WordPress website to become: a blog / business website / online store / interactive forum / membership site / personal website.
Even if you have no previous experience, you will eventually be able to customize your site step by step.
What is WordPress?
To get straight to the point, WordPress is a content management system ( CMS ) that facilitates and speeds up the process of creating a website through a set of tools that it includes by default, as well as through tools that can be added to it using plugins and templates.
WordPress was developed by Automatic . It is written in the PHP language and relies on the MySQL database. It is a free system that anyone can download from the official website and then install it on their server to create a professional website.
But there are some additional tools that may require you to invest some money, as is the case in any business depending on its size and goals. WordPress is also open source software, and you can modify it (if you are a programmer) under the GPLv2 license to make it more suitable for you or your clients.
WordPress has many features that make it one of the best and most popular ways to create a website, which include high customization capabilities thanks to the large number of templates, plugins, and customization tools available, as well as ease of use, and the ability to get help regarding anything in it quickly by searching on the Internet or using… With experts.
Requirements and costs of creating a WordPress website
Before starting to create a WordPress website, you must know its requirements. There are basic and optional requirements, and there are paid and free requirements. The most important of these requirements include:
- Web hosting : It starts at $5 per month, and it is one of the requirements that cannot be dispensed with at all, because it is the computer that runs the website.
- Domain name : It starts at $12 per year, and represents the address that enables visitors to access your site, where they will be able to enter the domain name to open the site.
- WordPress system : It can be obtained for free from its official website, and the hosting company can provide the ability to transfer it directly to your hosting.
- WordPress template : It helps customize the appearance of the site, and there are free templates and paid templates.
- WordPress plugins : They help add new functions and tools to the site. There are free plugins and paid plugins.
The cost of creating your site on WordPress varies according to its size, but the basic requirements that you need to pay for are hosting and a domain. The rest can depend on the effective free options that we will talk about in the rest of the article, and in the case of expansion, you will have the option to purchase some paid tools.
Note: You will find some companies offering you free hosting and domain services for a marketing purpose, but we do not advise you to rely on these companies because there are several disadvantages that will appear to you very soon on the site.
Steps to create a WordPress website (with pictures)
After we reviewed the requirements for creating a WordPress website, we now move to the practical part, through which you go through the steps of launching your website to visitors in the way you want it to appear to achieve the goal of creating it.
1. Get hosting and a domain
In the beginning, you need hosting and a domain, as we said, so that your website files can be hosted and appear to users, and also so that you have a prominent name that expresses you (www.Example.com) that the visitor can use to access your site easily, and also that search engines recognize you and your name is prominent on this. Grammar in social platforms.
A domain name can be obtained through domain name providers, that is, companies that sell domains. There are many of them, but the best ones are GoDaddy, NameCheap, Domain.com, and Google Domains. We explained how to obtain a domain name from the latter provider practically in an article. ( Illustrated explanation of how to buy a domain from Google ).
The method of purchasing a domain from any domain company is similar to the explanation in the article above, where you first enter the name of the domain you want and choose its suffix to ensure that it is available, then click on the search button. If it is available, you can directly pay for it and reserve it for a year or more. If It is not available. You will have to choose another domain name that is appropriate for your site.
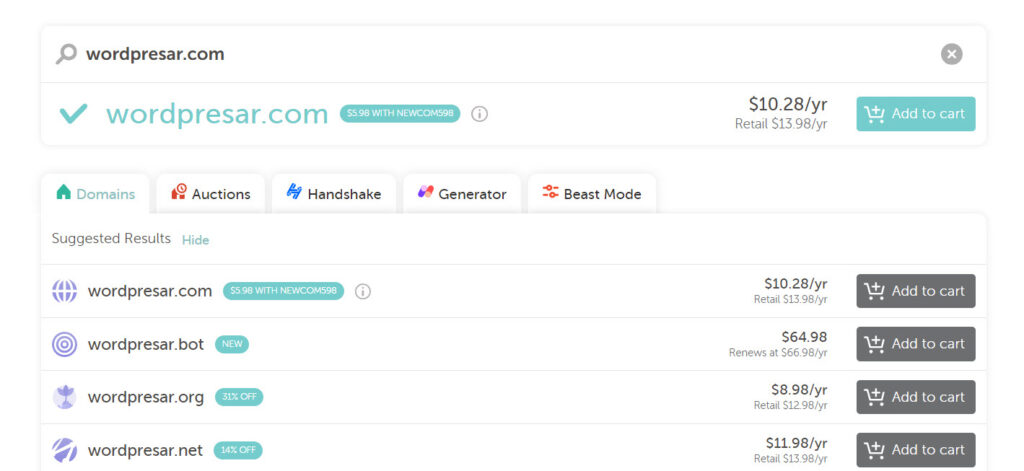
With regard to obtaining hosting, there are many hosting service providers that you can rely on, and in this context we advise you to rely on cloud hosting that has flexible plans, because of the freedom to obtain basic plans at an affordable cost, with the possibility of obtaining a higher plan in case Expansion and receiving more visitors, unlike shared hosting , which causes your site to fail when the number of visitors increases.
Therefore, the cloud plans that charge you for consumption charge you at a low cost if the number of visitors to your site decreases, and at a higher cost if the number of visitors to your site increases, and this option of flexibility is the most important for you in the payment process.
Regardless of the hosting service provider , we will complete this explanation by relying on Digital Ocean hosting, and you will find that the explanation steps are similar to the rest of the service providers.
You will go to the Digital Ocean website: www.digitalocean.com , create a new account, complete the login like any registration process on a website, and choose the plan that is appropriate for you:
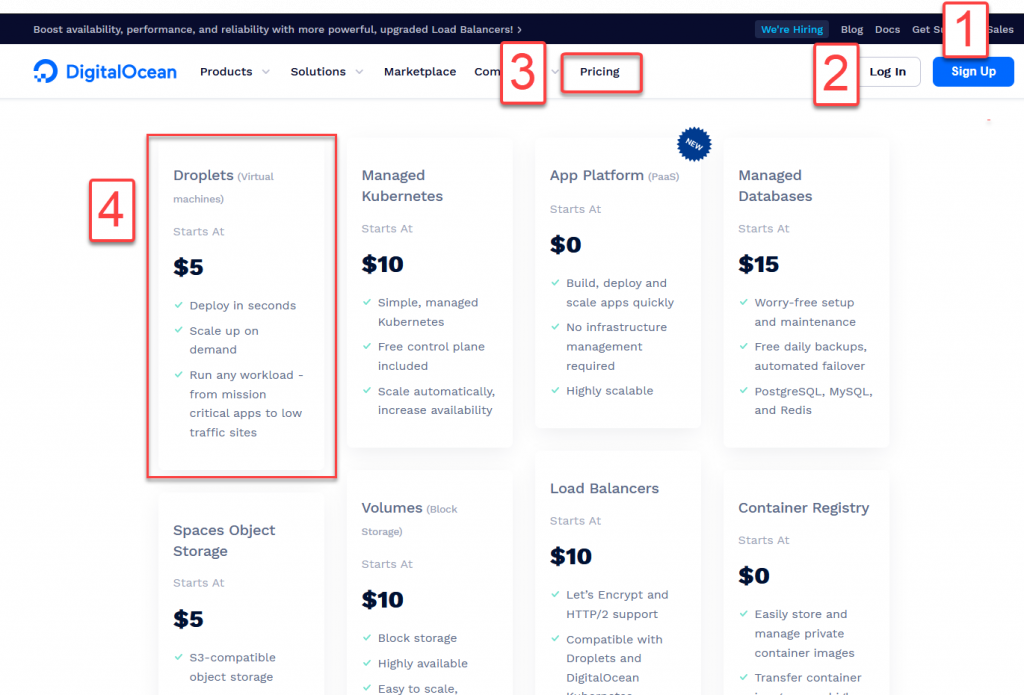
- Sign up : to register a new account if you do not have a previous account on the site
- Log in : To log in to the site with your own account
- Pricing: To learn about the plans offered by the hosting company
- Droplets : This is the plan that you will rely on to create a WordPress website
And log in to the site to start using the hosting account, and install WordPress in preparation for launching your site. We advise you to review the guide that we prepared previously, in which we explain the steps for creating and activating an account on Digital Ocean hosting in a detailed and illustrated manner.
Note: After purchasing the hosting and the domain, you will need to link them together if you obtained them from two different companies, in order to make the domain direct the visitor to your site on your hosting, as we explained in the article: How to link the domain to hosting .
2. Install WordPress
Now you have cloud web hosting that you can rely on to launch your website to users with any content management system. If we liken web hosting to a computer, you are like someone who bought a new computer and wants to install the operating system (Windows or Linux).
This is just a simular example, so you can get familiar with the concept of installing the WordPress system on your server account with the service provider.
Technically, in order to install WordPress you must upload the WordPress software files to your hosting. These files can be uploaded manually through FTP or through easy-to-use tools provided by hosting companies.
DigitalOcean allows WordPress to be installed through the DigitalOcean App Marketplace, which also includes many other content management systems.
To install WordPress specifically, from within the hosting account control panel, we will create a (WordPress droplet) that we can rely on to create a new WordPress site:
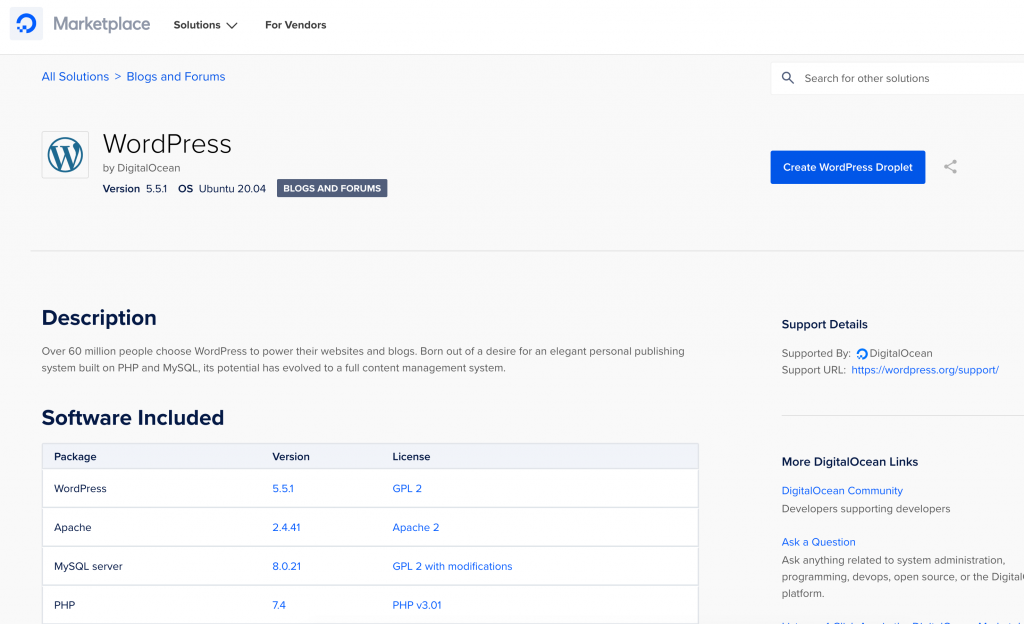
Then, after creating a WordPress droplet, you must install WordPress through the Droplet Console. To do this, you must go to the project that includes the droplet, then choose (Access console) from the droplet options, and then click on ( Launch Droplet Console ) to launch the prompt. Drop commands in Digital Ocean.
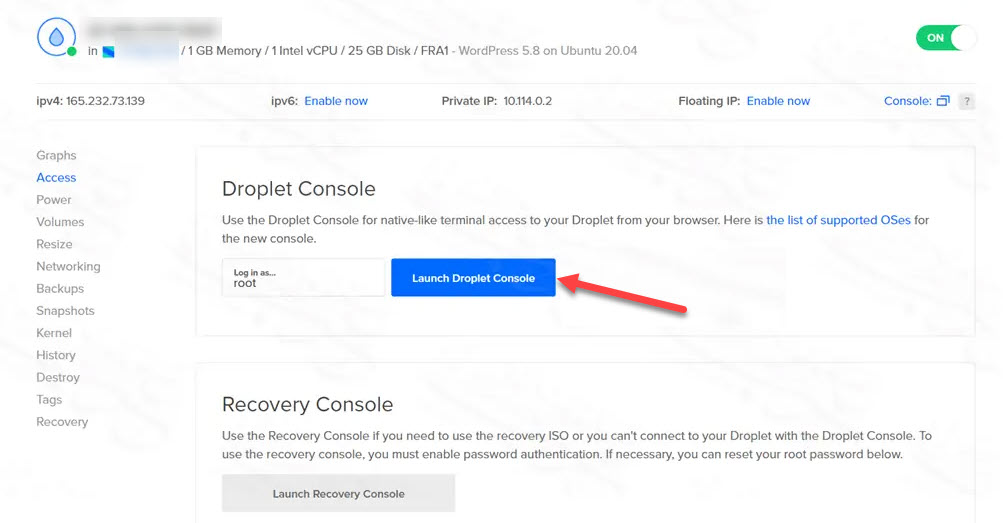
The Droplet Console will open with a black screen with text. Enter what is asked of you in the last line, click on the (Enter) button, then enter what is asked of you after that and click on the (Enter) button again, and repeat the process until you see a message stating that WordPress has been installed ( installation complete ).
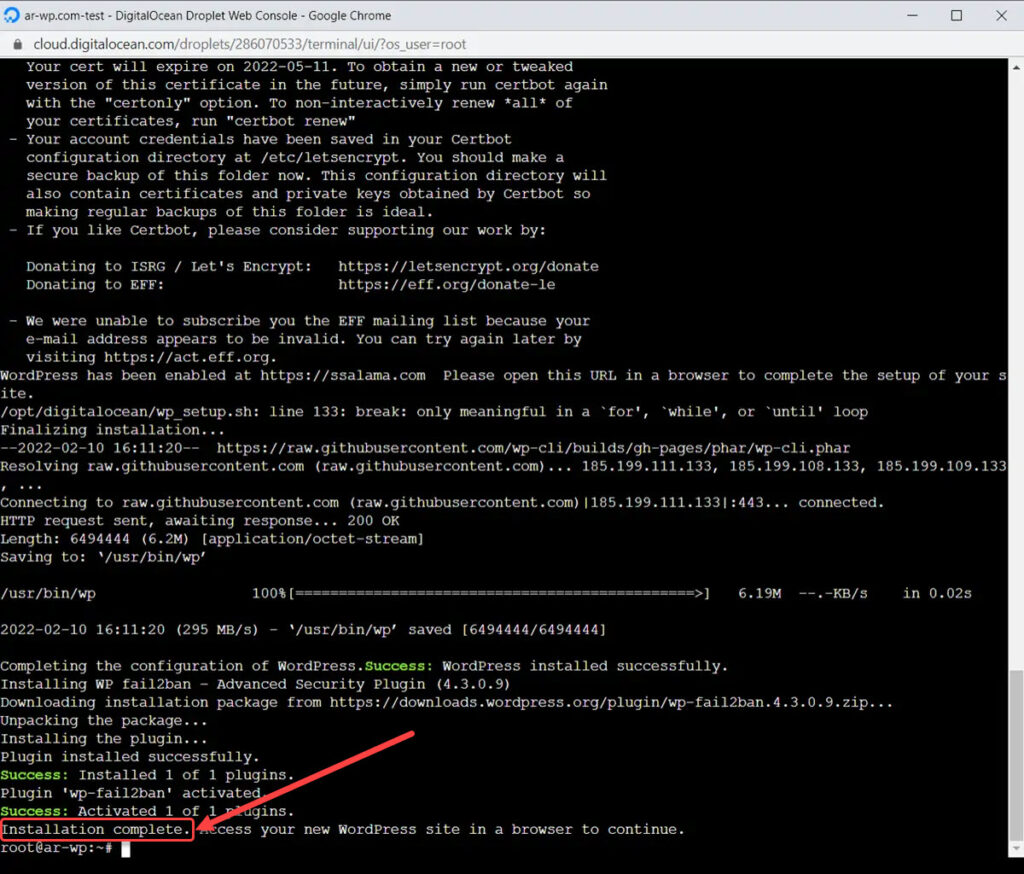
After that, you will be able to access the site through the domain or IP address of the drop, using the administrator account information that you entered. If you want a more detailed explanation of the process of installing WordPress on Digital Ocean hosting, you can review Installing WordPress on Digital Ocean hosting .
If you are using another hosting that is different from Digital Ocean hosting, you can install WordPress on it by following one of the methods that we explained in the article that explains installing WordPress on the hosting .
3. Choose and install a WordPress template
After you have installed WordPress as we explained in the previous step, the next stage is to install a template to rely on to customize the appearance of your site. After completing the installation, you will find that your site appears in this very simple form, which contains the phrase (Hello world) with a default appearance and texts.
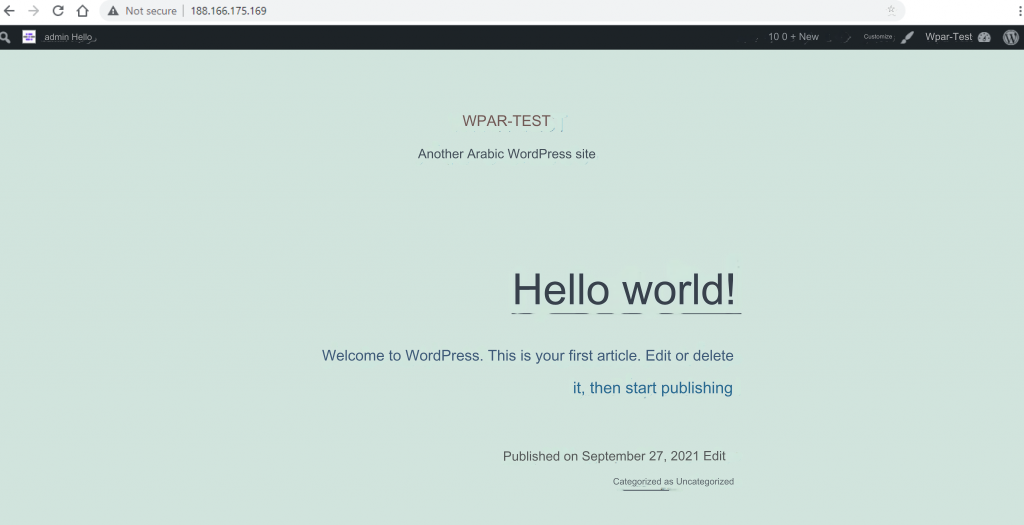
Of course, we do not want our site to appear in this humble form, but we want to customize its appearance in an attractive way for users according to the type of site, and design each of its pages in the best way. We want to customize the overall appearance of the site as well as the content pages that we want to display to users.
Here comes the role of WordPress templates that enable you to change the shape, format, and design of your WordPress site. The template allows you to transform your default site design into a unique design in terms of distributing the elements, fonts used, colors, and all design components according to the type of template.
There are thousands of free templates as well as paid templates that vary in the options and features they provide, so the step that must be taken before installing the template is to choose the appropriate template. The appropriate template varies depending on the type and purpose of your site and the features you want to include in it, so we have prepared for you two articles in which we recommend the best WordPress templates for different types of sites, one for free templates and the other for paid ones:
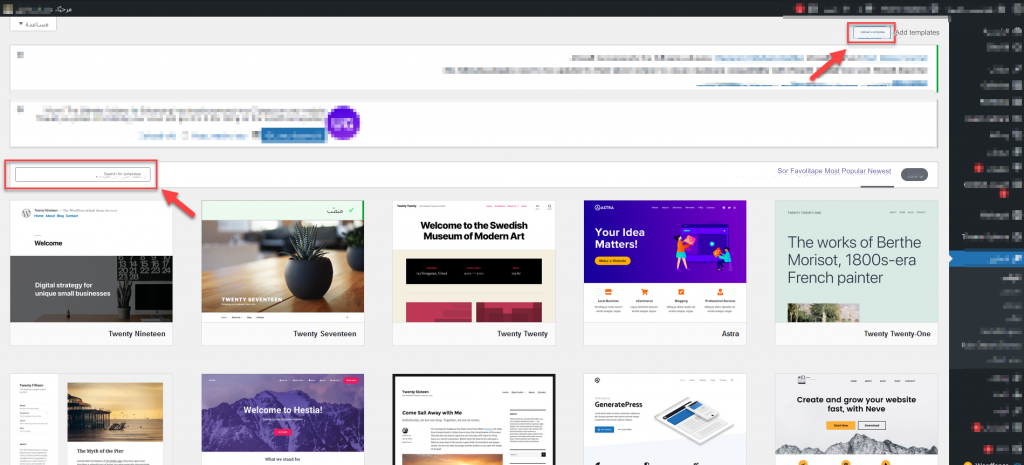
After choosing the template, you can install it. In general, you can start installing the template from within the WordPress control panel, by going to: Appearance >> Templates, then click ( Add New ).
You will be directed to the page for installing and activating the template on the site, whether by searching for templates in the WordPress store itself that are available in a free version, or if you already have a template that you downloaded from an external source and want to upload and activate it on your site, as follows:
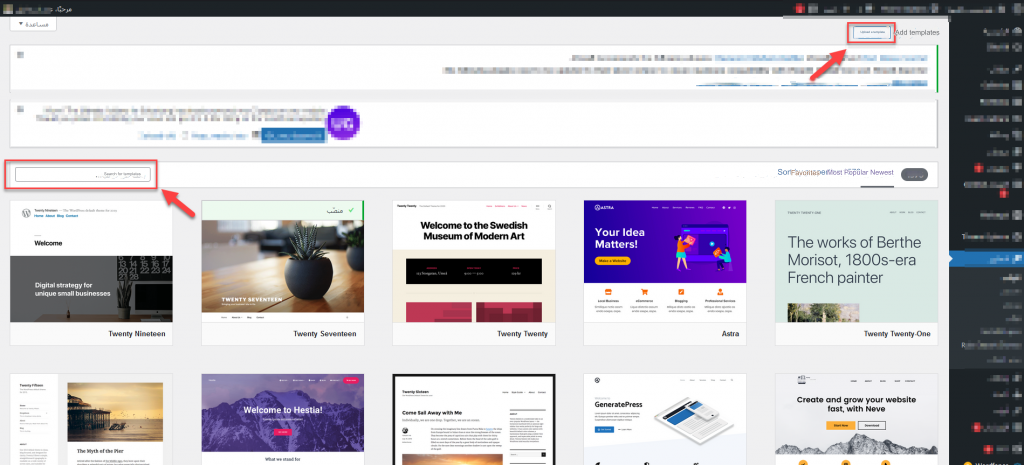
We have prepared a previous explanation on how to install a WordPress template on your site in more than one way. We advise you to read it to learn how to install the template with illustrated steps.
4. Adjust site options and customize appearance
After installing WordPress and the template, it is best to check all the settings in the control panel, and adjust them according to what suits your site. You can access and review the settings through the ( Settings ) tab in the side menu, where you will find the WordPress program settings organized.
After that, you have to adjust the appearance of the front interface that appears to the visitor. The method of doing this varies from one template to another, but in general there are three ways in which you can adjust the appearance of the site, and the theme should provide one of them.
The first method is through the customization tool in WordPress, where you click on the ( Customize ) option under the (Appearance) tab to go to the customization tool that provides options that allow you to adjust the appearance of your site on the right side, and displays a live preview on the left side.
The second method is through special options provided by the template within its own tab in the control panel. You may find it called ( Template Options ) or the equivalent in Arabic or English.
The third method is through the full site editor, which enables you to modify your site based on the components, and you can go to it by clicking on the ( Editor ) option in the (Appearance) tab.

The template may provide one or more ways to adjust the appearance of the site, and for more information about ways to modify the appearance of the site .
5. Install the necessary add-ons
After you customize the appearance of your site to the way you want, the next step is to install the necessary WordPress plugins that help you include the necessary functions on the site through ready-made tools, as WordPress does not provide by default all the options necessary to create any website.
For example, WordPress does not come by default with a tool that enables you to create a contact form. Rather, you need an add-on through which you can use ready-made, editable templates to create and customize the fields of the required contact form. Some add-ons can be obtained for free, while others require some additional costs.
In a similar way to installing the template, you can install the necessary plugins for your site through the control panel by going to: Add-ons << Add new
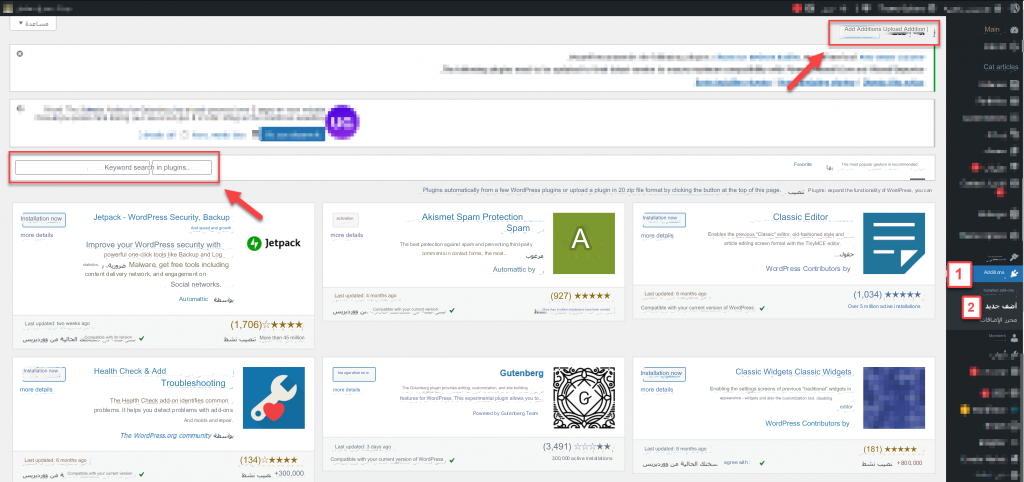
You can search for the required add-ons and then install them on your site.
Here is a selection of some of the essential plugins you’ll need most often:
- Yoast SEO to optimize your site and improve its appearance for search engines
- Wordfence , which secures and protects your site from hacker attacks
- Akismet , which blocks spam comments that come from auto-posting programs
- W3 Total Cache , which speeds up your site for visitors who visit it regularly
- WPforms creates contact forms or any other type of registration forms
- WooCommerce if you want to turn your website into an online store to display products
There are thousands of other plugins available in the WordPress store and outside it that you can obtain in order to add more features and functions to your site depending on its type, but beware of using pirated plugins.
Our advice to you is do not get distracted by comparing thousands of published add-ons so that you do not become confused and bewildered in choosing the appropriate add-ons for you. But start with the goal of your site and based on that you’ll know which plugins you’ll need to get specific features.
6. Add website content
After you create your site, customize its appearance, and install plugins, it is almost ready to publish to users, but the last step remains, which is adding content to your site by creating pages and starting to create articles .
The pages that must be added to the site vary depending on its characteristics, such as the purpose of its creation, its size, and the features to be provided in it. The owner of a commercial website wants to add introductory content related to his business activity, the owner of an online store wants to highlight his products to shoppers, the owner of a blog wants to publish articles, and the owner of a restaurant wants to publish a menu of foods. It enables users to order a meal, and the owner of the real estate platform wants to publish information about the properties offered for sale to enable users to make a reservation… and so on.
Therefore, keep the user experience and the main goal of creating a WordPress website in mind, then start creating the content of the main pages based on that. You can use the guides that explain how to create custom websites on our website. If you want to create a website for a restaurant, for example, you can enter the keyword in the search box. Go to the guide that explains all the steps in detail.
Regarding the practical way to add content and create pages on the site, this is easy, as WordPress provides a professional component editor that helps you add all types of content in multiple ways to reach the look you want on your site pages through its use.

If you want to create a new website with a new idea and you do not find a guide explaining how to do that, put it in the comments and we will create a detailed guide about it later. You can do this yourself using the ready-made tools in WordPress, i.e. plugins and templates specific to the type of site you want to create 🙂
7. Marketing your site to targeted visitors
After you create the site and publish it on the web, you will ask yourself: Now I want to get visitors? Want to get sales? Here comes the key role in marketing your site .
There are many marketing methods that you can rely on to reach targeted visitors, such as:
- Search Engine Optimization (SEO)
- Content marketing
- Social media marketing
- Pay per click
- Affiliate marketing
- Influencer marketing
- Native ads
- Email marketing
- Public relations
It is certainly not necessary to rely on all of these methods at once, but it is enough to start with one method that will attract many targeted visitors and does not require you to invest a lot of money, which is relying on search engine marketing (SEO). This skill will not require you to invest a huge investment in hiring freelancers or creating advertising campaigns. Rather, it is sufficient for you in the beginning to improve the technical matters on your site, and this is what we talked about in detail in the WordPress SEO guide .
8. Continuously manage and improve the site
Finally, after creating a WordPress site, adding content to it, marketing it, and starting to get visits, there is a step that must be applied continuously as long as the site exists, which is managing it optimally and improving all its aspects to increase the number of visitors and profits if your goal is profit, and this step includes many tasks, the most important of which are:
- Monitor site statistics periodically and strive to improve them.
- Troubleshoot and solve problems that may occur.
- Responding to comments and inquiries from visitors and customers.
- Improving the user experience in all its aspects.
- Study what is new with competitors and learn from them.
- Publish new content and update existing content periodically.
- Updating the site’s software , including WordPress, plugins, and templates.
This step also includes other tasks depending on the type of your website, but its goal is always the same, which is to ensure that the site works properly and improve it to outperform competitors and achieve the goal of creating a WordPress site.
Don’t have enough time?
You may not have enough time to manage all of these things yourself: from managing hosting, customizing the theme, setting up site plugins, using some external tools, adding content, and other tasks.
In this case, we advise you to hire a freelancer to help you develop your site , so that you do not burden yourself beyond your capacity.
- For example, you do not have experience in creating a logo design for your website? You can purchase a logo design service
- Or you don’t have enough time to add products to your site? You can purchase a data entry service
- Or do you want a professional writer to help you write your website content? You can browse website content writing services
- There is also a classification on the site that specializes in WordPress services , for people who have dedicated services in managing and developing WordPress sites
It is not required that you purchase all the services on the site initially, nor is it required that you do all the tasks yourself.
However, we advise you to complete the tasks that you have the ability to do on your own and to seek help from other people for tasks that will require an expert to help you with specific matters, or for matters that will consume a huge amount of your time to work.
But we expect that after reading the previous guides, you will have experience in accomplishing many tasks on your own, God willing 🙂
In conclusion, we hope that you have learned through this article how to create a WordPress website that meets your needs first and helps users reach what they want on your site. Make sure that your own website is an interface that expresses you and that you create in order to reach a specific goal, so take care of the details of the website and think about its success in the best way.
If you encounter any obstacles while launching your website, write to us in the comments and we will help you overcome any problem.


Leave a Reply