

In the previous lessons of the WordPress template development series , we explained the basics that a WordPress developer needs to know to build a simple template for a blog. Through these lessons, we learned the main parts of the template in detail, and we explained how to add some features to this template.
In today’s article, we will explain to you how to customize your template professionally using a custom application programming interface called Customizer API Theme. This interface is included by default in the WordPress installation and you can take advantage of it to customize your template professionally, and add new features to the customization page options.
Through this interface, it can allow website owners to make various customizations to their WordPress templates and modify the appearance of their sites with ease without the need to write any code on their part.
What is the Customizer API and what are its most important components?
The template customization interface is the interface that enables you to configure website settings and instantly see all changes in a live preview window. When you want to apply the changes to your actual site, all you have to do is click the Publish button at the top right of the window, so that the changes can be implemented on the site with ease.
To access this window and deal with the Theme Customizer, all you have to do is log in to your site’s control panel and click on the Appearance tab > and choose the Customize command .
As a template developer, you can programmatically control this window and add different elements to the Customizer API, as the window includes 4 types of elements as follows:
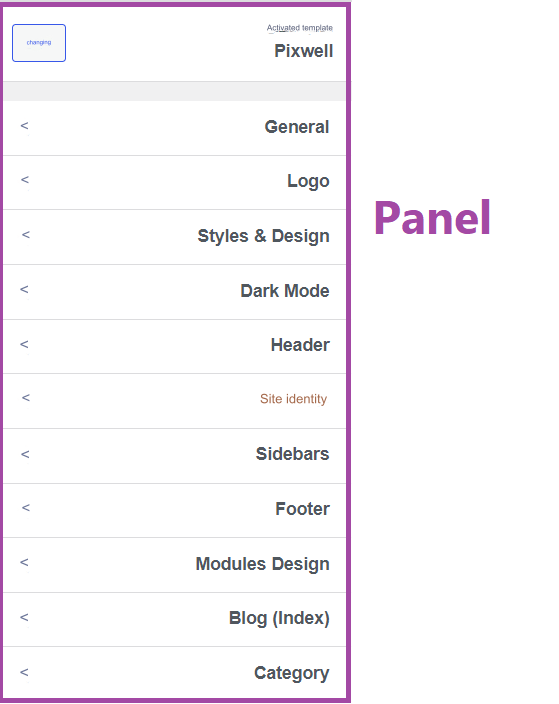
1. Panels: The panel is the section that collects or includes all the fields that you will create using the Customizer API interface. It collects settings that have a relationship with each other in one section.
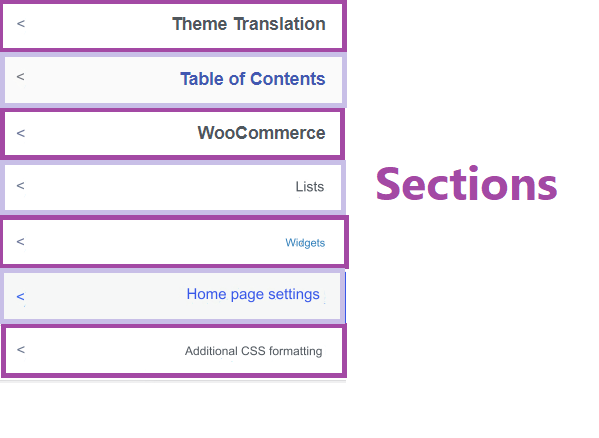
2. Sections: Each independent tab or menu within the Panel can be considered a Section.
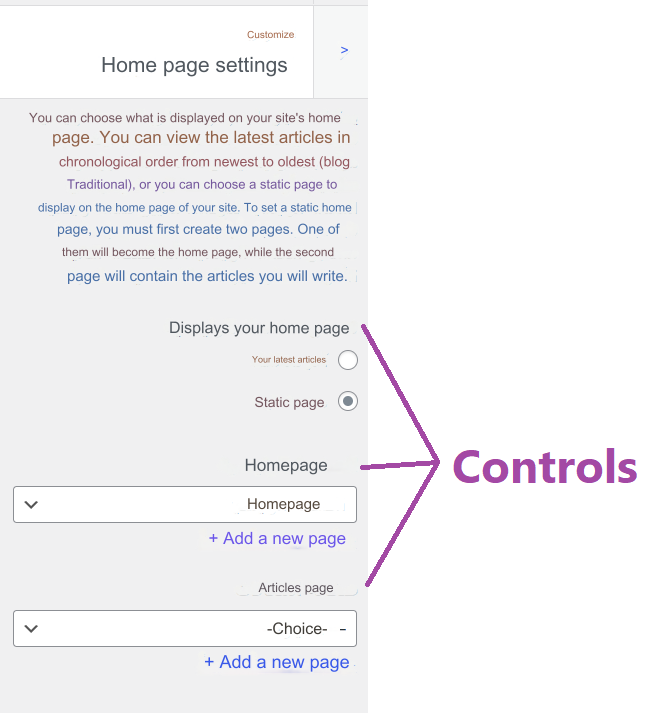
3. Controls : When you click on any section in the panel, a section will open for you that includes a group of controls for this section. Each control here is a form field of a specific type.
For example, the following image is the Home Page Settings section , which contains three controls with titles as follows (displays your Home Page, Home Page, Articles Page)
4.Settings We also need to add a setting for each control that is added to the template customization interface. The setting is through which you can save the value of the control that you create. All settings made on the control fields are saved in the database so you can show the changes that you made. You perform them on the template through live preview, or fetch settings saved in the database.
How to create elements in the template customization interface
As we explained in the previous paragraph, you can create 4 types of items through the Customizer API. To do this we need to use a custom callback function to create each of these elements, and associate this function with an action hook called custom_register.
Read more: Explanation of WordPress Hooks and their importance for theme and plugin developers
For example, the following code shows the general form of the function to create elements in the template customization interface and how to link it with the customize_register hook:
The parameter passed to the olatheme_customizer_regions function here is the variable $wp_customize. This parameter is an object of the WP_Customize_Manager class that controls the theme customization interface as a whole.
This interface includes four main classes:
- WP_Customize_Manager
- WP_Customize_Setting
- WP_Customize_Section
- WP_Customize_Control
When you add panels, sections, settings, controls, or even custom controls to this interface, they must be within a function used by this hook, to which we pass an intent from the WP_Customize_Manager class.
For example, the following code defines a set of functions that create, fetch, and delete various elements from the Customizer API:
note:
While creating elements in the Customizer API you must consider the order given in the above code. You must first create the Panel>, then the Section>, then Setting>, and finally the Controls within each section. In the following paragraphs, we will explain in more detail how to create each section
Add settings to the template customizer through the add_setting function
The $wp_customize->add_setting() function is used to save a default key and value for this key in our WordPress theme database, after which you can use this saved key and its value to make the desired change in the appearance of your template or theme.
For example let’s say you created a setting named title_color (this name is the key) and set its default value to be black #000000 (this is the value of the setting)
Now in your theme files you will need to call the get_theme_mod function or the get_option function to get the value of this setting:
The get_theme_mod function returns the template modification value for the property or setting passed to it as an argument, while the get_option function returns the value of the property whose name we pass as an argument, each of which has a use case.
In order to apply this setting to the appearance of the template, we write the appropriate formatting code to apply this change to our website, for example:
But if we set the type parameter in the following form ‘type =’option when creating the setting (we will explain how to configure this parameter when talking about function parameters), then we must write the code to apply the changes using the get_option function in the following form:
As you can see, by creating a setting in this way, i.e. giving the setting one default value, you will make it limited to it and cannot be changed. Here comes the question: How can we change the default value we give to the setting? Do we always have to use the same value?
Of course, the answer is no, as we are not obligated to use the same value for the setting, and we can make the site owner change this default value, and here comes the role of linking the setting with the appropriate controls to change it through.
By creating a control based on this setting, we can allow the site owner to determine the value of the setting, as we will explain shortly.
Add_setting function parameters
Now let’s explain the parameters of the add_setting creation function in more detail. This function can take two parameters and has the following general form:
As you can see, the add_setting function takes two parameters: $id and $args
The first parameter, $id, is a mandatory parameter. It is a text string that does not contain spaces. It represents the key or identifier of the setting that we will create. We use this key to return the value given to this setting.
note:
Make sure that the $setting_id value is expressive, and do not give a value that begins with the words widget_, sidebars_widgets, nav_menu, nav_menu_item, because WordPress uses values that begin with these expressions, and this causes a conflict on the site.
The second parameter $args is an arbitrary parameter that represents an array in which you can provide many details about the setup we want to create.
This matrix can include several parameters as follows:
- default: This parameter stores the default value of the setting.
- type: This parameter determines how this setting will be preserved. We can use two values for this parameter: the ‘option’ value , which means that we want to save the setting we made in the wp_options table. In this case, we will be able to use it even if we change our template, and its stored value can be returned from Through get_option ($id).
The second value is theme_mod , which is the default value of the parameter. When we use this value, the setting will only be available when the template is activated and will be deleted when the template is changed with another template. Its value is returned using the get_theme_mod function ($id). - capability : This parameter represents the minimum permission or permissions required to change the setting and its default value is edit_theme_options .
- theme_supports : This parameter is used to hide the setting if the theme does not support any of the features that are added to the theme using the add_theme_support() function.
Read more: Learn how to add features to a WordPress theme using the add_theme_support function
- transports : This parameter determines when you want the setting to be displayed in the template. It takes two values, the first and default value is update , which means that your setting will be applied or take effect when the entire page is refreshed, and the second value is postMessage , which means that your setting will appear immediately in the live preview section of the page.
But you must be aware here that in order for the postMessage feature to work, you must write custom JavaScript codes whose task is to apply these settings to the live preview. - sanitize_callback : This parameter provides a security measure to protect your setup. It represents the name of the function that applies certain protections to the given value of your settings.
Here you can also use one of the security functions that WordPress creates to protect form fields, such as the sanitize_text_field() function to protect text fields, the sanitize_hex_color() function to protect color codes, etc. You can also write a custom validation function yourself and pass its name to this parameter. - sanitize_js_callback: This parameter provides security for the JavaScript output of your setup. If your setting value will be used to generate JavaScript output, you can create a function that passes this value through certain security operations and enter its name here.
Add controls through the add_control function
In order to change the default value for each setting, you need to create an appropriate control based on that setting. The $wp_customize->add_control() function allows us to create controls or in other words form fields in order to change the default value of the setting created using the add_setting() method that we explained in our previous paragraph.
The add_control() function has the following general form and also has two parameters: $id and $args:
For the first parameter $id we pass either a string representing the ID of the setting for which this control was created, or an object of the WP_Customize_Control class representing one of the pre-made form fields that comes with WordPress.
For example, suppose you want to use a color palette to make adjustments to the colors in the template. Here you can use an object from the ready-made class in WordPress WP_Customize_Color_Control .
The second parameter $args represents an array of parameters through which we specify details about the setup we will create. But if we pass the first parameter $id as an object of a control class and not as a string, then there is no need to use this parameter.
We can pass the following parameters to this $args array:
- label This parameter represents the title of the control that we will create and accepts HTML elements
- description This parameter represents the description of the control field that we will create, and it appears below the label, for example:
- section This parameter represents an identifier for one of the custom sections that we created, or an identifier for a section present on the default page for customizing the template, as the template usually includes a group of virtual sections, each of which has an appearance priority as follows:
- The activated theme section has priority 0
- The title_tagline section has priority 20
- The colors section has priority 40
- The header_image section has priority 60
- The background_image section has priority 80
- The nav_menus section has priority 100
- The widgets section has priority 110
- The home page settings section static_front_page has priority 120 and this section appears only if at least one page has been created on your site.
- The custom_css section has priority 200
For example, to add the control to the Colors section, we pass this parameter the colors value as follows:
- Priority : This parameter determines the priority, or in other words the order of position of the control that we will add to the section. The smaller the value of this parameter, the section will have a higher priority. For example:
- ‘type’: This parameter specifies the type of control or form field we want to add. Here you can add one of the following elements:
- text
- textarea
- checkbox
- radio
- select
- dropdown-pages
- url
- number
- hidden
- date
For example, to add a control representing a text area, we write:
- settings This parameter specifies the setting to which the control is bound. Where we pass the setting ID value to it to be verified using this, and its default value is the same as the value of the $id parameter
- choices,height,width Some controls need to specify options, width, height, etc. and can be passed through these parameters..
- input_attr: Through this parameter you can specify additional properties that need to be added to the control field you created. For example, if we were creating a control field of type field of values, these values could be written as follows:
Add sections to template properties through the add_section function
We can add a section to the template customization page through the function $ wp_customize-> add_section (). This section can be added either to the default panel of the template or to a special panel that we create ourselves by calling the function
$ wp_customize-> add_panel ().
The add_section function takes the following general form:
It requires two parameters:
$id A text string representing the ID of the department we want to create.
$args: An array of parameters through which we provide details about the partition we want to create. This array can take a set of parameters as follows:
- title A parameter that represents the name of the section as you want it to appear within the panel.
- Priority is a parameter that represents the priority or order of placement of the section within the panel. Here too, the smaller the value of this parameter, the higher the priority.
- description Through this parameter we add a description of the section we want to create.
- capability A parameter that represents the minimum permissions or permissions required to display the section to the user. Its default value is edit_theme_options.
- Panel : A parameter that represents the ID of the panel on which the partition will be created. Its default value is the ID of the default template panel.
- active_callback This parameter specifies the page or group of template pages where we want this section to appear when it is customized in the template editor.
For example, if you want the section you create to appear only when the home page is open, you can set this parameter as follows:
Add panels through the add_panel function
Usually items are added to the template’s default panel, but you can create a new panel to customize your template by calling the function $wp_customize->add_panel , which takes the following general form:
The function needs two parameters, like its predecessors. The first parameter, $id, represents the ID of the panel we want to create. The second parameter $args represents an array of parameters that describe the board.
Practical example
Let’s combine all the previous ideas into one complete example. For example, to create a panel with the identifier mytheme-options and its visible name is My Theme Properties, we write the following code in the customizer.php file:
What is worth noting here is that this panel does not appear here as a separate page, but rather appears as a panel within the default panel of the template, and it is under the header_image section, which has priority 60, and above the colors section, which has priority 40, and when we click on its name, a new panel will open that does not contain any control element because We haven’t added any items to it yet.
To add a special section for blog-options within this panel, we modify the code to be as follows:
The next step will be to add some settings and controls to the blog options section. For example, to add a setting to customize the sidebar position sidebar_position, we add the following code:
Finally we need to add a suitable control to link it to the setting and the relevant element here is the radio buttons to adjust the sidebar to the right or left. They are added using the following code:
Remember, we can fetch the value of this setting with the following code:
But a better practice is to fetch the setting by writing a condition to check its value as follows:
Then we must process the appropriate changes according to the setting made by the user in the customization interface. For example, if the user selects the option to place the sidebar to the left, we write the following php code
Then we write the CSS formatting code necessary to display the left sidebar as follows:
Conditional display of items in the Customizer API
Starting with WordPress 4.0 and later, the Customizer API has been used to add conditional display to any section or control in the theme’s customization window.
In other words, you can set template custom API fields to appear only when you preview a specific page or pages of the site.
For example, if you create a section, field, or control related only to the home page. You can set this field to appear only when you customize the home page, in which case this field will not appear on pages where it is not needed during the customization process.
For example, the following code makes only the blog-options section and the items in it appear on the home page:
This section will only be visible when there is a preview of the home page on the template customization window. It is worth noting here that the previous code can be written in several different ways that lead to the same result.
Selective Refresh feature to display template changes.
One of the important features that comes with the WordPress Customizer API is the Selective refresh feature that provides the ability to view or preview the changes we make directly while customizing the theme by reloading only the part of the page on which we made the changes and previewing the changes we made more quickly.
This feature was included in version 4.5 of WordPress, according to which an AJAX request is sent when a property is modified on the theme customization page, and only the required part of the page is updated. This saves us from performing many unnecessary PHP and JavaScript queries that are not related to the changes we make in Page parts. This way we can preview the changes we’ve made more quickly.
To add this feature to the Customizer API fields we created in the template we have to set the value of the optional parameter $transport to ‘ postMessage’ and handle any layout updates manually using the appropriate codes, otherwise we leave it at the default value of ‘refresh’ and the entire page will reload.
The selective update feature is added within the code in several ways, including setting up the Customizer API through PHP codes in the template functions file functions.php as follows:
Or JavaScript codes can be used to achieve this feature if the ‘postMessage’ parameter value is used.
The importance of validating and sanitizing data when adding properties to a template.
It is necessary that we take the necessary security measures for the data entered by site users, whether the data is passed through the back-end or front-end interface of the site.
To achieve this we can use the sanitize_callback and validate_callback parameters when creating a setting in the Customizer API.
Each of these two parameters takes the name of a function as the value passed to it, and the function here is to filter and filter data from the user and verify its validity.
For example, WordPress has a ready-made function named validate in the wp.customize.Setting class that is used to perform input validations and JavaScript validation if any of your theme’s settings fields are previewed with the help of JavaScript and there is no selective refresh feature. Activated.
JavaScript notifications can be displayed in the Customizer API fields by creating a JavaScript file, such as customizer-control.js, and adding this file to the template. We write codes to verify the validity of the data that the user enters and alert him if he enters incorrect data.
In this file, we write the JavaScript API codes that we will use, as the Customizer JavaScript API is an interface used on the template customization page. Using this interface, we can create Customizer API customization fields, hide these fields, implement conditional actions, and also add some features to the live preview pane. From the template.
This file can then be added to the template’s functions.php file using the customize_controls_enqueue_scripts hook .
If we want to access the Customizer API fields we use the following codes in the customizer-control.js file
For now, we will be satisfied with this much about the Customizer JavaScript API, and we will explain the capabilities of this interface in more detail and accompany it with practical examples in an upcoming article about designing and developing WordPress themes .
Conclusion
In this article, we learned about the mechanism of the Theme Customization API, which enables us to customize the features of our templates professionally, expand the fields of the template’s customization page, and add fields for new properties to it to make the template easily modifyable by website owners without the need for them to deal with software files. For their templates.