may seem that disabling WordPress plugins is very simple, but in reality, uninstalling or deleting some plugins in the wrong way can lead to some problems and threats to your site, and can leave a lot of unnecessary data, tables, and files on the site and take up storage space in your site. Hosting.
In this article, we will learn the correct way to disable all WordPress plugins that you have downloaded on your site in the event that you are unable to access the site’s control panel as a result of installing one of the plugins, without causing unnecessary problems.
How to solve the problem of deleting the plugins folder?
We all know that there are a huge number of WordPress plugins that provide many features to websites, and the user often wants to try many of these plugins to help him customize his site and obtain additional benefits.
Since these add-ons are external components and not part of the WordPress system itself, installing an add-on from an unknown source or an add-on that is incompatible with your site components may cause an error that leads to the entire site crashing and losing access to the site’s control panel .
Usually, the preferred behavior in this case while troubleshooting WordPress is to completely disable WordPress plugins from within the site’s control panel itself, and try activating plugins one by one in succession until it is known which plugin caused the error to delete it from the site.
But it may not always be that simple because the error may prevent the site administrator from entering his site’s control panel. Then, other methods are needed to uninstall these additions.
One of the wrong ways that beginners may do is to browse their site folders via FTP or via the cpanel hosting control panel to access the plugins folder located in the wp-content folder inside the site’s root folder and then completely delete it from the site with all its contents, or delete all the plugins subfolders inside it. Thinking that this would solve the problem from its roots.
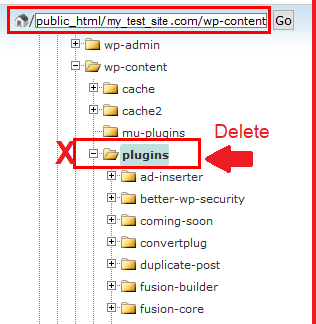
Unfortunately, this method is wrong and not preferable, because you will lose all the add-ons and their settings on your site, including the add-ons that did not cause any problem, and you will not be able to reactivate them quickly, and you will have to re-download all your add-ons again, activate them, and set them up again one by one.
What do I do if I deleted the plugins folder from my site?
The only way to fix what happened is by trying to restore the plugins folder and the files in it from a previous backup of your site. Therefore, if you have created a backup copy of your site, this is excellent. If you do not have one, you can contact your site hosting to obtain it.
If you are unable to do this, then you have to access the file system again, create an empty folder called plugins again, install all the plugins and set them up again again.
So that you do not have to do this, we will show you in the following paragraphs the correct way to deactivate add-ons on your site at once and delete only the add-on causing the problem.
Steps to disable WordPress plugins in one step
We will explain to you two different ways to deactivate all site add-ons in one step if you cannot access your site’s control panel:
1. Deactivate all site add-ons through the site file manager
1- Log in to your site’s hosting control panel ( cPanel ) , then click on File Manager , then go to the Public_html folder , wp-content , then choose the plugins folder.
Note: Alternatively, you can connect to your site via the File Transfer Protocol (FTP) and browse the site’s files and folders until you reach the folder responsible for storing plugins on your site, located inside the wp-content folder .
2- Select the plugins folder with the right mouse button and choose the Rename command from the list of options, and give the folder any other name you choose, for example plugins.old
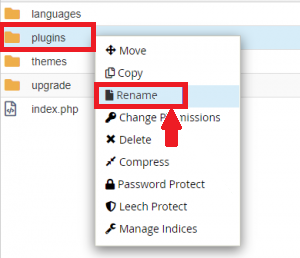
3- Once you rename the plugins folder to any name other than its original name, it will automatically disable all WordPress plugins present on your site. This is because WordPress searches for the plugins folder to download site plugins, and if it cannot find it, it will automatically disable all active plugins in it. Website database.
4- Now go to your site’s control panel. You should now be able to access the site’s control panel without problems. Click on the Plugins tab and you will notice that all plugins on your site have been disabled.
5-Then you can rename the plugins folder again, and do not worry, the plugins will remain inactive. Then you have to activate the plugins from the control panel (activate one plugin at a time until your site crashes again).
6-When your site crashes again, you will know exactly which add-on caused the problem. You must then delete only this plugin folder from your site.
2. Deactivate all add-ons using phpMyAdmin
There is another way that enables you to disable WordPress plugins on your site at once using the database manager phpMyAdmin . This is done by following the following steps
1- First, make a complete backup of the website database to ensure its recovery in the event of any error.
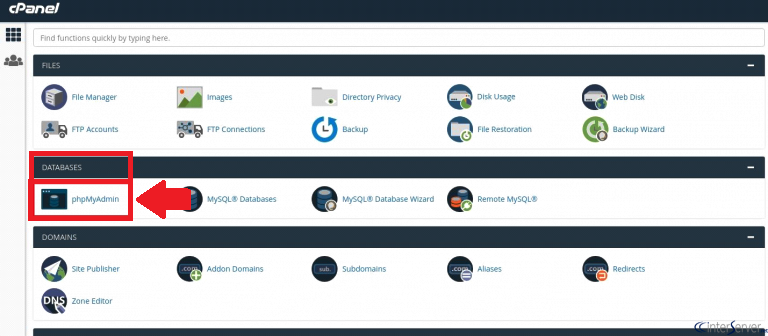
2-Then log in to the cPanel hosting control panel . Click on the phpMyAdmin icon under the DATABASE section .
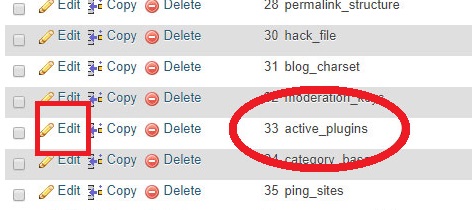
3-Find the table named wp_options. This table includes all of your site’s options. Search for the active_plugins option , then click on the Edit link next to this option.
4- The following window will appear, in which you will need to change the option_value field to the value a:0:{} and then click the Go button to implement the modifications.
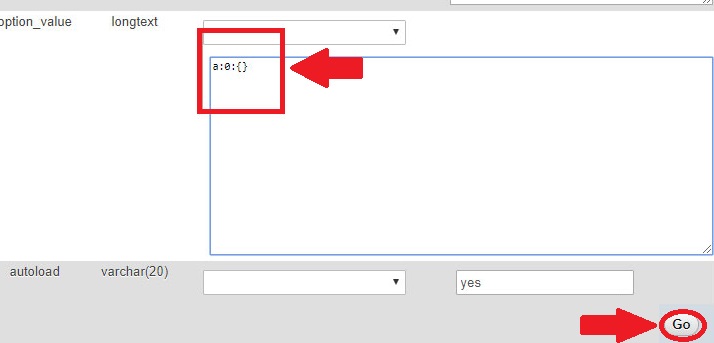
5- Thus, you have deactivated all WordPress plugins using the database management program phpMyAdmin. You should be able to log in to your site now.
6- Now activate the add-ons one by one to find out which add-on caused the problem, as we explained to you in the previous paragraph.
Caution: It is always best to back up your database before making any direct changes to it, this way you can always revert to the old version in case something goes wrong.
Delete the add-on that caused problems on your site
It is necessary that you uninstall the plugin that caused you problems and that you no longer want to use on your site. So that you do not pose security threats or other problems on your site. Simply deactivating the plugin that caused the problem from the control panel or deleting the plugin folder from within the plugins folder may not usually remove all of its files from your site.
Some plugins leave a trace on your site by leaving some files outside the plugins folder or some tables in the database and they will not be deleted when you uninstall the plugin this way.
Keeping unnecessary files on your site also increases the size of your WordPress backup, and downloading or restoring a backup will take longer.
In the next paragraph we will explain to you how to delete and remove all other files associated with the plugin that you do not want to use again on your site.
1. Search on Google for a way to remove the add-on from its official website
Most external plugins usually have their own website, providing the user with a convenient way to remove them from WordPress. We will take the Updraft Plus plugin as an example. We will search for a way to remove the Updraft Plus plugin from WordPress. We will find the results as in the following image:
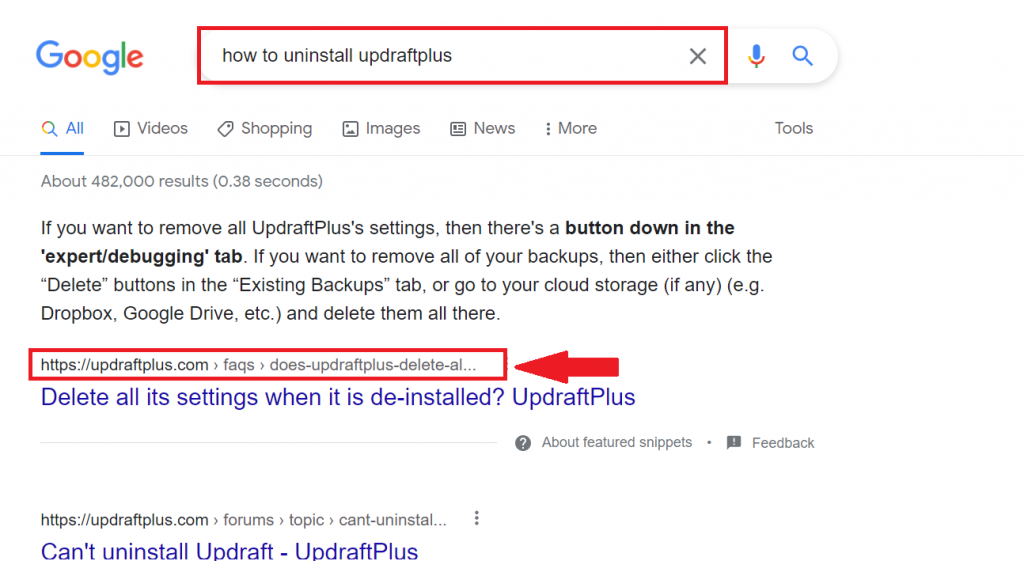
You will get reliable information from the company itself on how to remove the add-on and all its settings in the correct way, and it will not take you any more time. All you have to do is search and then follow the attached instructions.
2. The extension itself may remove all data and settings automatically
In properly developed add-ons, when the user performs an uninstall, the user will be presented with options to completely remove the add-on along with all files and settings as in the following example.
We will delete the Elementor add-on by clicking the ( Disable ) button. You can choose the reason for deactivation or skip this step and then press Delete . A message will appear to you as you see in the second image (Are you sure you want to delete the Elementor add-on and its settings?) After clicking on Delete , the addition and all its belongings will be completely removed.

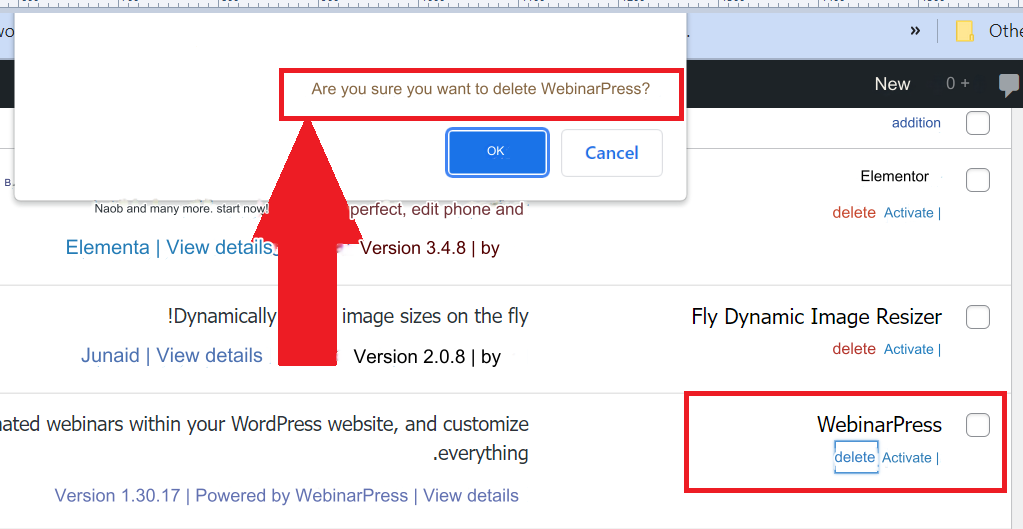
Although it is easy to remove the Elementor add-on because it allows it to delete all its data, there are many add-ons that do not allow users to do this feature, as is the case in the following example.
When we wanted to delete the webinar press add-on, a message appeared only (Are you sure you want to delete WebinarPress), which means that if you agree to the deletion, it will not be deleted with all the settings as in the Elementor add-on, so pay attention to this point.
3.Use a custom extension to delete all attachments of the extension
First, make a backup copy of your site files. Then you can install a custom add-on that helps you completely remove all basic files and settings for any add-on that you do not want to use on your site. Below we list the most important of these additions.
Add Advanced Database Cleaner
Advanced Database Cleaner enables you to clean up your database by deleting items you no longer use, such as outdated versions and spam, to reduce the size of your database and improve your website’s speed and performance. In addition, you will have a faster database backup because the backup file will be smaller.
Add Database Cleanup
Using the Plugins Garbage Collector plugin you can scan your WordPress database, checking it to show tables that you can’t see in your WordPress dashboard.
Add WP-Optimize
The WP-Optimize Cache plugin caches your site, cleans your site’s database, and allows you to cache site pages, to make loading times super-fast.
Add WP-Sweep
With the WP-Sweep plugin, you can clean up unnecessary data in your database, including redundant data that is no longer used and tables left over from old plugins.
4. Remove remaining shortcodes from the deleted add-on
You can do this by using the Remove Orphan Shortcodes plugin . This plugin removes inactive shortcodes from your WordPress site that were previously used with previous plugins and themes.
Read also: What is a short code? The most prominent examples of its uses
Conclusion
As a website owner, you may need to disable all WordPress plugins from your site in the event that an emergency occurs that prevents you from entering your site’s control panel if you are unable to identify and know the plugin that is causing you problems.
But doing this task incorrectly by deleting the entire plugins folder will even cost you more time and effort. So, through this article, we explained to you the correct ways to deactivate all add-ons at once, find out which add-on is causing the problem, and delete it completely from your site to solve the problem from its roots.


Leave a Reply