WordPress website, providing an easy and fast browsing experience for your site users is essential, as well as providing best practices that increase the conversion rate on your site. One of these procedures is the Scroll to id procedure, which allows the visitor to move to a specific element when they click a button. Or a specific element at the beginning of the page. This is a useful step, especially on long pages.
In other words, if your landing page contains 8 parts, and in the first part of the page you ask the visitor to register in a specific form in the first part of the page, then you ask him to click on the word ( see more) to click on it to move to the second section of content, which contains The registration form to ensure that it is not distracted from the rest of the landing page.
In this article, we will explain three simple ways to add the feature of moving from a first element (button, word, image, etc.) when the visitor clicks on it, he moves smoothly to a second element (whether it is a title, article, image, price table, etc.) within the same page. What is known as Scroll to ID. We will explain this using 3 methods:
- Using the Page Scroll to ID add-on
- Using (Html Anchor)
- Using website building tools
Let us review these methods of achieving the same value, but in different ways, by giving the example of using a perfume selling website as follows:
1. Use the Page Scroll to ID add-on
The Page Scroll to ID plugin , which allows page scrolling to the ID (element), is a fully featured plugin, rather than the browser ‘jumping’ behavior with a smooth scrolling motion, when clicking on dedicated links. It provides all the basic tools and advanced functions for single-page websites, such as top-to-bottom page navigation and other features such as:
- Adjustable scrolling motion duration and relief (more than 30 relief types)
- Link highlighting and intents via ready-to-use CSS classes
- Vertical and/or horizontal scrolling
- Scrolling to and from different pages (scrolling to target ID on page load)
- Insert the target ID and link buttons into another visual editor
It is an add-on that provides this feature for free or purchase the add-on to obtain higher features. It has been downloaded more than 100,000 times, and received a rating of nearly 5 stars
Install the add-on
From the sidebar of your site’s control panel, click on the Plugins section, then Add New, then in the search box type the keyword (Page Scroll to ID). After the add-on appears, click Install Now , then Activate .

Add-on settings

There are many settings for this add-on, such as latency, speed, and format. Which is well configured (it is better to leave the automatic settings). But we will make sure of only two points:
Make sure that the selector is written as follows:

Then in Advanced Options: where we will make sure to put a check mark on the option “Prevent other scripts from processing links to this extension,” as in the picture.

Then we will click on the “Save Changes” option.
Creating Targeting ID
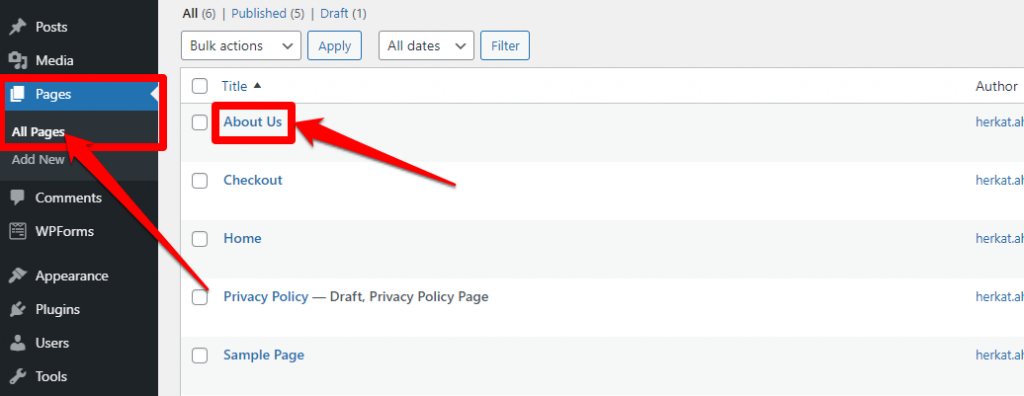
To understand the steps to determine the goal we want to reach through the jump, we will take a simple example, which is the “About us” page. We will first go to the “Pages” option in the control panel, then the “About Us” page. Of course, you can choose which page you want to access and customize any element of it and follow the same steps below:
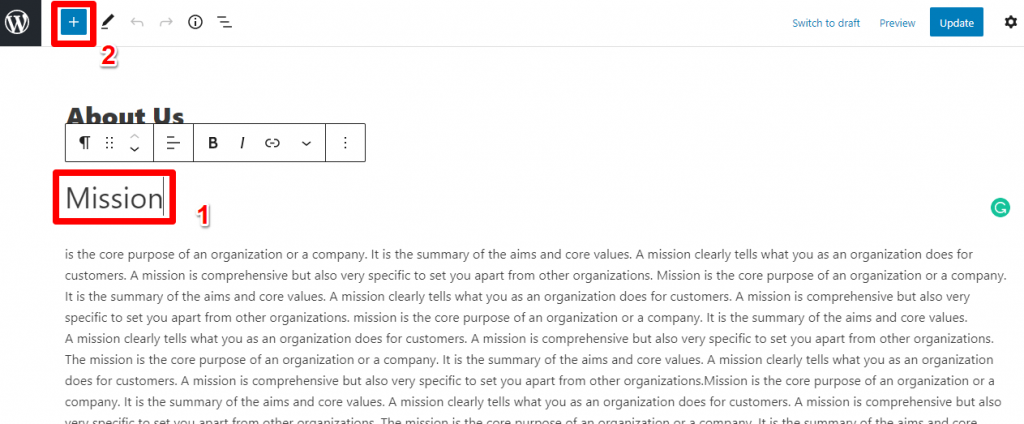
On the About Us page of your site, select the element you want to link to the Jump feature, then click Add Component. In our example in the picture, we chose the first title, “Mission,” as in the picture.
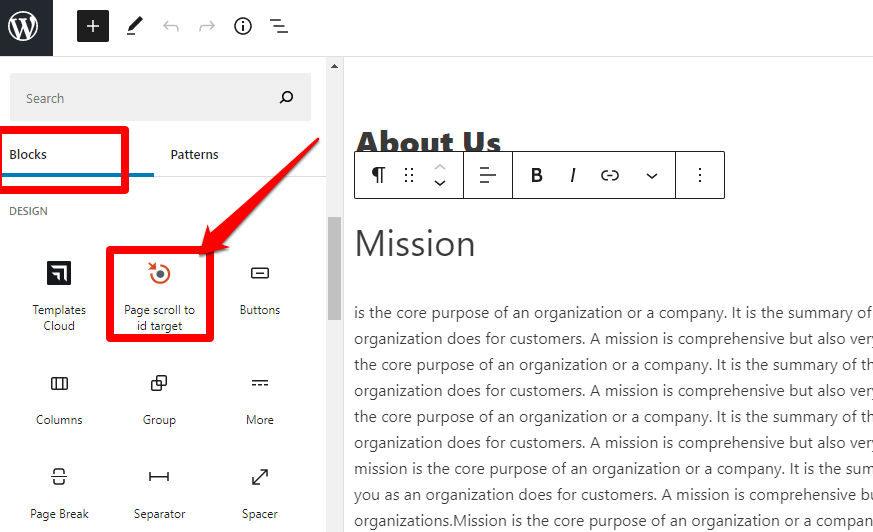
You will see an options page on the left of the screen that includes both the “blocks” and “Patterns” options. From the Blocks options, we will choose the addition option (Scroll to ID) as in the picture.
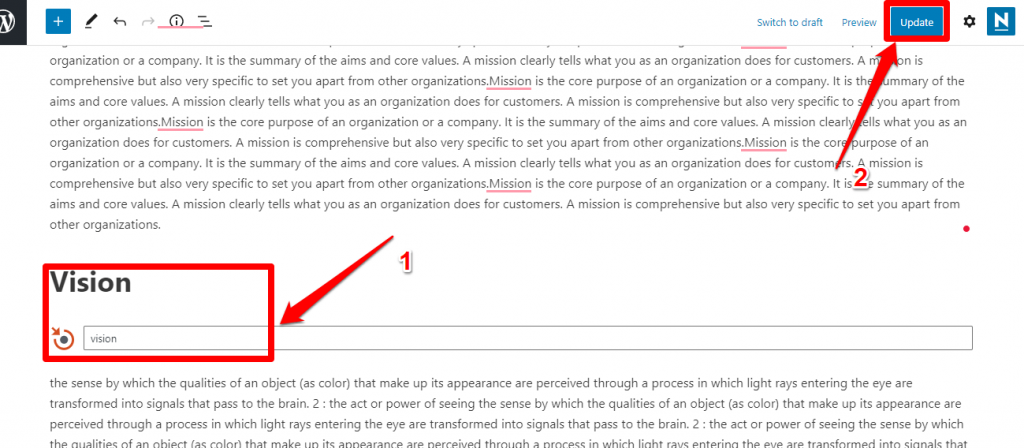
After clicking on the addition, a space will appear to write the name. Choose a name for this item (if the name has more than one word, do not leave spaces between the words, but rather use connecting movements such as separator marks “-”).

In the same way as before, select any second element on the page and click in front of it, then add the addition block. After you finish selecting the elements, click Update as in the picture.
Add selected items to the list
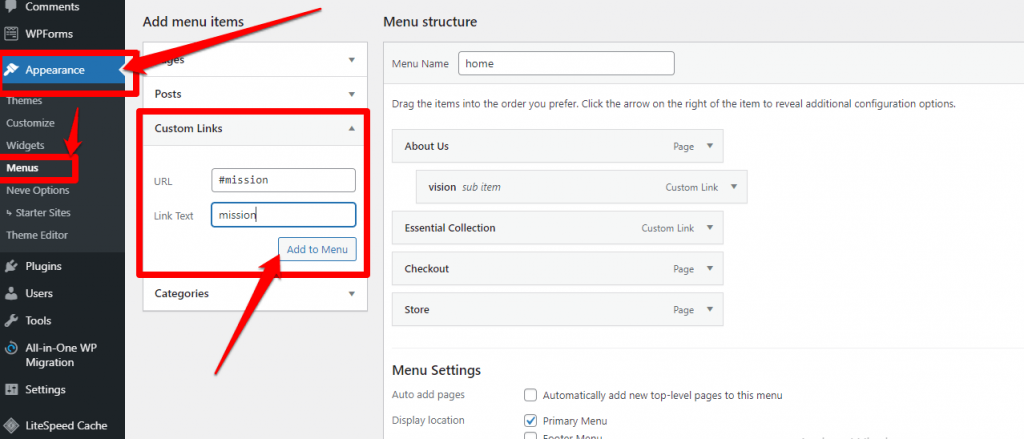
After selecting the elements that you want to link to the Jump feature, we will return to the control panel on your site, and from the Appearance section we will click on Menu. Among the tabs that will appear to us, we will click on the “Custom Links” heading, as in the picture.
In the “Link” box, we will write the symbol (#) + the same definition or title that you chose for the item, in our example (mission#). In the Link Text box, we will write the name you would like to appear in the list. Then choose Show in the Primary Menu, and finally click on the “Add to Menu” icon as in the following images.
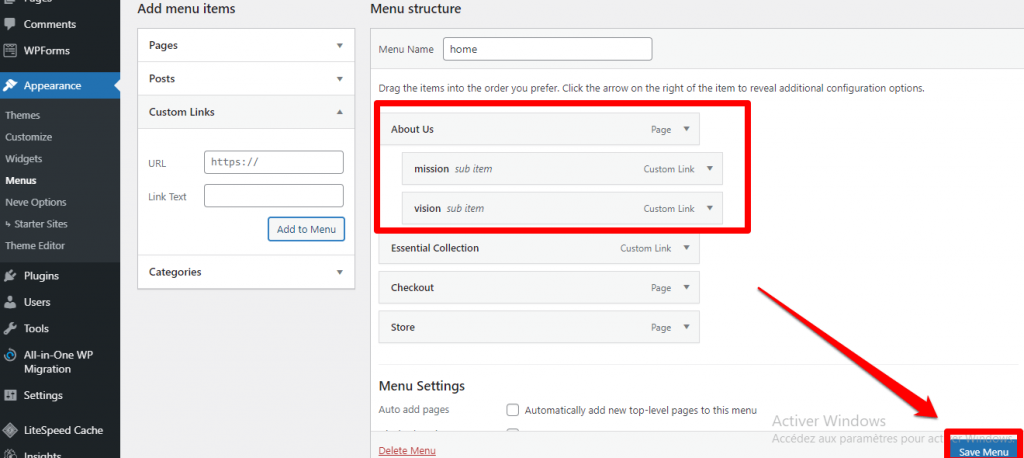
After adding the items to the list, arrange their location (click – drag – release) and then click Save Menu.
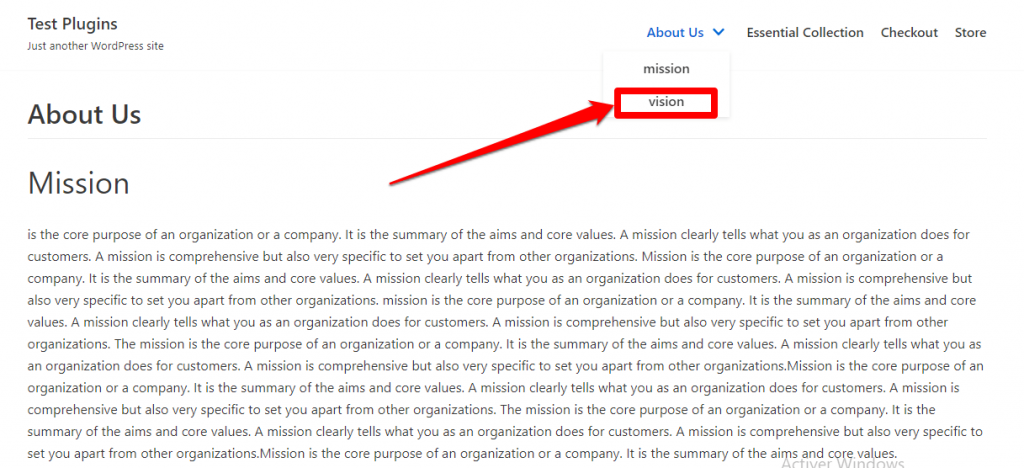
After completing all the previous settings, we will make sure that the Jump feature works. We will open the About Us page, to which we added the feature in our example, with any browser. You will notice that icons appear at the top of the page for items or titles to which we have added the jump feature, as in the picture.
We will click on the headings “Mission” and “Vision” to ensure that the quick navigation feature within the page works effectively. It must also be that the process of moving from the head of the list to the selected item is in the required speed and form.
2. Use Html Anchor to navigate to a specific element
If you own a blog and publish long articles, taking advantage of the feature of quick navigation to the main article titles will be a great step and addition to your site, so that the reader can access the sections of the article he wants directly after clicking on the title at the top of the page.
We will now talk about some presets within the WordPress article editor that are designed to customize the quick navigation feature on the pages of websites and blogs specialized in publishing articles, especially long and content-heavy articles.
There are two basic ways to add a jump feature through the WordPress post editor:
- Add Id
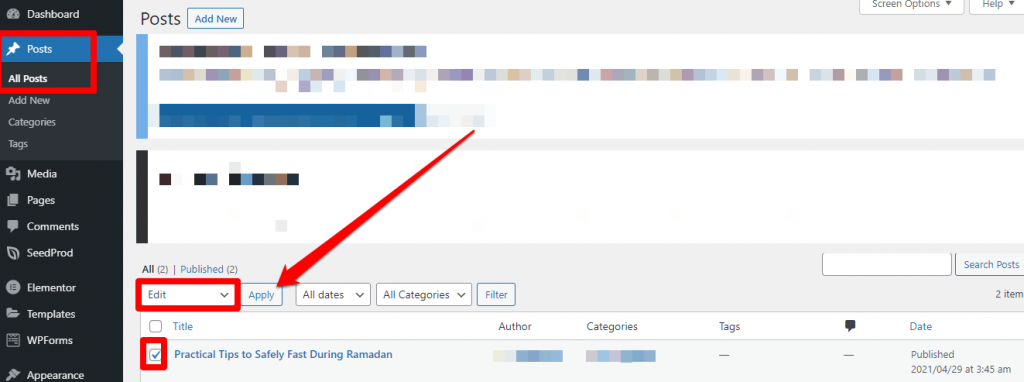
In this method, we will go to “Posts Section,” then “All Posts,” and we will click on the “Edit Article” option, as in the picture.
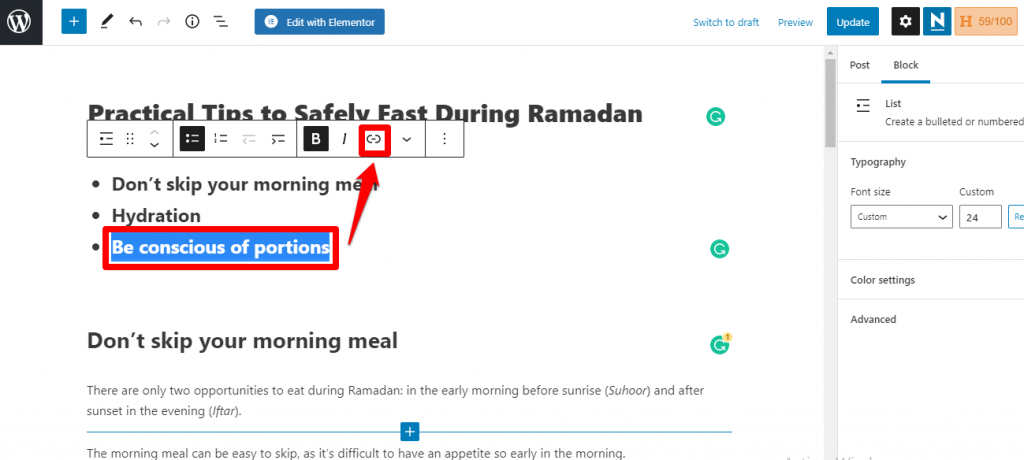
We will now choose, for example, one of the main titles in the article, as shown in the image, and then we will click on the links icon (add a link).
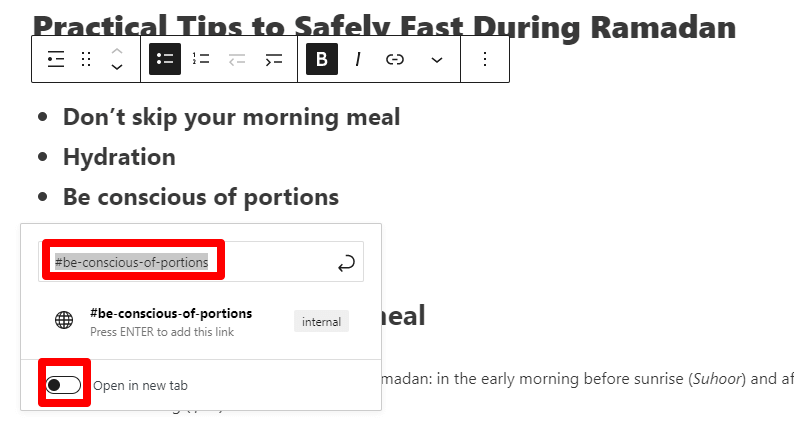
A window will appear asking us to add a link to that address. What we have to do now is write the “ID” for the address, which is the address itself, preceded by the symbol (#). The address is the same, but without spaces between the words. Rather, we put (-) between them, as in the picture, and then we will click On (Enter), we must also make sure that the “open in new tab” option is not activated because it will lead to opening a new tab in the visitor’s browser when clicking on one of the article titles, and this is of course not suitable for visitors.
2 . anchor html
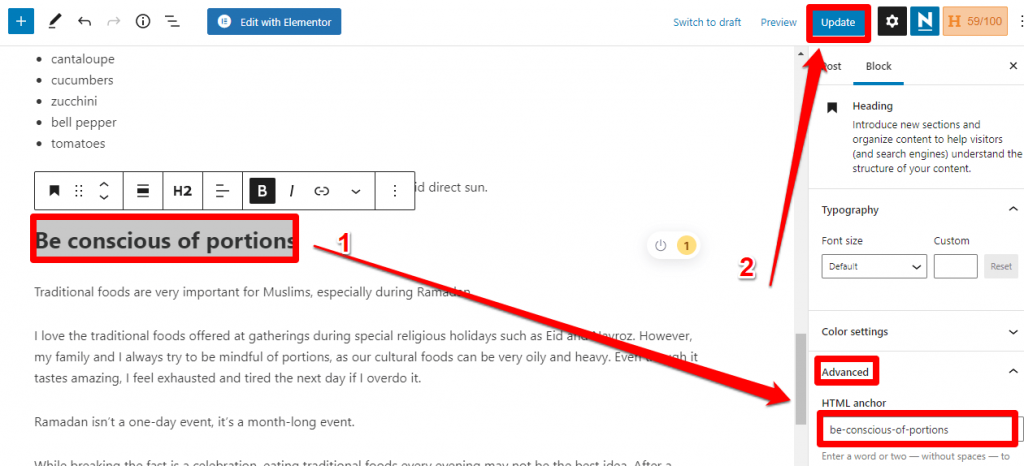
The second way to add the scrolling feature to another element is by relying on the component editor , by going to the article editor as in the previous addition. Now we will choose the main target title from the quick navigation feature. Here, instead of choosing the “Links” icon, we will move to “Advanced Options” which you will find to the right of the article editor, and we will write in the “HTML anchor” box the name of the main title without commas with (-) but without… Put the symbol (#) and then we will click on (Update) as in the picture.
3. Verify the effectiveness of the feature
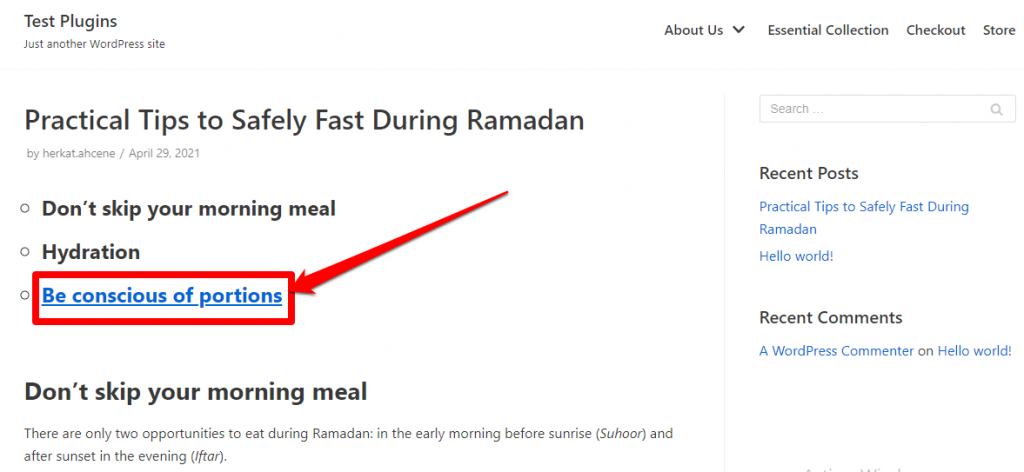
After setting up the Jump feature through the WordPress article editor in one of the previous two ways, we will move to viewing the article (Preview), where we will be shown a preview of what the final article will look like. Now we need to make sure that the link on the main title we worked on will take us to the paragraph of that title.
3. Using website building tools (Visual Builders)
This method is very suitable for website owners who already use website building plugins on their sites, as you can easily create a jump-through feature. In this explanation, we will add the feature of quick navigation to the item (Essential Collection) from the main menu at the top of the site (Main Menu).

After navigating to the editing page using Mentor, choose the part to which you want to add the jump feature.
- Click on the Edit section (symbolized by a group of dots).
- Choose Advanced Settings in the tab section
- Type the Css ID for this part of the page (eg: essential-collection, do not put spaces between words, you can use – or _)
- Click on ( Update )
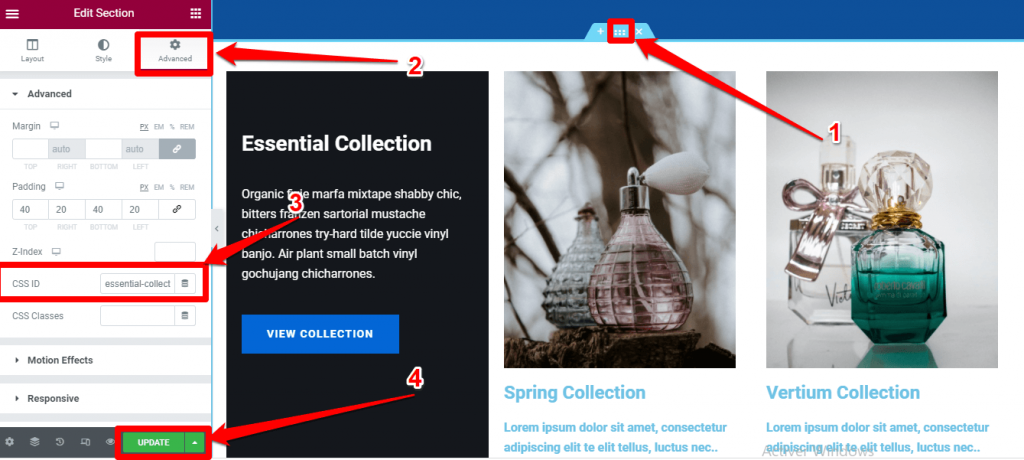
Add a new list:
We will now return to the control panel of your site, and from the Appearance section we will choose “Menu,” and from the menu items we will choose Custom Links.
- In the Link box, type a symbol (#) with the same identification that you chose in (Css ID), for example: (essential-collection#)
- In the “Link Name” box, type the name you would like to appear in the list.
- Now all you have to do is choose “Show” in the Primary Menu, then click “Add to Menu” as in the following image.
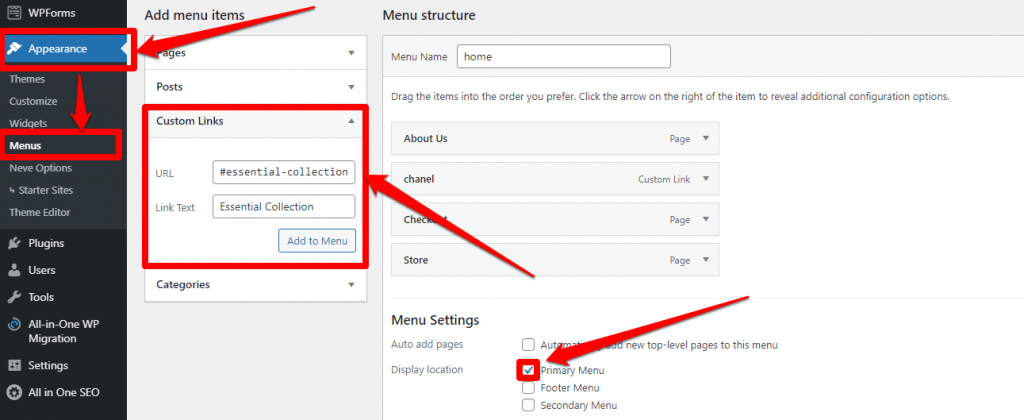
After adding the new menu, arrange its location and then click Save Menu .
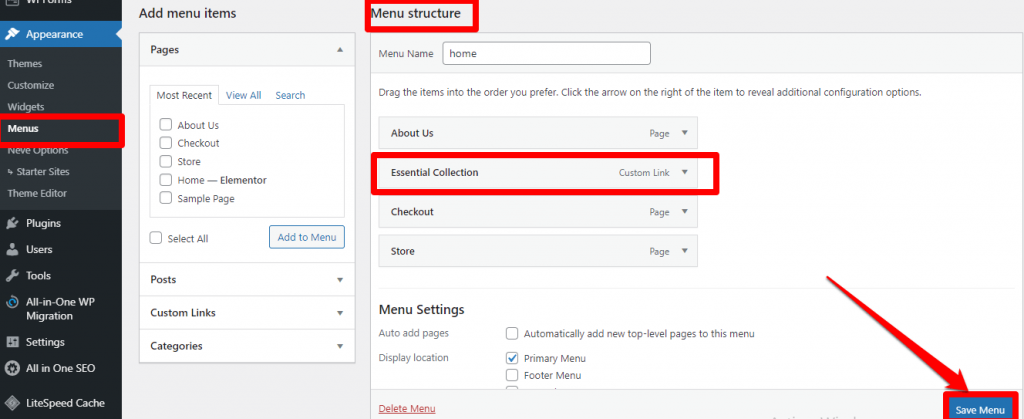
After completing all the settings, enter the main page of the site, which will appear to the client, and click on the menus that you added to ensure that the quick navigation feature is activated within the page, and that is all.
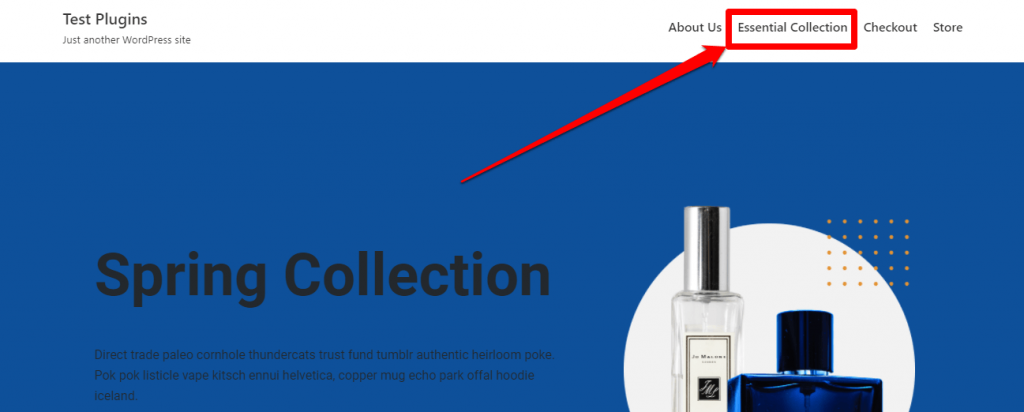
Thus, we have detailed three of the most prominent and simplest methods used to activate the Scroll to ID feature in simple steps. All methods lead to the same result, and you can choose the method that suits you and you will not face any problems


Leave a Reply