

The PayPal payment gateway is one of the most popular payment gateways in the field of e-commerce, as more than 400 million active users in more than 200 countries around the world rely on it. For this reason, it is a reliable payment gateway that is flexible in accepting payments.
The PayPal payment gateway provides you with the ability to receive payments on your store via PayPal accounts or via Visa or MasterCard bank cards and receive them on your PayPal account. All you need is a PayPal Business account.
In today’s article, we will explain to you the correct steps to link Paypal with your WooCommerce store step by step so that you can start receiving payments on your store. We will also explain how to test the success of the payment gateway linking steps using virtual PayPal Sandbox accounts.
How to add and set up PayPal payment gateway on WooCommerce stores
1- Add the PayPal payment gateway to WooCommerce stores
First, you need to install the WooCommerce PayPal Payments plugin on your WooCommerce store . You can do this by entering the main WordPress control panel, then choosing “ Plugins ” from the side menu, and then “ Add New .” After that, you can search for the “ WooCommerce PayPal Payments ” plugin and click on the “ Install Now ” button next to it, as shown in the following image:
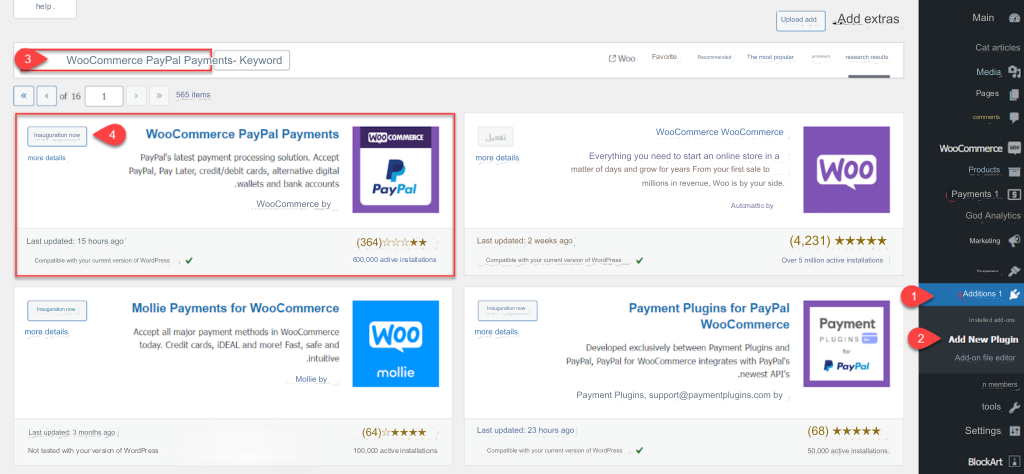
After that, you must wait for the add-on installation to complete. Once finished, you can click on the “ Activate ” option, and in this way the add-on will be successfully installed on your store’s website
2- Activate the PayPal payment gateway on WooCommerce
Next step, you must activate the PayPal payment gateway on your online store. You can do this by choosing the “ WooCommerce ” tab from the side menu of your WordPress store, then choosing the “ Settings ” tab. Then, go to Payments in the top menu and you will be directed to the payments settings on your store.
You will find the option to pay via PayPal within the payment options on the store. Click on “ Finish setup ” as shown in the following image:

After that, you can manually or automatically link your PayPal account with the WooCommerce platform, but it is not preferable to rely on the automatic linking option until you can control all the details of your account, including redirection options and others.
So, click on “ Toggle to manual credential input ”, and you will be asked to enter your PayPal account data as follows:

- Live Email address.
- Live Merchant ID.
- Live Client ID.
- Live Secret Key.
3- Obtain data for linking your PayPal business account
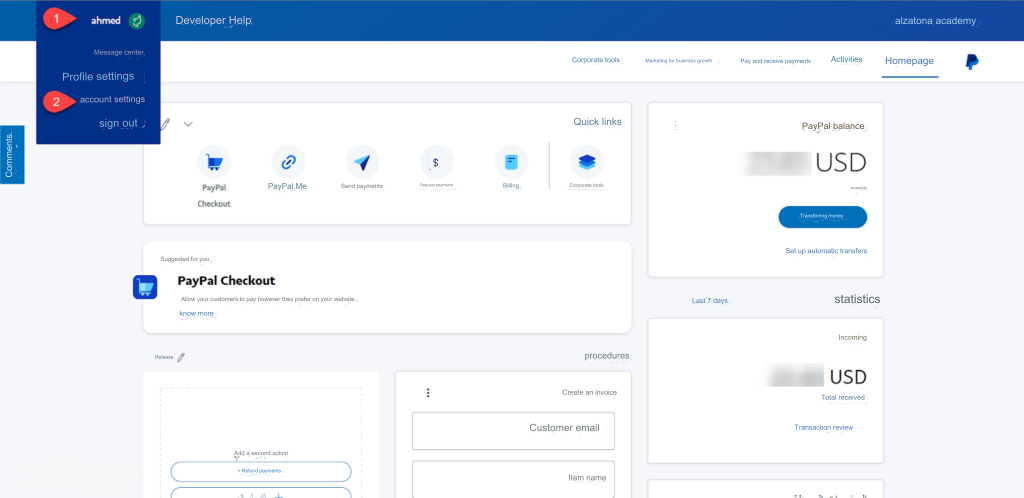
First of all, you need to have a PayPal business account to benefit from the payment gateway services. Then, log in to your PayPal account control panel, then click on your account name in the top menu. After that, click on “ Account Settings ” as shown in the following image:
After that, choose “ Business Information ” from the side menu, then copy your merchant identification code “PayPal Merchant ID” as shown in the following image:

After that, you return to the main PayPal interface, then choose Developer Mode from the top menu as shown in the following image:

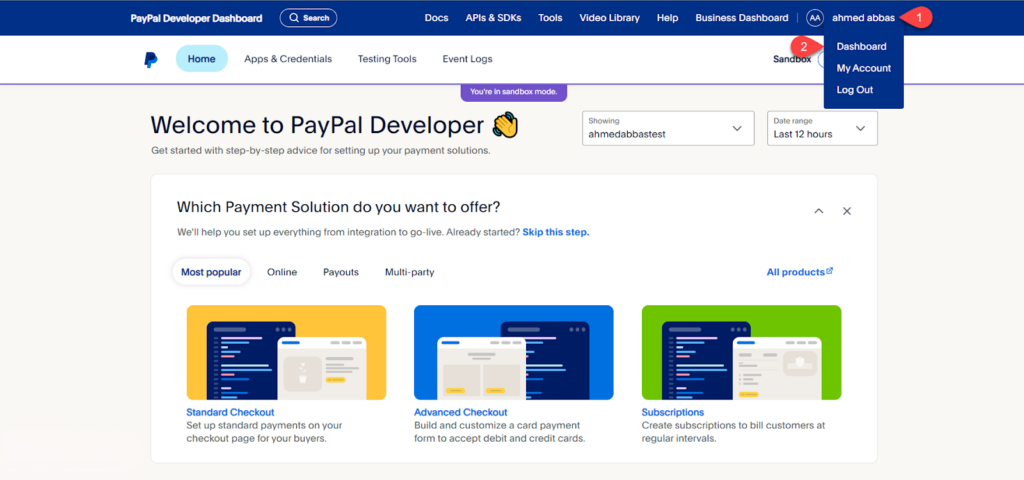
After that, you click on your username in developer mode, then choose “ Dashboard ” as shown in the following image:
After that, you click on “ App & Credentials, ” then activate “ Live ” mode from the top menu, and then click on “ Create App ” as shown in the following image:

You are now asked to specify a custom application name for your online store on the PayPal payment gateway, then click on “ Create App ” as shown in the following image:

After that, a “ Client ID ” and a “ Secret Key ” will be generated for the application designated for the online store, and you will copy this data as shown in the following image:

In this way, all the data required to link your PayPal business account with the WooCommerce platform has been obtained
4- Link your PayPal account to the WooCommerce platform
You now return again to your store on WooCommerce, add the “ Merchant ID ,” “ Client ID ,” and “ Secret Key ” data, then click “ Save Changes ” as shown in the following image:

Next, you will see additional options for the PayPal payment gateway. Activate the “ Enable PayPal features for your store ” option to activate the payment gateway on your online store.
You can also customize the appearance of the payment gateway by modifying the name of the payment gateway in the “ Title ” tab, and the description of the payment gateway in the “ Description ” tab, as shown in the following image:

5- Activate instant payment notifications on the PayPal payment gateway
Next step, you need to enable push notifications between your WooCommerce store and the PayPal payment gateway. This allows a notification to be sent from the payment gateway to the online store once the payment process is completed, allowing the online store to complete the purchase as well. And vice versa if the payment process is not completed. Thus, payments on your store are managed automatically.
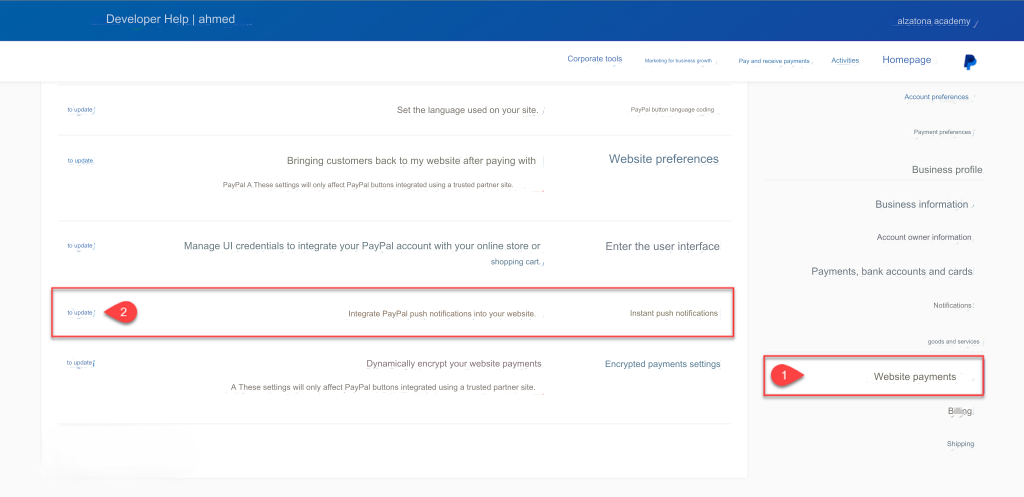
You can set instant payment notifications by accessing the account settings from the PayPal payment gateway as shown in the following image:

Next, choose “ Website Payments ,” then select the “ Instant Payment Notifications ” option and press the update button next to it, as shown in the following image:

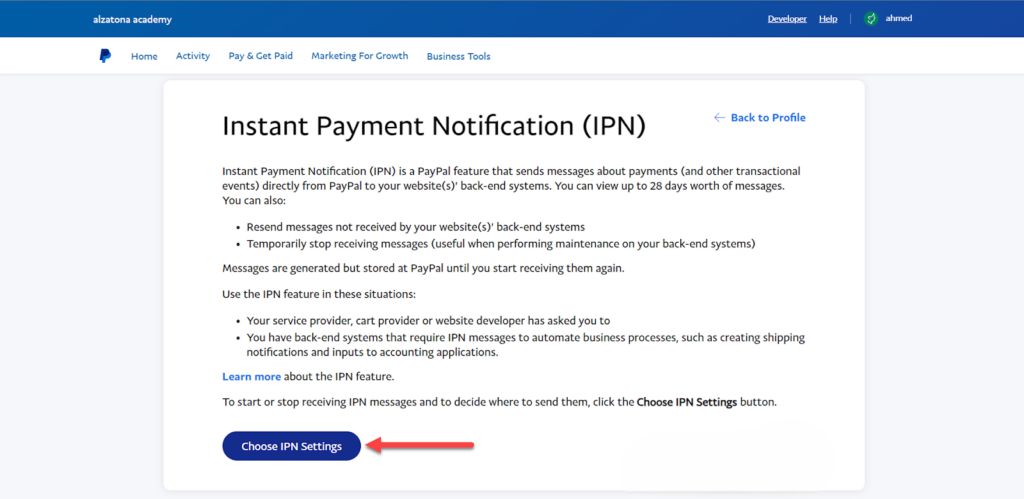
After that, go to the IPN push notification settings by clicking on “ Choose IPN Settings ” as shown in the following image:
Now, write the custom URL to send and receive IPN notifications in your online store. In WooCommerce stores, it is in the following format:
https://domain.com/?wc-api=WC_Gateway_Paypal
Where you replace domain.com with the URL designated for your store, then click “ Save ” as shown in the following image:

In this way, notifications will be sent between your online store on WooCommerce and the PayPal payment gateway automatically.
6- Set redirection options on the PayPal payment gateway
Next step, you should set redirection options for your online store customers after completing the payment process. To achieve this, go back to your account settings in the PayPal payment gateway. Then, choose “ Website Payments ” from the side menu. Next, go to “ Website Preferences” and press the “ Refresh ” button next to it, as shown in the following image:
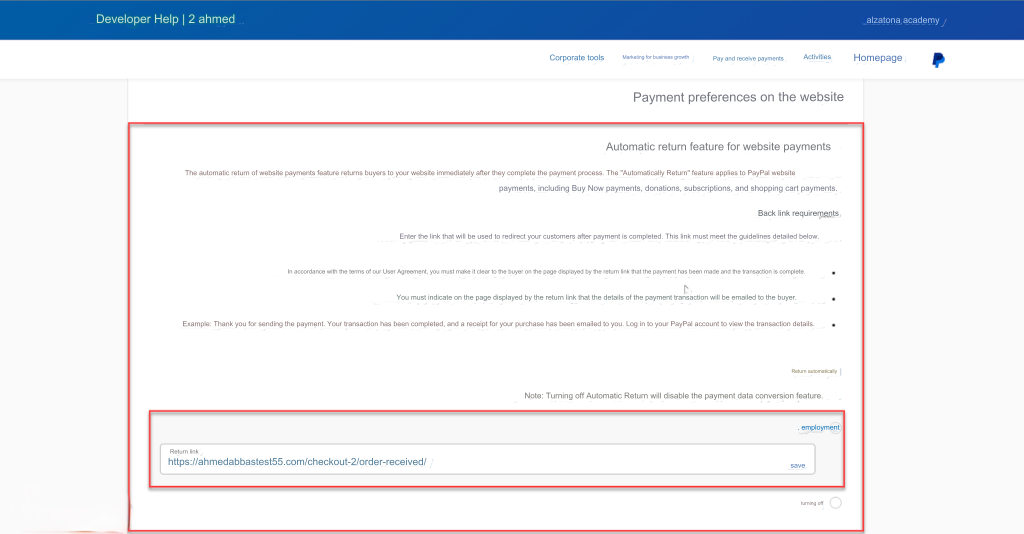
After that, scroll down to find the “ Automatically return website payments ” tab. Then, activate the launch option and type the URL of the payment checkout page on your online store. WooCommerce stores often have this format:
https://domain.com/checkout/order-received
You also replace domain.com with the custom URL of your online store, and the modifications will be automatically saved as shown in the following image:
7- Make a test purchase using a PayPal Sandbox account
Last step, you need to test linking the PayPal payment gateway with your online store. You can do this by trying a real purchase on your online store, but you must be careful because you may lose your money if the linking steps are incorrect. Therefore, it is best to start by adopting a PayPal Sandbox account, and then try the real purchasing process.
A PayPal Sandbox account is a demo PayPal account that contains a free, dummy balance that helps you try out the full purchasing process on your online store and test sending and receiving money on your account.
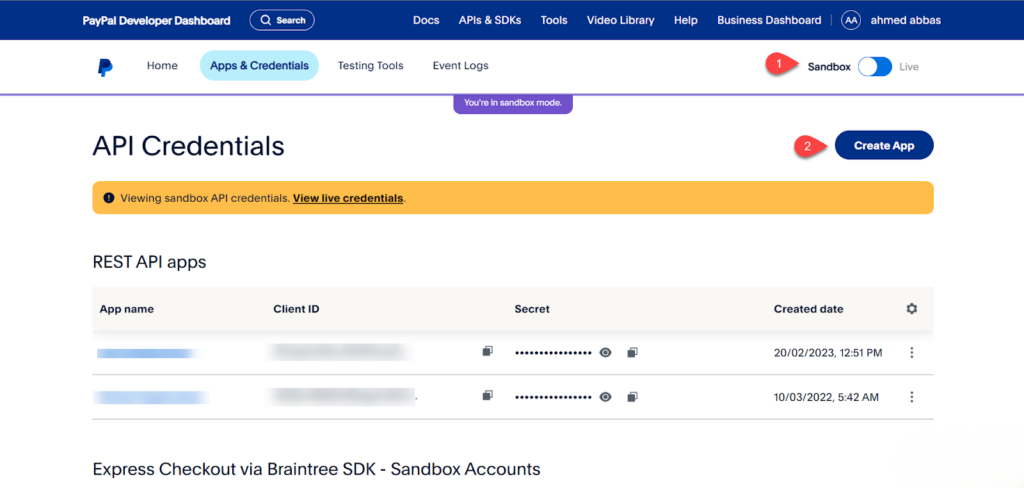
First, you need to create a new PayPal Sandbox account. To do this, enter the “ App & Credentials ” section in PayPal again in developer mode, but activate “ Sandbox ” mode from the top menu. Then, click on “ Create App ” as shown in the following image:
Next, type a custom app name for the demo account, then select the “ Merchant ” account type to create a new merchant account. After that, click on “ Create App ” as shown in the following image:

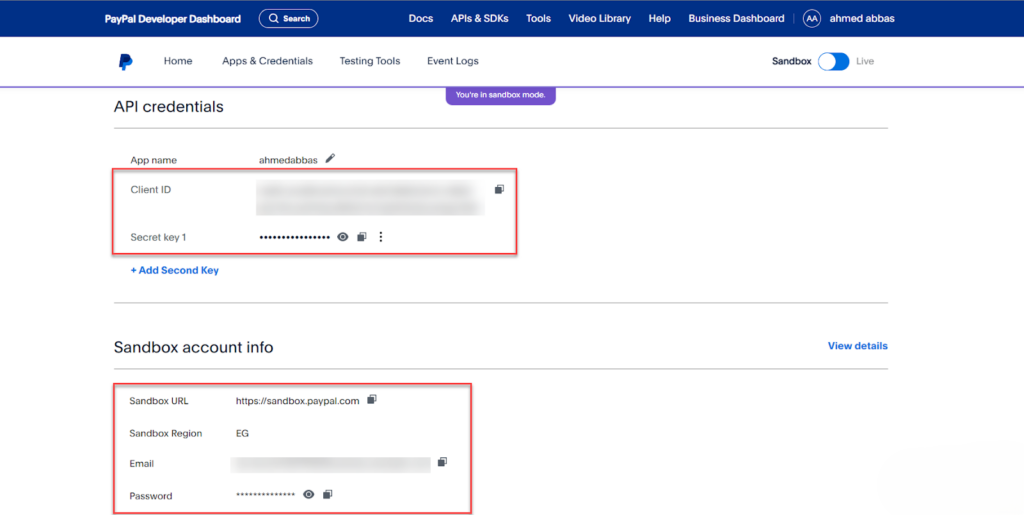
A new application dedicated to the Sandbox account will be created, and you will find all the basic account linking details such as “Client ID”, “Secret Key” and “Email”. Save this data as shown in the following image:
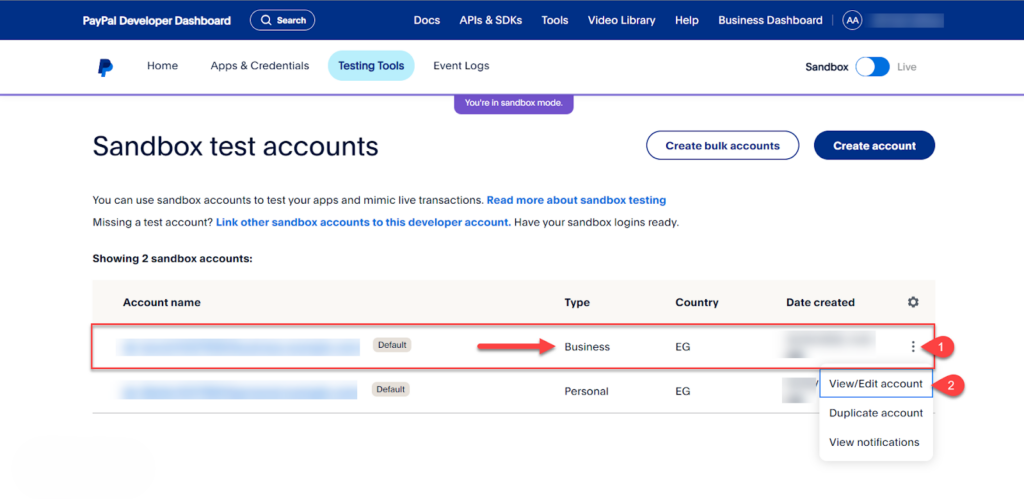
You now only need a Merchant ID number to be able to link your Sandbox account to WooCommerce. Click on the “ Testing Tools ” tab from the top menu in developer mode, then select the “ Business ” merchant account, click on the edit marks next to it, then choose “ View / Edit Account ” as shown in the following image:
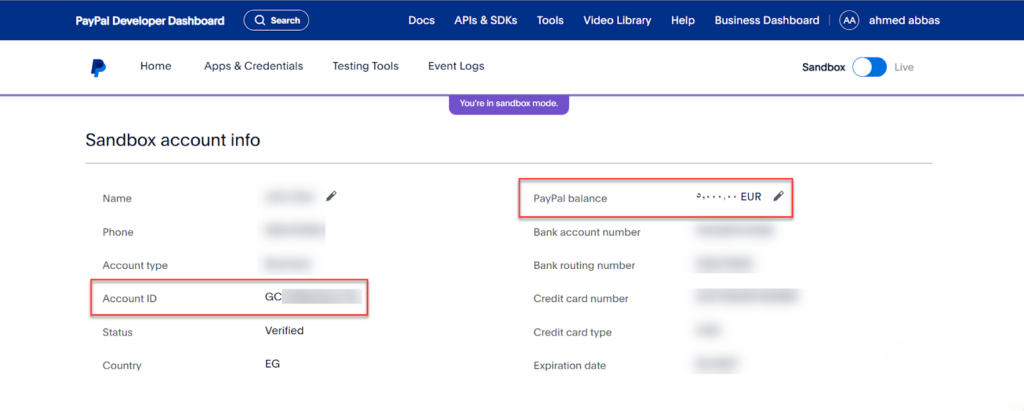
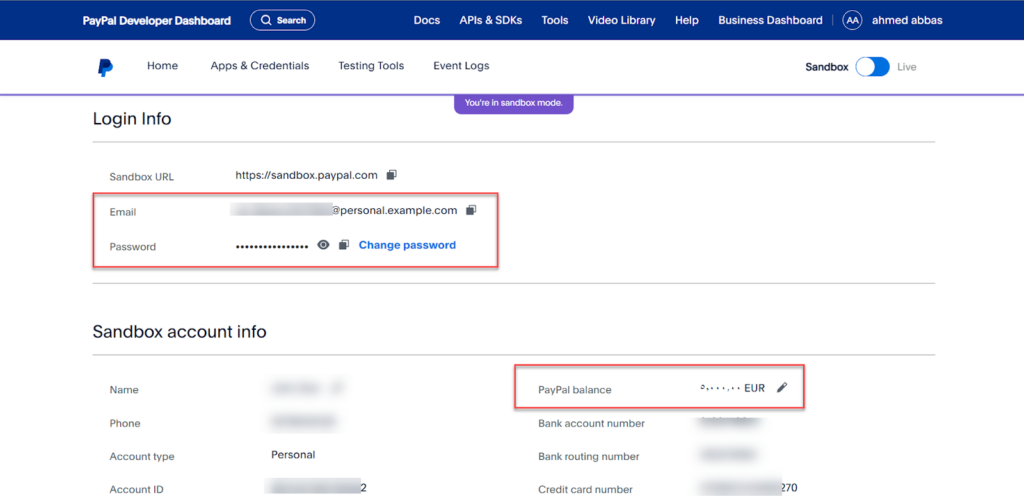
You will be directed to the merchant account information. Scroll down to find the “ Account ID ” option, which represents the “Merchant ID ” number . Also, the PayPal Balance account must be monitored, as the balance values will be reviewed at the end of the test.
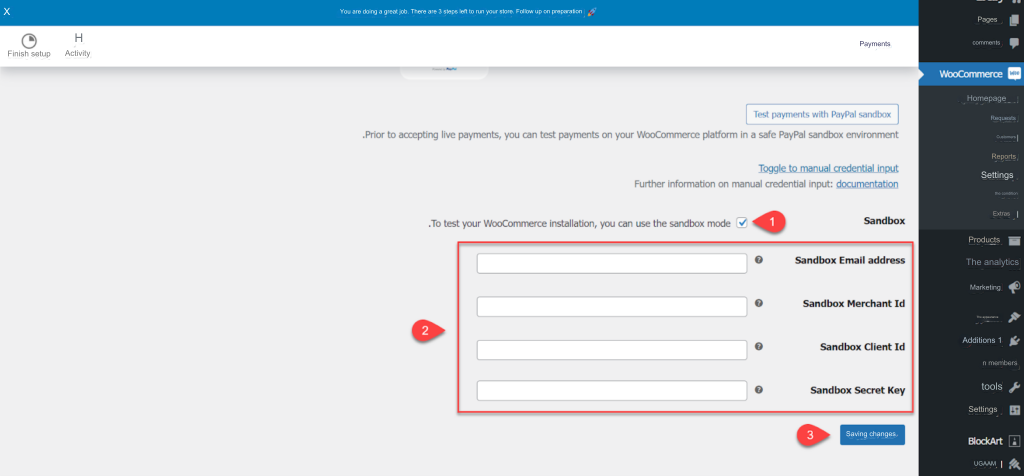
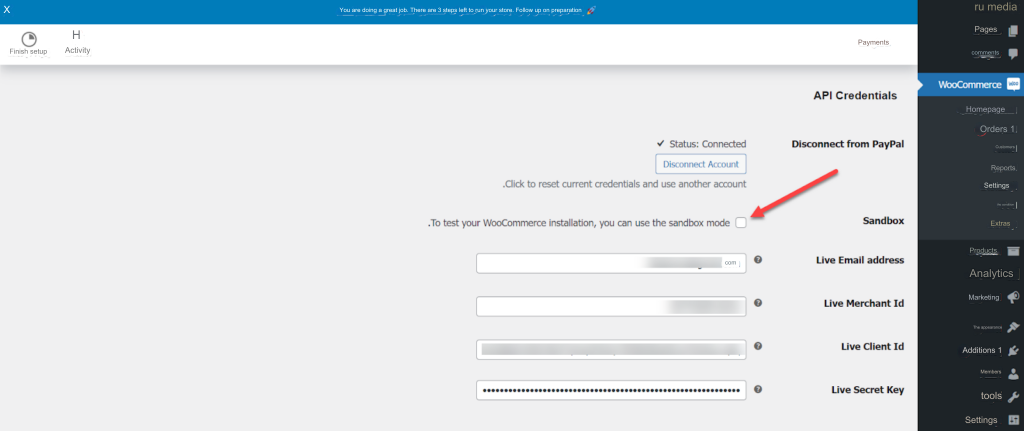
Now, go back to the PayPal payment gateway settings in the WooCommerce store, and activate the “ Sandbox ” option. You will be asked to enter the Sandbox account linking data that you obtained from the previous steps. Then click “ Save changes ” as shown in the following image:
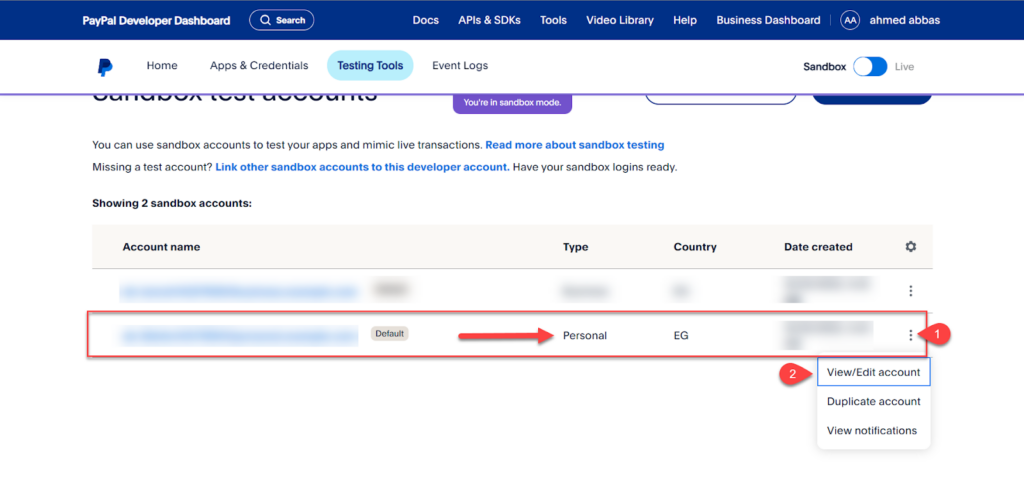
After linking a Sandbox merchant account with your store, you must create a buyer account with a trial credit to try out the purchasing process virtually. Go back to the Sandbox accounts in the PayPal payment gateway and modify the “ Personal ” account as shown in the picture.
You will now find the buyer’s account data containing a trial balance of up to €5,000. You must copy the account data from the email and password as shown in the image.
Now, you can experience the virtual purchase process on the store. Choose one of the products on the store, then follow the normal purchasing steps, and choose to pay using the PayPal payment gateway as shown in the picture.
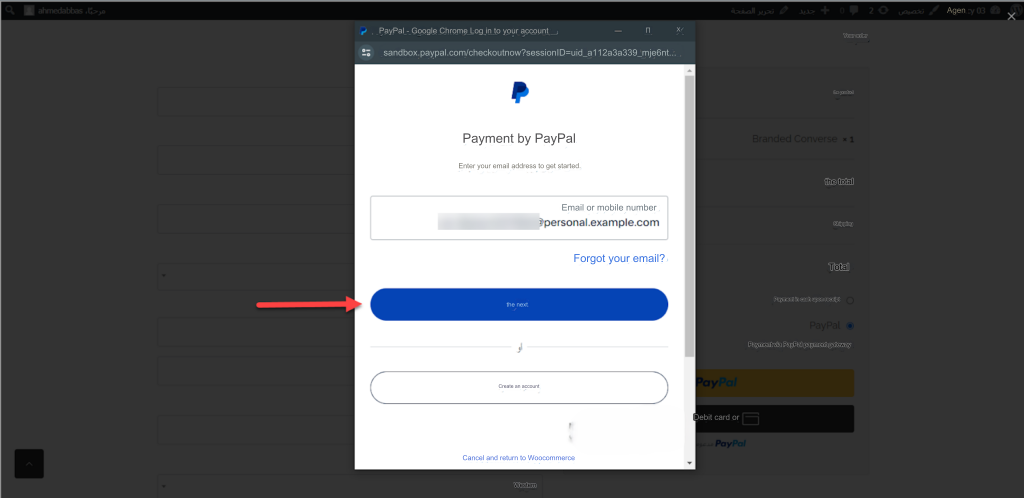
You will be directed to the PayPal payment gateway. Enter the virtual buyer account data obtained previously and then complete the regular payment process as shown in the image.
After completing the payment process, you should be redirected to the payment completion page on your online store as shown in the following image:

You return again to the Sandbox virtual merchant account data on the PayPal payment gateway, and you should find that the cost of the product has been added to the account balance as shown in the following image:

If the payment process is completed successfully, this indicates that all steps to link the PayPal payment gateway with your online store have been completed correctly. In conclusion, you must deactivate the “ Sandbox ” mode on your store in order to receive payments on the main account as shown in the picture.
In this way, we have reached the end of the article. Linking and testing the PayPal payment gateway with the WooCommerce store has been completed. If you encounter any problem during the linking steps, you can comment below the article or participate in the Arab WordPress community to obtain the necessary technical assistance.