The 404 (Page not found) error is one of the most common errors associated with the HTTP protocol. This error appears to users when browsing websites. Unfortunately, it causes you to lose visitors and increase your bounce rate.
For this reason, some website owners resort to creating a custom design for the 404 pages on their sites. Or they redirect visitors to the site’s home page or any other page in order to help reduce the bounce rate and give users a greater opportunity to discover useful content on this site.
In this article, we will show you how to redirect all 404 pages to the home page in WordPress sites step by step. This is done using plugins and software solutions for developers.
Error 404 (Page Not Found) Overview
We can say that 404 error indicates that the specific page you are trying to access in a site is not available, in this case your web browser can connect to the hosting server but cannot access the specific page you are trying to access in that site.
The reason this error occurs is because this page does not exist in the first place, or it may have been deleted or moved, or the URL for this page is misspelled. The number 404 is a short code that indicates the server’s response to your request, and it is one of 500 other responses that occur when you visit any web page.
When a visitor ends up on a non-existent page with a 404 error, he feels annoyed. So, if you are a website owner and you do not customize the design of the 404 error page in an attractive way for the user , and you also do not redirect the 404 error pages to another page, the result that your site visitors will get will be as follows:
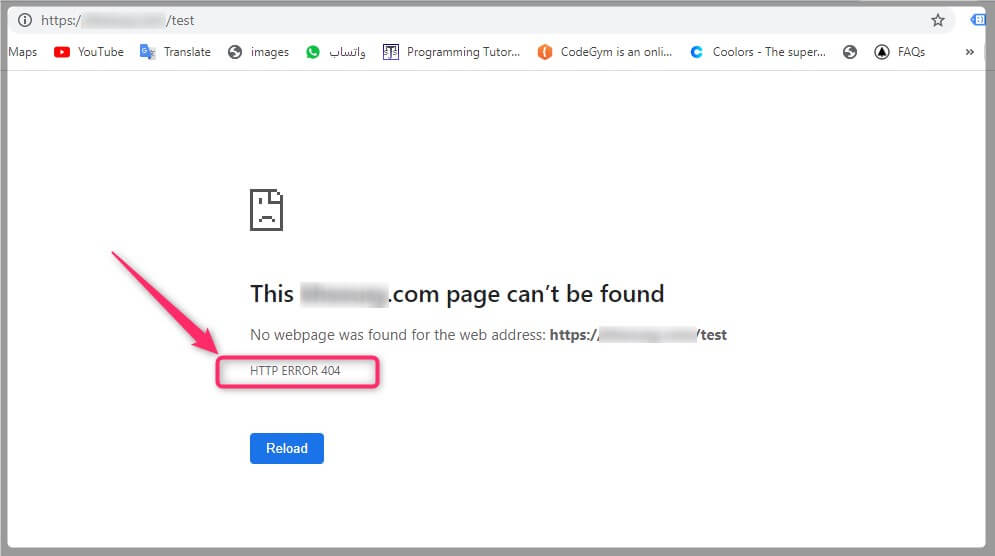
For this reason, the vast majority of sites have resorted to dedicating a specific page to receive all 404 pages. Some of them are creative with this page in a way that apologizes to the visitor for the error, and also suggests relevant alternative pages for him to go to. This definitely gives a better impression of the site.
When you request access to a link or page on the Internet on a site, you send a request to the server, and then the server, in turn, responds to your request in what is called a server response, or rather (HTTP response).
There are 5 different types, including 500 cases, of the server’s response to your request, each with a dedicated code indicating it. Below is a brief explanation of these codes.
HTTP response status codes
HTTP response status codes include the following:
1- Informational responses (from 100 to 199) :
It is the first response from the server that indicates the status of the information and the protocol used, and it is considered temporary responses. For example, code 101 is the code (switching protocols) and means that the client has asked the server to change protocols and that the server has agreed to do so. Code 102 , which is considered one of the most famous media response codes, indicates that the server received the request but it has not been processed yet.
Successful responses (from 200 to 299) :
It includes a set of responses that express the success of the request directed to the server. One of its most famous codes is code 200 , which indicates that the content is available and has been displayed.
Redirects (300 to 399)
These are responses that indicate that the page is redirected to another page. An example is a 301 redirect , which states that the page has been completely moved to another page.
Client errors (from 400 to 499)
These are errors that occur on the part of the client or the site itself, and are not errors on the part of the server. It usually indicates that the content is not available. An example of this is the 404 error that we are discussing in today’s article, which indicates that the page or link you requested does not exist.
Server errors (from 500 to 599)
A set of responses that the server returns to the browser indicating that an error has occurred on the server’s part. One of the most common server errors is the general error 500 Internal Server Error , which means that the server encountered an unexpected condition that prevented it from fulfilling the request.
You can know the server response status code for any page by right-clicking on the page, choosing inspect from the menu that appears, then going to the Network tab, as the image below shows:

Returning to WordPress, we will explain to you in the following paragraphs how to redirect all 404 pages to the home page of the site, or to any other custom page of your design. This will of course help improve your site and make it easier for visitors to find content similar to what they are looking for instead of finding themselves on a blank page.
Reasons why error 404 (page not found) occurs
This error occurs for several reasons, perhaps the most important of which are:
- A spelling error made by the user when he manually typed the page link.
- Because an article was deleted or its link changed.
- Changing the format of Permalinks on WordPress, which leads to all links on your site being directed to the wrong pages.
- Moving your site from one domain to another or from one server to another changes the structure of permanent links. In this case, you need careful work to move each link to its correct place. The closest example of this is converting from Blogger to WordPress .
Then you have to track down all the broken links on your site, maintain them, and redirect them to their correct place, or even to relevant pages. But until that happens, convert all 404 pages to your home page so that you do not leave visitors in despair because they do not find what they are looking for.
It should be noted that 404 pages may also appear as a temporary condition due to a browser or server problem. For this reason, you may sometimes need to clean your browser or restart your router to solve this problem. but! Rest assured, such problems occur individually and temporarily and are not generalized to all users of your site.
Redirect all 404 pages to the WordPress homepage
The archiving order of redirected pages is usually moved to the new (redirected) pages, especially when a 301 redirect is used . Therefore, we recommend doing a 301 redirect for pages that have been deleted, or that have been moved to other links, to ensure that visitors flow to the same content, and most importantly, move the ranking of the missing page to a new page.
One way to improve the site and keep users better engaged is to redirect 404 error pages to other, more relevant pages. Perhaps one of the most effective ways is to create a custom 404 page. however! Many website owners and developers prefer to redirect visitors to the home page.
There are 3 methods that can be used to redirect 404 error pages to your WordPress homepage. These methods include:
- Redirect to home page using 404.php file.
- Redirect 404 pages to home page with code solutions via functions.php file.
- Use the All 404 Pages Redirect to Homepage plugin.
Whether you are a website owner or a WordPress developer, the three methods mentioned above can be applied easily and in simple steps. Follow the illustrated explanation to find out step by step.
Note : Of course, you need to apply one of the three mentioned methods, not all of them. We intended to provide several alternatives for you to choose from among what suits you.
First: Redirect all 404 pages to the home page using the 404.php file
The 404.php file is present in most if not all WordPress themes, especially advanced ones. The function of this file is to direct any non-existent page with the error code 404 to it, thus making it clear to the visitor that the page does not exist and providing him with several other options such as suggesting content, a bar to search the site, links to sections and articles…etc.
The following image shows the design of the 404 page on our WordPress Arabic website. You can notice that the page design is attractive and fully compatible with the template design. It also shows many suggestions to direct users to it instead of leaving the site, as shown. We of course do not want to leave our visitors confused and distracted.
We can also add a redirection code at the top of this page, so that all visits to it are transferred to the site’s home page instead of being displayed to the visitor.
It should be noted that it is better to customize the design of the 404 page for your site rather than redirect it to another page. Especially if the site has a high number of visits. Although switching from the 404.php page to the home page improves SEO compared to if you leave the page without any action, on the other hand, in this case it may affect the site’s performance.
So if you have a well-designed 404 error page that serves the purpose, this may be the best option for your site. Otherwise, follow the instructions below to transfer to the home page:
1. Route your site files through an FTP client program such as Filezilla.
2. Go to the template folder at the following path: wp-content, then choose the themes folder, then choose from within it the folder that bears the name of the active template.
3. Find the 404.php file inside it, as the image below shows, or create it if it does not exist.

4. Open the 404.php file in any text editor, then add the following code at the beginning, as the image below shows:
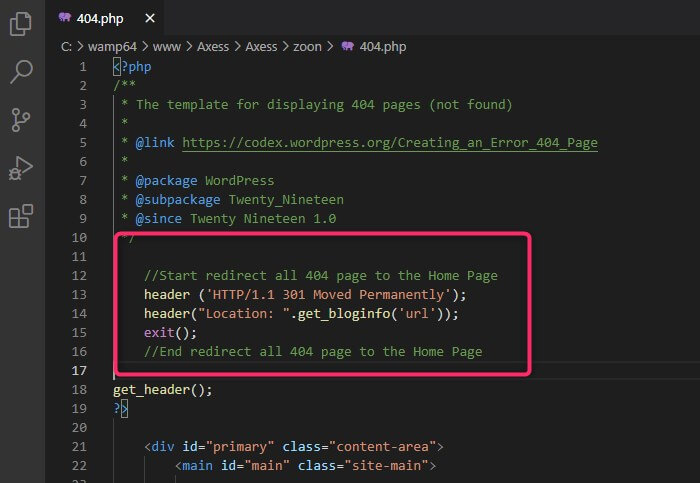
5. Save the file and upload it again in the same path.
Code explanation:
- The first line moves the archive and ranking of the page to the new link, and this is what the number 301 indicates, and we explained this at the beginning of the article.
- The visitor will then be redirected to the home page. When the header() function is passed to it, it will ask the server to change the URL to the link passed to the function, which in our case is get_bloginfo(‘url’), which returns the site link.
- The exit() function is written to prevent the rest of the file code from being executed.
After following all the steps mentioned above, you can ensure that what you have done is correct by trying to access any wrong address (link) on your site (this can be done by typing random letters after your site’s domain), then you should be redirected to the home page.
In fact, modifying the basic template is not the ideal way to set up your site in general, or to redirect all 404 pages to the main page in WordPress, as in our case, as these modifications may be deleted after theme updates.
Therefore, it is preferable to modify the child theme of the main template by creating a 404.php page in the main folder of the child template, and adding the same code as before, but after placing it between the open and close tags in php as follows:
As for the exit() instruction in this case, it is not necessary, because the code will actually stop when exiting the file on the previous line because it does not contain any code after it. But there is no harm in putting it on.
You can also follow the following method, which is actually the easiest and preferred method among developers and website owners, as it is not affected by updates and is also very simple and is accomplished in one step.
Second: Redirect 404 pages to the home page using the functions.php file
Perhaps one of the smartest programming solutions is to modify the functions.php file in the child theme to redirect to all pages that are not on your site, because this solution will never be affected by template updates.
to do this. Follow next steps:
1. From the WordPress control panel, go to Appearance, then Theme editor.
2. Open the functions.php file for the child template from the active template, add the following code, then click Update File, as the image shows:
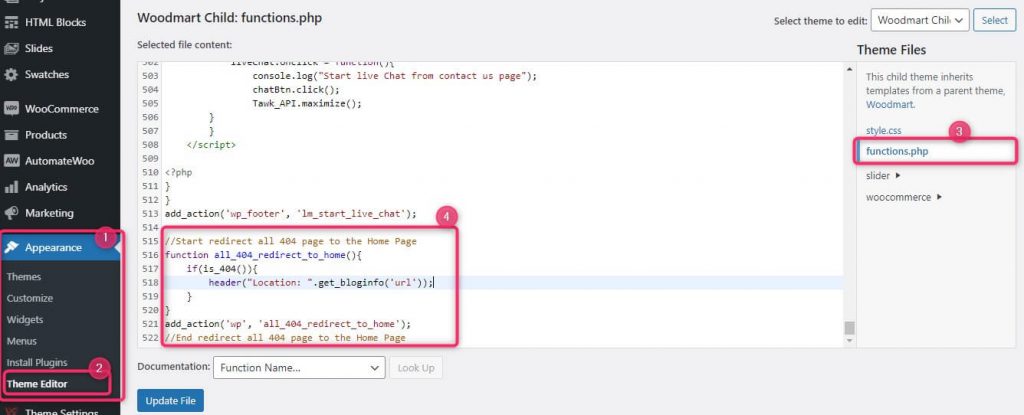
Third: Use the All 404 Pages Redirect to Homepage add-on
This add-on is not the only one, but it is one of the best add-ons that allow you to redirect all 404 pages to the home page without the need to write codes.
It should also be noted that this add-on has no other functions, which means that it is light and does not affect the site’s performance as it only works in the control panel.
To reset 404 pages using the plugin, go to the WordPress control panel, then go to the (Add-ons) tab , then choose (Add New)
Then in the search for add-ons box, type the name of the add-on: All 404 Pages Redirect to Homepage. You will notice that the required add-on appears. Click on Install Now as the following images show:

4. Then activate the add-on by clicking on the Activate button .
If you encounter any problems while installing and setting up the All 404 Pages Redirect to Homepage plugin, please see our following article: How to install a WordPress plugin and activate it on your site correctly.
Adjust add-on settings
After installing and activating the add-on, you must adjust the add-on settings to redirect all 404 error pages to the home page by following these steps:
1. Go to the Settings tab in the WordPress control panel.
2. Click on the extension name All 404 Pages Redirect to Homepage, as the image below shows:
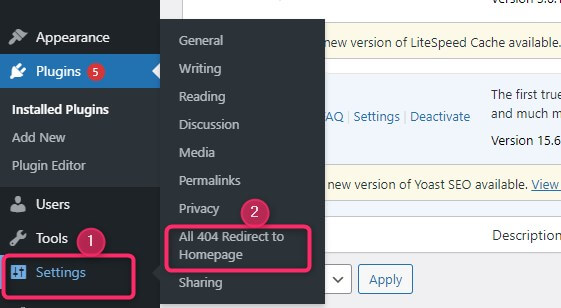
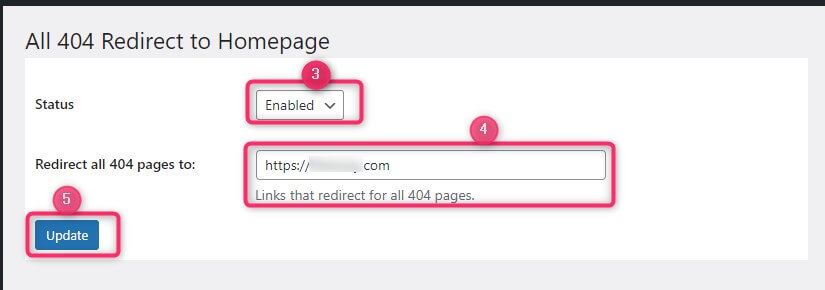
3. Choose the Enabled option from the drop-down menu next to Status.
4. Then write the link to your site’s home page – or any other link you want – in the next text box that appears next to the phrase (Status Disabled Redirect all 404 pages to) to convert all 404 pages to this link.
5. Click on the Update button , as the image below shows:
Now go back to browsing your site again and try making the add-on by typing any wrong address. For example, write random characters after the domain name as follows:
You will notice that you will not see the 404 page in this case, but rather you will go directly to the home page of your site.
Conclusion
Thus, we have discussed in this article in some detail what a 404 error is and what code 404 means, and we indicated that it is one of 500 other codes that are sent to the browser to display the appropriate message to the user. We also explained how to redirect all 404 pages to the home page through three different methods. Two of them rely on software solutions and one relies on the All 404 Pages Redirect to Homepage plugin dedicated to this task.
Dear reader, all you have to do is choose the method that suits you from the three methods mentioned in the article. Use it if you want to redirect visitors to the home page of your WordPress site when a page is not found on the site, instead of showing the 404 error page, which, as we mentioned, causes users to leave your site immediately and search for other sites.
If you encounter any problem while implementing the steps mentioned in the article, do not hesitate to contact us in the comments section, and we will respond to your inquiry as soon as possible.


Leave a Reply