Rerhaps one of the most difficult situations that WordPress site administrators may be exposed to is being suddenly hacked, or exposed to attacks aimed at that. According to statistics , WordPress sites are exposed to approximately 100,000 hacking attacks every minute, which is a very logical number in light of millions of sites using WordPress.
In this case, if you neglect the security and protection of your WordPress site, you may eventually be hacked, and this hack may lead to the leaking of your site’s database, or your site’s users’ personal information, which is a dangerous matter, especially if you are running an online community or an online store, because These types of sites are full of members and users.
But the matter is not a cause for concern, as most attacks rely on malware. Fortunately, website owners are able to scan their sites against this type of software and then completely treat their sites. In this article, we will talk to you about the correct way to do this. That, and we will go on a tour to learn about the most important easy security and protection practices.
You may be interested in reading: Explaining Firewall, its types, and activating it on your site to get complete protection
What is Malware?
The phrase (malicious software) comes as a translation of the English phrases most used in this regard, which are (Malware) and (Malicious Software). These terms generally express any software, code, or codes that hackers use to harm your site on the one hand, or On the other hand, access and modify it without your permission.
As previously mentioned, the dangers of malware do not only affect you, but also affect your site visitors. If your site is infected with malicious software, visitors may face some problems, and you may notice some symptoms, which are as follows:
- Your site’s performance suddenly decreases
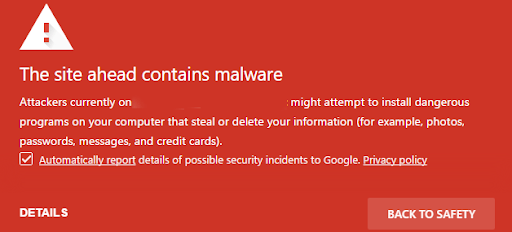
- Site visitors see the message (the site ahead contains malware)
- Website visitors who use antivirus software may not be able to visit your site in the first place
- In case of infection, you may notice the appearance of new files within the site’s files
- In critical cases, the administrator may not be able to log in to the WordPress control panel
- In some other critical cases, site visitors begin to see annoying pop-up advertisements, which were, of course, placed by the hacker
This is an example of an alert that appears to visitors
Related article: Solution to the problem: The site contains malicious programs – This site ahead contains harmful programs
How does malware reach your WordPress site?
We cannot disagree about the great damage that malware causes to websites, and the above were examples. But when a visitor sees these alerts or notices these symptoms, he may refuse to visit your site again, which is something you do not want, and the risks increase if your WordPress site is actually a WooCommerce store .
But the most important and interesting question here is: How did the malware get to your site in the first place? WordPress sites are susceptible to malware infection in different ways. This may happen manually by a hacker, or through (injecting) the malware into your site in more than one way on your part, such as using stolen templates or plugins.
In addition, your site may be infected by a certain bot, and the uses of these bots appear if you do not set a limit on the number of attempts when logging in to the administrator control panel. In this case, a small automated application can try millions of options until it is able to record Login, which is normal because the site’s system will not prevent him from trying again and again.
The owner of a WordPress site can be exposed to this malicious code if he does not delete unused templates and applications, which sometimes happens because their developers use (back doors) to access the sites that you use, and of course this applies strongly to templates and plugins downloaded unofficially.
Of course, your site will not be spared if you have been hacked, as if your device is hacked – by clicking on a misleading link or downloading an unofficial program – the hacker will be able to access everything you do on your personal computer, including your management of your site. .
Important article: Explaining the Jetpack add-on to secure and protect your site and many functions
The importance of constantly checking your site against malware
We previously talked about some clear symptoms of your site being infected with malware or malicious code, but sometimes no symptoms appear at all, and therefore any site manager must constantly scan his website.
Therefore, the greatest importance lies in resisting hidden malware, in order to avoid the aforementioned damages, but there are other damages that your site may suffer if you neglect to inspect it, especially if you know that 83% of the CMS sites that are hacked actually work based on WordPress!
But this is not due to the weakness or insignificance of WordPress, but rather because it is the most widespread, and we will now tell you about the main damages that your site may suffer if you neglect to check: (Editor’s note: The following headings are H4)
1. Huge damage to SEO performance
Your site benefits mainly from its SEO performance, and what is meant by SEO is search engine optimization, and therefore any damage to SEO performance will consequently lead to poor performance of your site in appearing in search results, simply because Google may give your site (violations) if it is discovered. Your site contains malware, and if you think about it, you will find that it makes sense, because Google leads visitors to your site… which contains malware!
You may be interested in reading: Search Engine Optimization Guide for WordPress Sites | WordPress SEO
2. Decreased site performance
We previously talked about the decline in site performance when it is exposed to malware, but the main reason behind this may lead to very difficult results, which is simply that the hacker is using your server/hosting resources to hack other sites! In addition to decreased performance, this event may lead to problems between you and the company providing the server or hosting.
3. Harm to email performance
Hackers can use your site’s resources, specifically its IP address, to send spam messages randomly via email, and this may ultimately lead to your site being banned from larger email providers, such as Google and Microsoft.
4. Visitors harmed
We talked about this point before, but because of its importance we are talking about it again. Malware planted inside your site can cause significant harm to visitors, and in some advanced cases, visitors themselves can be infected by this malware.
When is a good time to inspect your site?
You should never wait for symptoms to appear on your site or wait for your site to be damaged before you start scanning it. In fact, you should do this immediately and periodically, especially since we mentioned that some malware is very hidden.
We recommend that you scan your site against malware at least once a week, and that you do so immediately after installing any new theme, plugin, or file upload to your site.
How to scan your site against malware
Fortunately, the process of checking your site for malware or malicious software can only be done by relying on some reliable plugins. There are a number of reliable plugins that provide this service to WordPress website owners, and as usual, the features and features may vary from one plugin to another.
Although there are a number of add-ons, we will start by taking our first look at the Wordfence add-on due to its good reputation on the one hand, and its high performance. As usual, WordPress add-ons are available in a free and paid version, but you can start with the free version.
Start using the Wordefence plugin
Our first step is to download and install the add-on. You can download the add-on through the WordPress add-on platform and then upload it manually, via the add-on page .
However, the easiest solution is to install it directly through the control panel, by following the following steps:
- Log in to your WordPress site’s control panel in the usual way
- Go to the Add-ons section, and then go to the (Add New) option.
- From there, search for the add-on by typing its name in the search bar, then click Install. After the installation is complete, do not forget to activate:

Currently, the add-on has been installed and activated, and you can already see it appearing under Settings in the right menu. Once installed, the add-on will ask you to enter your email, as it will receive warnings related to your site directly. We are now ready to work, but before that you must create a copy. Site backup.
We previously explained this point extensively , but you and I are here, so it’s okay to take a quick look at how to create a backup of your entire site within minutes:
Create a backup copy of the site
You can create a backup copy of your site in more than one way, most notably by downloading your entire site files and database files! It is the traditional method, but now there are easier ways.
In order to create an integrated backup copy of the site, we will rely on an add-on called UpdraftPlus Backups, which you can download and install exactly as we explained regarding the Wordefence add-on.
You can learn more about the add-on in our previous article: How to use the UpdraftPlus add-on to back up your site . Whether you use it or use another one, the basic step is to create a backup copy before continuing.
Scan your site with the Wordefence plugin
Now that we have created a backup copy, we return to the Wordefence add-on, and the option we need to deal with currently is the Scan option. You can easily start a new scan of your entire site from the add-on’s home page, or follow the following steps:
- Go to the add-on section within the control panel
- Go to the (Scan) option to start the scan
- Click on the Start Scan Now option to start the scan
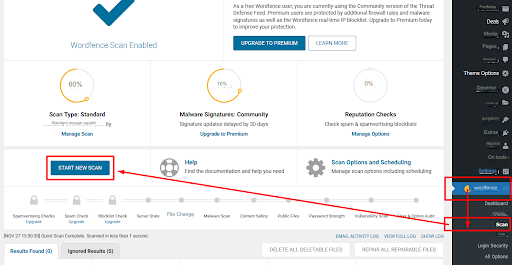
At this stage, Wordfence begins a full site scan, which of course also includes searching for Malware files within your site, and in addition to that, it also tracks changes made to any of your site files, along with any other elements that the plugin may suspect.

The add-on takes some time, especially if your site is large. After completion, it displays a report on what was achieved. The add-on also categorizes the risks into light, medium, or severe.
When you deal with the plugin, you should know that the appearance of (unknown file in WordPress core) in the report means that your site is most likely infected with malicious software, because this alert means that the plugin has found a strange file within the main WordPress files.
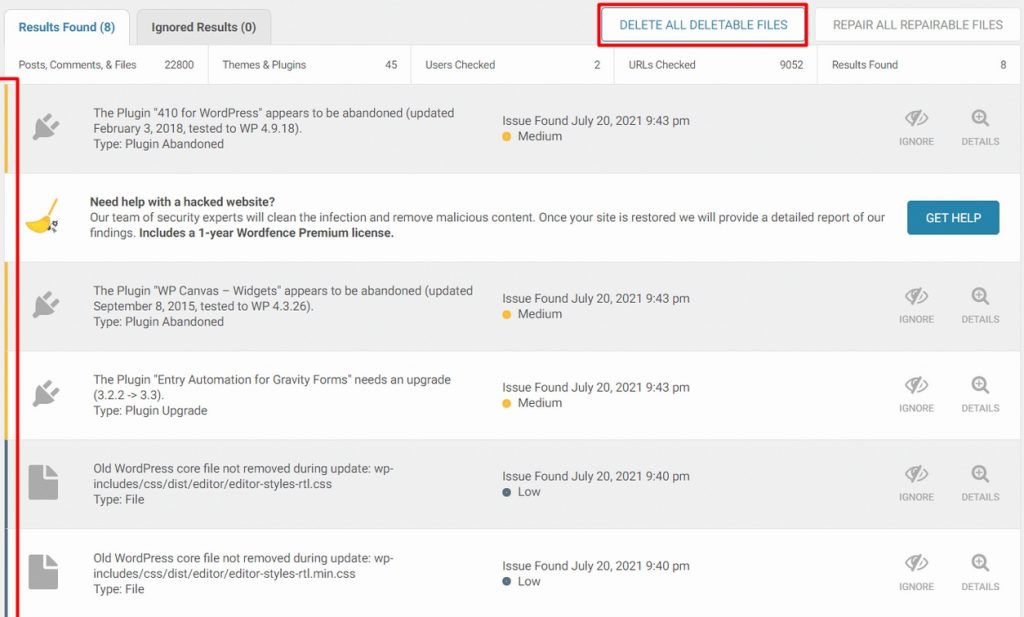
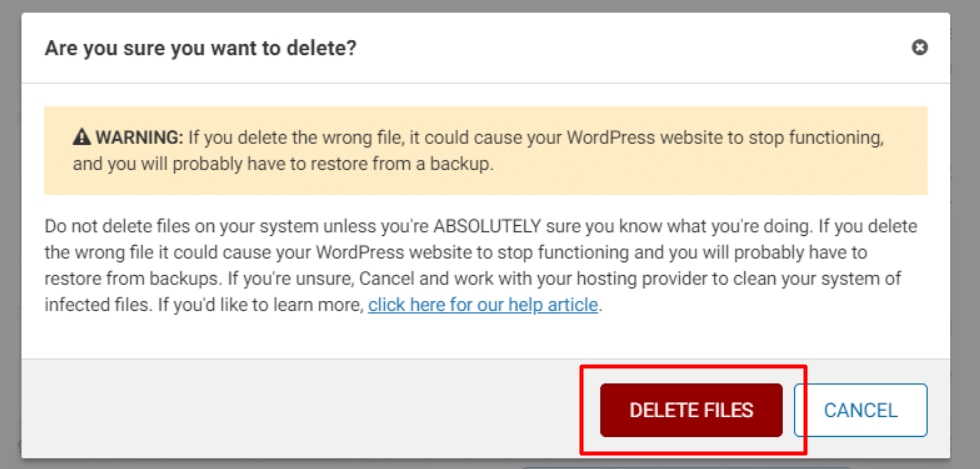
Fortunately, through the Wordefence add-on, you can directly delete all deletable files with just the click of a button. Of course, deleting these files may ultimately lead to damage to the performance of your site if an important file has been deleted, so be sure to Read warning messages carefully.
Use the Wordfence plugin professionally
We return to the main page of the Wordfence plugin, which can be accessed by clicking on the name of the plugin that appears in the settings menu in the WordPress control panel:
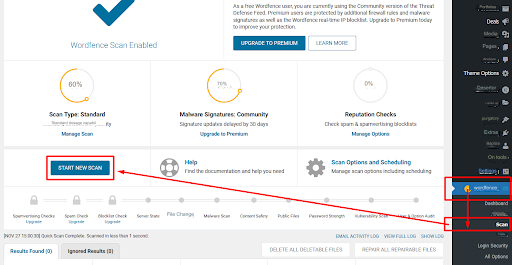
As you can notice, the home page displays more than one option, and in the middle we see the Scan option, which we learned about previously, and next to it we find the Security Wall option, whose settings we can control by clicking on (Manage Firewall), as in the picture:

We notice through the security wall options – or firewall – the possibility of activating the wall since it is not activated, as it is now in Learning Mode and can be activated by choosing Activate from the menu, or leaving it in automatic mode so that it will work automatically on the date shown.
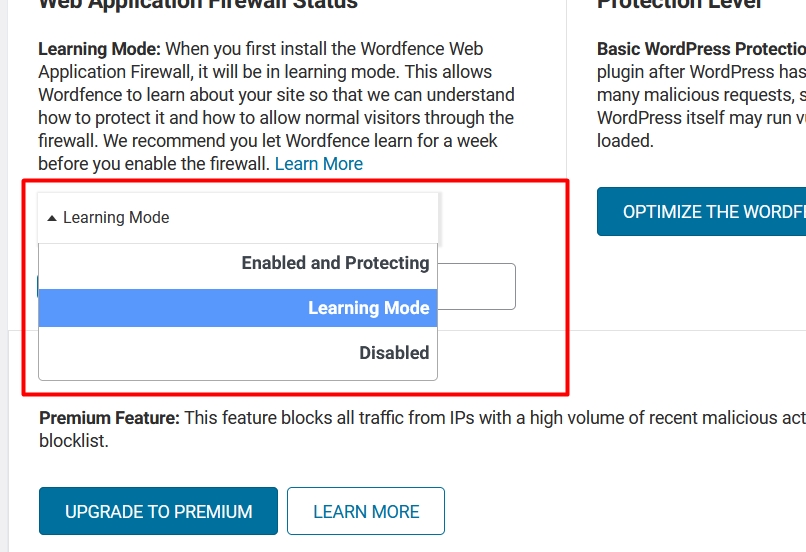
We note from the same page that there is another option, which is (Real-Time IP Blocklist), but it is a paid option, which allows you to block the site from specific IP addresses.
Returning to the security wall settings page again, we notice the ( Protection Level) option , which allows experienced users to modify the way the firewall works, but we do not recommend modifying the settings if you do not have experience to do so:

We point out that the default settings for adding Wordfence are sufficient, and we recommend modifying only if you have experience doing so. Within the same firewall options page, we can notice a group of other options:

The options are divided (in order) into:
- Advanced firewall options
- Options for protection against Brute-Force attacks described within the article
- Options to control the rates at which users – or robots in particular – consume data
- White link options, which are links that are not subject to firewall settings
The options within the Wordfence add-on do not stop there, as the Tools section within the add-on offers other very important options, which are as follows:

Live Traffic options :
The options within this tool allow you to follow what is happening on your site in real time – that is, directly – and through this tool you can see login attempts, hacking attempts, or any requests (Requests) made through the site, whether they are rejected by the firewall within Wordfence. Firstly.
Whois Lookup options :
This tool allows you, by relying on the Whois database, to see the owner of the domain or IP address that is trying to publish fraudulent or malicious content or even trying to hack your site, even though the IP address already appears in Wordfence reports and within the comments on your site.

Import/Export options :
These options allow you to save a copy of the settings configured within the Wordfence plugin for later use if you delete and reinstall the plugin or on another site.
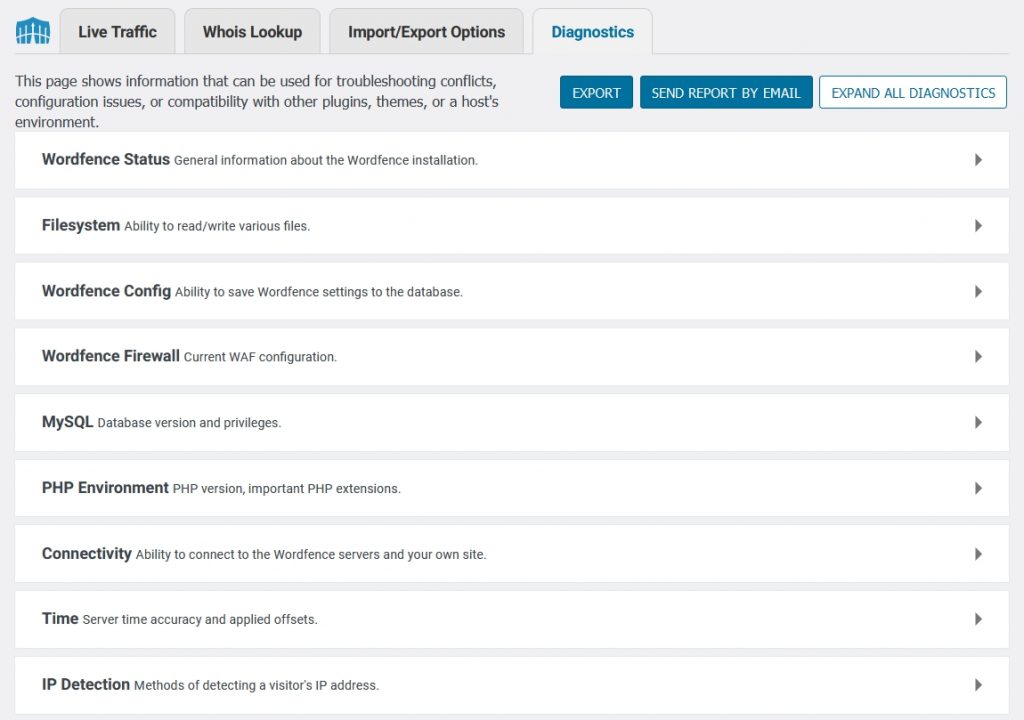
Diagnostics options :
This is the last list of options under the (Tools) category, and through it Wordfence gives you a report on the site:
You can benefit from a large number of features for free, but the remaining features require a paid subscription, and there is no doubt that you will need some time to fully benefit from this addition.
- What is Malware?
- How does malware reach your WordPress site?
- The importance of constantly checking your site against malware
- How to scan your site against malware
- WordPress plugins to scan and delete malicious files
- What happens after deleting the malware?
- Change passwords
- Turn on two-factor authentication
- Verifying user ranks and accounts
- Take an extra backup
- How to ensure the security of your WordPress site
- Choose a suitable hosting company
- Do not use stolen themes and plugins
- Rely on security plugins and strong passwords
- Prevent files from being modified from the Control Panel
- Change the login link
- Add a confirmation code
- Scan your entire site without extras
- Manually remove malware from WordPress
WordPress plugins to scan and delete malicious files
The Wordfence add-on achieves excellent results and provides more than good performance, but it is not the only add-on that allows website owners to scan it against malware and then clean their site of those files. Below we learn about some alternative add-ons that are also worth trying:
MalCare plugin for scanning WordPress sites
MalCare comes as a service from BlogValut, a paid add-on that costs $99 per site, while its developers also offer a service to fix hacked sites at a separate cost.
This add-on allows tracking hacks and malicious software before they cause major damage to the site, in addition to not consuming a lot of server resources. The add-on was developed based on the analysis of more than 240,000 websites and relies on more than a hundred indicators to detect damage.
In addition, the extension also provides the feature of removing malware with one click, in addition to the ability to create backup copies through it. You can buy it via the official website .

Added Titan Anti-Spam & Advanced Security
This add-on offers all the features you might expect from an integrated security add-on, as it protects your site from spam on the one hand, and protects your site from hacking and malicious files on the other hand.
The add-on offers an attractive user interface and allows you to continuously scan your site and then clean it. The add-on is available in a free version, but its most powerful features – as you can expect – come in the paid version, including:
- Prevent spam
- Firewall feature
- Professional WordPress website scanning feature
- Professional Malware scanning feature
- Possibility of blocking any IP address
- The feature of tracking malicious codes and code
within template and plugin files - Site inspection feature
The paid version is available for $55 per year, and can be downloaded through the WordPress plugin platform , and later the paid version can be purchased from it.

Sucuri plugin to protect and scan WordPress sites
Known as one of the most prominent Wordfence alternatives ever, Sucuri is generally known for its contributions in the security fields as it offers a number of products and services other than the plugin.
The plugin offers features such as full site security scanning, file scanning, site scanning for malware and more, with the ability to block hacks before they happen.
The plugin is available in two versions, as usual, one free and the other paid, and it is available through the WordPress plugins platform .
Add iThemes Security
This plugin, which was formerly known as Better WP Security, offers more than 30 security features that you can take advantage of, and the plugin effectively protects your site from attacks before they even happen.
You can use the paid version to get more features, including continuous scanning or sending reports via email, and you can download it and start using it for free to decide whether you need to upgrade or not.
Other extras
We previously talked about the Wordfence add-on and alternative add-ons, but there are still many add-ons that serve the same goals, and below we list them for you in case you want to expand on the experience and comparison:
- Anti-Malware Security and Brute-Force Firewall
- Cerber Security, Anti-spam & Malware Scan
- SecuPress
- Clean Talk
- Astra Security Suite
- BulletProof Security
What happens after deleting the malware?
In the previous steps, we have succeeded in creating a backup copy of the site, then checking the site against malicious files, and finally deleting them. Thus, your site is in good condition, but there are still some steps that you must take after completing this, and they are as follows:
Change passwords
You should change all of your and other users’ passwords after you have cleaned your site of malware, since the hacker likely already knows your passwords.
Turn on two-factor authentication
Even if your passwords are leaked, having a two-factor authentication system will prevent the hacker from logging in to your site unless he also hacked your email! In general, we recommend adopting this system continuously on your site, and this can be implemented by relying on any reliable add-on, or through Wordfence itself.
Read also: What to do if your site is hacked? Tips and practical steps
Verifying user ranks and accounts
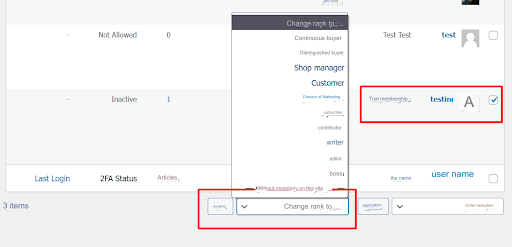
Once your site recovers from its infection, you must look directly at the user ranks and accounts, by going to the Members section within the control panel:

From the same place, you can view the existing ranks, by selecting any account and then clicking on (change rank to) so that the site will display to you all the existing ranks (User Roles):
Take an extra backup
Once you have completed all the previous steps, there is no harm in taking a new backup copy, because in this way you are taking it while the site is completely clean.
How to ensure the security of your WordPress site
You should never treat the security of your WordPress site carelessly, because the worsening consequences of neglecting the site could be truly catastrophic, and may reach a stage that cannot be remedied.
There are a number of basic tips that you must follow to ensure that your WordPress site is constantly secure, which will be mentioned below, but we recommend that you review the Security and Protection section in WordPress in Arabic because of the important articles it contains.
Choose a suitable hosting company
You cannot choose the cheapest offer available from an unknown hosting company and then complain about the site being hacked or any problems occurring. The beginning always is with choosing a suitable and reliable hosting company, and Digital Ocean is an example of this.
Do not use stolen themes and plugins
Most professional plugins and themes come paid, but some WordPress website owners are looking for stolen (hacked) versions of them to use for free, and in addition to the extreme prohibition of doing so, the results will never be good.
This is because the site or person who provided this add-on to everyone had previously purchased it, and certainly has its own goals in making it available for free… such as injecting it with malware!
Rely on security plugins and strong passwords
We previously talked about one of the most prominent security add-ons, and we recommend relying on one on an ongoing basis. Indeed, there are many alternatives (which we will talk about next), but the idea lies in the principle of keeping the add-on and paying even for the paid version of it. As for passwords, we are now in 2021. You cannot use your date of birth or phone number. Always try to use complex passwords that are difficult to guess, such as: GhY@12200@z
Prevent files from being modified from the Control Panel
When you create a new WordPress website, it automatically includes a feature that allows you to modify codes through the control panel itself, which includes template files and plugins. This feature is known as (File Editing) and you can access it by going to the Appearance section, and then the Editor:

Once you have finished preparing your site and its features and modifications are complete, immediately stop the work of this editor, because it allows anyone who accesses your control panel to modify the codes directly, which is something you do not want.
To deactivate this feature, place the following code at the end of the wp-config.php file:
Change the login link
By default, the login link is example.com/wp-admin, and sometimes the user needs to change this path, just to avoid spam attacks, also known as Brute Force, which we talked about above.
Add a confirmation code
In order to avoid the aforementioned type of spam attacks, which keep trying multiple variants of password guessing, also activate the confirmation code known as CAPTCHA.
Start the application now: change the WordPress login page link to wp-admin and activate reCAPTCHA
Scan your entire site without extras
There are a number of sites and platforms available that allow the user to examine his site remotely, and they analyze your site in an integrated manner without the need to install add-ons, but as you can expect, these sites only succeed in catching very clear symptoms, and in the end the user needs to use a specialized add-on such as The aforementioned Wordfence.
But we will share with you the following platforms for important reasons, which are to inspect the site more than once after completing the cleaning process, and on the other hand, they are also useful even before the inspection begins.
1. Check the site via Sucuri SiteCheck
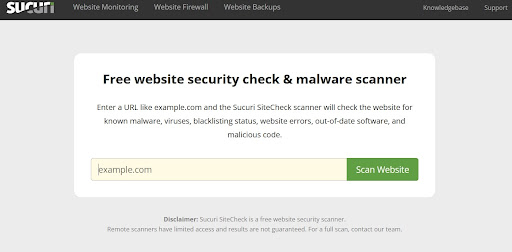
The Sucuri platform is one of the most prominent platforms for scanning and securing websites. It allows the user to scan his site directly by entering the link on the site’s main page, so that it can later track malicious codes and others:
1- Enter the tool’s home page.
2- Enter your website link and then click Search
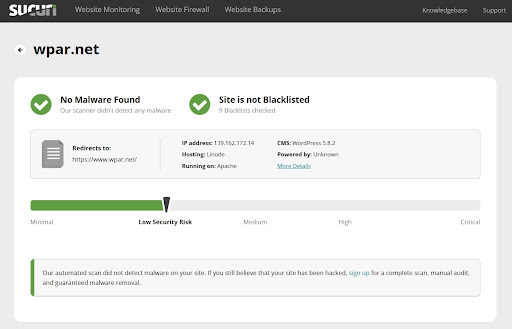
After the scan is completed, the site will give you a report:
2. Scan the site via IsItWP Security Scanner
This tool gives you the same options, as it scans your WordPress site for any vulnerabilities or malware and then gives you a quick report, and later you can start solving problems based on the details that we talked about previously.
3. Use the Google Safe Browsing tool
This tool is distinguished by the fact that it comes directly from Google, and it allows you to know whether your site’s URL is safe or not, and specifically whether Google itself has classified it as a malicious link.
If this happens, you should immediately go to Google Search Console to resolve the issue.
4. Relying on the WPSec platform
You probably understand it now. This tool scans your site against any known codes, malware, or even software vulnerabilities, and it also gives you hints on how to fix these problems.
5. Other tools
These tools are useful, and we would not be exaggerating if we advised you to access all of them and place links to your sites and examine them, as it is a free service that will not cost you anything and does not require time or effort.
Manually remove malware from WordPress
In the previous points, we talked about how to scan a site for malicious software and malware based on a variety of add-ons and platforms, and we talked about the ability of these add-ons to delete that software as well.
But many WordPress administrators, especially those with a technical background, may prefer to try to remove malware manually, especially when they know about the severe damage that can be caused if this is done late.
We can follow the following steps to delete malware manually, which can also be implemented in addition to relying on add-ons and other tools:
1. Create an integrated backup
The first step – as usual – is to create a complete backup copy of the site. This can be created either through add-ons as mentioned above, or manually by saving a copy of the database and site files through the hosting control panel.
2. Check the backup
The backup copy you created often reflects all the problems that actually exist in your site, and you can examine it in more than one way, but you can start by comparing its files with the official WordPress files, which you can find when downloading the script from the official website .
At this stage, you must make sure that the files contained in your backup copy of the site are the same as those that appear in the WordPress folder that was downloaded from the official site.
Later, you must comprehensively scan the wp-content folder, which contains all the files and images that are uploaded to the site, in addition to templates and add-ons as well. Of course, scanning all of these files using an anti-virus application is an excellent option.
3. Clear all files in public_html folder
Now that you have made sure that the backup you took of your site is complete, you must erase all files and folders located in the main public_html folder within the hosting, except for the cgi-bin folder and the rest of the folders related to the server itself.
If you operate more than one site on one hosting, you must perform all steps for all hosted sites, since it is easy for malware infections to spread between sites that share the same hosting.
4. Reinstall WordPress
At this stage, you have confirmed that your hosting is completely empty and that you have checked your site files that you downloaded within the backup copy. Now you have to install WordPress again, but from scratch.
Install WordPress in the same location as the original version, and after completing the installation, return to the wp-config file in the downloaded version to transfer the database data from it to connect the new version of WordPress directly to it.
5. Reset passwords
Now you have to return all the passwords for all the accounts registered on the site. If you happen to find a new account that you do not know and at the same time has great powers, this is an indication that the site has been hacked.
Change all passwords, delete all fake accounts, and you must also go to the permanent links page within the control panel and directly click on Save modifications without changing anything, in order to restore the .htaccess file.
Read also: Full explanation of htaccess. File functions, uses, and most important modifications
6. Reinstall themes and plugins
Remember with me, we downloaded a backup copy of the site as a whole, but we did not upload it after that, and up to this point there is no good reason to upload it again, and instead you have to install your templates and plugins manually as if you were starting a new site.
There is no need to upload theme and plugin files from the backup, as they may be compromised in one way or another.
7. Upload photos
Well, inside the wp-content folder within the backup copy uploaded to your site, you will find the image files arranged in the correct order based on the month and year, and after all those previous steps, you do not want to upload malicious files again.
Therefore, you will have to manually scan all the folders within the Images folder (Uploads), and make sure that all the contents of the folder are image files only and that there are no files in PHP format. Of course, there is no objection to performing a careful examination of the folder using anti-virus programs.
Read also: How to deal with broken images in WordPress
8. Scan your computer and install a security add-on
Always scan your computer for malware and viruses in general, whether before starting the previous steps, in the middle of them, or at the end.
After completing all of the above, you will also have to install a security add-on to check your site after renovations on the one hand, and to protect it in the coming period on the other hand against any re-hack operations.
Conclusion
You must always ensure the security of your website. This step is not a luxury, but rather a necessity in our modern era, especially since Google may give your site severe violations if your site poses any dangers to visitors.
When you follow the previous steps, your site will be more secure with a clear difference, and there is no doubt that using a security add-on will improve the overall experience. Start now to choose the ideal add-on for you, and start examining your site well, and as we talked before, there is no need to wait for something to happen. Hacking and then trying to solve its problems. Indeed, prevention is better than cure in these cases.


Leave a Reply