Many website owners wonder how to install the header section, navigation bar, or menus at the top of the page, and how to keep this section fixed when the user scrolls down.
This bar is called the Sticky Header menu. By activating this feature, you can keep the header fixed and visible to visitors when they scroll up and down.
Follow this article with us, to learn how to create a sticky header on WordPress websites, through WordPress plugins or through custom CSS codes.
What is a sticky header menu?
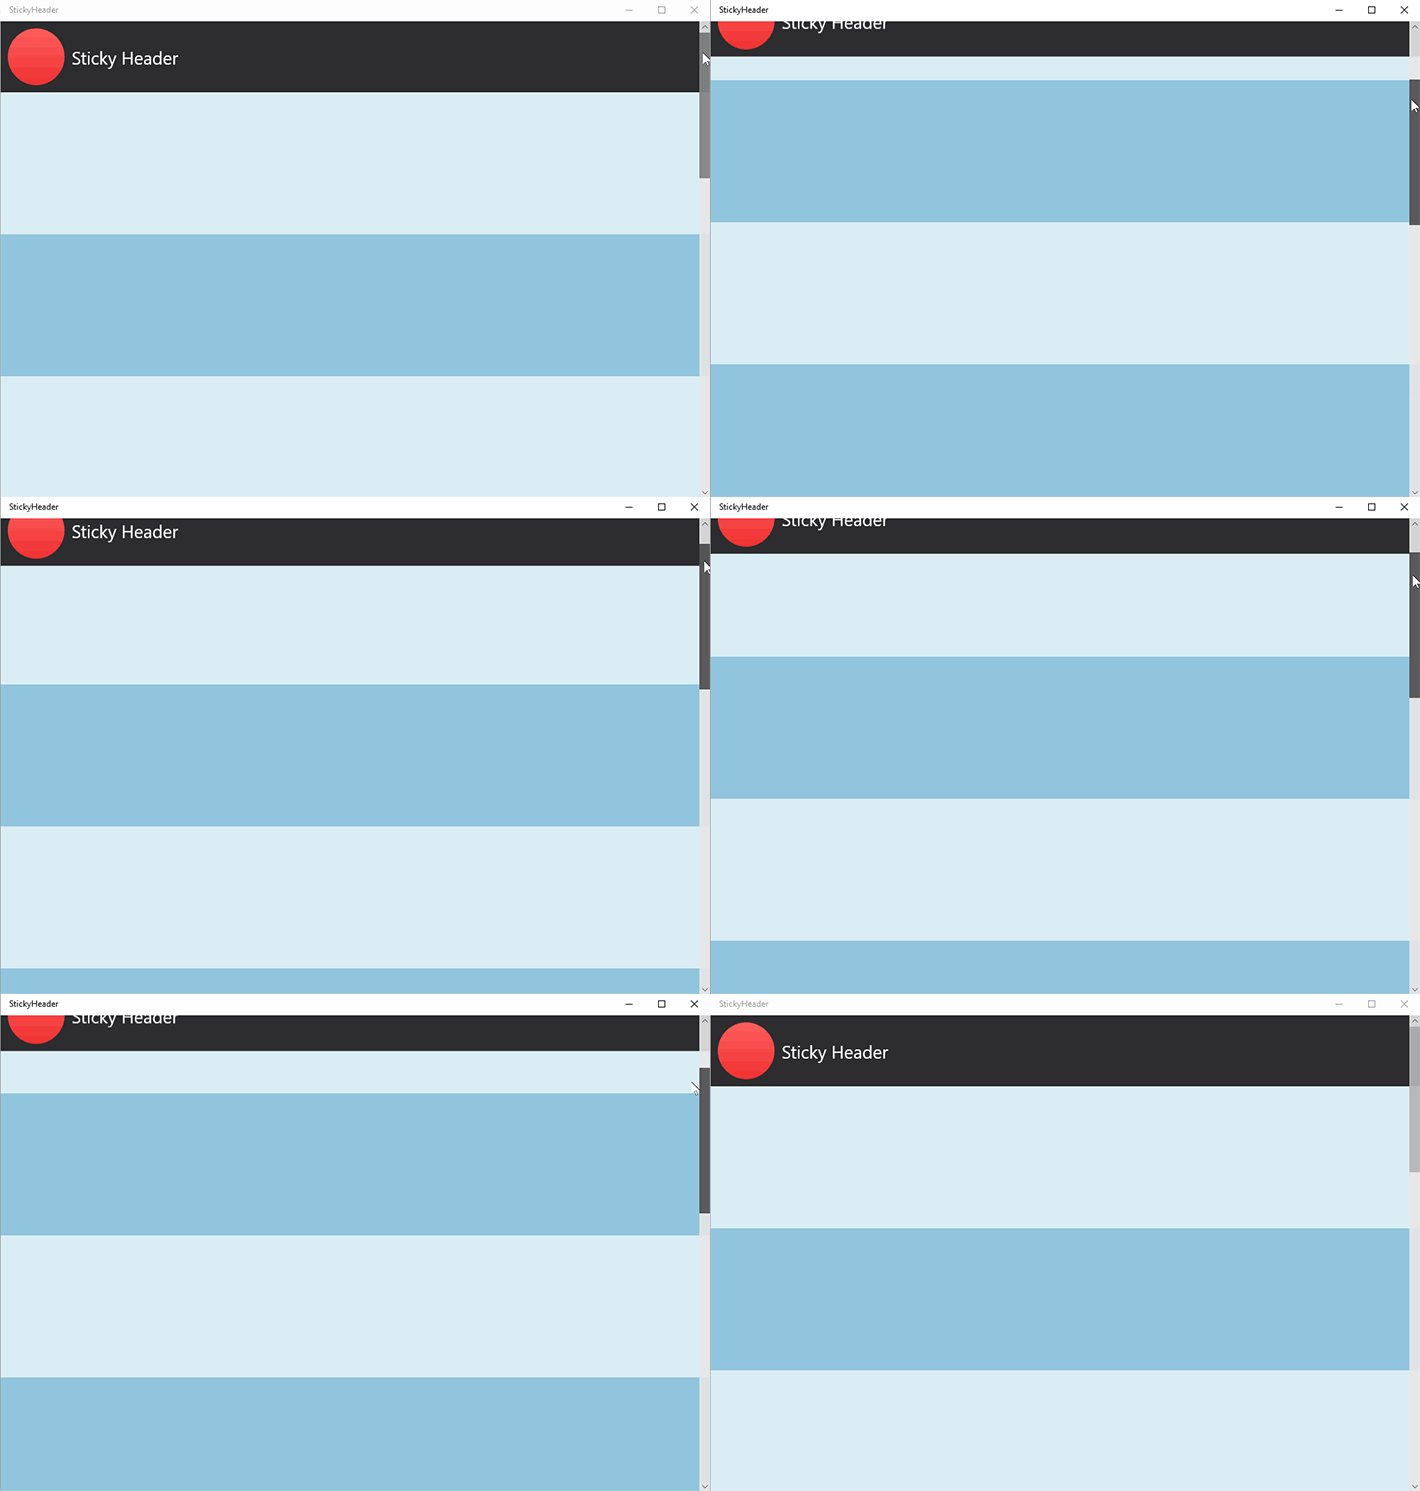
Fixed header menu or fixed navigation bar are terms that mean the visual portion that remains fixed and stuck to the top of the screen while users scroll up and down the website as shown in the image above.
That is, this list remains fixed in place, and does not disappear from your sight when you scroll down the page. Thus, you can move between the pages of your site through the links they contain quickly and easily without the need to scroll with the mouse to return to the top of the page.
A website header can contain many elements depending on the site’s requirements, but common things that are usually included in this section are:
- Logo or website title
- Main navigation menu
- Search icon
- contact information
- Social media icons
- Notifications, marketing basket or subscription
What happens on your site when you activate the fixed header menu feature (we will talk about ways to do this below), is that this header or vertical menu will remain fixed and visible to users as they scroll down or up, allowing them to quickly access it, search and move between all the elements in it. Without having to scroll up the page.
Before we start talking in detail about how to create and activate the Sticky Header feature on WordPress websites, we must know why website owners need this feature and what its most important advantages and disadvantages are.
The importance of sticky header
Website owners resort to creating a fixed header menu to help them create a better user experience, make the website easy to use, and other things, as activating this feature offers a number of positives to site users, the most prominent of which are:
1- Speed of movement
All website owners are looking for a way to display as much information as possible to users, and they also want to provide a way for users to navigate and access these pages and information easily.
According to a study conducted by Smashing magazine , using a sticky header menu contributes to increasing site navigation speed by 22%.
2- Save time
If the fixed navigation menu is not used, users will have to return to the top of the page if they want to choose another page to go to, or if they want to click, for example, on one of the social media buttons, site search, or other items displayed at the top of the site.
Thus, visitors will spend a lot of time scrolling to the top of the website to reach one of the items on it, especially if the website pages are long and full of content. Therefore, using the Sticky header feature in this case will save them a lot of time.
3- Advertising your brand
Whether you own a website, store, or blog, you certainly seek to spread and publicize your brand, to remain in the minds of visitors and users permanently.
The best way to do this is to place your logo or brand name in the top menu bar, and then use the “Sticky header” feature for this menu, to keep your brand in front of visitors’ eyes.
4- Increase conversion rates
Including calls to action (CTA) in your sticky header menu can help you increase your conversion rates .
Also, displaying phrases such as (subscription registration, phone number, or shopping carts) in front of users on a permanent basis can help raise conversion rates on your site.
Cons: Fixed head activation
There are no negatives in the sense of major negatives for using this feature, as you can overcome its negatives by relying on a good and thoughtful design. However, it is important to clarify some of the negative points of having a fixed vertical menu, which are:
1- Take up a lot of space
This is the main drawback, as some fixed headers may occupy a large area of the website at the top and obstruct the display of the page content that is located below it, and this may affect the design of sites that rely more on the visual element.
The solution here: is to reduce the space for the fixed list as much as possible.
2- Mobile phone problems
If the static header menu is not created well or the elements in it are not designed in a responsive way (i.e. compatible with all screen sizes), this may cause problems when browsing the site on mobile devices.
The solution here: is to do the design work in a good and correct way, and try displaying the menu on several mobile devices to ensure that it appears optimally.
Tips when creating a sticky header menu
- When creating a fixed header menu, make sure that it is not large or takes up too much screen space. It is best for the height of the fixed section to be between 45-50 pixels. For example, the height of the sticky header on Facebook is about 44 pixels, while it is 48 pixels on Twitter.
- Also, make sure to design the menu or fixed navigation bar in an elegant and simple way so that it does not contain many distracting elements and colors or elements that do not provide any benefit.
- Choose a color for the fixed section that distinguishes it from the rest of the content. Choosing an appropriate background color for the fixed section that is different from the color of the main content of the page will make it more clear and readable and will enable the user to distinguish it from the content of the page on which it is installed.
Now we can move on and talk practically about how to create or activate the sticky header feature on WordPress sites through several methods.
For WordPress website owners, using the sticky header is a common thing today to improve the user experience and facilitate site navigation, and this can be done in two ways.
- Using WordPress plugins.
- Using custom CSS codes.
1. Activate the sticky header through WordPress plugins
There are many plugins in WordPress that enable you to activate this feature on your site in an easy, smooth and suitable way for beginners. You can use the myStickymenu add-on , which helps activate the sticky navigation bar feature, with many additional features.
The myStickymenu add-on comes in two versions, the first is free (contains most of the features you need) and the second is paid (Pro) which contains more options and control.
The myStickymenu add-on provides you with several valuable features that help you add a Sticky header on a custom basis, such as:
- Install navigation bar (fixed header menu)
- Control background color and text color
- Control the type of effect for the bar (Fade or slide effect)
- Disable the fixed bar feature on small screens
- Choose when you want the bar to be visible on hover
- Determine the transition time
- Specify Sticky Opacity
- Welcome Bar feature
Steps to use the myStickymenu add-on
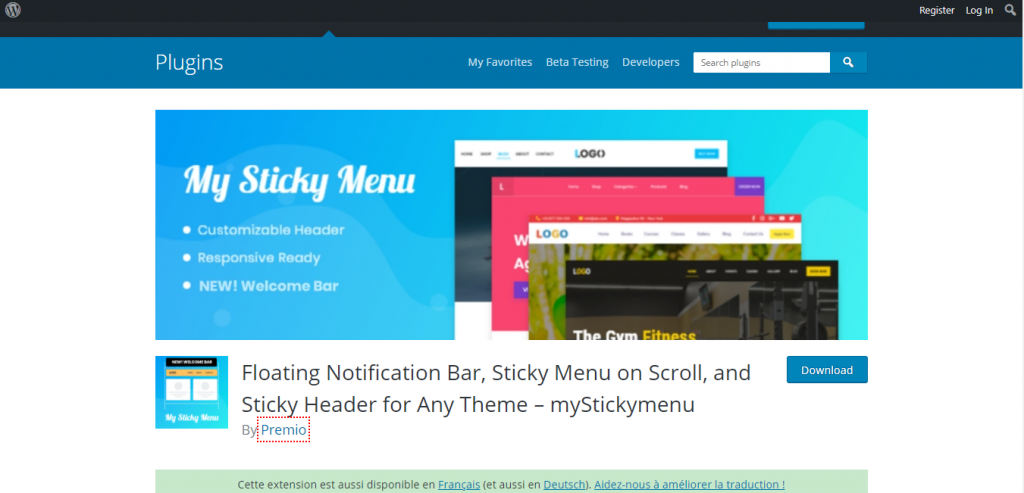
First, you must install the add-on, by going to the WordPress control panel for your site, then going to the Add-ons tab << Add New and writing the name of the add-on in the search box, then clicking the (Install) button.

Then click on the Activate button to activate the add-on on your site.

For more information about installing plugins in WordPress, see our next article.
After activating the add-on, you will notice its name (myStickymenu) appearing in your site’s WordPress control panel, and you can now start controlling your own options.
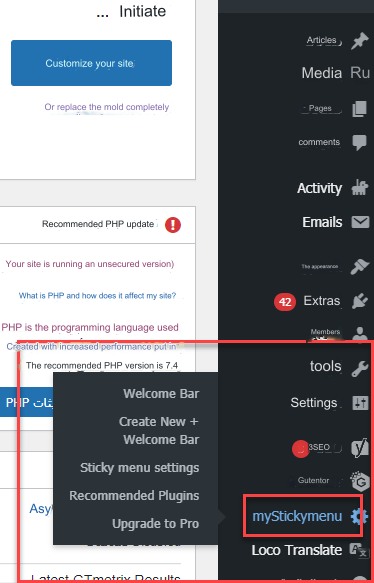
To control the add-on settings, go to the myStickymenu tab , then choose Sticky menu setting from the submenu that appears as shown in the following image.

The add-on settings window will open for you, through which you can activate the Sticky header menu feature and control the properties and features you want.

To activate the Sticky header feature, you must choose the item you want to install by clicking on the Select Sticky Menu drop-down menu and selecting the item we want from it.
We note here, as in the image below, that there are three options:

- My new menu: To install a new menu that was designed on the site.
- Primary (Primary Menu): To install the primary navigation menu on the site.
- Other Class Or ID: If you want to install elements other than menus, to be displayed permanently at the top of the page by specifying (Class or ID) the element you want, such as (logo, image, text, or any element of the page).
After that, you can specify the additional options you want for the fixed header through the Setting section. Below is an explanation of all the options available in the extension:
- Sticky z-index: This property is used if there is an element blocking the view of the sticky head. To give it a z-index value greater than the value of the element blocking it.
- Specify the type of animation effect for the fixed bar (fade or slide effect).
- Disable the fixed bar at small screen sizes.
- Make the bar visible when you start scrolling.
- To make the ribbon visible on the homepage (Make visible on Scroll at homepage).
- To control the strip’s background color (Sticky Background Color).
- Sticky Transition Time control.
- Control the text color (Sticky Text Color).
- Sticky Opacity control.
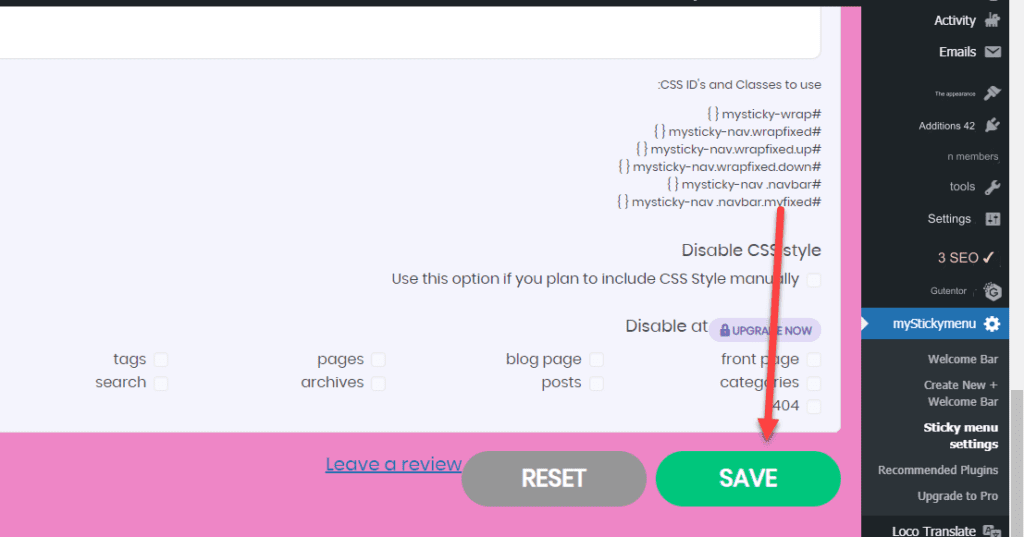
You can control these options and then scroll down, press the Save button , go to the site again, preview the changes, and review how the bar appears on the site.
When you preview the changes, the navigation bar will appear permanently fixed at the top of the page, and when you scroll down it will remain that way, as in the following image
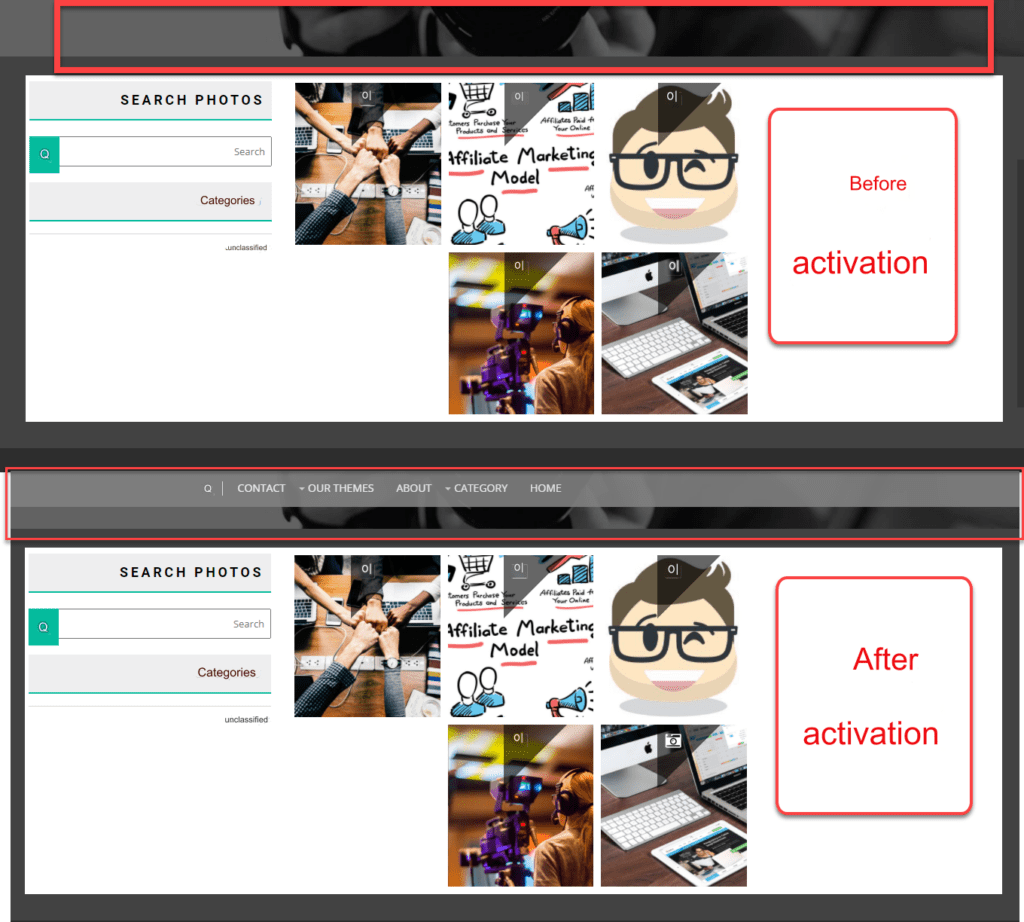
Note: There are some cases, and some WordPress templates, in which the sticky header feature for menus is not activated in this way. So, if your WordPress menu does not become stable after following the previous steps, in this case you must find the appropriate CSS row or identifier for the menu and specify it, as we will explain to you in the next paragraph.
What should I do if the sticky header feature does not work?
If the Sticky header feature does not work for you, you can follow the following steps
1. Go to the home page of your site, place the mouse cursor on your list, and then right-click on Inspect

2.Then you have to get your list ID, which will be highlighted in a light color
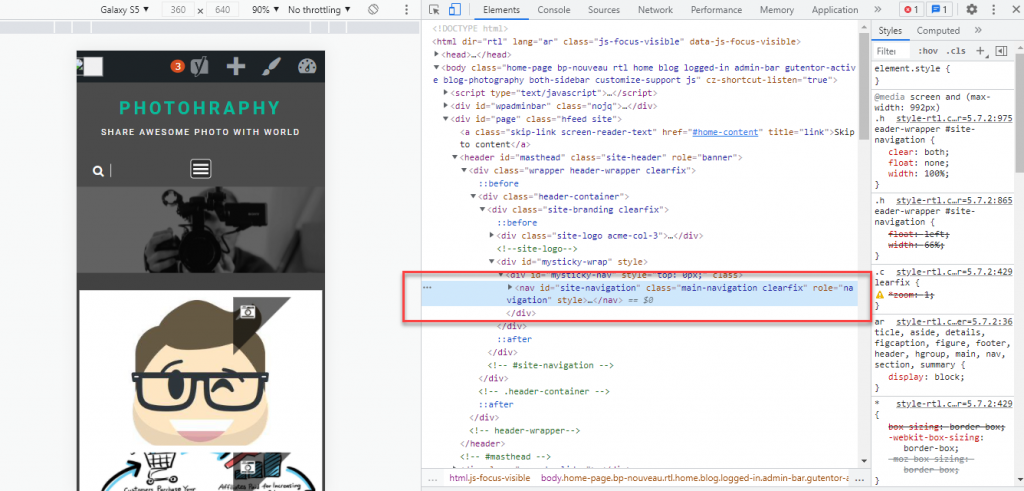
3. You must copy the ID that appears in front of you by double clicking on its location and then copying it as follows.
4. After that, go back to the settings page for the add-on and choose from the drop-down menu (Other Class or ID)
Note : Before you paste the ID in the designated place, write it in the correct form
.#Class_ID
Replace the Class ID with the Class name you obtained

5. After that, you can control the properties you want, then click Save again

6. Go back to the site, preview the changes, and you will notice that the Sticky header menu has been activated.
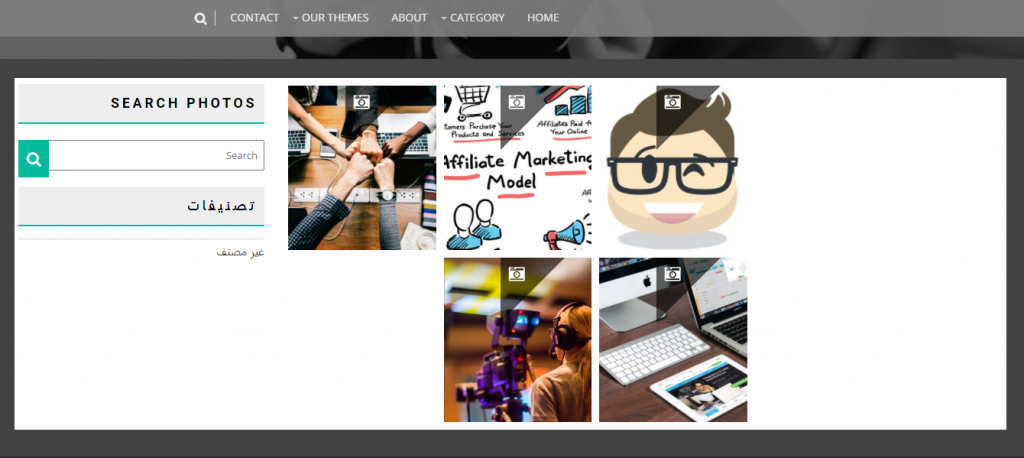
We now move on to talk in detail about the second feature in the myStickymenu add-on, which is the welcome bar feature. Where you can add a special bar at the top of the page with the ability to control it and customize it as you want.
The add-on also comes with a paid version that provides other features such as:
- Disable fixed header menu on desktop or mobile
- Control swipe down and disable
- Add CSS codes to the fixed header menu
- Disable or enable the feature on specific pages on the site
To activate the Welcome Bar, you must go to myStickymenu on the site’s control panel, then choose Sticky menu setting, then go to the Welcome Bar tab that appears at the top of the settings window.
A new window will open, in which you can activate and customize the Welcome bar settings.

Note: If your image appears as above, this will be because the language settings on your site are Arabic, and you must change it to English for it to appear correctly.
We change the language settings on the WordPress site through the WordPress control panel, then go to: Settings <<General <<Site Language Then we change the language to English by scrolling down and clicking Save Changes
After that, go back to the Welcome Bar tab again and you will notice that it has become as follows:
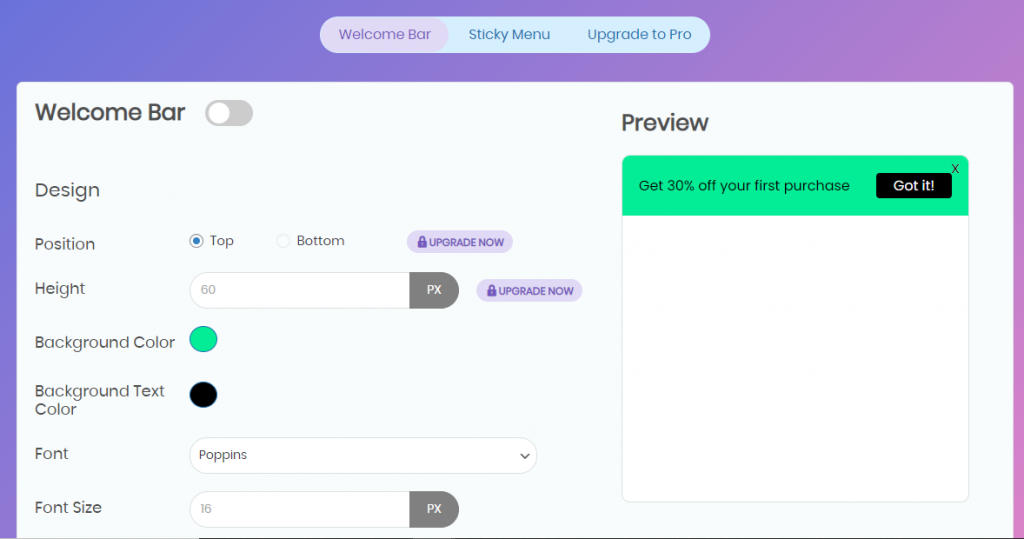
On the left side there are many features that enable you to customize and modify the welcome bar as you want, and on the right you can preview the changes you make.
You first need to activate the feature by clicking on the activation key next to the phrase Welcome Bar, and then start customizing.
You can do many things to customize your welcome message, including:
- Specify the background color
- Specify the text color
- Write the text and welcome phrases you want
- Change font type and size
- Control the button and the text written inside it
- Control the effects or movement of the button appearance and many more
For example, notice in the following image, how we changed the written text as well as the text of the button to show us the welcome bar as follows:
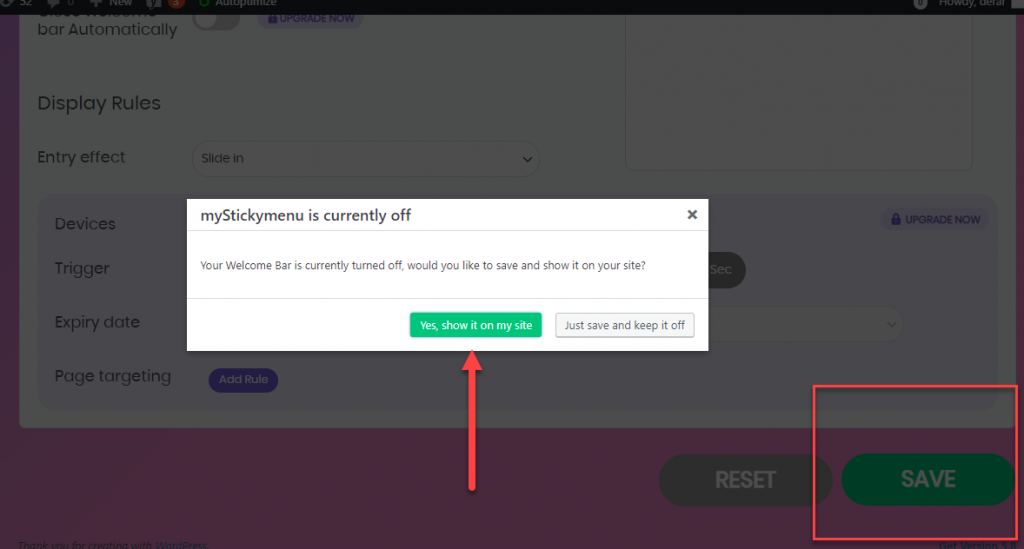
After designing the bar as you want, scroll to the bottom and click ( Save ) .
You will then see a window asking you if you would like to activate the display of the welcome message on the site. Click the button (Yes, show it on my site) to activate.
That’s it. All you have to do now is go to your site to preview the changes, and see the bar you designed installed in your site’s header. In our example, the result will be as follows:
If you do not prefer to work on plugins, and prefer to write the codes yourself, you can also activate the sticky header feature by adding some CSS code by following the following explanation.
2. Activate the sticky header feature through CSS codes
By adding some CSS code to your WordPress site, you can activate the sticky header menu feature with ease and without the need to have significant programming experience.
To do this, you can follow the following steps (the template used in the explanation is the Twenty Twenty template):
1. Go to the WordPress control panel, then go to: Appearance << Customize
2. Choose additional CSS formats . Here you will add CSS codes to activate the (Sticky header) feature.
3. In this step, you will need to access the header properties and add some codes to it in order for the feature to be activated. So place your mouse cursor on the header, press the right mouse button, and choose inspect.

4. Specify the identifier for the header to edit, which in our case will be (“id=”site-header).
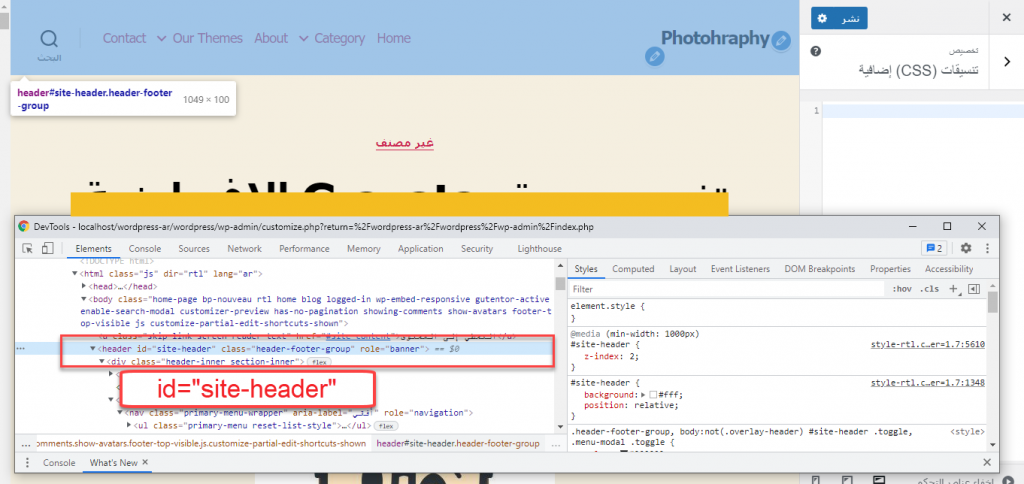
5. Now go back to the Additional CSS formats section on the right and add the following code to it as shown in the following image.
This code gives the header a fixed position at the top of the page and will not move with the rest of the page elements.

6. You will notice that the header has been installed at the top of the page, but you now have a void in the header. You can easily modify it by adding the following properties to it:

- ;top:0 – means that the distance of the header from the top of the page is zero (so that the header is fixed at the top of the page).
- ;Left:0 means that the distance of the header from the left of the page is zero (so that the header is fixed to the left side of the screen).
- ;Right:0 means that the distance of the header to the right of the page is zero (so that the header is fixed to the right side of the screen).
This way, the Sticky header menu feature will be activated properly and can be tried and previewed on the site.
Additional codes, you can add:
If you have some problems with the appearance of the code for some mobile or tablet devices, you can add the following code and control it so that the header appears better.

You can also control the background color of the installed header or its transparency by adding the following code
Conclusion
In today’s article, you learned about the importance of the Sticky Header menu feature and how to activate it on your WordPress site, whether using plugins or by adding custom CSS codes.
Although many sites prefer to do this to improve the user experience and save the user time, there are some sites that have a lot of designs and effects on the site and this is not suitable for them depending on the type of content of your site.


Leave a Reply