You have a website or online store, and users or visitors to this website need to log in to be able to use it, and you have not yet added the ability to log in through social media accounts, then this article will definitely benefit you in recording the registration process on your website with simple clicks.
In fact, including the feature of registering via social media accounts guarantees you many advantages on your site, the first of which is improving the user experience . Some visitors do not have the time or desire to enter the huge amount of information such as name, email, password, etc. to log in to the site, and they prefer quick solutions. And easy to do so.
Also, by enabling user registration through social media accounts, you will work to limit fake registrations because the administrations of social media platforms are keen to document their users’ data, and therefore the user who registers through the social media account often obtains the registration of a real account with correct information about the user.
In this article, we will explain to you how to enable the registration feature through social media accounts using an easy and simple add-on.
Enable user registration via social media accounts
In this article, we will explain to you about adding the Super Socializer, as it allows visitors to your site to log in using social media accounts. Therefore, this add-on fetches the required information from their social media accounts and logs in to the site through them.
This add-on is free, easy to use, and supports the ability to register users through 27 social accounts such as Facebook, Twitter, Google, and LinkedIn. It also offers a group of other features, including including comments and posts on the site’s pages, thus providing integrated solutions to improve the user experience and enhance the sharing of private content. With you.
You will do this in easy steps as follows:
- Install and activate the Super Socializer add-on.
- Enable the Social login feature, which enables you to register users through social media accounts (we will give an example in this article on the Facebook platform so that users can log in to your site through their Facebook accounts).
- Linking your site to the social media network. As we said, we will give an example by creating a Facebook App for the site.
- Customize the Facebook login form.
Follow the following paragraphs that explain each of these steps in detail.
1. Install the Super Socializer add-on
We will first install the Supre Socializer plugin by going to your website’s WordPress control panel, then clicking on Add-ons << Add New

Type the name of the Super Socializer add-on in the search field on the left side of the screen. After the add-on appears in the search results, click on the Install Now button next to it, then activate it.

For more information, read: How to install and activate a WordPress plugin on your site
2. Enable Social login option
After installing the plugin, you will notice that a tab called Super Socializer appears in the WordPress control panel. Click on the name, then click on Social Login in the submenu that appears, as shown in the following figure.

Then you will need to select the Enable Social Login option at the top right of the window that appears in front of you, then choose the desired social network. In this example, we will select (Facebook) as shown in the following image.

In this article, we will enable user registration through the Facebook account, and all its steps apply to the rest of the social media platforms.
Note : In order to be able to register users on your sites through Facebook accounts, it is preferable for your site to have an SSL certificate to enable the HTTPS protocol, which provides more security for your site and encrypts users’ communications.
3. Link your site to the communication platform
To enable users to register through their Facebook account, you must create a Facebook App and obtain and link the following contact information to it.
- Facebook App ID
- Facebook App Secret
After you select the Facebook option in the previous window, scroll down and you will find a set of contact data fields that must be filled out.
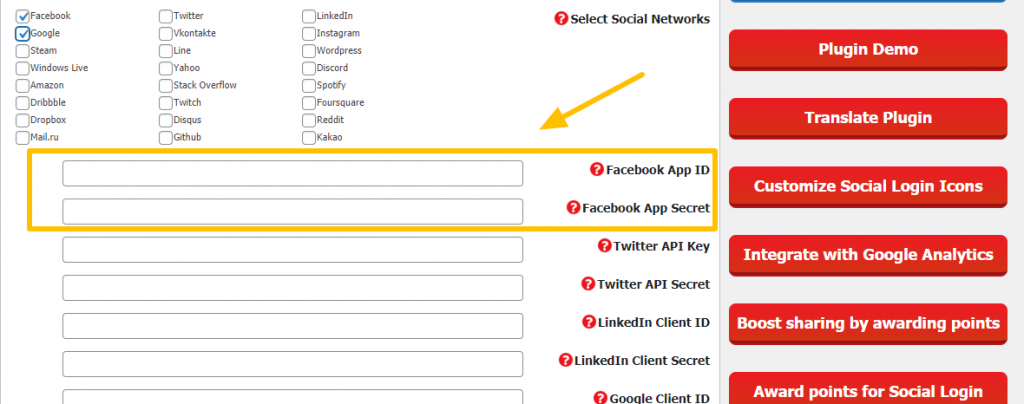
The required data is as you see in the previous image (Facebook App ID and Facebook App Secret). This data is obtained through the Facebook website for developers by following the following steps:
- Go to FACEBOOK For Developers
- Log in to the site through your Facebook account, and follow the steps that appear on the screen
- After that, click on Get started in the upper right corner as shown in the following image

Click on the Create Application button.

Select the “ User ” application type, and click the Continue button at the bottom.
Now, you have to enter the following information to register the application which in this case is your website as follows:

- Application name : You can choose any name, but it is preferable that it be related to the site. For example, we will write “wpr login”
- Your E-mail
- Then determine whether you have a Facebook business manager account or not. This option is optional and you can skip it.
- After completing entering the necessary data, click on the Create Application button.
At this stage, you will be asked to enter the password for your Facebook account. Enter it and click Submit . After that, a window will appear consisting of a group of options. Go to the Facebook login option and click Setup.

In this window you will find a set of options, the first is for linking iOS applications and the second for Android applications, but you will definitely select here the third option, which is the WWW web, as we want to enable user registration on a website.
Immediately after that, include your website link ( URL ), taking care not to include / at the end of the link. Click on the Save button, then go to the right menu of the screen and click on Settings, then Basic.
The Facebook login form settings window will appear. This window contains a set of fields that you must fill out. There are some fields that you can ignore, but there are some mandatory fields such as the namespace, the link to the privacy policy page , and the link to delete user data. Below is an explanation of the meaning of all the fields in this window.
- Application ID : The ID that appears in this field is the application ID that you are required to copy and paste into the Facebook App ID field in the Super Socializer plugin settings in the WordPress control panel.
- Application Secret Key: You must also copy this key and include it in the Facebook App Secret field of the Super Socializer plugin.
- Display Name : You can put any relevant name here.
- Namespace : Here you must add a name consisting only of lowercase letters and dashes.
- Privacy Policy URL : Here you should include the link to the privacy page of your site. If your site does not have a privacy policy page, you can learn how to create this page from the following article: How to create a privacy policy page on your site
- Terms of Service URL : Here you must include the link to the Terms of Use page if available.
- Delete user data : Hehttps://www.wordpress-1409476-5242918.cloudwaysapps.com/creating-privacy-policy-page/re you must add a link to a page in which you explain and guide users on how to remove their data from the site, for example by sending a message to your email or another contact option. It is one of the necessary fields for Facebook, and if you do not comply with the regulations, the Facebook registration form may be disabled. If you want more information, go to this link .
- Application icon : You can add an application icon within the application settings window in Facebook Developers, in order to facilitate access to this application if you have many applications.
- Once finished, click Save Changes.
Then you must publish the application so that users can access it, by switching the application mode option to ( publish )
After completing all the application settings in Facebook Developers, go back to the plugin settings in the WordPress control panel and select the Facebook option, enter the application ID ( Facebook App ID ) and the application secret key ( Facebook App Secret ) and then click on the Save Changes button . .
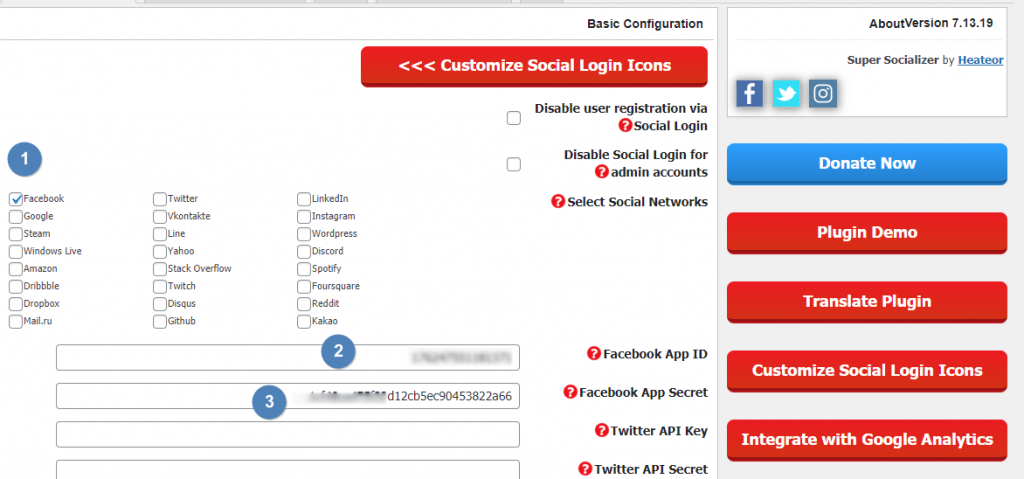
You will notice that a notification has appeared at the top of the extension settings window, indicating that the link for the extension has been copied and attached to the Valid OAuth redirect URIs field within the Facebook developer settings. You must copy this indicated link as shown in the following image.
Then go back to the application settings window in Facebook developers, then click on Facebook login and then choose settings.
Then paste the link into its designated field (valid OAuth redirect URIs) as shown in the following image, and save the changes.
Thus, you have completed the process of linking your website to the Facebook application, and you will find that the option to log in through your Facebook account has been added to your website.
Now, if you go to the site’s login form, or to the new user registration page, or to the site’s comments page, you will see the registration icon through the Facebook account appear as shown in the following image:
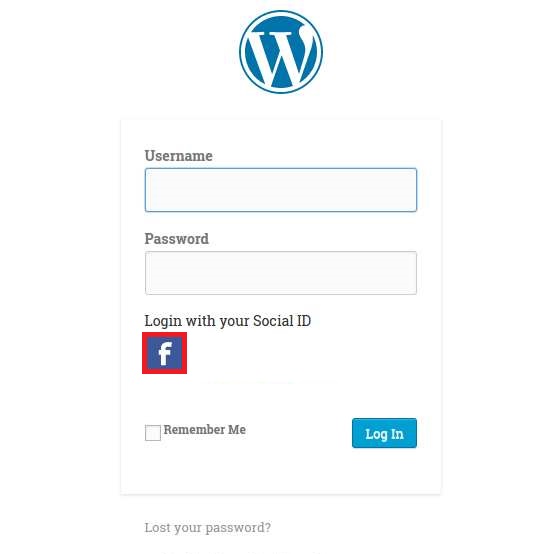
Note : You can customize the pages on which registration icons appear through social media accounts, as well as customize the way they appear on the site as needed, as shown in the following paragraph.
4. Customize the login form
After enabling user registration through a Facebook account, you can customize the login form, such as changing its address and the places in which it is included, in addition to many options that you will learn about now:
By clicking on the Advanced Configuration tab of the extension, you will find a set of options to customize the login form, which are:
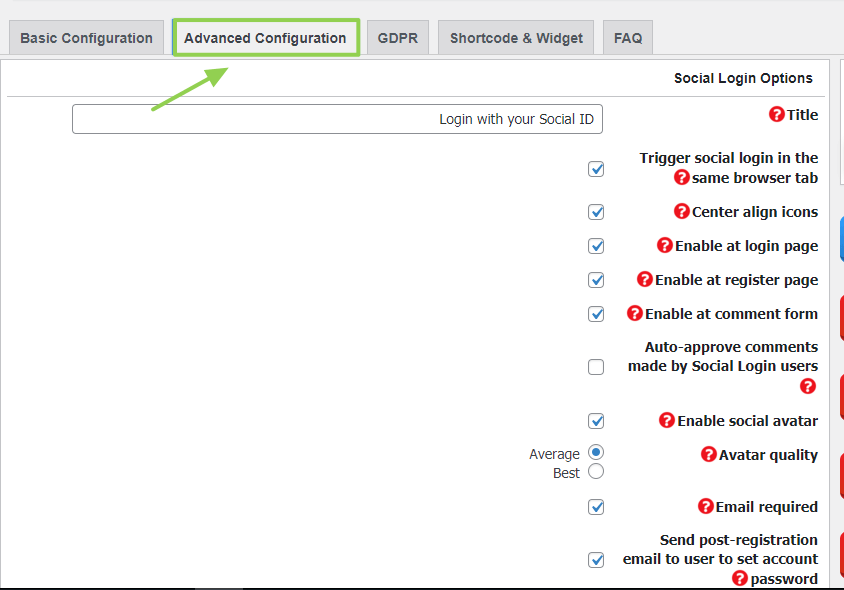
- Title : It is the title that appears above the social media icons, and it looks like the following:
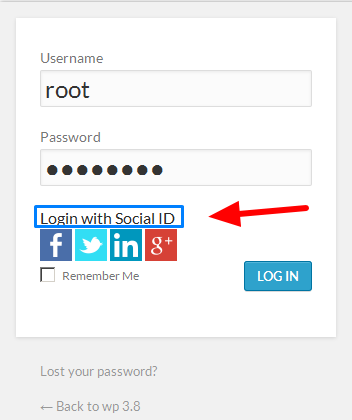
- Trigger social login in the same browser tab : Determine whether you want to show the login form in a new window, or in the same browser tab.
- Center align icons: To place social media icons in the center of the login form.
- Enable at login page : By selecting this option, the login form will be added to the login page of the site’s control panel on WordPress.
- Enable at register page : To enable the login form on the login page on the site.
- Enable at comment form : Add a login form to the comments field on the site.
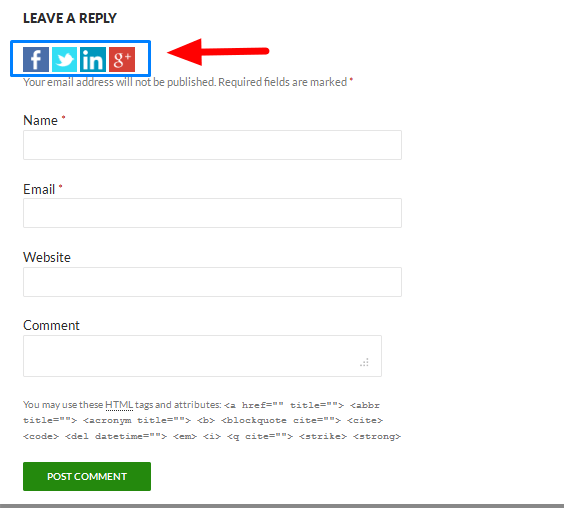
- Auto-approve comments made by Social Login : By enabling this option, comments added through social media accounts will be automatically approved.
- Enable social avatar : When you enable this option, you will be able to use the user’s profile picture as his profile picture on the site.
- Avatar quality : To determine the quality of the profile picture.
- Send post-registration email : To send a message to the user’s email after login, containing login information to use the traditional login form.

- Send new user registration notification to admin : By enabling this option, a notification will be sent to the site admin’s email every time a user registers on the site.
- Login redirection : To redirect users after entering the site. There are four redirection options:
- Put the user on the same page where he logged in.
- Direct it to the home page.
- Direct him to his account.
- Use a special url to locate the page.
- Registration redirectionClick to toggle help : To direct users after registering on the site, and the add-on gives you the same options available in the Login redirection option.
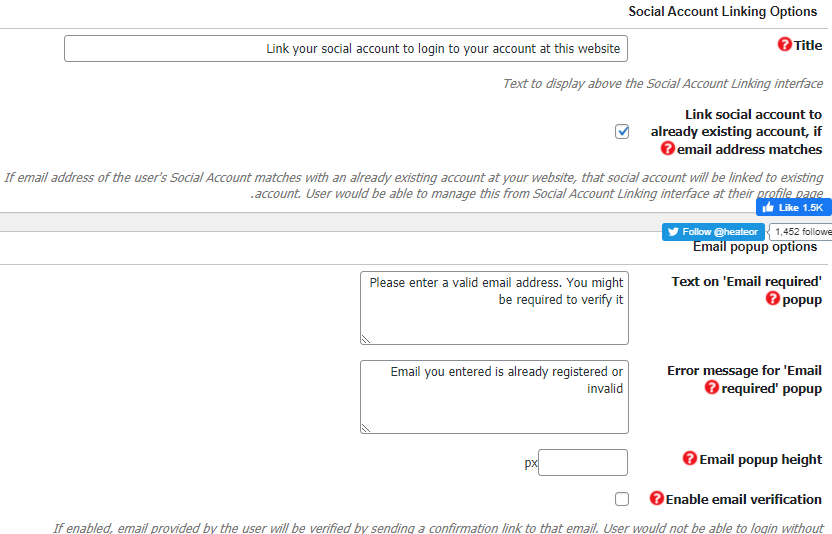
- Social Account Linking option : This option allows you to specify the message that appears at the top of the login window through the Title option, which looks like this:
- Link social account to already existing account : Through this option, the current account will be linked with the user’s social media account if there is a match.
- Text on Email required : To customize the message that appears to users when an email is not entered.
- Error message for ‘Email : To customize the message that appears when you enter an invalid or previously registered email.
- Email popup height : To specify the dimensions of a registration form. It can be left blank for the default setting.
- Enable email verification : To enable the email verification feature, send a message to the user’s email.
Conclusion
By reaching the end of this article, you will have learned how to register users on your site through the most famous social media platform, Facebook, using the Super Socializer add-on.
It is possible to use the same steps to enable user registration through other social media platforms such as Instagram, Amazon, Twitter, and LinkedIn, but each platform has its own steps regarding linking it to the addition. After enabling the login form, you can customize it as you wish using the options provided by the Super Socializer plugin or other plugins that perform the same function


Leave a Reply