you think that blogging and writing in our current era is enough to satisfy your site followers’ passion for content; So think again.
We now live in an era in which content has many forms: text, images, audio, and video. Therefore, relying on text only will make you lose a large portion of followers who prefer other types of content. After we presented to you our article on how to embed videos in WordPress sites , we continue with you today in the same context to explain the mechanism of including audio files also in WordPress sites.
Users’ desire to listen rather than read
Audio content is one of the most rapidly increasing types of content on the Internet in the world. According to a study conducted by the Semrush website , it showed that people have already spent 15 billion hours listening to podcasts (a form of audio content) from the beginning of 2021 until now alone.
To further imagine the growth, you can just know that two years ago the number of listening hours was 12 billion hours. We conclude from this that there is a huge demand and a strong growing demand by users for audio content in all its forms.
This significant growth in demand did not come out of nowhere; Audio content has the ability to reach people in a way that other types of content cannot. The types of content, such as texts, images, and videos, all require the user’s concentration to read, watch, and comprehend them, unlike audio content, which can be received at any time and in any place while doing any other work.
Through audio content, the user can listen while walking, working, exercising, or even studying. Audio content has the advantage of integrating with any task easily, and this is exactly what your loyal followers are looking for so that they follow you constantly, even when they are busy.
Including audio files in WordPress sites will go beyond just being a tool that can be used to increase followers, to a necessity that must be present in the following cases:
- If the site specializes in radio broadcasting and online radio that is essentially based entirely on audio only.
- Sites linked to educational and teaching institutions and figures, which can present content in audio form to students and followers.
- News sites or blogs that conduct interviews and dialogues with individuals on any topic
- Podcast sites that rely entirely on podcasts and live audio broadcasts to discuss various fields.
You may be interested in: How to add voice search to your WordPress site
Supported audio file types in WordPress
Previously, playing audio files via websites was done using the Flash player, which was abandoned because it was full of security vulnerabilities. Today, HTML5 has been released instead of Flash in playing audio files more efficiently, making it the technology adopted so far in WordPress.
Adopting the HTML5 version in browsers to include audio content had another positive advantage, which was supporting work across all types of browsers and devices, including smartphones as well.

As for the types of audio files that can be included in the WordPress content system, they are: mp3, ogg, wma, m4a, wav. However, we recommend trying to rely on the mp3 type when working in audio blogging because of the balance that this type offers between small file size and good quality, as well as its support in most browsers.
Add audio files to WordPress sites
Now that it has become clear what features you will get from attaching audio files to your site, you now need to select the article or page in which you want to include audio content, and then follow one of the following methods to do so:
1- Direct upload to the site
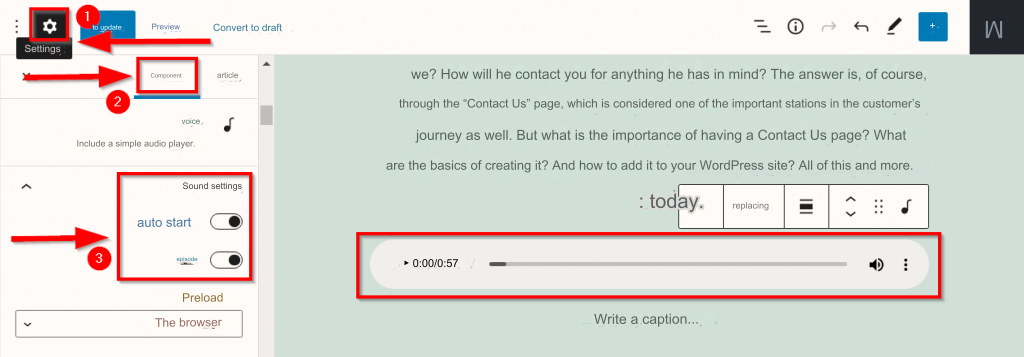
WordPress allows audio files to be embedded via direct upload from the local device. Just click on the + button to add a component, and type the word “ sound ” in the search and the “ sound ” component will appear; Click on it to add it.

Then click the “ Upload ” button, and choose the audio file you want to include on your site.

Let us notice that the audio file appears within the article as simple as this. When selecting the audio file and then clicking on the “Settings” icon, and then heading to the “Component” section, we notice that there are two options within the “Audio Settings” menu:
- “ Autoplay ” option, which allows the audio file to play automatically when the page loads.
- “ Loop ” option, which allows the audio file to be automatically restarted after it ends.

2- Share audio files uploaded to other sites
There are many sites that provide services for uploading audio files, hosting audio broadcasts, and everything related to audio blogging, and anyone can include any audio file uploaded on one of the sites that support this within any article or page on the WordPress site.
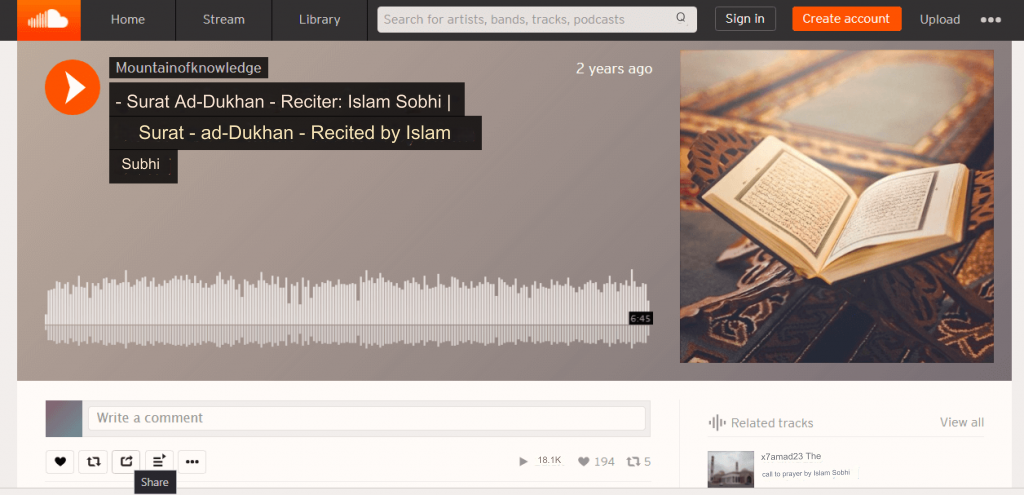
Among the most popular sites on which WordPress supports embedding of uploaded audio files are: Spotify , SoundCloud , and Mixcloud . Let’s try including an audio file from SoundCloud in an article on our website to understand more how to do this:
Choose the audio file from SoundCloud that you want to embed on your site. Then click on the “Share” button.

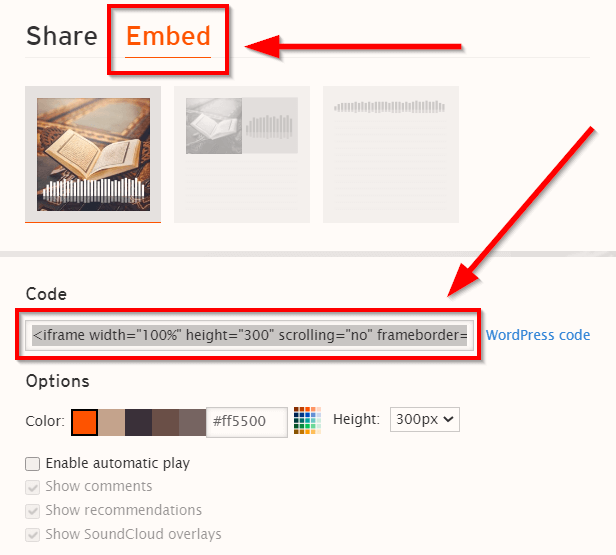
A window will open containing two basic options: “ Share ” and “ Embed ,” both of which do the job perfectly.
A- Share
In the sharing window containing the link to the selected audio file, we notice to the right of the link that there is an option to specify the start time of playing the audio file if necessary.
For example, if we set the start time as 1:27, the audio file will start playing from the beginning of the chosen time. Now we copy the link to the audio file.

After copying the link, go to the page or article where you want to include the audio file, then choose the place on the page where you want to include the file, and paste the link.
You will notice that the component editor on your WordPress site will automatically embed the audio file without requiring any further step. This method of pasting the audio file link on the site is known as using oEmbed.

B- Embed
Through this window, you can also embed the video on your site in another way known as iFrame code. This method allows for further customization of video embed options on your site.
For example, the SoundCloud website allows you to specify the way the audio file is displayed on your site, choose the color of the embed window to match the colors of your site, and specify its height to match the design of your site pages, in addition to the possibility of activating the option to auto-play the video when the page loads.

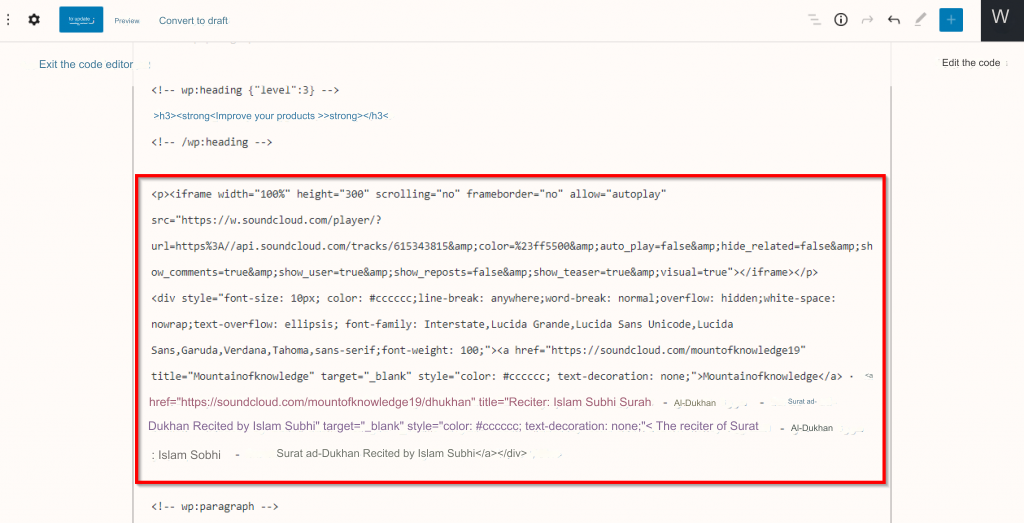
After selecting the embed options you want, you must copy the iFrame code and return to the page or article where you want to embed the audio file. Then you must go to “code editor” mode by pressing the “ Options ” button.

Now choose the part of the article where you want to embed the audio file and paste the iFrame code.

Now go back to “Visual Editor” mode by clicking “Options” again, and you will see the audio file appear exactly in the part where you pasted the iFrame code.
The same steps are used in audio content platforms
The oEmbed protocol and iFrame code apply in their implementation and outline to all audio file upload sites. All of these sites allow sharing files on their servers using exactly the same steps.
3- Use custom plugins
Website owners often resort to this method when their sites are based entirely on providing audio content to users. Then the owners of these types of sites will certainly want to have more advanced options and designs related to presenting audio content and displaying it in a more professional manner to visitors.
Even if your site does not specialize in audio content but you want to include audio files in a more effective way, plugins give you broader options, including:
- Sync your uploaded audio files directly to sites like Spotify, Apple Podcasts, Stitcher, TuneIn, and Google Podcasts.
- An advanced audio player with more advanced options such as speeding up and slowing down the sound, and with various modern designs, with the ability to show all the information of the audio file such as the name of its creator, recording date, etc.
- Create playlists that contain several audio files related to each other to make them easier to listen to.
- Integration with e-commerce sites (WooCommerce) if you want to sell audio files (such as selling educational lessons, for example).

Among the most popular plugins that provide additional support for the audio content on your site are: PowerPress , AudioIgniter , and Audio Album . If you want help installing the plugin on your site, you can see our article on how to install a WordPress plugin and activate it on your site correctly . The most popular templates that you can install on your site to make it fully audio-themed are: Tusant , Music , and Oscillator . To install any template on your site, you can read our article on how to install a WordPress template correctly .
In the end, no one is aware of the importance of audio content and the speed of its spread among users on the Internet day after day, and it has become one of the influential ways in which users interact with the content of your site. Therefore, we advise you to apply the steps of this article, and start relying more on audio blogging in order to provide a new experience for your site visitors.


Leave a Reply