One of the big problems facing restaurant owners is obtaining an interactive menu, which enables customers to view all the foods and drinks available in the restaurant in an easy way.
Some may add the menu to a PDF document, but this method is not practical, as not all customers are able to download it, in addition to concerns about their privacy. Therefore, the best option in this case is to create a menu for your restaurant on WordPress, and through this article we will learn how to do that.
Why do you need to create a menu on WordPress?
Certainly, this matter has many positive aspects, which serve website owners and increase their sales and visitors to their restaurant, as it works to:
- Improving sales: With the Corona pandemic, barriers and regulations preventing gatherings have increased. Which means there will be a lack of sales in general. But by creating a menu on WordPress, people will be able to browse the menu and then order the meals they want from their home.
- More interactive: Yes, there are many options for creating a menu. It can be in a PDF file as I mentioned previously, a paper menu or in the form of a graphic design. However, it will lack the interactive element. Through the menu created by WordPress, you will be able to modify the prices or pictures of the available products or items at any time.
- Reaching new customers: The digital menu allows you to gain more customers and expand your market. This is due to the ease of sharing menu links among people who have a desire to obtain certain foods. These links are also characterized by a permanent presence on the Internet, whether linked to your website or published on social media platforms.
- Ensuring the menu is compatible with mobile phones : As we know that other methods of creating menus may not be distinguished in terms of compatibility with phones, you will find that customers zoom in and out of the menu in order to read the menu and get to know the available items better. But by creating a menu for your restaurant on WordPress, you will ensure that it is compatible with phones and other screen sizes.
How to create a menu for your restaurant on WordPress
If you are determined to design a menu for your restaurant on WordPress, then through the following lines we will learn how to do that. It is worth noting that the method is easy and will not require you to enter any programming code. We will simply use one of the plugins for creating pages. It is SeedProd.
Before starting that, you will certainly need to provide some basic requirements, in order to be able to create a menu, which is to have an existing WordPress website, as we explained previously in: Guide to creating a WordPress website , and also as we explained in how to create a website for your own restaurant and provide a selling service. Food and delivery to customers .
Create a food menu using the SeedProd add-on
The SeedProd add-on is a paid integrated website builder, but it offers you a free version that enables you to create a professional menu. It comes with many customization options to display items the way you see fit. In addition to being easy to use, it works with most WordPress templates for restaurants.
To start using the plugin, you will have to go to the WordPress control panel and click on Plugins > Add New and enter the name of the plugin “SeedProd” in the search box that you find on the upper right side of the screen.
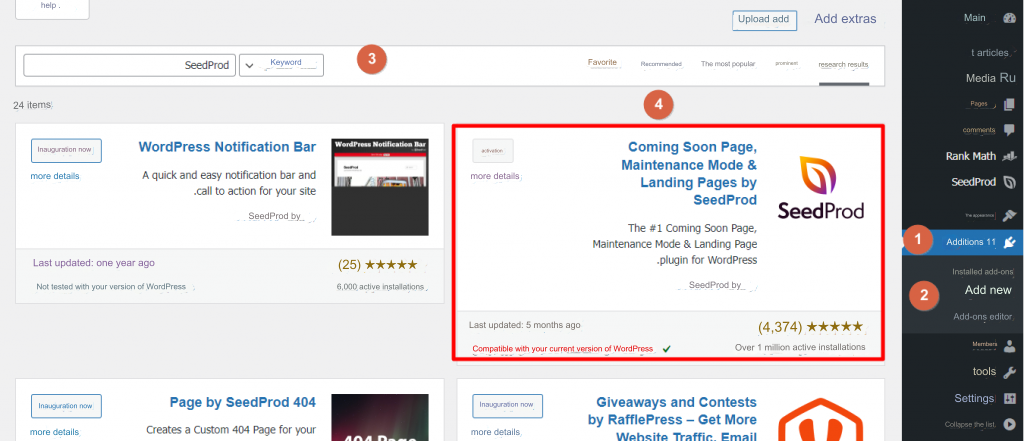
Now, the add-on will appear as an icon on the right menu of the site’s control panel named SeedProd. Select it and then click on the pages option . Then scroll down to click on the Add New Landing Page option to start creating a menu for your restaurant on WordPress.

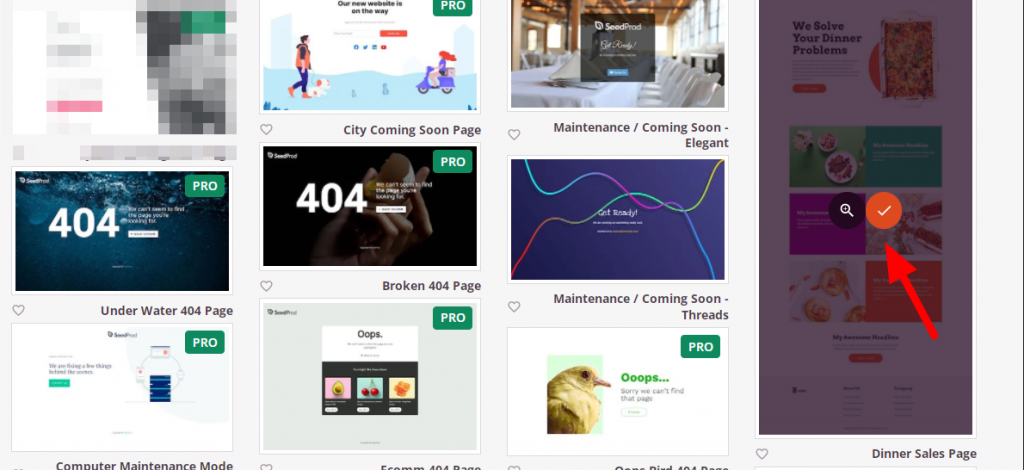
You will find that there are many templates, some of which are available in the free version of the add-on and others that are available in a paid form only, which are the ones with a green “ PRO” icon on them . Fortunately, there is a free template dedicated to creating food menus, which is Dinner Sales Page . Select it and click on the right icon.
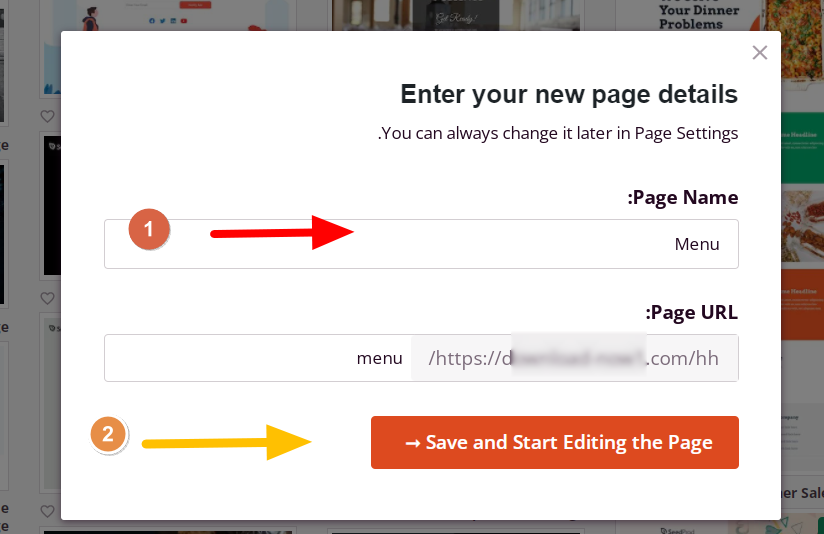
In the next window, you must enter the name of the menu, which will be added to the menu link later. In this case, it will be advisable to add the name “ Menu ” and click on the save icon below so that we can then begin customizing the menu.
Customize your WordPress menu by adding SeedProd
Now, we are in the step concerned with customizing the ready-made template that we have obtained. It certainly does not contain the products that you want to display, nor does it even contain the brands or links that point to your site or something similar. We will go through three stages:
- Edit the logo.
- Editing the menu title.
- Add items to the menu.
- Customize the menu footer.
Now, let’s start customizing it:
Edit the logo
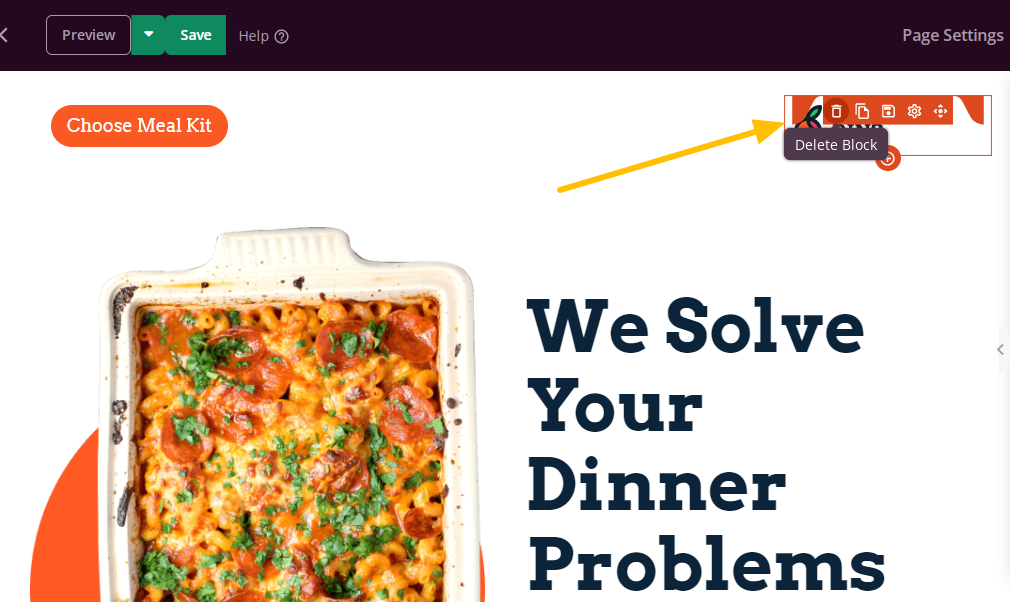
The first thing you will notice in the menu is that it does not contain the logo of your website or restaurant, as I mentioned previously, and from here you can remove this logo and add your own logo.
Select it, and then remove it by clicking on the trash icon.
On the right menu, drag the “Image” component to place it in the place of the top logo.
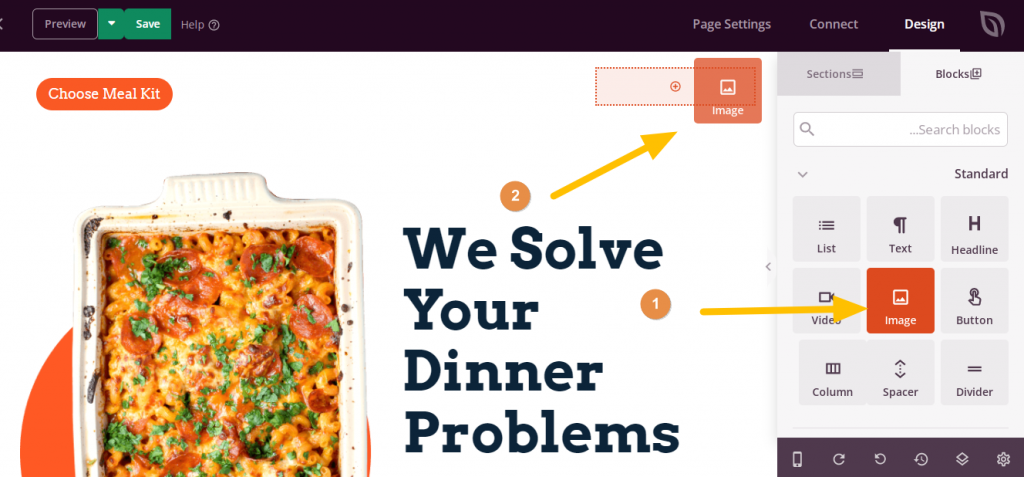
Next, click on the logo location at the top, so you can add your own logo. Then select use your own image .
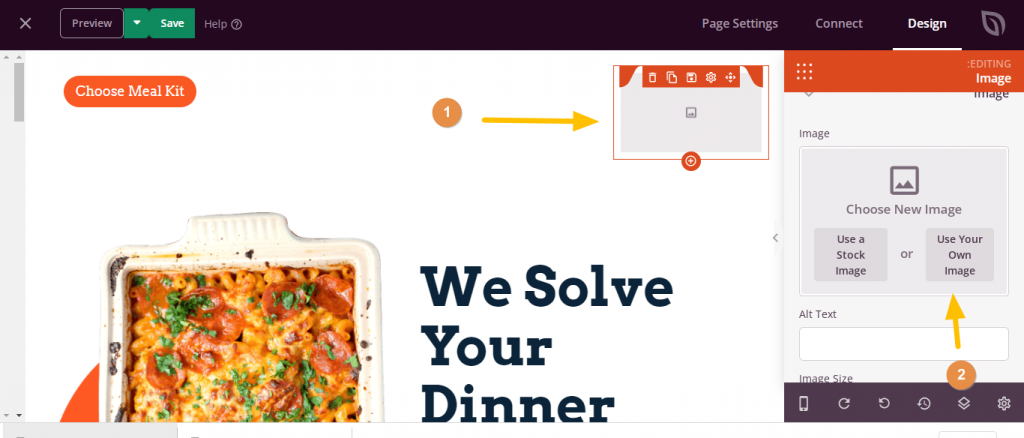
Choose the logo you want, and after that, you will find a set of options related to customizing it as well, where you can modify its size and also add a link to it so that when you click on it, it leads to this link.
Editing the menu title
As you can see there’s a little heading on the left side of the menu. Which contains the phrase “ Choose Meal Kit ” and you can modify it with ease. Click on it, and then on the right menu you will find customization options related to changing the text, its size and color, as well as the distance between the phrase and the top of the menu and the shape of the icon itself.
Add items to the menu
In this step, you will add your foods to the menu. It is worth noting that the template comes with pre-defined texts and images to show you the appropriate place for each content type separately. To add products, you must first prepare the product names, descriptions, and pictures, and then you must:
Select the image of the first product by clicking on it with the mouse button, and then go to the right menu to show you the customization options. All you have to do is click on the Replace Image icon.
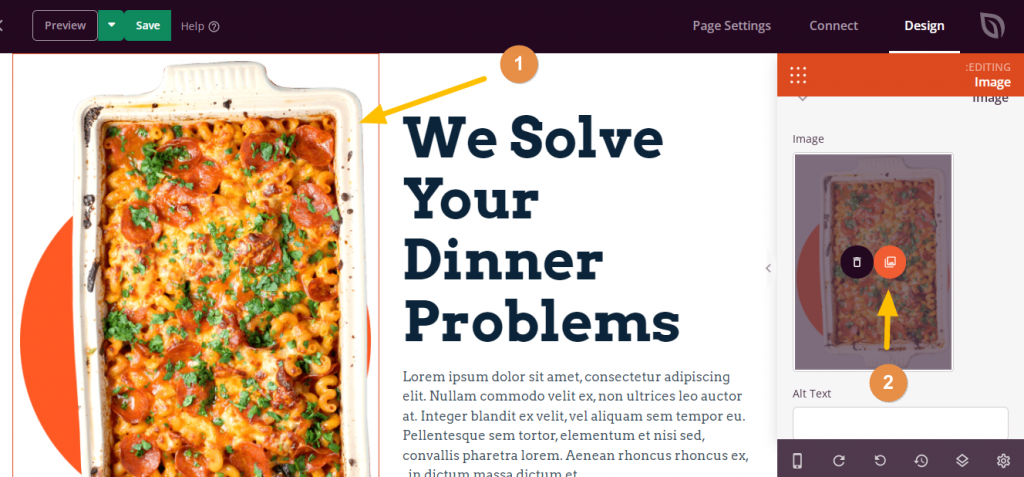
Now, you have to select the item image from the WordPress media library or upload it from your computer.
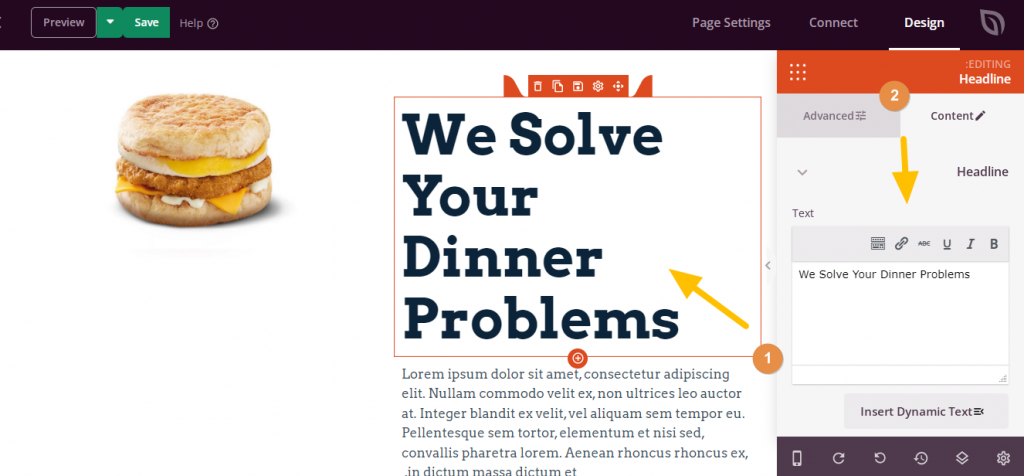
After adding the photo, you will have to write the name of the item and its description. This is done through exactly the same steps mentioned above. Then you must repeat all these steps with each item you want to add to the menu.
Customize the menu footer
After adding all the foods, you will be left with the footer or the bottom part, and you can customize it as you want, add the restaurant’s logo, and also place the order link or anything else you want.
For example, in this article, I created an “Order Now” button that directs the user to the restaurant’s website, or to another window to complete the ordering process. It is also possible to put a WhatsApp link or phone number if the restaurant is not processing payments on its website.
Thus, you have been able to create a menu for your restaurant on WordPress. All you have to do is click on the publish option above to publish it. It will be added to the Pages section of your WordPress dashboard.
Its form will be as follows:
Conclusion
Now, you have learned how to create a menu for your restaurant on WordPress, and you can customize it at any time you want and add the content you want. It is worth noting that there are other additions that enable you to do this, such as adding the Food Menu or Five Star Restaurant Menu. What do you think of reading the article on creating a website for your own restaurant and providing food selling and delivery services to customers ?


Leave a Reply