Changing the WordPress domain is considered one of the rare procedures that a website owner may resort to, and one must be careful about doing this procedure and take all necessary safety measures and precautions so that the process can be completed safely and without problems.
In this article, we provide all the information that you must do during the process of changing the domain of your WordPress site while maintaining SEO settings and working to reduce the negative impact on search results to the lowest possible percentage.
Why does the website owner resort to changing the domain?
There are many reasons that prompt the website owner to change the domain, and the following are the most prominent cases in which the website owner changes the domain:
- Choosing a new name for the business: Many website owners that represent online businesses change the name of the business in some cases, especially if there is a new partnership or a new manager within the business.
- Choosing a different domain extension : Some website owners change the domain to a new domain that is more relevant to the site’s activity, for example changing from the .com extension. To the extension org. And vice versa…
- Choosing a highly relevant domain: After a period of launching the website online, the website owner may find a domain name that is more relevant than the current domain, which prompts him to change the old domain.
- Applying penalties to the old domain: Penalties may be applied by search engines to the domain name due to violating some policies, whether intentionally or not. In this case, changing the domain is one of the options that the site owner resorts to.
Whatever the reason that prompts you now to change the WordPress domain, we will explain to you all the practical steps to change the domain in a safe way while maintaining the SEO settings and setting the site administrator tools correctly.
We will divide the article into three main parts in order to organize the explanation and make it easy to move from one part to another. If you have any additional questions after completing the article, share them with us in a comment below the article.
Note: If changing the domain is not necessary, we do not recommend this procedure just because you want to change the domain, especially if your site appears strong and stable in search engines.
Procedures that must be taken before changing the domain
Here are some procedures that we advise you to take before changing the domain in order to make it happen with a high degree of security.
Take a backup of WordPress
Before starting the procedure to change the current domain for your WordPress site, we advise you to make a complete backup of the site’s files as well as its databases, as the process of changing the domain is considered sensitive and may result in the site crashing or losing some data.
As we explained in: Explanation of making a backup copy of a WordPress site , make the backup copy and save the copy in a safe place, in order to restore it again in the event of any sudden or unexpected malfunction.
Check the composition of permalinks

The structure of permanent links is what determines the form and appearance of links to pages, articles, and files of the site in general, so one of the useful things when changing a domain is to maintain the structure of permanent links that you used in the old domain.
Maintaining the structure of permanent links in the new domain makes the site’s page links take the same form as before with the old domain.
So, go to the WordPress control panel, then go to: Settings > Permanent Links . And see what the current structure of permanent links looks like on your site, because we will set the same structure after changing the domain.
Steps to change the domain correctly
After you take a backup copy of the site in case of any unexpected malfunction, you can directly begin the process of changing the old domain to a new one, as we will explain in the following lines.
1. Maintaining ownership of the old domain
One of the very useful things when changing a domain is not to give up ownership of the old one, as this domain was spreading across Internet sites and bringing you many visits that may reach very large numbers if the site enjoys high fame.
Perhaps you do not want this domain to appear again on your new website links, but what if this was an old domain that you published on social media sites and it began to bring you a lot of continuous visits! Are you prepared to lose those visits?
Therefore, if you want to preserve the visits that come to you through the old domain, do not give up ownership of it because you will use it to redirect it to the new domain, so that anyone who clicks on the old domain will be directed directly to the new domain, and in order for this to be done correctly, you must You are also the owner of the old domain.
2. Purchasing and preparing the new domain and linking it to WordPress
The first step is to purchase the new domain that you want to replace with the old one. You can certainly purchase the domain from the same hosting company on which your site is currently located, or you can purchase it from another company.
Note that if the domain is located on a company other than the company hosting your current website, you must first confirm that the domain is linked to the hosting by adding the nameservers data for the hosting with the domain host:

Then, after linking the domain to the hosting well, you can now go to the Cpanel hosting control panel for your site, then enter the Addon domains tool:

The page for adding a new domain will open for you within the hosting control panel, which will ask you for the following data:

Type the new domain name, such as NewDomain.com
Then name the subdomain name. (routine write any word inside)
Then, in the last box, you write the name of the folder you want to create inside the file manager so that there is a file for the new domain inside the hosting file manager with the name you choose, for example (newdomain).
Now the new domain has been added, you can go to the file manager within the hosting control panel:

Within the file manager, you will notice that a new folder appears with the name you wrote on the add new domain data page, which in this case is (newdomain):
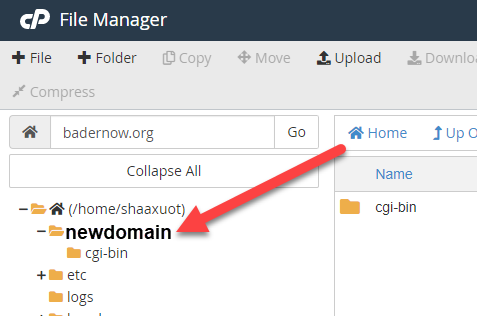
Now you can access the folder for the new domain within the hosting file manager and completely upload the backup copy of WordPress inside it.
After confirming that the complete backup has been uploaded, log in to the WordPress control panel through the following link:
newdomain.com/wp-admin
Replace newdomain.com with the link to your new domain.
Then change the website link through Settings << General

Replace the links in red in the image with the link to your new site, so that WordPress is fully configured on the new link to which the site was moved.
Note : If you access the WordPress control panel and notice that the links are not editable and appear greyed out, you can easily solve the problem by accessing the wp-config.php file from within the WordPress file manager on the new domain folder and adding the following codes inside it:
Taking into account replacing newdomian.com with the new domain name.
Then, after successfully pasting the code into the file, save and close the file, and return to the WordPress control panel to find that the links have become editable without problems.
The last step to ensure that the linking process was completed completely and correctly, is by logging into the hosting database manager:
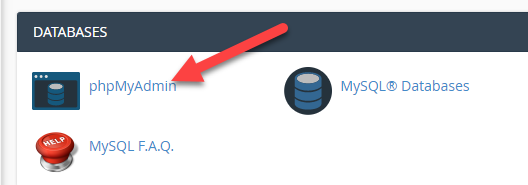
A page containing the databases available on the hosting will open in front of you. Click on the WordPress database to open another page containing WordPress data tables, including a table called wp-options:

As you noticed, inside the wp-options table, you will find a box titled Siteurl, and next to it is a link to the old domain. Click on Edit, type the name of the new domain, and save the changes.
Thus, you have completed the procedures for linking the new domain and transferring the website to it. Here is a summary of all the procedures we have taken to ensure the linking process:
- First, ownership of the old domain was retained to be used in the process of redirecting the new domain
- We purchased the new domain and linked it via DNS to the site’s current hosting.
- We added the new domain within the file manager and a special file was created for it
- We accessed the new domain file and uploaded the backup copy of the site to it
- After that, the website link was changed from within the WordPress control panel
- Then add the new domain identification codes into the wp-config.php file.
- Finally, the website link was updated within the wp-options table within the data processor manager
Procedures that must be taken after successfully changing the domain
According to the procedures that we explained in the previous paragraphs, the process of transferring the website to a new domain was completed perfectly. Here are some of the procedures that we advise you to do after completing the domain change in order to preserve the SEO settings and the proper functioning of your website and reduce any loss of traffic to the website.
Configure the site’s permanent links to be in the same structure as the old domain
Do you remember the permalink settings in the WordPress control panel?
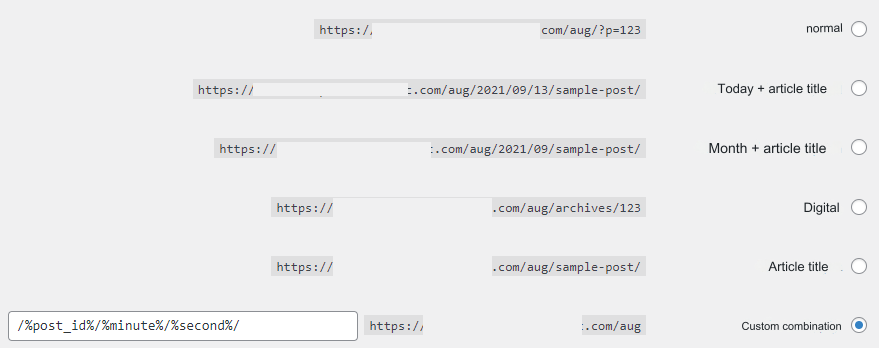
Log in to the same page on the new domain and set up permanent links to be in exactly the same structure as the old domain.
You can certainly create a different structure in the new domain if you think it is better for the site’s SEO, taking into account that the best permanent link structure is the one that is as short as possible and contains words or page titles and site articles because they are easy to archive and read by the search engines that crawl them. Site content.
Updating internal links on all pages, articles and files of the site
One of the most important actions that must be taken is to change the internal links that you previously included within the content of your site, which are the links that were inserted within the site pages and point to other pages, as these links still contain the old domain.
Of course, you can search for all internal links on the site’s pages and articles and change them manually, or you can install one of the WordPress plugins that does this with just the click of a button.
You can install the Better search replace add-on , through which you can automatically change all internal links on sites that contain the old domain name to new links that contain the new domain.
After installing and activating the plugin on WordPress , you can access the plugin tab from within the WordPress control panel to open the settings page, in which you will find the following two fields:
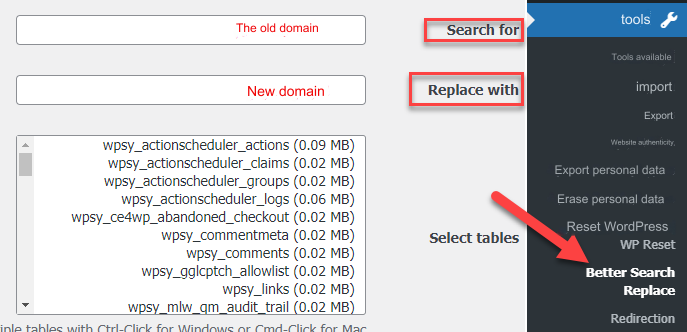
- Search For : In which you type the old domain name, such as olddomain.com
- Replace with : where you write the name of the new domain, newdomain.com.
Immediately after saving the changes, the add-on will search for all internal links that contain the old domain name and replace them with the new domain name automatically without your intervention. Thus, all internal links on your site will work properly and will not give the 404 error message , which indicates that the page is wrong or incorrect. Not available on the site.
Make sure you have SSL security locked on your site
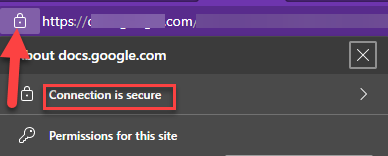
You may have noticed that many browsers display a message (the site is not secure) on any site that does not use an SSL security certificate.
Therefore, make sure to install an SSL certificate to secure your site and ensure that it appears to visitors in a safe and unsuspicious manner to gain the trust of your visitors as well as the trust of various search engines.
Activate redirection from the old domain to the new one
Do you remember at the beginning of the article when he advised you not to give up ownership of the old domain?
In this step, you will know the importance of maintaining ownership of the old domain and not abandoning it after transferring the site to the new domain.
If one of your site visitors or current customers accesses the old site link, they will often receive an error message telling them that the page is wrong or the site is not working properly. In addition, if there are links from the old domain that appear within Google search results, for example, When the researcher clicks on those links in the search results, he will receive the same error message because the site has been moved to a completely different domain.
Therefore, it is very important to activate redirection from the old domain to the new domain, even for a limited period, to ensure that all visitors are accustomed to the new domain, as well as so that links to the new domain begin to appear in the search results instead of the old domain.
You can easily redirect from the old domain to the new domain to preserve any traffic coming to the old one.
You can apply redirection. You can enter the old domain folder within your site’s hosting file manager, and search for a file named htaccess .
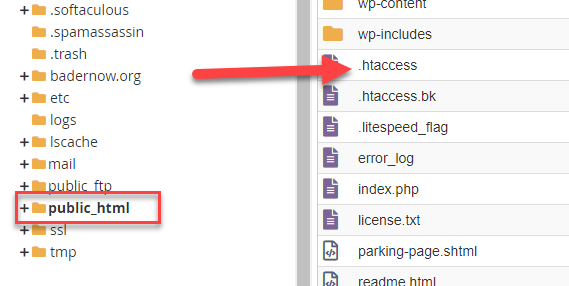
If you do not find the file, you can show it by explaining access to the htaccess file.
Open the .htaccess file. To modify it, paste the following code into it:
Taking into account replacing newdomain.com with the new domain link.
After editing, save the file, and now paste the old domain link into the browser and you will notice that you will be automatically directed to the new domain link.
With this procedure, you will have prevented any possible loss of visits that come to the old domain, whether direct visits or visits that come through links to the old domain that appear in search engines.
Updating domain data in Webmaster Tools and Google Analytics
Now add the site with the new domain to the webmaster tools (Google Console) and ensure that the linking process is done correctly so that Google begins to recognize the link to the new domain on your site and your journey in search engines begins with the new domain.
After adding the site to the Webmaster Tools with the new domain link, now go to the Webmaster Tools control panel for the old domain to inform Google that you have changed the domain.
You can open the webmaster tools for the old domain and go to the Settings tab, then go to the ( Change Address ) tab:

After entering the Change Address tab, the following page will open for you, in which you will find a list from which you can choose the link to the new domain that you are supposed to have added within the webmaster tools in the previous steps:
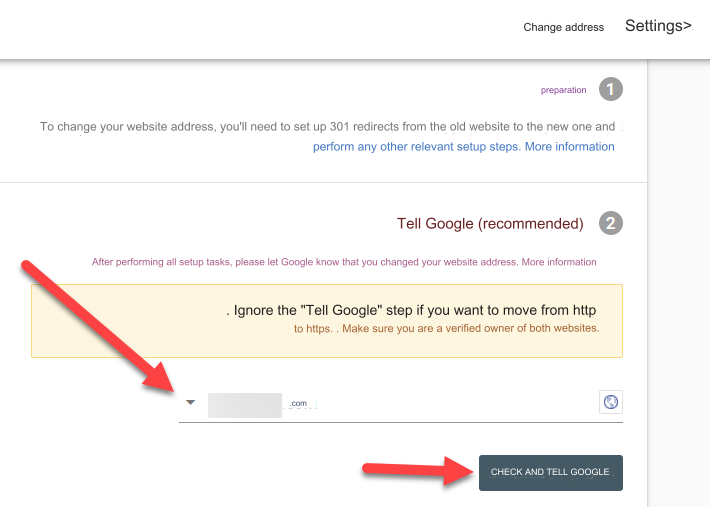
After choosing the new domain name, click on the ( Verify and inform Google ) button. You must have redirected from the old domain to the new domain so that Google can easily recognize this change.
After performing these steps in a few days or weeks, you will notice that links to the new domain appear instead of the old one in search results on Google.
Send a sitemap with the link to the new domain
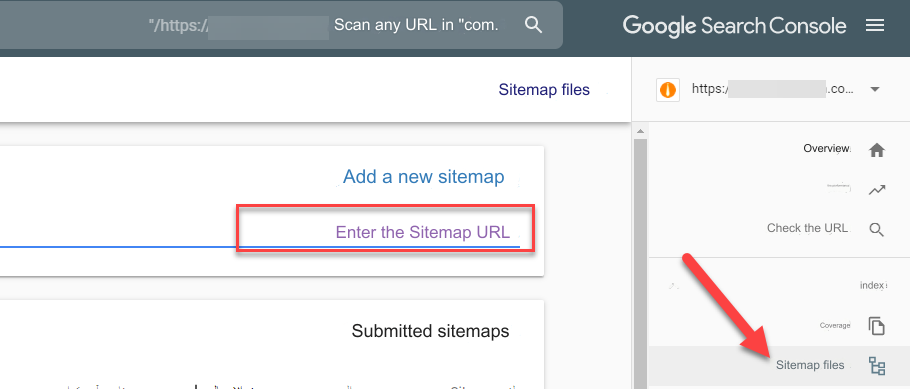
One of the steps that speeds up the process of search engines archiving the pages of your new site is to create a new sitemap file with the link to the new domain and submit it to Google within Webmaster Tools. We talked before about how to create a sitemap file for WordPress sites in an easy way.
After creating the sitemap file, he can go to the webmaster tools control panel for the new domain, go to the Sitemap tab, and paste its link:
Conclusion
In the end, after you change the old domain to the new domain, you may notice some decrease in site visits, but if you follow all the steps that we mentioned within the article in terms of properly redirecting 301 links to the old site, this matter will not affect your site in a significant way.
You should also not change the domain of your website frequently because this may negatively affect the reputation of your website or business online and may raise many questions from your visitors and customers about the reason for changing the domain frequently.


Leave a Reply