You may have heard of the Google Tag Manager tool, abbreviated (GMT), as it manages the features that you add to your site with great efficiency, based on your simple programming information and without referring to the site developer. Through it, you can measure the site’s performance, measure the success of your marketing campaigns, track your products, and study the behavior of targeted and potential users. Of course, Google can do all of that. It is not new for Google to provide one tool for many tasks that facilitate your work.
What is GTM, what are its uses, who benefits from it, and how can we add it to your WordPress site?
We will answer these questions one by one in this article.
A comprehensive overview of Google Tags Manager
Let’s get to the point, Google Tags Manager, Google’s tag manager, what are these tags first?
Tags
Tags are considered software code included in the entire script of your site, which performs a specific function such as tracking an advertisement, or analyzing users’ behavior while browsing the site, or other multiple functions that any site owner, regardless of its type, needs, even if he is only a blog owner.
These tags are added manually, written by the specialist developer for each page on the site, which takes up his time and effort as he activates the tag and examines it, and it may conflict with others, changing its location, and so on, the difficulties facing the developer in his work.
Without a system that manages the process of adding tags, updating them constantly, and carrying out downloads of new additions, this may cause you some technical challenges that you can overcome with easy solutions, such as slowing down your site, and the process will take a long time, which will cost you a delay in responding to your customers and followers and thus losing them.
Definition of GTM
GTM solves the problem of managing tags and tags. It is a free tracking tool whose primary function is to manage the tags on your site and place them in one file without the need for the site developer, in addition to studying the behavior of users, so you can do this through the user interface in the tool and you can also obtain marketing information that helps you in Your site will grow faster than you can imagine.
There are other systems that perform the same role, but there is something that distinguishes the Google GTM tool, and it is recommended to use it instead of others, and for several reasons, the most important of which is the ease of dealing with it through the easy-to-use interface that anyone can deal with without the need for technical or programming experience. Google also provides guarantees for the update process. Optimization is done through the user interface as well, rather than modifying each page individually.
In addition to the ability to check the tag before publishing it to ensure the correctness of its work and to correct any errors in it, it allows you to manage copies of your site before and after updating or adding new tags, so that you can return to the old version if the current version does not suit you, and the benefits are not limited to that, as you can specify permissions for individuals Users who are eligible to add new Tags.
The importance of adding GTM to your WordPress site
Can you guess the returns of adding GTM to your WordPress site? I do not think that this needs a heavy explanation, as the tool allows you to add Tags as many times as you want to various tasks and functions and with organized management that does not involve the worry of scripts, writing them, errors, correcting them, and overlapping them. Here is a list detailing the advantages of the GTM tool for your site on WordPress:
- It increases the loading speed of your website, because it collects scattered code into one file, which makes it easier to deal with them and reduces the possibility of conflicts.
- It facilitates the work of your website developer, as it reduces writing and debugging codes.
- It tracks the forms you publish and makes sure they reach the target audience.
- The decision-making process is easier and more flexible due to the availability of greater and more accurate information.
- It tracks interactions with your published videos and provides comprehensive analytics such as: at what minute did viewers pause the video, and for how much of the video they watched, which will improve the production of upcoming videos.
- It analyzes people’s interaction with a link you posted on your website or on social media, to give information about the people who interacted the most, where they got the video, etc.
Beneficiaries of GTM
It may seem that it is a tool that only helps online store owners with the valuable marketing information it provides, but this is not true. If your site is for a charitable initiative and you want to reach people faster, the GTM tool will offer you a lot.
For example, if you are the owner of a blog and want to measure the extent of the success of your writings, their spread among people, and how people interact with them, it is also a great solution for you. If you are the owner of a company and want to support your site with accurate analyzes of people’s interaction with your marketing videos or photos, then GTM is for you.
Also, if you want something other than tracking, such as increasing the speed of your site, you can do that. These are examples, but not limited to, of those who may benefit from GTM. If I do not address you with a function that directly helps the growth of your site, you will find several benefits if you search for it yourself.
Now we will move to the practical part after a lot of intense theoretical talk. How can GTM do all of this and how can it be installed on your WordPress site?
Adding GTM to your WordPress site in practice
First, you must have an account on Google Tag Manager. You can create the account through this link, and when you click on Start for free, it will take you to the page for adding a new account.

You start by filling in the fields that are appropriate for your site, give the name and link to the site, and you have the option to allow Google to obtain your personal data and your site data directly or to save it as anonymous data. It is of course preferable to save the data while it is anonymous so that all of your data is not available to Google, and the option does not affect GTM worked in both cases.
Place the link to your website, then select the platform you are working on, either on computers, Android and iPhone mobile devices, on AMP mobile pages , or on the server device, then click Create at the end of the page.

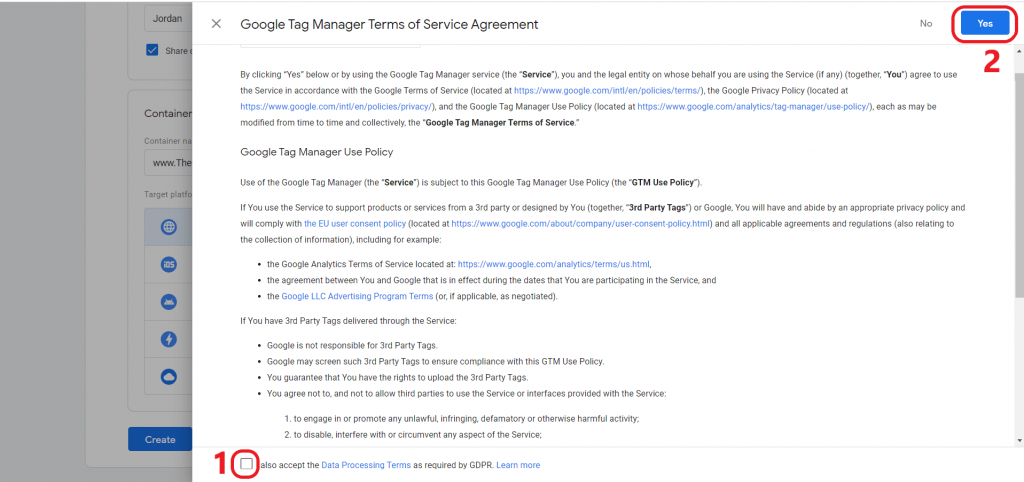
Then the Terms of Service Agreement page will appear. Read it carefully, then agree. Click on the box at the bottom of the screen, then on yes at the top right of the screen.
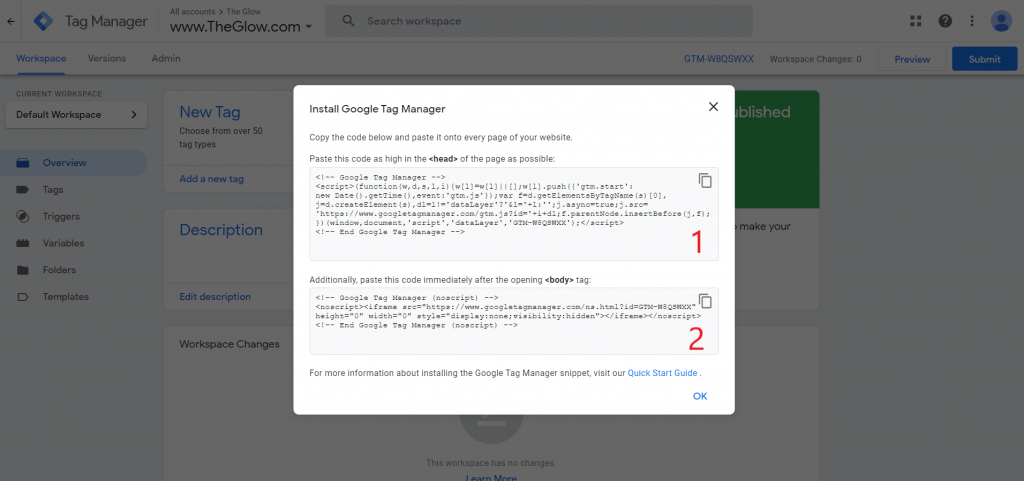
You will wait a few moments, then the (Workspace) window will open, and a message will appear titled (Downloading GTM), in which two scripts will appear that you will need to copy to your website, so do not close them.
We will now go to your WordPress site, where we will paste these scripts to complete the process of linking GTM to your site. It is recommended that this task be done by the site developer and not someone with limited technical knowledge. There are three ways to add GMT to your WordPress site:
1. Add GTM through plugins
It is easiest through a special add-on such as the Head, Footer and Post Injection add-on , and you can install it like any add-on by searching for it, then downloading it and activating it.

After activating it, it will appear in the settings box in the last options. Click on it to reveal the add-on settings, which show the Head and Body parts and will be as follows:

We will now return to the GTM page to take the scripts that he showed us, where we will copy text number 1 and place it in the Head section, and copy the second and place it in the Body section.

We will leave the Before Body Tag field empty, then click save to save the settings. Thus, you will have downloaded and activated GTM on your site.
There are also other add-ons that can be downloaded, such as the GTM for WordPress add-on, but it may be less simple than the previous one. We will search for it in the add-ons, then install it by clicking on ( Install ) to the left of the add-on, then activate it by clicking on the ( Activate ) button that comes in the place of installation.

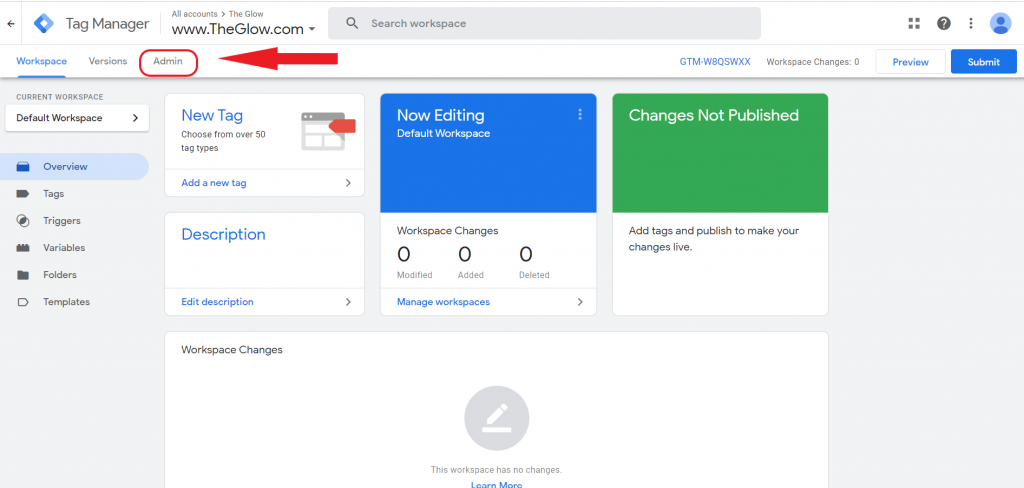
After activation, we will go to the GTM page and click on the Admin window located on the left of the screen:
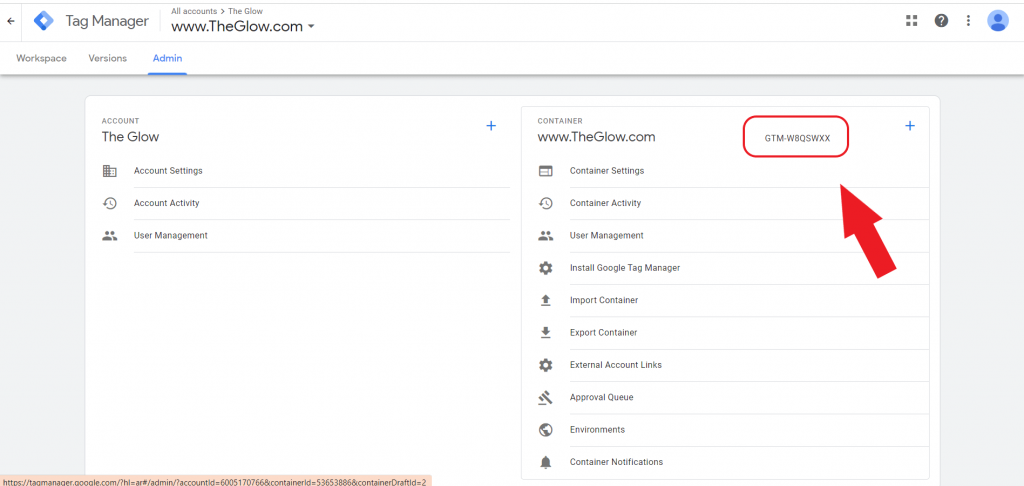
When you open the admin window, you will find at the top right of the screen a group of letters and numbers, which is called the GTM ID. We will copy it and paste it in the extension settings:
We return to WordPress to the settings of the GTM for WordPress add-on and paste the previous ID in the ID field that appears in front of us. There is more than one place to contain your script. It is either in the footer, which is not recommended by Google, as you notice, or it is in a position that you specify. It may require modifications to your template.
Or even through unencrypted injection. This is experimental and may disrupt the front-end, so it is not recommended either. The last option is to disable positioning. We will choose custom, after which you will need to modify the template and add the following script in the body tag:

A message confirming that the settings have been saved will appear at the top of the page:
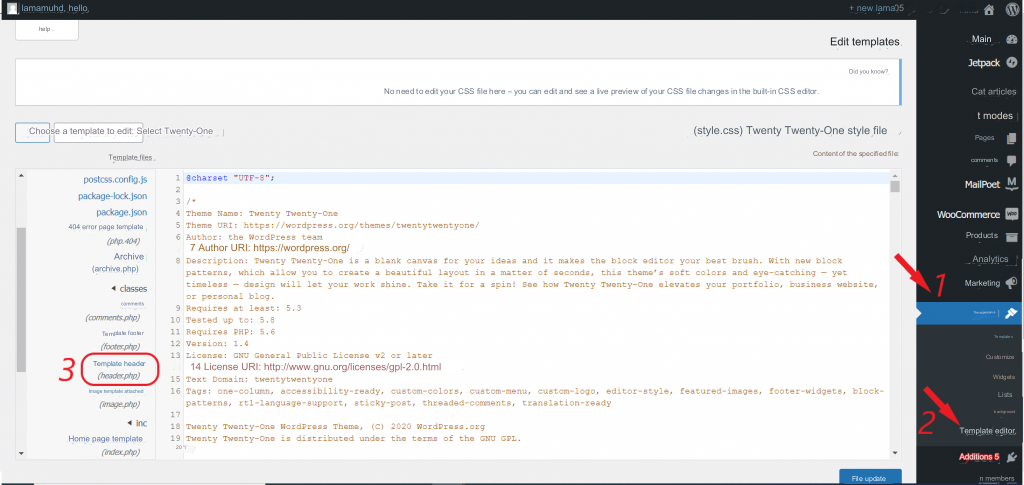
Still in WordPress, we will go to the (Appearance) page through the black menu on the right of the screen, then click on (Theme Editor), then click on the template header (header.PHP) as in the picture.
We will search for the Body tag, which is indicated by the number 1 in the following illustration, and we will paste the previously mentioned code directly under it as indicated by the number 2, and finally we will update the file:
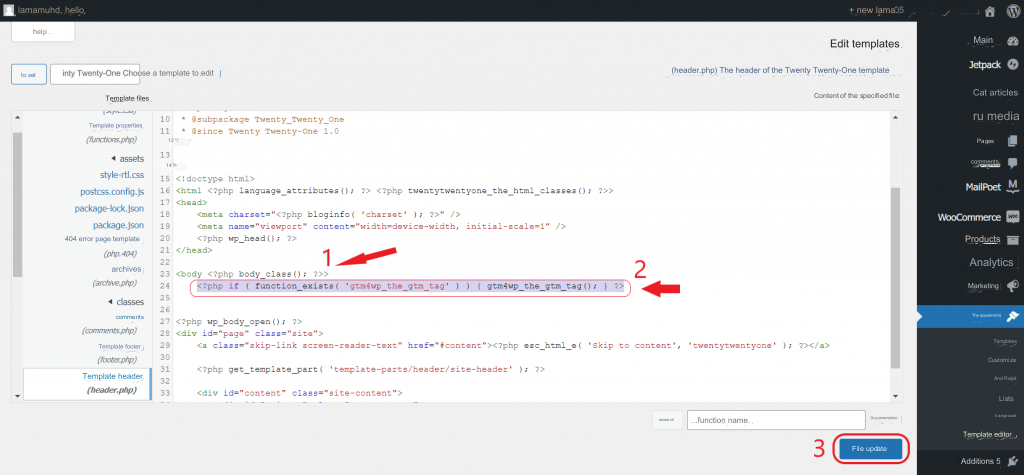
A message confirming that the file was saved successfully will appear at the bottom of the screen to ensure the integrity of the process. You can refresh the page or exit it and return to it to ensure the presence of this added line within the template header. You are required to check the presence of this line from time to time to ensure that GTM is activated on your site. If it doesn’t exist you have to copy and paste it again:
Go back to the extension’s settings and save the changes as you did before to confirm the process is complete.
2. Add GTM manually
It is the manual method without the use of add-ons. It is also easy, simple, and direct, and may be similar to the previous methods. We will go to the Google Tag Manager admin page, then click on (Install GTM).
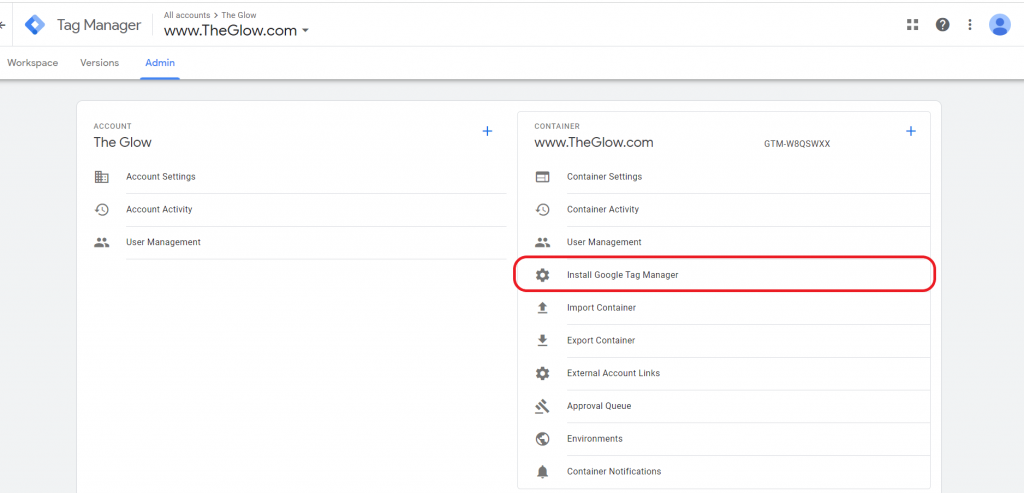
It will take us to the Head and Body scripts page, which we will copy to the site in WordPress
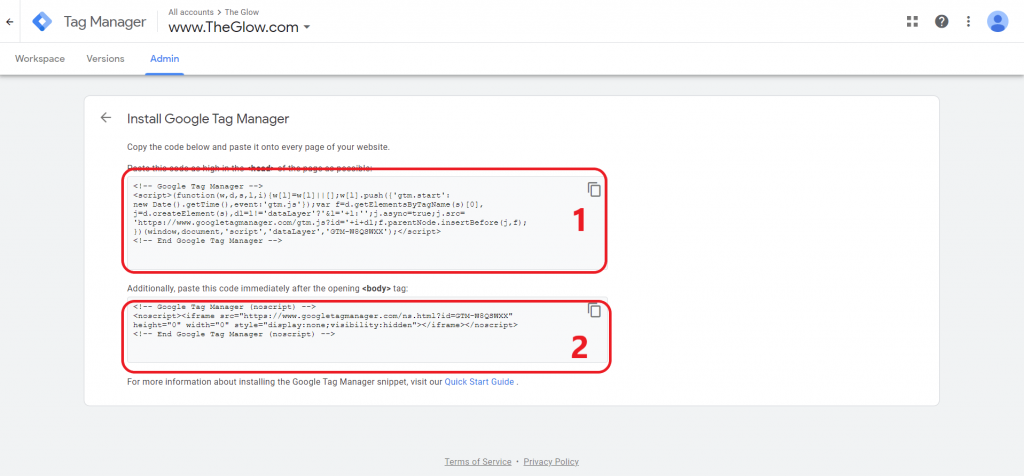
Copy the first text, then go to the WordPress page ( Appearance ), then ( Theme Editor ), then click on ( Template Header ) and search within it for the Head tag and paste the text directly below it, then return to GTM and copy the Body text, then go to the same page on your site and search Find the Body tag and paste the text directly below it, as in the following image:

With the last step, which is ( updating the file ), you will have finished learning about three ways to link GTM with your site in WordPress.
Ensure GTM is working
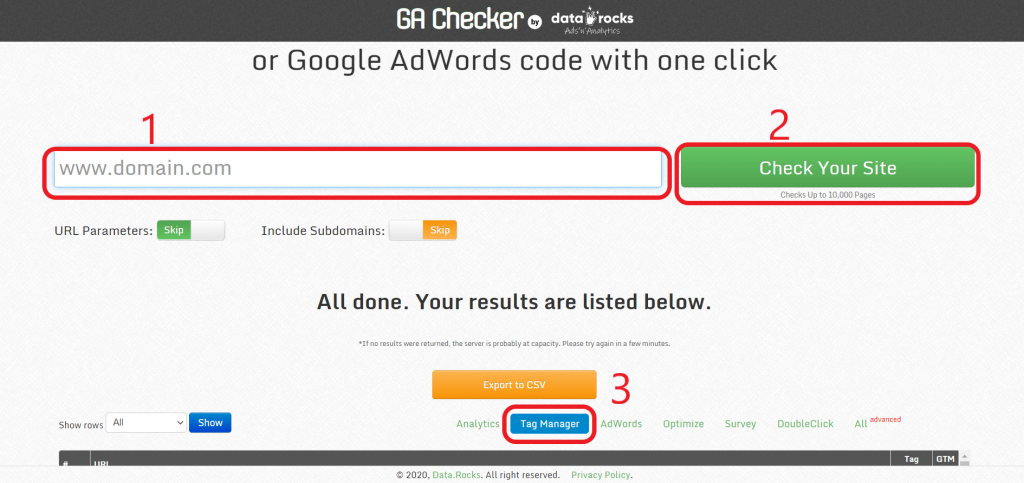
Now to confirm whether GTM is actually working for you, we will go to this link, which is a free tester that examines several aspects of the site. We are interested in this matter. GTM Enter your site address, then click on the tag manager column. If it works, a check mark will appear at the bottom of the column, and if not, a check mark will appear. Wrong, and we hope that your column is filled with signs that are correct, of course.
After downloading and activating, and making sure the process is running, let’s try adding a tag to your site. We will go to the work page in GTM, and to the left of the screen we have the option to add a new tag.
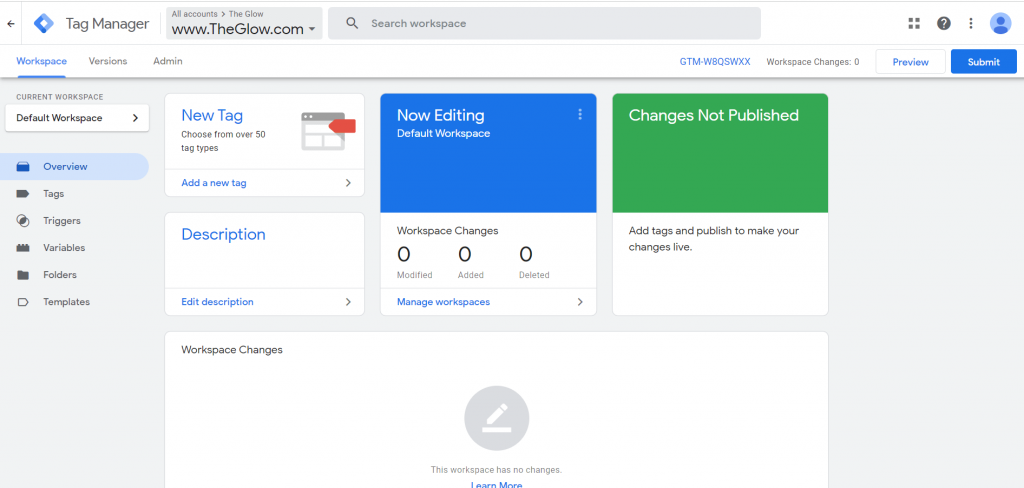
By clicking on it, a window will appear for you to create tag settings. Choose the type of tag you want to download, and Google will show you a set of previously prepared options, from which you can choose according to your need.
Here we have completed a comprehensive explanation of GTM and learned about the ways to add it to WordPress sites. These methods are independent from each other, so if you want to follow a method, just follow its specific steps. Google always provides us with tools that facilitate our electronic work, so do not waste the opportunity by searching for new gains and exploiting these useful and wonderful resources to grow your site.


Leave a Reply