The Call To Action button , or what is known as CTA for short, is one of the important means of encouraging the visitor to do a specific thing within the site, as the button appears in more than one form and for more than one purpose on different sites. Such as electronic stores in which a button appears to encourage the visitor to purchase, and news sites in which he is encouraged to subscribe to the mailing list, and many others..
In today’s article, we will explain to you the importance of this button, and how to add it to your WordPress site in more than one way and in more than one form. Whether you want to add the button inside articles, on pages, or in a fixed place on the site as a whole, today’s article will help you do this task.
In this article, we will explain to you several plugins that help you add a take action button in several forms on your WordPress site. Including the button that appears in the top navigation bar that we see on most sites, or in the form of a button that appears in a pop-up window that contains a group of texts and a prominent action button in it, and in the end we will explain how to add a call button that helps with immediate communication.
Follow the full explanation to learn how to do this in the easiest ways.
WordPress CTA button and why it is important
Action button : Any button that is designed in a visually attractive way with the aim of drawing the user’s attention and encouraging them to click on it to take a specific action on the site instead of just clicking on a simple link.
There are many forms that the button appears on, whether in the shape of the button itself, the colors, or the purpose for which it is used.
There are many goals for placing a take action button on your site, including a subscription button to a mailing list, a purchase button from online stores, or sharing buttons on social media networks. The take action button also includes download buttons from the site.
This button is one of the most important elements of websites, especially in WooCommerce stores. There is hardly any website that is devoid of this button on which striking phrases appear, such as ( Click here ), ( Contact us now) , ( Add to cart ), or ( Register now and get great discounts )…
This button is usually displayed in the form of a distinct, clickable button, and is placed in the most prominent strategic locations to help direct your site visitors in the right direction you are planning for your site.
For example, in online stores, you want the user to make a purchase or add products to the basket, so direct him to do so by placing the purchase button or the Add to Cart button clearly and prominently on your store pages because it will motivate the user to click on it and help him reach his goal.
Therefore, the main goal of the take action button is to help you in the task of getting the visitor to any goal that you, as a website owner, want from him. Whether this goal is to make him buy from your store or any other goal you aim for. It is possible to measure this example and conclude the importance of this button in other types of WordPress sites.
Specifications of a successful take action button
There are many things to consider when creating an action button to effectively achieve its goal and generate the most clicks. This includes the design of the button itself, the color of the button, and where the button is placed.
Here are the most important things to consider in the take action button.
1- Create a professional design
Special attention should be paid to designing the take action button so that it looks professional and has a prominent color that matches your brand colors (if you are not good at creating professional-looking buttons, you can find a lot of pre-made buttons and copy their layout)
2- Choose a suitable position for the button on the page
Choose a location for the button that matches your site’s page layout, such as on the sidebar, at the top of the page, or at the bottom of the page after the visitor has finished reading. You can also place the button within a fixed header so that it remains visible at the top of the screen even if the visitor scrolls down.
3- Attach the button to a call to action
Make sure that the accompanying statement is simple, clear and direct. If the statement is unclear or exaggerated, it will have the opposite effect for the visitor, and they will often be ignored and less likely to be clicked.
4- Make sure that the call to action provides the visitor with value
A visitor won’t click on a button just because it looks good. Rather, the visitor generally wants to get something in exchange for clicking on the button, for example the phrase (Subscribe now and benefit from the discount) or (Subscribe for free ) is much better than just (Subscribe now). So keep that in mind and think about the benefit you will provide to your site visitors.
5- Try different variations of the take action button
Test which ones work best on your site. The matter is not always subject to fixed rules, as the behavior of visitors and their interaction with the button on your site is what determines the best formula. You can also use A/B testing software to make changes to your website’s take action button and see which one got the most clicks.
Create a take action button inside articles, products or pages
1- Create a take action button using the advanced editor (Gutenberg)
The latest version of WordPress allows you to create buttons without the need for any external plugins. You can do this simply through the Gutenberg editor .
It is enough for you to enter the page or article you want in editing mode, then add a new block and choose the type of block so that it is Button, and enter the data for the button you want as shown in the following explanation:
1. On the Gutenberg Advanced Editor page, click the Add New Component button.
2. Search for the word “button” and click on the “Buttons” item as in the following image.
3. Add text representing the call to action that you want to appear above the button by writing directly to show you what the final button will look like.
4. Add a link to the button by clicking on the hyperlink sign, and then adding the required link as in the picture.
Thus, the button has been added to your page or article simply and easily.
2- Create a take action button using the classic editor.
If they are using the WordPress Classic editor, there is no direct method within WordPress that supports adding buttons in the Classic editor. But in this case you can either create a take action button by writing HTML codes. Or use custom plugins that help you do this task in a much simpler way, as there are many plugins that help you create a take action button easily and quickly in Woodpress, with the ability to create more than one shape for the button. Below we explain both methods to you
First: Create a take action button using HTML code
- First, go to the control panel of your WordPress site, and add a new article or page, depending on where you want to add the button.
- Click on the (Text) tab at the top as shown in the following image to be taken to the HTML code for the new page or article.
- Add the following code where you want the button to appear on the page, and change the # symbol to the link you want the button to point to.
With this, the button will be added in the color you want and will point to the link you want with ease. Therefore, by adding this simple code, you can add a take action button anywhere on the site.
Read also: How to add or edit HTML code in WordPress
Second: Create a take action button by adding Forget About Shortcode Buttons
The Forget About Shortcode Buttons plugin is considered the best free plugin to enable the feature of adding buttons in the traditional editor in WordPress. This plugin gives you a set of features, most notably the ability to add icons to the buttons you create, with control over the button color and size, in addition to the ability to create custom buttons. Save it for later use.
To use this add-on, all you have to do is follow these steps:
1. Install the add-on by entering your site’s control panel > then choose Add-ons > Add New > then search for the name of the add-on Forget About Shortcode Buttons in the search box and install and activate it on your site.
2. After you activate the addition, the Add Insert Button icon will appear on the Add Article page in the traditional editor, as shown in the following image. Click on it.

3. A pop-up window of the button contents will appear in front of you, enabling you to specify the button color, button icon, button link and text, and button size as follows:

4. Through the drop-down menus, you can also choose the button size and button shape, where you can choose between a different set of ready-made shapes (Flat, Flat rounded, Glossy, Glossy rounded, Pop out, Pop out rounded).
5. There are also other tabs available in the add-on that you can browse to get other customizations for the button and design it the way you want.
Best plugins to create action button in WordPress
In this paragraph, we will show you several variations of the take action button in WordPress that you can use on your site as needed. We will show you how to create:
The call button that appears floating at the bottom of the site when pressed to automatically call a pre-existing number, and the contact button that helps the customer communicate with you, whether via WhatsApp, Messenger, or other social media platforms. We will also explain how to create the offers and coupons buttons that appear. As a notice at the top of the site.
Follow the following paragraphs, which explain in detail how to create each of these buttons, and the appropriate plugin in WordPress that helps you create each of them.
1 – Create a Click-to-Call button
To create this button, we will use the WP Call Button plugin , which enables you to add a stylish call button with the phrase (Call Now) or any other call to call on your website with just a few clicks, without the need for advanced programming skills.
Install the plugin first by going to Plugins < Add New < Search for the name of the plugin WP Call Button in the search box and install and activate it on your site, as we explained in: How to install a WordPress plugin and activate it on your site
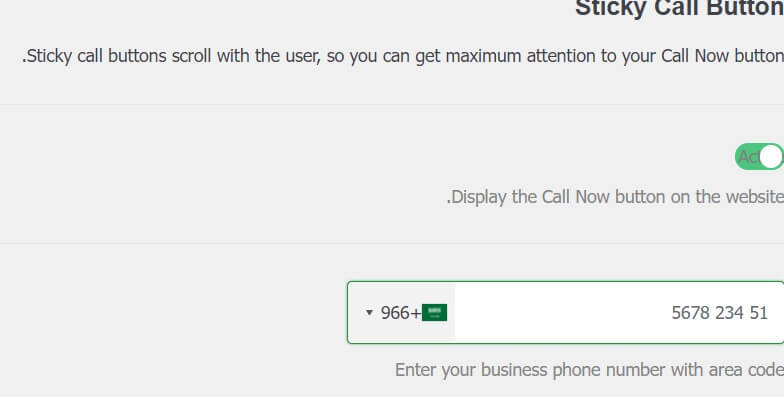
Now that the plugin is activated, go to the plugin settings through the WordPress control panel: Settings tab, then choose WP Call Button.
Choose the country code, and then enter your phone number in the box that appears in front of you.

Now choose the text that will appear on the button. In our current example, we chose to write the phrase ( Contact Us ).
Now choose how the button will appear on your site, whether in full size, or as an icon. It is preferable to leave the automatic selection because it is best.

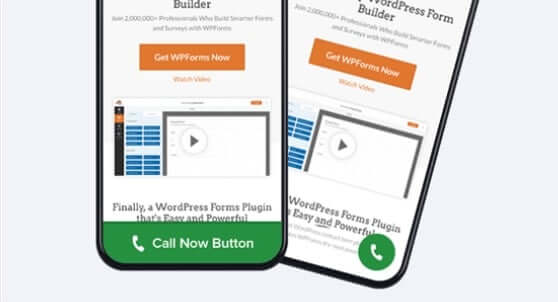
Thus, the add-on will be ready for use, and the shape of the button will appear on the site in two forms, one on the phone and the other on the computer, as shown in the following image:

2- Create a Pop Up window with a take action button within this window
Popup Maker is one of the best WordPress plugins for creating any type of pop-up window on your website. It is flexible and easy to use. Using the Popup Maker add-on, you can create many types of popups such as (email subscription popups, content promotion popups, e-commerce popups, contact form popups, etc..)
After installing and activating the add-on, add a pop-up menu to the site by clicking on the Popup Maker tab that appears in the control panel, then choose Create Popup , then enter the title and content of the pop-up window in the editor so that it includes phrases to urge the visitor to the action you want him to take, And a button to direct the visitor to another form or page of your choice

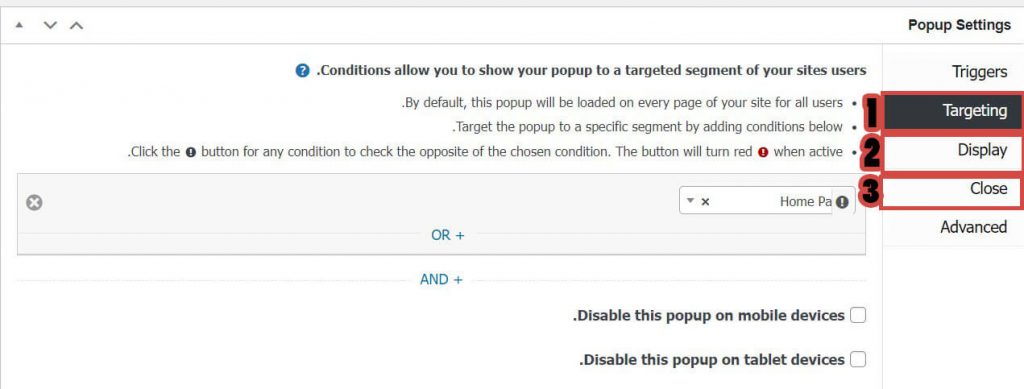
Now you must determine the shape of the pop-up window, where it will appear, and how it will appear on the page. This is done by scrolling down and browsing the Settings section ( Popup Settings ).

- Through the Targeting section , you can specify where the pop-up window will appear, whether on the home page, in articles, pages, or on a specific page on the site.
- Through the Display section you can specify the popup’s appearance, background, colors, and other key visual settings.
- Through the Close section , you can specify how the pop-up window will be closed, whether it will close automatically, or through the Close button, and whether it will appear again if it is closed or not.
3- Make a take action button in the form of a notification in the fixed upper section of the site
To create this button we will use the WPFront Notification Bar plugin , which is perfect for displaying notifications about a promotion, breaking news, or special offer in the sticky section at the top of your site.
After installing and activating the add-on, go to Settings > then click on the WPFront Notification Bar add-on tab > and put a check mark next to the Enabled option to activate the notification.

Scroll down to customize the notification and decide where it will appear and what message will appear there.
You can add a take action button by activating a check mark next to the Display Button option , adding the text of the button, and the title of the link that will be taken to when the button is pressed.

Thus, a notification attached to the take action button is added permanently at the top of the page, which is an appropriate place that any visitor can clearly see and respond to.
Read also: How to make the Notification bar in WordPress
Conclusion
With your arrival here, we have reached the end of this article, in which we have provided a comprehensive explanation of the take action button, its importance in drawing the attention and directing the visitor to your site, and we have explained all the places where the take action button can be placed, and how to design it and benefit from it optimally.
We also explained the most important additions that help you create a take action button in more than one place on the page with practical examples.
All you have to do now is to determine the appropriate type of button for your site, determine its shape and purpose, and apply the necessary steps to place it in the most appropriate place on the site.
Finally, we do not advise you to add more than one form to the button on the same page, as this distracts the visitor and reduces the effectiveness of the goal for which the button was added.


Leave a Reply