you want to build your new website, you will be sure to launch it at the ideal time with excellent performance and affordable cost, and these three features are available in WordPress. Therefore, in this guide, I will provide you with a comprehensive and detailed explanation of WordPress, from when we start getting to know WordPress until you customize your site in the way you like.
I have prepared this short video for you to understand what WordPress is
In addition, you can continue reading the article to get deeper information explaining WordPress.
- What is WordPress
WordPress is an open source content management system that was created in 2003 by Automatic Company based on (PHP & MySQL). It is one of the easiest ways to develop your website by relying on a control panel and customizable tools for your site, until WordPress has become the most popular among website owners.
Why is WordPress the most popular?
WordPress is the most popular among website owners ( approximately 37% of websites rely on WordPress), and you always find explanations for building websites recommending using WordPress. You may ask, what is the secret of this popularity?
In fact, there are many factors that make WordPress top the list of content management systems ( CMS ), which is that it is an open source system, which allows anyone to modify the code and produce thousands of templates, plugins, and other tools from various programmers around the world.
This combination of tools allows you to create any type of website (creating a blog, personal website, business gallery, online store, discount sites, social platforms…and other sites), and WordPress is not just a blogging tool, as is Blogger.
In addition, most hosting companies support WordPress, and the system is constantly updated by the supporting company, and the same applies to companies that produce templates and tools, as they update their products with the aim of providing a safe environment and better performance for website owners.
WordPress.com or WordPress.org
If you want to learn more about WordPress and go to its official website, you will find two WordPress sites, one is WordPress.com and the other is WordPress.org. What is the difference between them?
In principle, .org means the abbreviation = organization, while .com means the abbreviation = commercial.
By relying on WordPress.org, you can download the WordPress script for free and upload it to your hosting ( Bluehost, for example ) and you can use it for your website.
As for WordPress.com, it allows you to provide free hosting and use it to launch your site with limited capabilities, such as including the name of WordPress in your site’s domain (example.wordpress.com) with no possibility of setting custom templates and plugins or modifying the PHP code. Therefore, I do not advise you to do this, but rather I advise you to rely on it. On your paid hosting, and this is what I explain in the rest of the article.
Note : You may ask, if the WordPress system is 100% free, how does the company developing it benefit? Answer: The company does not benefit from selling the WordPress system itself, but it benefits from selling the tools and templates contained within it.
Now let us move on to the steps to explain WordPress in more detail.
Step 1: Install WordPress
You can rely on WordPress to launch your site by installing it in one of two ways: the manual method, or the automated method.
Manual method: You download the latest version of WordPress from WordPress.org, then upload the script to your hosting using FTP Manager, to the Public_Html file, then create a new database in MySQL Databases, then install WordPress.
In fact, it is a complicated method, and there is no need to explain it, especially since most hosts currently provide you with one-click installation of WordPress by relying on the automatic installer.
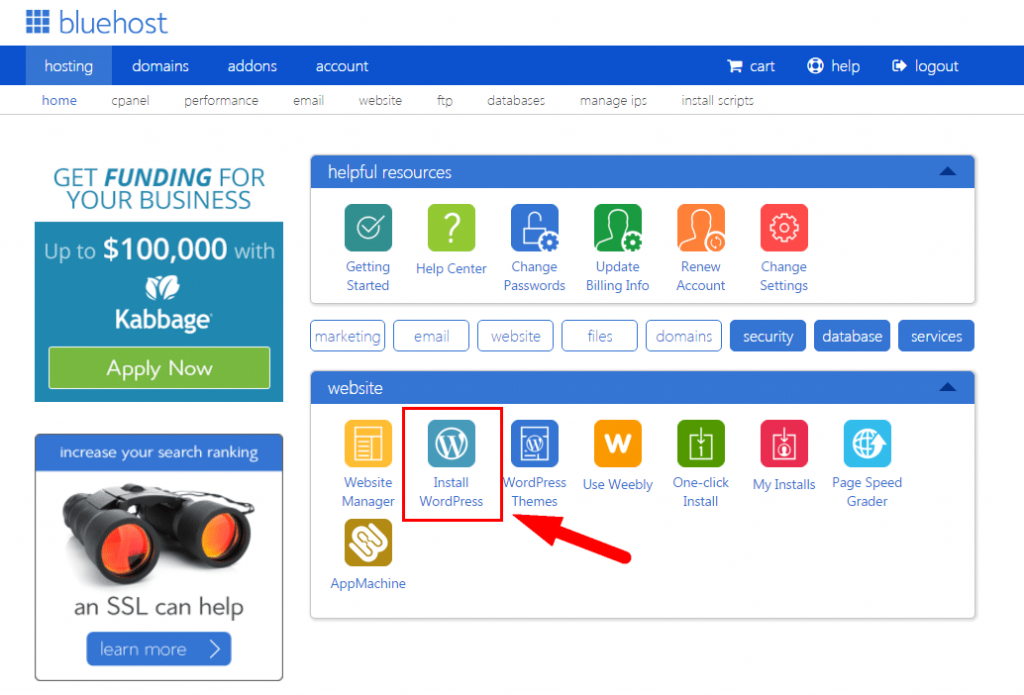
The automated method: You go to the hosting control panel, then choose the desired domain to install WordPress, then choose and click the Install WordPress button.. This is very easy!
The method varies from one host to another, but the method is the same by choosing to install WordPress from website builder tools.
For example, if you purchased hosting from Bluehost and then went to the control panel, you will find the ability to install WordPress with one click in the control panel in the (Websites) section.
The following video also explains how to purchase hosting from Bluehost and install WordPress.
Step 2: Use the WordPress control panel
After installing WordPress, you will find the integrated control panel that WordPress provides you through which you can fully control your site.
You can go to the control panel by adding (wp-admin/) after the domain name, so the link becomes like this:
example.com/wp-admin
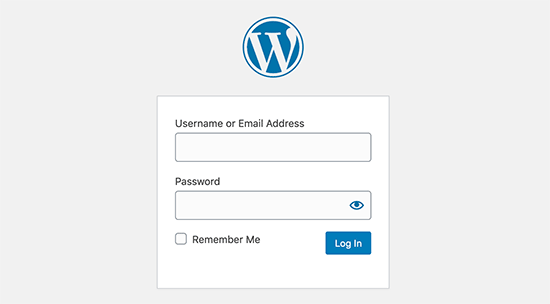
This link will direct you directly to the control panel and ask you to enter the username and password that you relied on during the installation of WordPress (I explained this in the previous video).
After logging in, you will find the WordPress control panel looking like this
Once you head to the main control panel you will find an overview of the latest site news, as well as all the available updates you need.
You will find the board easy and simple, and is basically divided into three sections
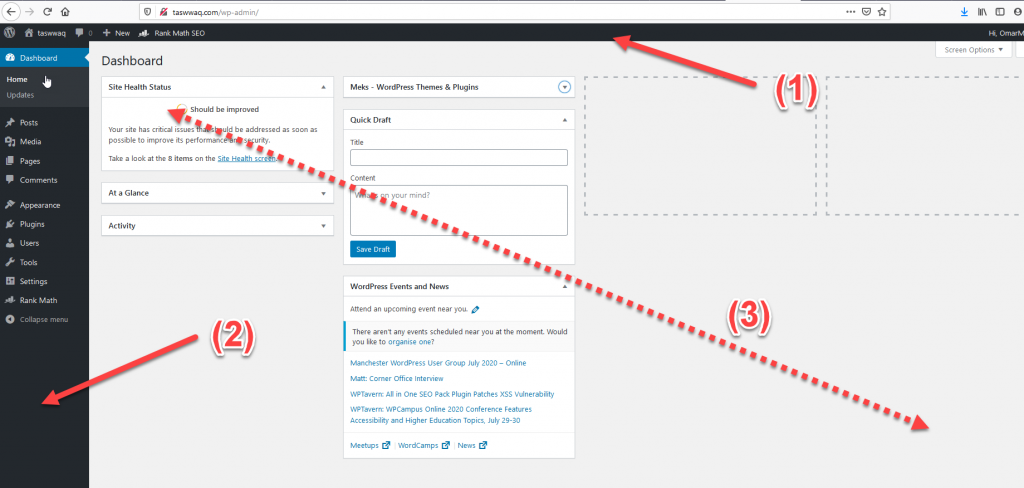
- At the top of the control panel you will find the toolbar, which contains the most frequently used tools in the control panel, such as going to the site, adding a new page or article, and the latest comments.
- To the left you will find the navigation menu, which includes all the control panel tools, and through each tab you can navigate to a special part of the site management parts, such as (managing articles, managing pages, managing site appearance, main settings, etc.).
- The large area through which you use the control panel.
Step 3: Customize the look of the site
After installing WordPress, you need to customize the appearance of the site. What will the home page look like? And the pages and articles of the site, and customizing the colors and formatting of the articles and the sidebar, and all these details you customize based on a ready-made template.
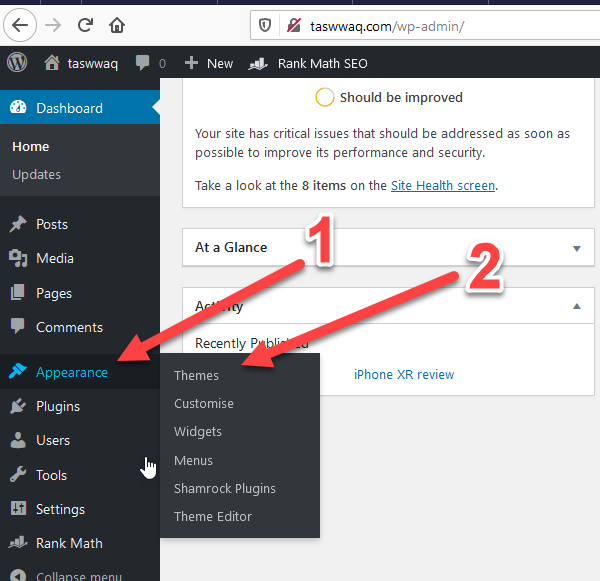
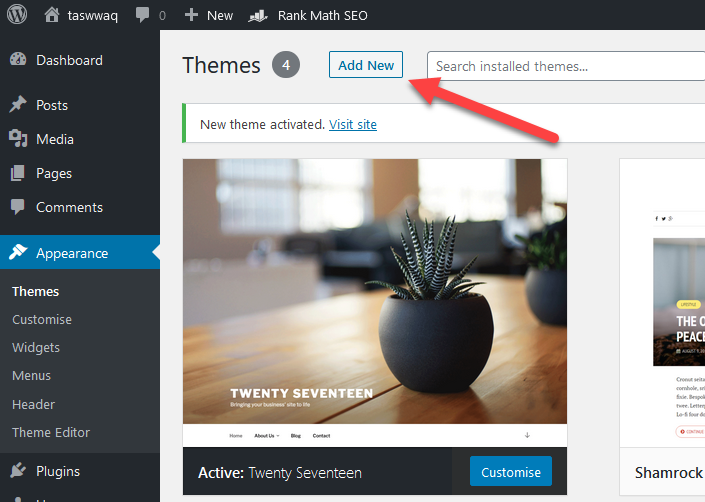
Go to Appearance >> themes
Then click on Add new
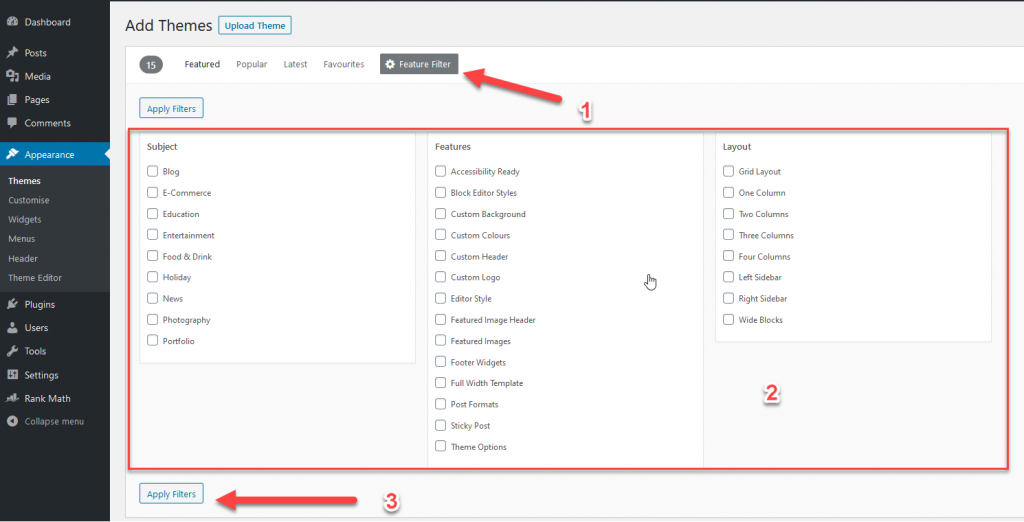
Then choose Feature filter, and choose the properties required for the template: Do you want a template for a blog, an online store, a business gallery, or other properties? Then, after specifying the properties, click Apply filters.
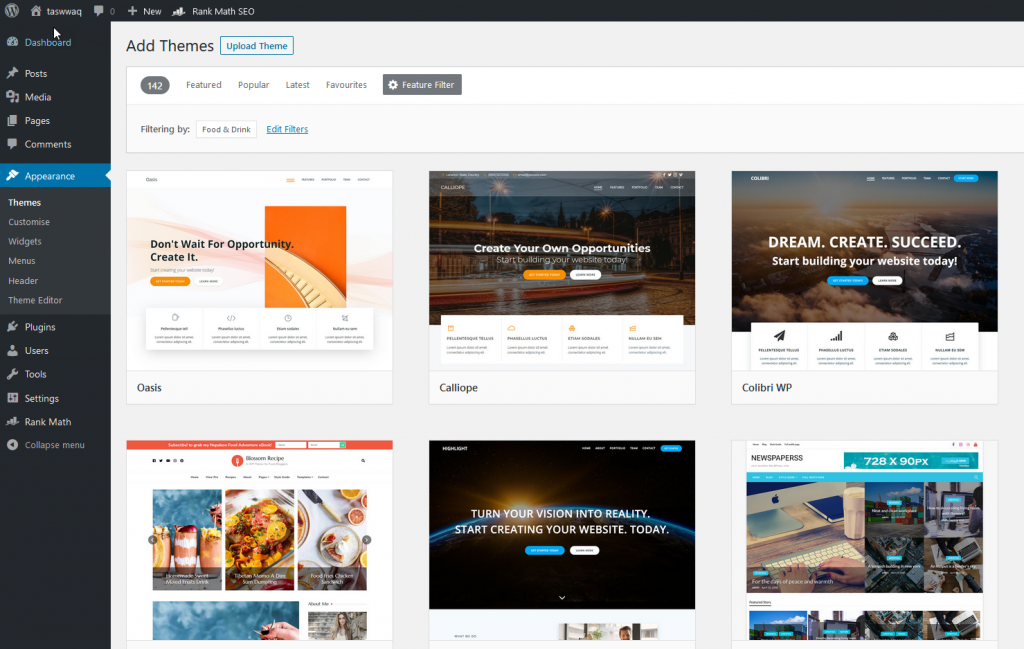
You will find many templates available to you, choose what suits you, then click install, Activate
You will find your site appearing in the beautiful template you chose
Another option is to purchase a paid template from Theme Forest (the largest WordPress theme store), then after purchasing you will receive the template in the form of a .zip file that you will download to your computer.
Then you can upload the template through appearnce >> themes, then Add new, then Upload Theme, then upload the template file from your computer.

Step 4: Publish content
After you customize the look of the site to your liking, we will publish different types of content, whether that content is in the form of pages or articles. You may ask, what is the difference between articles and pages?
Articles are placed and published within the blog within a group of articles and are divided into categories and tags (such as the article you are currently reading on the blog). Users can build an interaction environment through comments.
As for pages, they are for unchangeable content on fixed pages (such as the contact page, about us, and our services). ..etc).
Now let me tell you how to publish articles and pages
4.1 Publish a new article
You can publish a new article by going to Posts >> add new

You will go to the WordPress visual editor to add new content
3. You will write in this rectangle the title of the article
4. In this large white part you will write the entire content of the article
5. After you finish writing the article, you will select its classification (if you created categories before that)
6. You will click on Add new category (if you are going to publish the article In a new category that has not been created yet)
7. You will add tags to the article for easy access (optional)
8. After configuring the article appropriately, you will click on (Publish)
Thus, you published your first article on your blog 🙂
4.2 Publish a new page
In the same way, you can publish a new article, by going to Pages >> add new

You will go to the WordPress visual editor, through which you can add page contents in the same manner by writing the page title and page contents, then click Publish.
Step 5: Install WordPress plugins
You have installed WordPress, created content for your site, and published it to users, but there are still some features that you want to increase on the site. What is the solution? You will search for plugins that implement these features and activate them on a site to obtain the desired feature.
There are thousands of free plugins for various purposes: from setting social sharing buttons to activating security and protection features.
You will search for the required plugins and install them easily by going to
Plugins >> add new

3. In the search box, you will write the name of the add-on you are looking for, then you will find different results for add-ons.
4. You will install the required add-on by clicking install now and then activate
You can also upload the add-on from your computer, by uploading the compressed file (.zip) in the same way we used to upload the template.
Go to Plugins>> add new
to go to this page

3. You will choose Upload plugin
4. You will click on Browse and upload the .zip file from your computer
5. After uploading the file from your computer, you will click on install now, and then do it after that
Thus, the add-on is downloaded from your computer and installed on your site
Some recommended add-ons
There are some necessary add-ons that I advise you to install, regardless of your site type, as they will add some wonderful and useful features to your new site. I advise you to type the name of the add-on in the search box and then install it in the previous method, which is as follows:
Google XML Sitemaps: This plugin creates an XML map to make your site easier for search engines to read.
Rank math SEO: This add-on helps you make SEO settings for your site’s pages and articles, to improve their appearance in search results correctly. This optimization includes keyword placement, meta, SEO settings for pages, and so on.
Wordfence Security: Helps you put a firewall on your site, to prevent hackers and malicious files from accessing your site’s database or files.
Contact Form 7: A simple add-on that helps you place a contact form on your site, so that users can communicate with you through this form.
Note : I do not advise you to go to great lengths to install many add-ons unless you need each add-on that you will depend on (such as the add-ons I mentioned to you). However, installing many add-ons unnecessarily will have a negative impact on the overall performance of your site.
Step 6: Improve site performance
In the previous steps of this educational guide, I presented to you the basic things that you can do to create your WordPress site in a professional manner, starting with installing WordPress, then customizing the appearance of the site, publishing the content, and installing the necessary plugins.
Now I will explain to you a complementary part about making some general improvements to the performance of your site, and these improvements you will need sooner or later, especially after you publish many articles, pages, pictures… it receives many visitors, and so on.
These improvements will generally affect the speed of the site to ensure a good user experience and give a good impression to the search engine (site speed is an important factor in SEO).
We will make these improvements through a few simple steps
6.1 Installing cache add-ons
Cache plugins in general help you improve the speed of the site by storing data temporarily and then displaying it to the user so that it is displayed the second time faster.
For example, if you visit the WPar.net website frequently, the cache plugins will save a fixed copy of the site to be displayed to the user on the second and third visit instead of downloading PHP and Javascript scripts every time, and this certainly increases the speed of the site.
Most popular cash add-ons:
Note : You can choose to add one of the three, not install them together.
6.2 Configure your site images
Creating images is one of the necessary tasks for any website owner, because often many images are displayed on one page (like this article you are reading, or like the owners of online stores). Most website owners display several images on one page. Imagine each image being 1 or 2 megabytes in size, the page will load in a very long time.
You will prepare the images through several steps:
- Use ideal image sizes: For example, if you are displaying one of the images on your site on the user’s phone screen, why does the image size need to be 6000 x 4000, for example? The result is that the user’s browser will download the large size and then resize the image to appear in the small size on the mobile screen. Therefore, my advice to you is to use the ideal image sizes in general.
- Compressing the size of images: By default, images are produced at the maximum size through graphics programs, or through popular image download sites. It is best to compress the size of the images without losing image quality through graphics programs, or you can compress the images using one of the ready-made tools
- Use the image compression plugin: If you already have an existing website and have uploaded many images and you do not have enough time to upload the images and then upload them again, in this case it is best for you to use the WP Smuch plugin, as it is a WordPress plugin that enables you to compress all of your website’s images professionally.
6.3 Compress your site files
You can compress website files (HTML, CSS, PHP, & JavaScript) so that the user can interact with the compressed files instead of the original, large files.
This process will help you increase the speed of your site without any negative impact on your site. You can accomplish this task through a WordPress plugin
Most popular file compression plugins:
After installing the add-ons, you will activate the GZIP feature.
6.4 JavaScript loading delay
Most templates and add-ons basically contain many programming codes written in JavaScript in order to perform some tasks on your site. When a visitor browses the site, these codes are loaded first, which causes slowness in the appearance of the site’s contents (pages and articles).
The solution recommended by Google programmers is to load the site contents first (pages and articles) and then delay loading these JavaScript codes.
You can accomplish this task through one of the following add-ons
Note: You should not do this task once you create a new WordPress site, but when the size of the site increases and the number of features available in the installed templates and plugins increases, then you will need to do this task.
6.5 Use a CDN
Using a Content Delivery Network (or CDN ) helps you speed up your site by saving a temporary copy of your site in many data centers around the world, and then when the user browses your site, he browses the stored copy from the nearest data storage center close to him.
Therefore, this factor works effectively in increasing the speed of the site.
You can use the free version of CloudFare and get a CDN and DDoS protection.
6.6 Activate the LazyLoad feature
If your site contains a lot of content on one page, for example, the sales page has many paragraphs and images, or the published articles are characterized by an abundance of information and images, then it will be appropriate for you to activate the LazyLoad feature.
This feature downloads the content that the user is browsing, and then when he scrolls the rest of the page, the rest of the content is downloaded (such as images, etc.).
There are some templates and plugins that contain this feature by default, but if you do not have this feature in the template you are using, you can rely on the Lazy Load or Rocket Lazy Load add-on .
Note : If your website pages are small, there is no need to use this feature.
Step 7: Secure your WordPress site
In the last and important step, we will talk about some issues related to securing your WordPress site from any malicious files or hackers accessing it. This does not mean that WordPress is an unsafe system, but it must be secured like any other program in the information world.
Here’s some quick information to secure your site
7.1 Get the latest updates from WordPress
The WordPress system is always updated by the company responsible for its development (Automatic) by providing the latest versions to provide a more secure information environment. The same goes for the themes and plugins you use.
To view this go to Dashboard >> updates
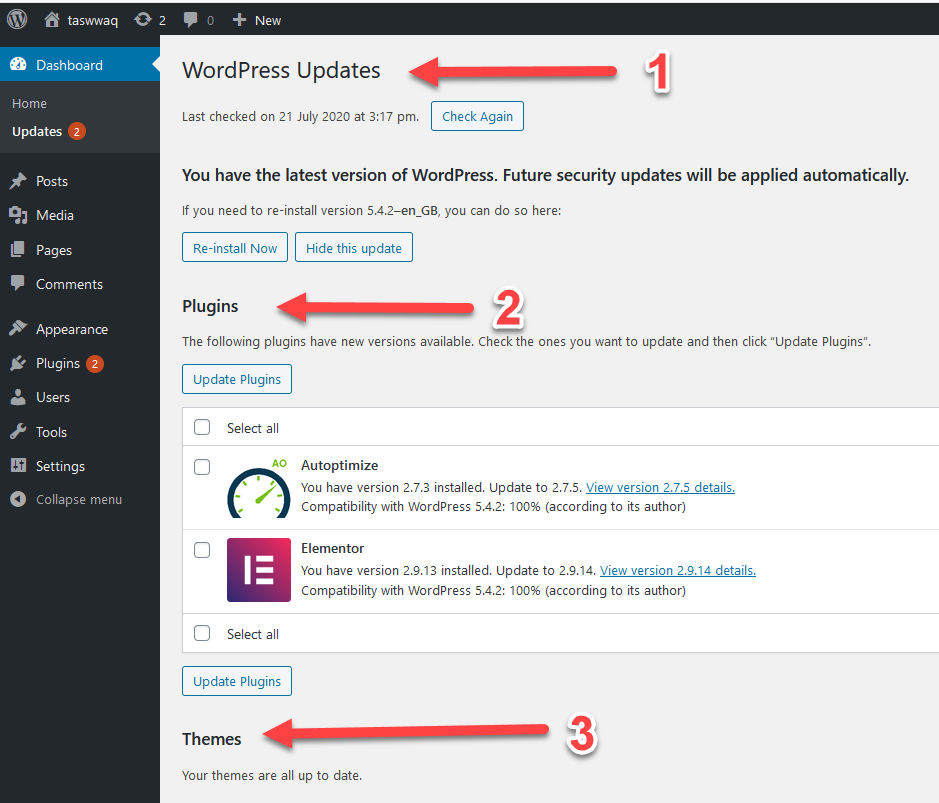
You will find the updates page divided into 3 sections
- 1. WordPress updates: This involves ensuring that you are using the latest version, and while there is a newer version, you will be offered to download the latest version automatically (by clicking the Update now button) if it is available.
- 2. Plugins: It displays the available updates for some of the plugins that you use. In this example, you will find two plugins, of which a newer version is available. You can download them by selecting the two plugins and then clicking on Update plugins.
- 3. Themes: It also includes updates available in the templates that depend on it
7.2 Change username and password
It is important that you use a secure username and password for your account on the WordPress control panel, so as not to make them easy for hackers to guess.
As for the username, try to make it unique, unlike some versions of WordPress that use it (Admin) by default. As for the password, it is important that it be more than 8 characters and contain small and capital letters, symbols, and numbers (ExAmPel!2#4)
7.3 Get a backup copy
When your site expands, and its data is updated periodically, it is important to obtain a backup copy on a daily or weekly basis. This step is extremely important to save your site files safely and so you can recover them if they are lost for any reason, God forbid.
If you rely on a hosting service that provides you with the feature of taking backup copies for an additional cost, I advise you to get it, as it is the best solution. Otherwise, you can take a backup copy manually by downloading the data base + site files to your computer, or relying on some add-ons to save backup copies, such as UpdraftPlus . Or BackUpWordPress .
Read also: The 6 best plugins for taking backups of your site
Note: You can choose to save data on a daily basis if your site gets major changes quickly, otherwise you can just make a weekly or monthly backup at first.
Thus, we have concluded this educational guide in providing a comprehensive explanation of WordPress and covering the most important basics and information you need to know how to manage WordPress.


Leave a Reply