you own a blog, online store, or any type of website on WordPress, the process of uploading various files, such as photos, videos, and other multimedia, will be a routine procedure that you do almost every day. You must learn all the details related to how to upload files within WordPress and manage them in an effective manner.
Ways to upload files and make them available for downloading to users
In this article, we will provide a comprehensive and simplified guide on ways to upload files within WordPress and how to add more options to the file upload process to help you upload files as efficiently as possible.
We will also highlight the most prominent problems or errors that website owners encounter during the process of uploading files, and how to fix and avoid these problems in a simple way and without any programming background or experience. Let us now review the methods for uploading files as follows:
1. Upload a group of files to WordPress from within the control panel
The first method on our list, which is the simplest and easiest direct way to upload files to WordPress, and you can implement it from within the control panel << then the “ Media ” option and then “ Add New ”.

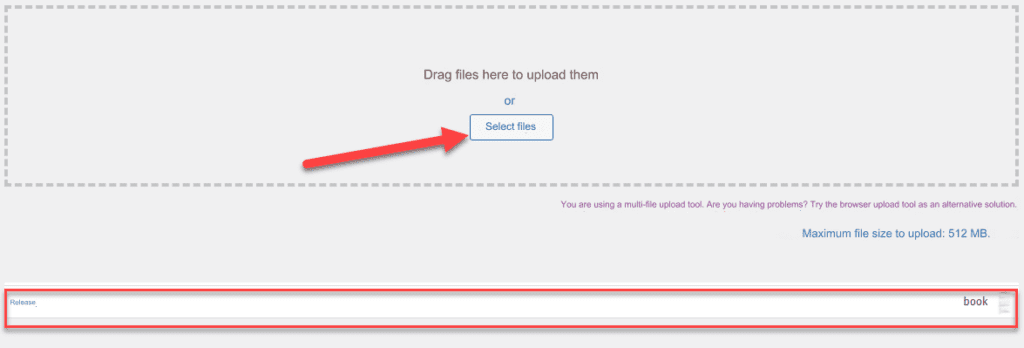
As you can see in the previous image, when you click on the “ Add New ” option in the “ Media ” menu, a page for uploading files to WordPress will appear. You can upload files by clicking on the “Select Files” button, where a browsing window will appear on your computer to choose the images or files that you want to upload to WordPress.
Note : If you want to upload images to your site, make sure that they are according to one of the following extensions (jpg – jpeg – png – gif – ico – svg). In addition to the previous file types, WordPress allows you to upload many other types of files other than images. Here is a list of the most popular file types that you can upload to WordPress:
- E-books pdf
- DOCX text document files
- PPT presentations and the like.
- Excel .xls files
- Image and video files
In this way, you can upload whatever files you want to the WordPress site in order to use them later in articles or general content within the site.
You can view all the files that have been uploaded to your site by going to WordPress Control Panel > “ Media ” then “ Library ” and a page will appear that contains all the images and files that you have previously uploaded.
When you click on any of the uploaded files, a page will appear for you containing all the data for the file or image, including the “ file link ,” which you can copy so that you can publish the image or file on any page, whether inside or outside your site, as shown. in the picture:

2. Upload files or images directly while publishing the article
In the previous method, we reviewed how to upload files within WordPress in one sentence, so that you can choose from them later while publishing different content on the site. Now we will explain how to upload files while editing an article or page on your site.
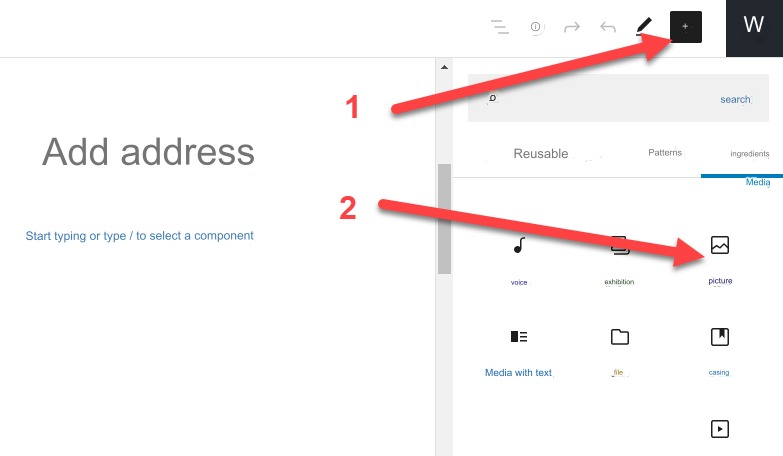
On the editing page of the article or page you are working on, you can choose an image from the gallery that we created in the previous method, or you can upload the image that you want to insert directly into the article, as shown in the following image.

If you want to know more details about the steps and methods for uploading media, you can see the following detailed article: Ways to upload images and media to WordPress for more information.
Upload files to WordPress and allow visitors to download them
We have talked in some detail about how to upload files to your site, but if you want to make these files, e-books for example, available for downloading to visitors, how can you do that?
First, it is obvious that you upload these files, the e-books, to your site, through the WordPress control panel > then “ Media ” > then “ Add New ” as we mentioned in the previous steps. For example, we will download a book with the PDF extension called “book” as you can see in the image:

The next step after downloading the file is to install the WordPress Download Manager plugin , through which you can assign a download button to any of the files that you have uploaded to your site.
After installing and activating the add-on on your site , you will notice that a new tab appears inside the control panel called download. When you click on it , the Add new button will appear , and when you click on it, it will open a page for you in which you can choose the files that you want to display for downloading by site visitors, as in the picture:

As you can see in the previous image, a settings page will appear that allows us the ability to upload downloadable files to the site. You will also notice a number of data that you must fill in:
- In field No. 1, you write the title of the file that you will display for download so that it appears in front of the visitor. You can write the name of the book, for example.
- In the indicated box No. 2, there is a “Select from media library” icon, which allows you to choose the file that you want to display for download from the file library on your site.
After that, you click on the “ Publish ” button.
After clicking the Publish button, we will move to the “All files” tab for the addition, where you will see a page containing the files or books for which you created a download page, as in the picture:

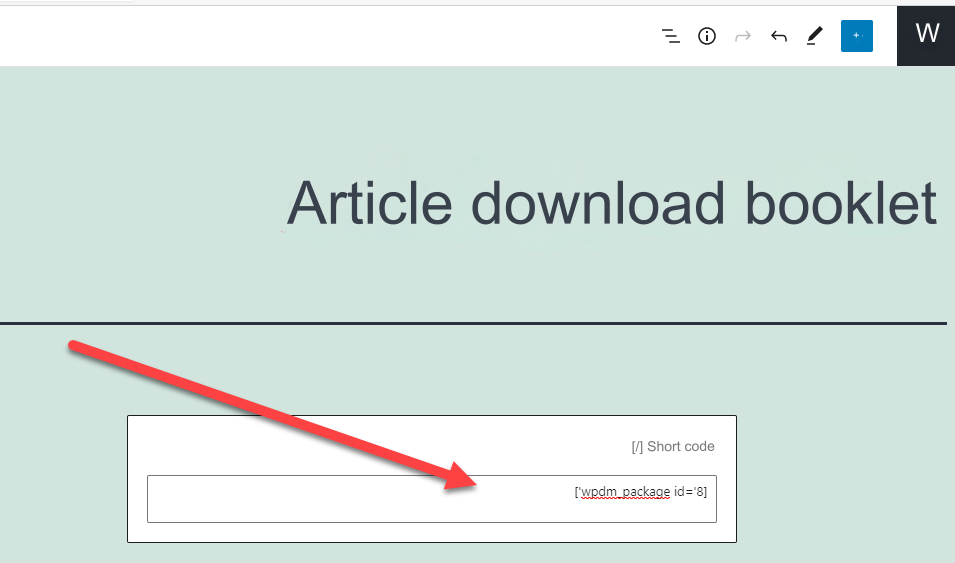
On this page, we notice the name of the file that we uploaded to the site, which is called Book, and next to it you will find a short code(indicated by the red arrow in the image). You must now copy this short code and paste it into any article or page on your site, and the download button for this file or book will appear inside the page or article and in the location where you pasted the code within the article.
The process of pasting the short code is very simple, as you open any article on your site and paste the short code as in the following image:

After pasting the code, you must publish or update the article, then visit its link, and you will find that a download button has been created for the book file. When you click on it, the visitor will be able to download the book as you notice in the picture.

Solve the problem of the maximum number of uploaded files in WordPress

The image above shows the notification that appears inside the control panel of the WordPress site when uploading a large file (larger than 512 MB) within the media library in WordPress, stating that the size of the uploaded file cannot exceed “512” MB.
In this case, if you want to upload files larger than 512 MB, WordPress will not allow you to do so, but the solution is simple, so do not worry.
The fastest way to solve this problem is by modifying the source code of the WordPress template that you use on your site. It is worth noting the importance of making a backup copy of the site’s data before making any change to the source code in order to avoid data loss if any malfunction occurs.
The first step that we have to do is to go to the WordPress control panel, then “Appearance,” then “Theme Editor.” Where a page will appear that contains the programming settings for the current template. In it, you will find the Functions.php file. We have to open this file and add the following code inside it. :
Note : In the previous code, you can change the value “1000M” to the size you want, and this number represents the maximum file size that you can upload to your site.
The process of modifying the source code will be as in the following image:

Immediately after adding the code and saving the file, you can now go to the media library in WordPress and click “Add New” to open the file upload page. You will now notice that the notification about the maximum upload file size has changed to 1000 instead of 512 MB, as in the picture:

Note : You will not be able to increase the maximum allowed size of files uploaded on your site if it mostly operates according to a shared hosting plan , because in that case you must write to the hosting company to ask them to allow increasing the maximum file upload limit.
Solve the problem of “Error uploading for security reasons”

In some cases, you may see the error message “Upload subl.exe failed” while uploading a file on your WordPress site, as in the previous image.
First, it must be made clear here that the problem “The upload failed for security reasons” appears in WordPress when you upload files that WordPress does not support by default, such as program files that have the .exe extension. For example, and other extensions that WordPress does not support. We previously mentioned in our article the file extensions that WordPress allows for uploading.
By default, the WordPress system does not allow uploading files that are suspected to contain viruses or suspicious files, so when you see an error notification regarding uploading for security reasons, you must make sure and be careful of the file you want to upload to the site, as it may contain malware.
Therefore, you must check carefully before uploading any file that WordPress tells you is blocked for a security reason, but we will assume that the file you want to upload is in a format that WordPress does not allow by default, and that you completely trust this file. In this case, you can upload it in the manner we explained previously.
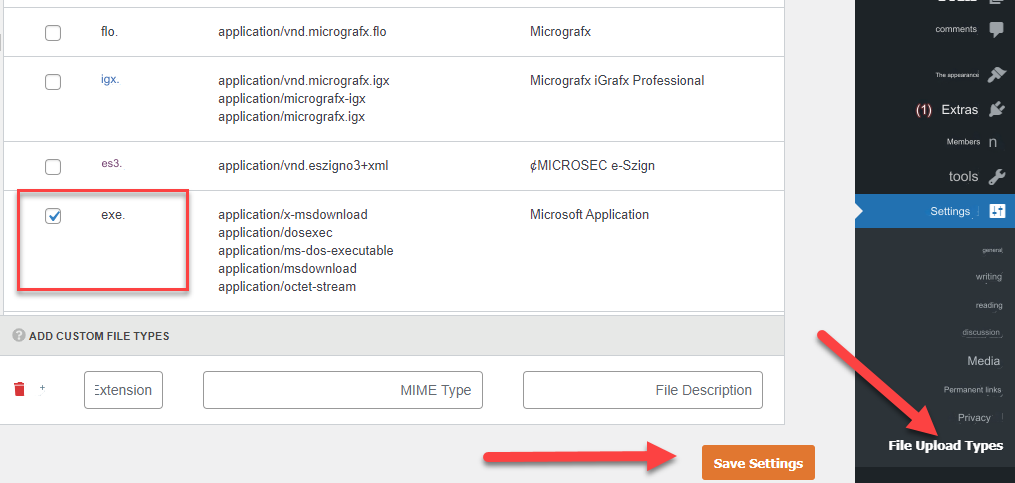
To solve this problem, we will resort to using the File Upload Types by WPForms plugin . First we must install and activate the add-on, then after installing the add-on on your site, now go to the WordPress control panel, then “ Settings ” and you will find the file Upload types tab for the add-on that you installed.
When you enter the extension tab, the following page will appear to you, which includes all types of files that WordPress does not support by default, where you can easily choose the type of files that you want to have an exception applied to and be allowed to be uploaded without showing the previous security error message.

In the end, the process of uploading files to WordPress is not a complicated matter, but rather it is one of the simplest routine procedures for website owners. In this article, we have detailed everything you need to know about how to upload downloadable files in WordPress while assigning them an upload button for visitors. We also touched on the most prominent accompanying problems. For the lifting process and how to handle it


Leave a Reply