Sometimes website owners need an effective way to remind your website visitors about updates, alerts or offers about their business. In this case, you will find many options, such as making a pop-up window or adding the reminder to the site’s home page.
All of these options are not effective enough. The pop-up window may be somewhat annoying, and visitors may not see the reminder or offer because they did not visit the home page. But through the notification bar, you will be able to alert your site visitors in an eye-catching way without disturbing them.
What is the notification bar?
Notification bar is a bar dedicated to providing notifications and alerts that appears at the top of the site and is widely used in online stores to promote offers, discounts, and product updates.
It is also used in blogs to remind users and collect emails, and as one of the ways to increase followers on social media channels, and its form looks like the following:
Why should you add a notification bar to your site?
As we said, the notification bar is used by many large websites, and there are a number of reasons why you should consider this step seriously, and I will summarize them for you as follows:
- Through the notification bar, you can remind visitors to your online store or website about important offers, which increases visits to the offer and attracts more visitors to your website.
- You can add a reminder to visitors to like or follow your accounts on social media platforms. This is done by urging them to do so and adding a follow button on social media platforms.
- It is possible to add a notification bar to remind site visitors of updates, such as announcing the availability of a product, changing content, or even changing the privacy policy or terms of use of the website.
- Many sites use the notification bar to collect some data about visitors, for example e-mail or phone numbers, and provide recommendations, opinions, and suggestions about content, products, or the state of the site in general.
How to make the Notification bar in WordPress
Creating a notification bar on your website is easy, and in the following lines we will learn how to do this by using one of the plugins or through the manual method.
Make the notification bar using an extension
First, we will be able to activate the notification bar through one of the external add-ons, and we will rely on the Hello Bar add-on, as it is one of the famous add-ons that are used to create the notification bar. In the first step, we will go to the Hello Bar add-on website.
Then log in to the site or create a new account by entering your email and the link to the site to which you want to add the notification bar.
1. Install and activate the Hello Bar add-on
Now, you will need to add Hello Bar to the site by going to the control panel, then clicking on ( Add-ons ), then ( Add New ), then search by the name of the add-on, then install and activate it.

2. Link your account by adding Hello Bar
In order to be able to create a notification bar, you need to link the account that we created previously, by going to your account on the Hello Bar website and clicking on the website link at the top.
Then click on I use WordPress . Copy the code that appears on the window.
After that, go to the site’s control panel and click on the Hello Bar add-on icon, which you will find added to the right menu. Then scroll down and add the code to the custom field and then select on the bottom option of the field. As a final step, click on Activate Hello Bar

3. Create a notification bar
Now, you have to go back to the extension’s website and click on the Create New Popup option
Determine the goal you want to achieve by adding a notification bar, whether it is to present offers or divert visitors to specific content on the site, or to create a list for marketing through email and other goals.
Adding the Hello Bar allows you to have many types of notifications, and we will certainly choose the top notification bar, and you can select the appropriate style for you.
After that, you can customize the notification by entering the text you want, font type, and color. The addition gives you several notification bar shapes that you can choose from by clicking on the template option, and all designs will appear on the right side of the screen.
There is a Bar Styling option to modify the color of the bar, the font color, the background, and the placement of the advertisement bar. There is a third option, which is the Countdown Timer, which allows showing the countdown, but this option is only available in the paid version of the add-on. After completing that, click on the Next option at the bottom.

In the next window you can control many aspects of the notification bar, where you will be able to:

- Adding your own logo, but only in the paid version of the add-on.
- Move the notification bar.
- Allow users to hide the notification bar.
- Show notification bar even when you scroll down the page.
- Adjust the notification appearance time.
Make the necessary settings, then click Next
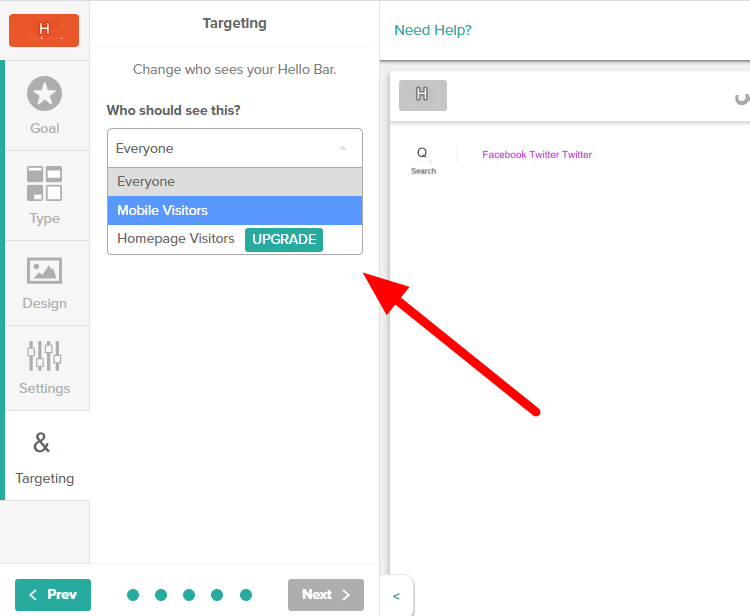
In the next section, you will be able to specify who can see the notification bar, whether mobile phone users, all visitors, or only home page visitors

In the next step, after completing the process of customizing and preparing the logo, click on Publish Now
After that, a notification bar will be added to the website
The addition will provide you with a set of analytics, such as the number of views and clicks on the notification bar, in addition to identifying the number of people registered on the mailing list and interacting with your social media accounts.
The add-on also comes in a free version with limited features, such as it does not allow you to have many features, such as removing the logo for the Hello Bar add-on. Or advanced targeting features. But you can start with the free version.
Make the notification bar work manually
There is another method that allows you to add a notification bar to the site without using any add-on, and this may be a suitable option for those who do not want to install a lot of add-ons on their site due to their impact on the site’s speed or other reasons. But this method requires some advanced skills.
Read also: Does too many plugins affect your site’s performance or not?
To make the notification bar through code, you will rely on the following code, which you can copy:
Then, go to your WordPress dashboard and click: Appearance > Customize
Select Additional CSS, paste the code (make sure the code is similar to the one shown in the image below) and click Publish.
Then you have to copy the following code
Go back to the Control Panel and go to: Appearance > Template Editor . Select the header.php file, then scroll down and paste the code at the bottom of the file. And click (Update File)
The notification bar will appear directly on the site after that, and if you have some experience in modifying codes, you will be able to change the notification color, font, height, and width, as well as the time the bar appears and disappears, and all other options.
In the end, we hope that the article has been helpful to you on how to make the Notification bar in WordPress with a great appearance and features.
Knowing that there are some other add-ons that provide you with this, such as OptinMonster and HubSpot, and if you want more professionalism and customization of notifications on your site, you should avoid the manual method because you will need to use a lot of codes to get all the benefits, and you should use one of the add-ons mentioned in this article.


Leave a Reply