website contains many articles, pages, images, and a lot of different data, and search engines can actually identify and separate that data, but that data can be identified in an unorganized manner, and you cannot control that data as it suits your website.
Therefore, when creating a new WordPress website, we must create a sitemap to help us control and organize all website data for search engines.
You can create a sitemap file in simple steps and in more than one different way that does not require technical experience at all. This is what we will explain in today’s article in detail and we will help you more to understand the meaning of a sitemap, its importance, and how it affects your website, so continue reading the article with us.
What is a sitemap?
The sitemap file is one of the basic WordPress files that contains URL links to all your website data, including articles, pages, comments, posts, links, keywords, and more.
Site maps are divided into two types as follows:
- HTML Maps : HTML maps are the basis for the emergence of site maps, as they consist of an interconnected map of all the pages of your website that the user can rely on and navigate within your website, so they were targeted at visitors, not search engines.
- XML Maps : They are the newest type of site maps and the most widely used currently. They also show all the pages of your website, but not in a coherent manner, so visitors cannot rely on them to navigate within your site. Therefore, they target search engines, not visitors, unlike HTML maps, which are more effective for search engines and this type. Which we will rely on in today’s article.
You can easily access the sitemap through the following link:
yourdomain.com/sitemap.xml
This link can certainly be changed as a type of security for website data, but this is the basic link for all WordPress sites in general, and the sitemap does not come automatically from the WordPress system, but must be created manually, so if it is not on your website, you will find the previous link is a page Empty.
Why do you need an XML Sitemap?
I mentioned in the introduction that search engines can actually access your website if you do not create a sitemap, so you may ask yourself as a new website owner: Do I need to create that map or not?
The answer will be yes, definitely. You must create a sitemap for your website, because search engines will not easily reach all the page titles of your website, especially if those pages are not linked well and organized. Let us assume that you have created a new WordPress site, but there is a specific page that has not been linked. As shown in the following picture:
You will find that search engine spiders will not be able to access the pages shown in the red box in the previous image because they are not linked to the main page of the site. If they are identified, you will find that the archiving process most of the time takes a very long period of time compared to the other pages on your website.
The matter is also not only related to pages that are not well linked, but also to the site’s performance in general, as the difficulty of identifying your site’s files for search engines in general causes a delay in archiving your website’s pages.
The problems of not having a sitemap file appear noticeably in sites that have a large number of pages or whose pages are updated periodically, where you will find that you have updated the content of the page, but the search engine has not sensed this update.
Therefore, in order to overcome all these problems in a simple way, you create a sitemap. It is worth noting that the process of creating a sitemap does not require technical experience and will also not take a long time. We will explain all the steps in detailed pictures in the following paragraphs, so continue reading the article with us.
How to create a sitemap in WordPress?
As we explained in the previous paragraph, creating a sitemap does not require complete technical experience, and there are many different tools that provide you with the ability to create a sitemap with one click. During the following paragraphs, we will show you how to create a sitemap with all the common tools in a pictorial manner.
Create a sitemap using Yoast SEO or Rank Math tool
Content optimization tools can be relied upon to create a sitemap on WordPress sites. The most popular tools that provide this functionality are the Yoast SEO tool and the Rank Math tool, and most users prefer to rely on these tools instead of installing a separate plugin.
The first and most widely used tool is the Yoast SEO tool. If it is not installed on your website, you can go to the main WordPress panel and from there choose the Add-ons tab, then choose Add New from the drop-down menu, and then search for the Yoast SEO plugin as shown in the following image:

After that, you click on Install Now and wait until the Yoast Seo add-on is downloaded and installed on your website, then click on Activate.
Now we go to the Yoast SEO add-on settings, where you will find a new tab added to the WordPress control panel called Yoast SEO. You click on it, then choose the settings, then choose the site features, as shown in the following image:

After that, you scroll down until you find the APIs section, and inside it you will find a list called XML Sitemaps. You activate this option by activating the enable feature button, as shown in the following image:

The method of creating a sitemap may differ according to the version of the Yoast Seo add-on on your website, but the general steps are fixed, and in this way the sitemap was created successfully. You can access the sitemap link by clicking on the Show Sitemap XMl button and it will look like the following image:
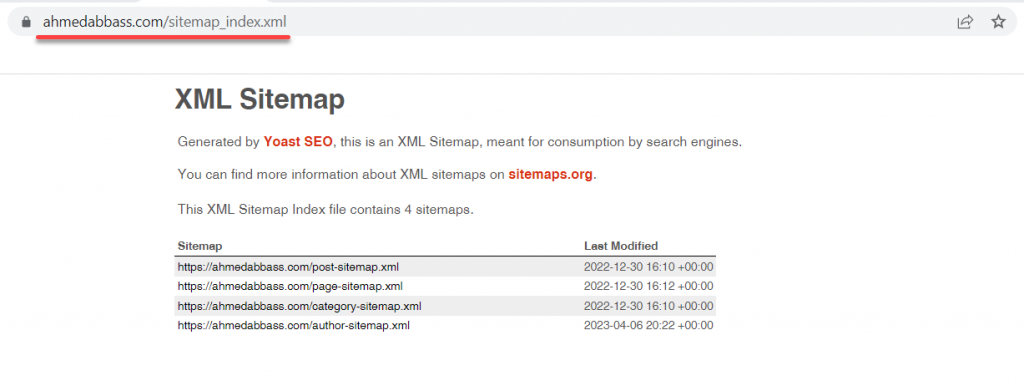
We will need the link to the sitemap in the section of submitting the sitemap to search engines.
If you rely on the Rank Math plugin , you can also create a sitemap in very simple steps. First, you choose the Rank Math tab from the side menu of WordPress, and from there you choose Dashboard until you are directed to the Rank Math plugin settings.
Then, search in the Rank Math add-on settings for the Sitemap option and activate this option as shown in the following image:

In this way, the sitemap was created using the Rank Math add-on. You can control all the sitemap settings by clicking on Settings in the Sitemap tab. You will be redirected to the sitemap settings page, and at the top of the page you will find a link to the sitemap on your website, as shown in the following image:

It is worth noting that the Rank Math add-on provides you with many more options than the Yoast Seo add-on, which helps you adjust the site map better and easier, as you will find that all the options are in Arabic and an introductory summary of usage is integrated with it. When the option is activated, the XML programming lines are added directly to the site map. The site without your intervention. The most important of these options are the following:
- Control the maximum number of archived links per page.
- Include images in the site map.
- Control the archiving of articles, pages, and attachments in the site map.
- Exclude specific pages or articles from the site map, for example the login page, search page, etc.
- Control the archiving of classifications, tags, categories, etc.
There are several other settings that you can easily learn to help you improve your website archiving.
If you do not rely on one of the previous search engine optimization add-ons or want to install a custom sitemap add-on, you can rely on the Google XML Sitemaps add-on, and this is what we will explain in the next paragraph, so continue reading with us.
Create a sitemap using the XML Sitemap plugin:
The XML Sitemaps plugin (formerly Google XML Sitemaps) is a custom plugin from Google for preparing the sitemap file in WordPress, and it is a completely free plugin.
First of all, you need to install the XML Sitemaps plugin on your website. You go to the main WordPress control panel, choose Plugins, then Add New, and start searching for XML Sitemaps, as shown in the following image:

You now click on Install Now and wait until the XML Sitemaps add-on is downloaded and installed on your website, and then you click on Activate.
After that, you choose the Settings tab from the WordPress side menu, and you will find that a new option has been added:

You now adjust all the sitemap settings to suit your website, then click Update Settings. In this way, the sitemap has been created correctly on your website by adding XML Sitemaps.
Now that we have created the sitemap on our website, the next step is to define the sitemap on the various search engines, and this is what we will explain in the next paragraph, so continue reading the article with us.
How to define site maps on search engines
The method for defining a sitemap varies depending on the search engine you rely on, so we will show you how to submit a sitemap to the most popular search engines, which are Google and Bing.
Adding a sitemap to the Google search engine
The Google search engine is the most widely used search engine, and you must define the sitemap that you created and modify it with previous additions to it. You can actually do that using the Google Search Console tool, which is a free tool from Google that helps monitor the performance of your site in general in terms of the number of visits. And its source for each page on your website separately.
You enter the Google Search Console tool through this link , click on Get Started Now, then register with your Google email.
After that, you will be asked to specify the method of linking to your website, whether through the domain or the URL prefix. It is preferable to choose the URL prefix because it is easier to link to the site in more than one different way, and then you add the name of your website in the following image:
https://www.yourdomain.com

Now you will be asked to prove ownership of the site and you will find many different options available. We choose the easiest option, which is the HTML tag, which is HTML code that is added to the header of your website, as shown in the following image:

After copying the HTML code, you now need to add it to your website. You go back to the WordPress control panel and choose Add-ons from the side menu. From there, choose Add New and search for the Insert Headers and Footers add-on, which is a simple add-on that helps you add code directly to your website, as Shown in the following picture:
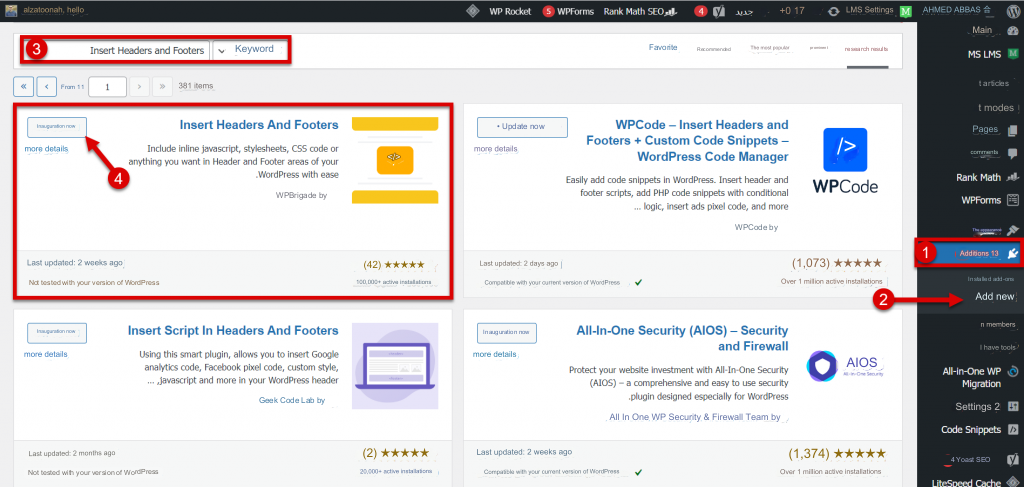
So you click on Install Now and wait until the add-on is downloaded and installed on your website, then click on Activate, and then choose the Settings tab from the WordPress side menu. You will find a new option called Wp headers and footers, so you choose it until you move to the Insert Headers and Footers add-on settings.
After that, you go to the Scripts in Header section and paste the HTML code copied from the Google Search Console tool, as shown in the following image:
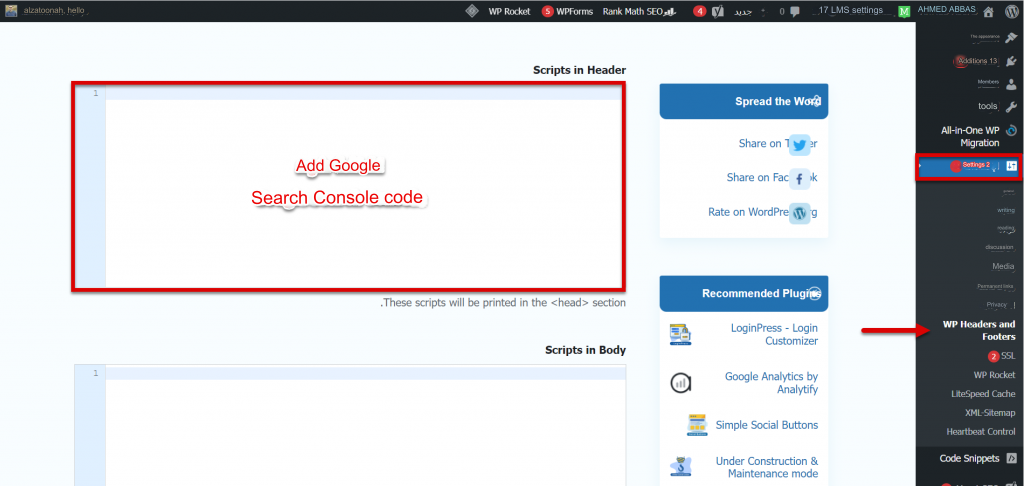
After adding the Google Search Console code, you click Save Changes and return again to the Google Search Console tool and click Confirm as shown in the following image:

After that, the Google Search Console tool will search for the HTML code on your website until the code is found, and a message will then appear to you indicating that ownership has been verified, so you click on the Go to the site button, as shown in the following image:

After that, you will be directed to the main interface of the Google Search Console tool, where you can choose Sitemaps from the side menu, and you will notice in the Sent Sitemaps tab a message that the file could not be retrieved.
You choose the Add a new sitemap tab, and you will be asked to specify the URL extension for the sitemap. So you type the URL extension that was obtained from the previous sitemap creation tools, which is as follows:
sitemap-index.xml
Then click Submit as shown in the following image:
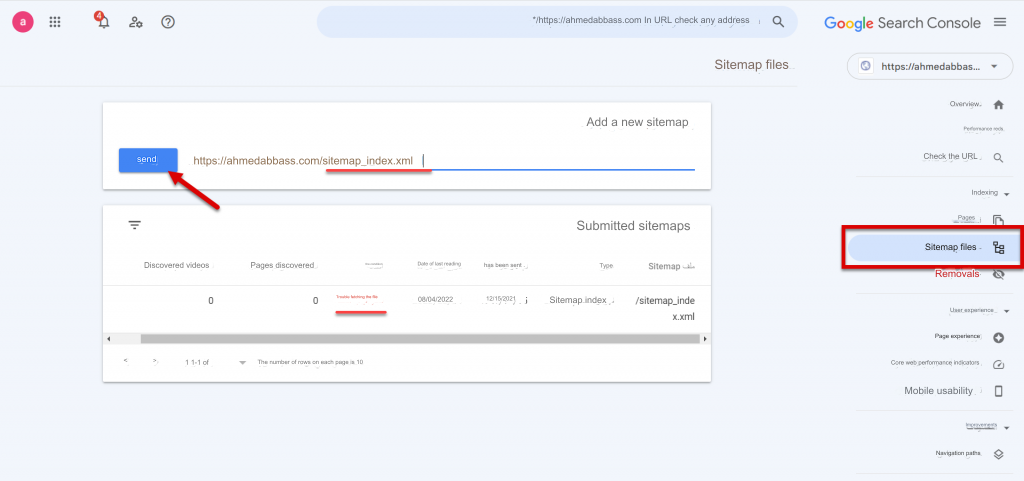
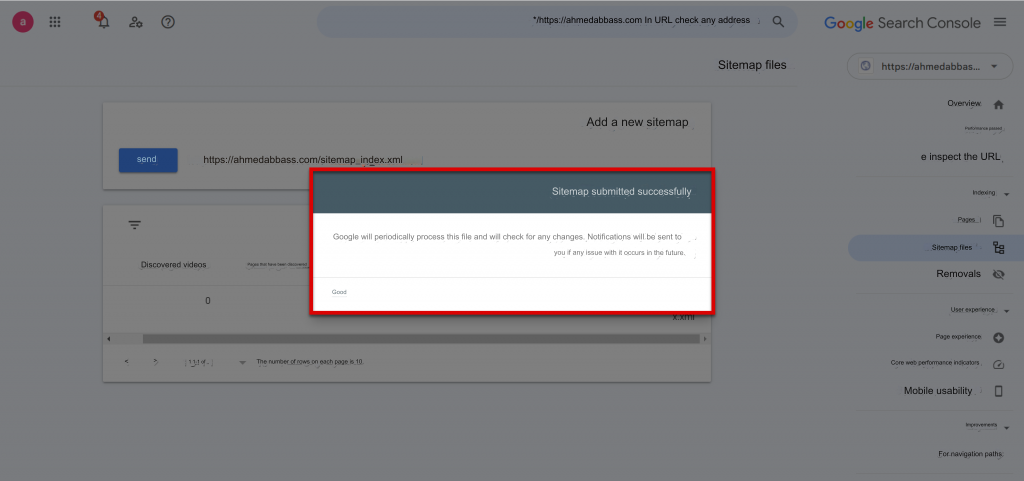
Google Search Console will now search for the sitemap on your website and fetch all its information. Wait until a message appears: The sitemap has been sent successfully, as shown in the following image:
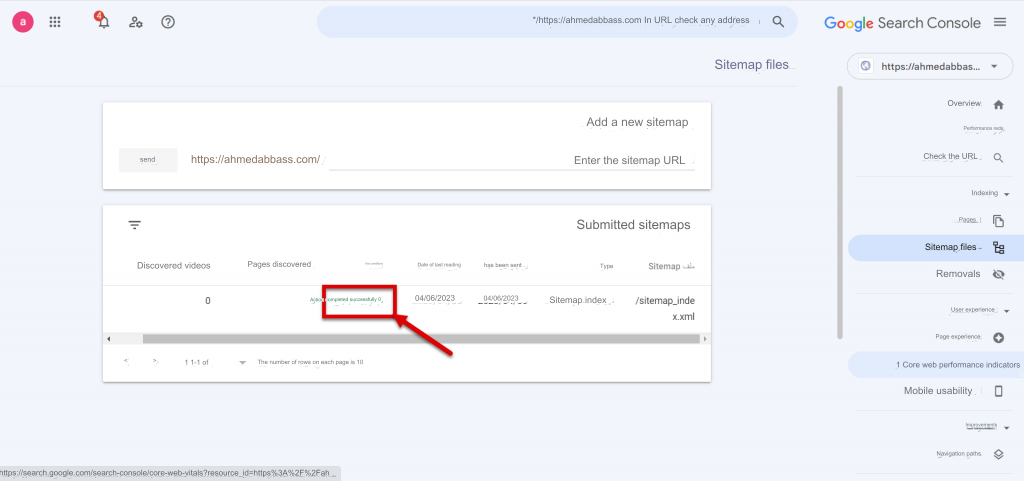
When you review the Sent Sitemap Files tab again, you will find that the status of the Sitemap file is “Completed Successfully” instead of the previous message: “The file could not be fetched,” as shown in the following image:
In this way, the sitemap was successfully sent to the Google search engine, and in the following paragraphs we will show you how to add the sitemap file to other search engines to get the greatest possible benefit, so continue reading with us.
Add a sitemap to the Bing search engine
The Bing search engine is considered one of the very important search sources, especially after the integration of search features supported by artificial intelligence, which made most users move from the Google search engine to the Bing search engine, so you must add your site to the Bing search engine as well in order to benefit from all available search engines.
First, you log in to Bing Webmaster Tools, which is a tool equivalent to the Google Search Console tool in the Bing search engine, through this link and log in. You can log in using your Google account without problems.
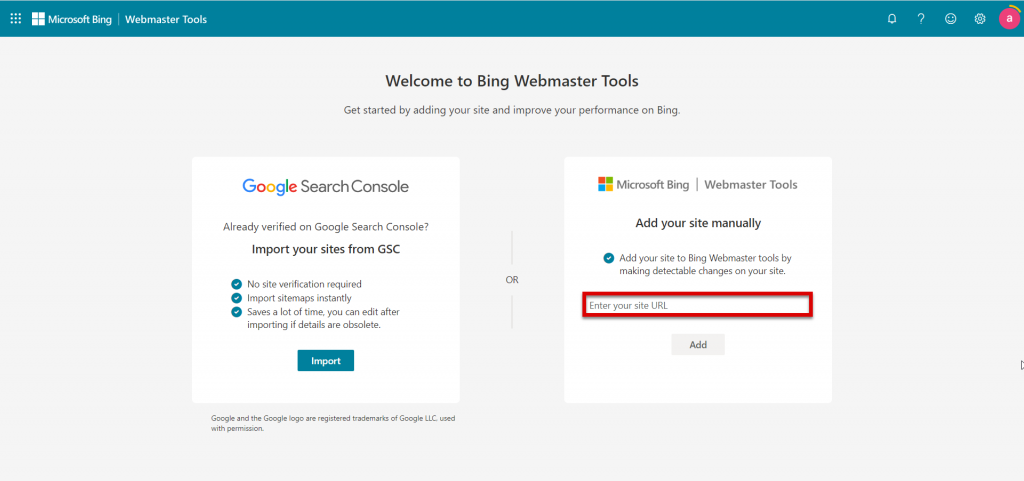
After that, you will be asked to specify the method of adding the site, whether by adding the site’s URL link directly or pulling the site’s data from the Google Search Console tool if it was previously added to it. It is preferable to rely on the first method, so you choose the Add your site manually tab and write the site’s URL in the https format. ://www.yourdomain.com and click on Add as shown in the following image:
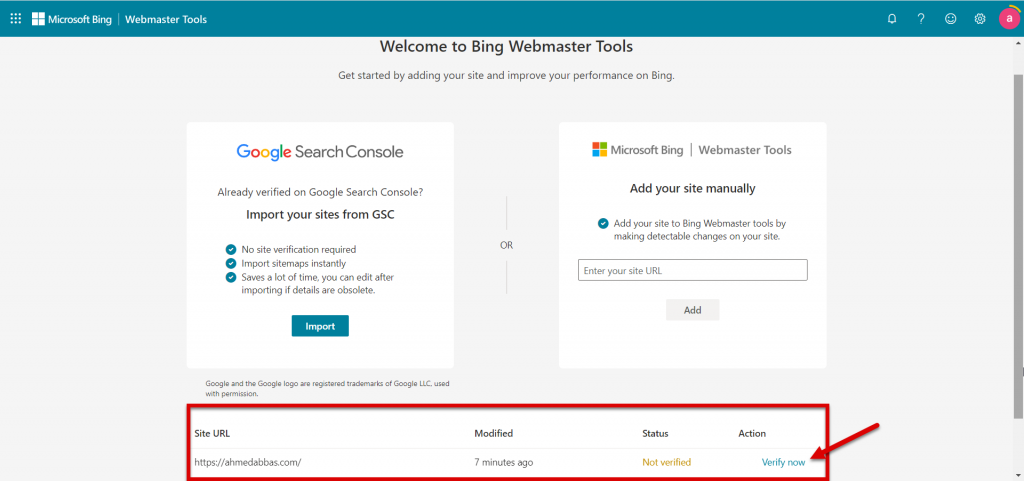
After that, you will find that the site has been added to the bottom list, but the status is inactive, so you click on Verify Now as shown in the following image:
You will see a set of options that will help you prove ownership of your website. We choose the HTML Meta Tag option as we did with the Google Search Console tool and copy our HTML code as shown in the following image:
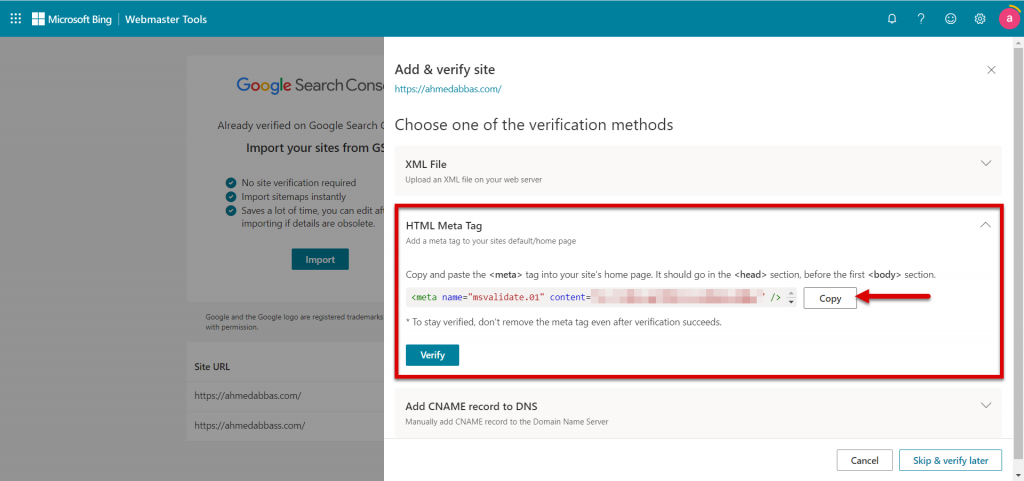
After that, we go back to adding Insert Headers and Footers again and paste the code for the Bing Webmaster Tools tool in the Scripts in Header section and then click the Save Changes button, as shown in the following image:

After adding the code to add Insert Headers and Footers, we return to the Bing Webmaster Tools tool and click on Verify as shown in the following image:
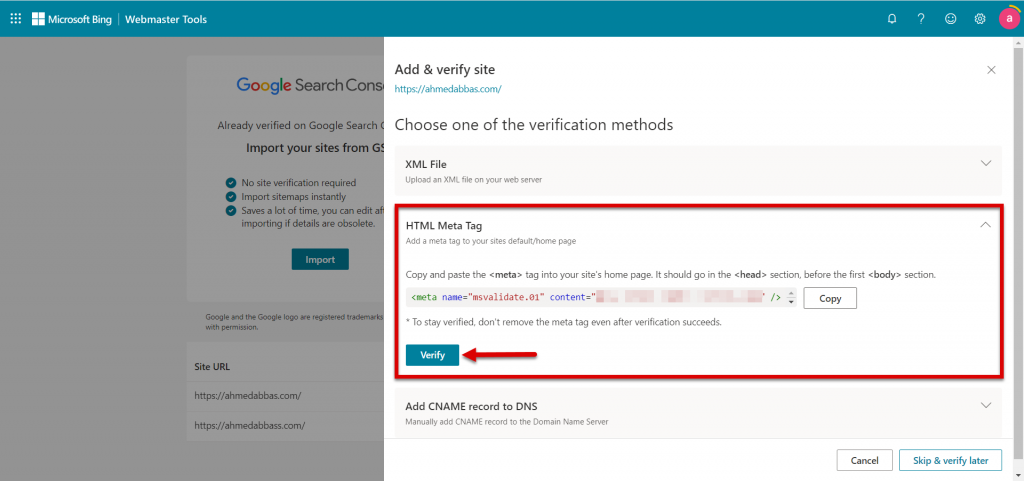
You wait until Bing Webmaster Tools searches for your code on your website and confirms proof of ownership, after which you will be transferred to the main control panel of Bing Webmaster Tools.
So you choose the Sitemaps option from the side menu, then click on Submit Sitemap. You will be asked to write the URL of the sitemap, so you write it in the following format:
https://www.yourdomain.com/sitemap-index.xml
Then click Submit, as shown in the following image:
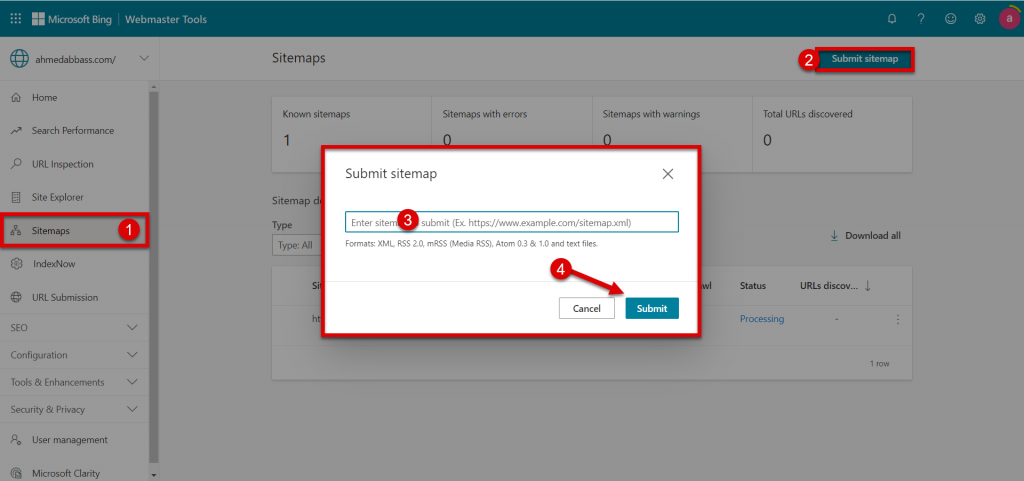
In this way, the sitemap was also successfully added to the Bing search engine and you can make the most of it. It is worth noting that there is no conflict between adding the sitemap to more than one search engine.
Conclusion
The sitemap file is one of the basic files on your website, and from the previous paragraphs you will find that the process of creating a sitemap file does not require dedicated technical expertise or a long time, so you can prepare it easily.
You may not initially feel the importance of site maps for search engines, but its importance will become clear when your website begins to expand and a large number of articles and pages are published and updated periodically.
In today’s article, we provided you with a comprehensive guide to the sitemap file in terms of its importance and how to create a sitemap file with all the common additions and in a pictorial format as well, in addition to how to deal with the sitemap file and upload it to various search engines.
If you have a special question or inquiry that was not answered in today’s article, do not hesitate to comment below the article and technical support will respond to you as soon as possible, God willing.


Leave a Reply