In today’s article, we will learn how to add custom line spacing between paragraphs or blocks on a WordPress site. WordPress editors provide several features for formatting elements, but the option to control line spacing between paragraphs or components is not very customizable.
For example, if you are using the traditional editor in WordPress, all you can do is add a blank line by pressing Enter to add a double spaced line break, which is a new paragraph.
Or press Shift+Enter to add a single line break after the end of any line, which is considered a new line within an existing paragraph.
So if you want to add different heights and line spacing, you probably won’t be able to do that in the default editors. But there are several ways through which you can change line breaks in WordPress to any specific values you want, as we will explain to you in today’s article.
Why do you need to change line breaks in WordPress?
Proper paragraph formatting and layout within articles or pages is important to improve readability. Proper line spacing enables your site users to find things within the article or page more easily. It also helps make articles clearer and more elegant, enables readers to distinguish paragraphs, and improves the overall user experience.
In the following paragraphs, we will explain to you the ways to control line spacing options on a WordPress site in the correct way, either manually through CSS code, or through ready-made plugins that eliminate the need to write code and enable you to accomplish this task easily.
Change line spacing in WordPress using CSS
To manually add a line break to a WordPress site, you need to add some CSS code to the template installed on your site, as follows.
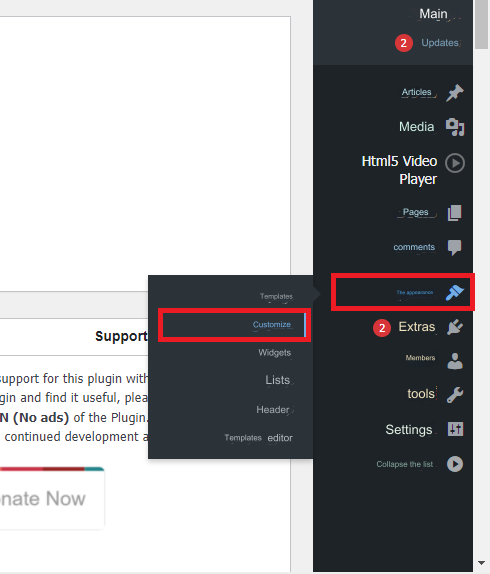
1-Go to your WordPress site’s control panel and choose Appearance > Customize > Additional CSS
2-Add the following code to the text box
This code changes the line spacing of paragraph content to the value 2em (em is a display unit intended for print).
Here we used the .post row that WordPress automatically adds to the content area of all posts to ensure that the code only affects article paragraphs and not paragraphs used elsewhere. On site.
This code only changes the single spacing of single paragraph lines. If you want to change the spacing between paragraphs with double spacing, you will need to add padding to the code as follows:
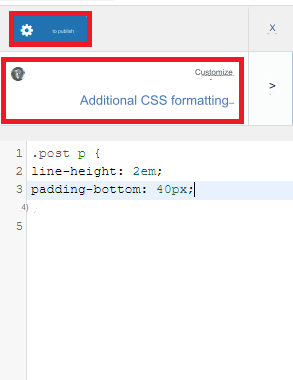
Now click the Publish button at the top to save the changes you made, then review one of your site’s articles and notice how the line spacing has changed with the new values. You can modify the previous numbers until you get the spacing that’s right for you.
Change line spacing in WordPress with the Spacer plugin
The Spacer plugin is considered one of the easy-to-use and lightweight plugins that enables you to control line spacing in WordPress very easily. This plugin expands the classic WordPress editor and adds different line spacing options that you can use according to your need.
It is also compatible with the Gutenberg editor, which relies on the principle of dividing content into several blocks that control each block separately. The addition adds a button to the paragraph block through which you can control the line spacing of any paragraph you add to the site. It also allows you to modify the line spacing specifically for mobile devices. To appear perfectly on any screen size.
The plugin also enables you to enter negative spaces so you can move the content up if you wish. It also enables you to create your own library containing the line break values you want. So they are always at your disposal and you can add them at any time with the click of a button.
The add-on is available in a free version and a PRO version that supports additional features. Below we will explain how to control line breaks in WordPress using the free version of this plugin.
Install and set up Spacer add-on
1-Go to the Plugins page in the WordPress control panel and search for the name of the Spacer add-on, then install and activate the add-on on your site.

2-Once you activate the add-on, go back to your site’s control panel > choose Settings > then choose Spacer. This will take you to the extension’s main settings page.
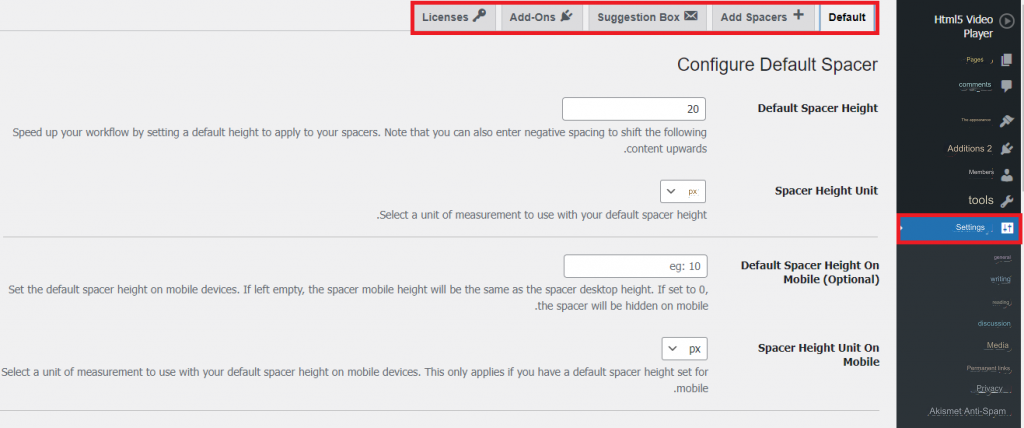
Through this window, you can set up the plugin as you want and add separators to change the line spacing on the WordPress site with the values you want, as the plugin contains five tabs as shown in the previous image.
Through the first tab, Default, you can customize the default settings for line spacing. This means that if you haven’t added manual breaks yourself, this will be the only major break available to insert between paragraphs.
The first field, Default Spacer Height: enables you to specify the default value for the line break, and its default value is 20 pixels.
The Spacer Height Unit drop-down menu enables you to select the spacing unit (px, em, rem, %)
In the following two fields, Spacer Height Unit On Mobile and Spacer Height Unit On Mobile, you can specify a single default spacing value between lines that will be used on mobile devices.
If you leave the Spacer Height Unit On Mobile field blank, the height of the mobile spacer will be the same as the spacer height selected for the desktop. If you enter the value zero, the breaks you added between the lines will be hidden when viewing the site on a mobile phone.
There is an additional set of options, but optional, that you can customize in this tab:

In the Default Spacer Class (Optional) field you can enter a custom CSS class to apply to all spacing elements. Multiple rows can be added by placing a blank space between the name of each row.
Finally, in the Spacer Style text box , you can write custom code to format the spacing if you have a good knowledge of CSS, as this code will be applied to all spacing elements.
Through the second tab (Add Spacers) you can add custom line breaks:

To add a specific line break to your own library, all you have to do is click on the +NEW SPACERE button on this tab, select all the options you want to create the spacing with the values that suit you, then give the break a unique name that expresses it so that you can distinguish it when you add it in an article. Or page.

After selecting all options click the SAVE CHANGES button at the bottom to save your changes and automatically add the new break to your library. You can repeat these steps to add as many line breaks as you want.

After completing setting up the add-on, all you have to do is add the separator you want within any article or page you want as follows:
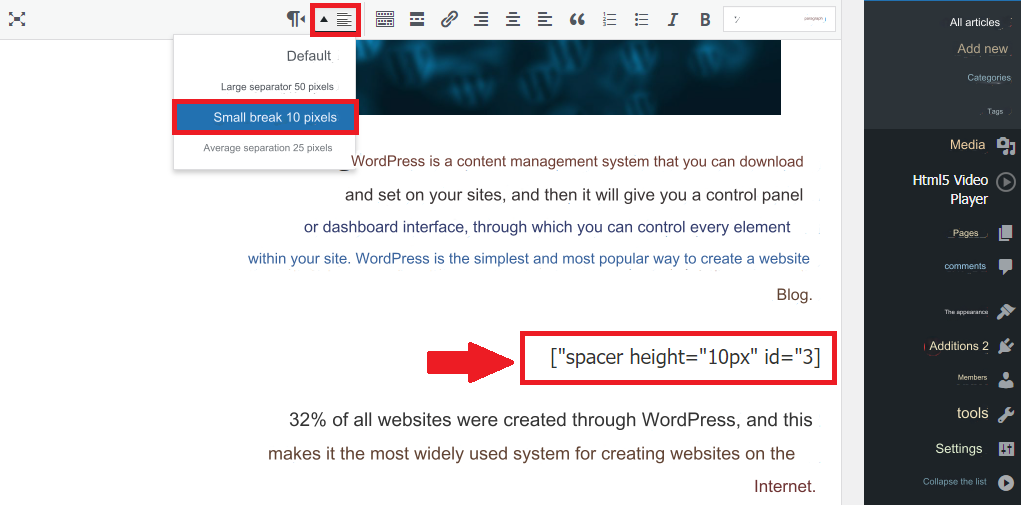
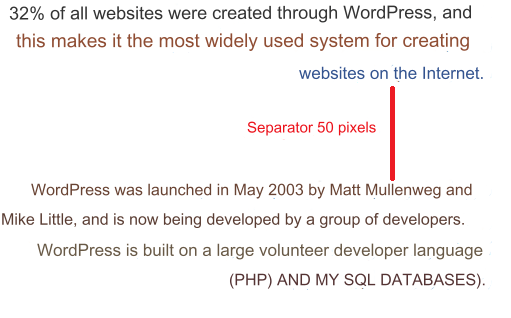
Open the page or article in editing mode. If you are using the traditional editor, you will notice that a new button has been added to the editor to add a break, as in the following image. To add one of the separators you have created, simply click this button and your added separator library will appear, choose the separator you want and that’s it.
Note: If you are using the Gutenberg editor, you can also use this add-on by adding the (Traditional) component, which inserts the traditional editor into the article, and you can then choose the line break button as we explained previously.

That’s all, now review the article and notice how the spacing has been changed according to the separators you added..
In conclusion, in today’s article, we explained the importance of being able to change the line spacing on a WordPress website and adding different types of line spacing breaks on a WordPress website. We showed how to add this feature to a WordPress site manually through code, or by using the Spacer add-on, which gives you the ability to add many different spacers upon request and specify different values for them on different devices.


Leave a Reply