Creating a website is something that has become available to all people, for all purposes whether for personal or commercial use.
One of the reasons why creating a website is one of the easiest things at the present time is the availability of professional tools for the process of designing and launching the website. You do not have to be a web developer to do this due to the presence of many tools that facilitate building websites, such as WordPress and Shopify ( Shopify, and Squarespace.
What are the ways to create a website?
There are many ways to create your own website, but the following methods are the most popular and one of them will most likely suit you:
The first method
is to use WordPress , which is a content management system that allows you to create and manage a website using a simple control panel, in addition to providing thousands of templates and plugins that contribute to customizing the site’s design and enhancing its functionality.
The WordPress system enables the design of a website regardless of its type and function, whether it is a services website, a blog, a personal website, and others.
The second method
depends on choosing a tool from among the website creation tools such as Shopify if you are creating an e-commerce website, or Squarespace if you want to build a public website.
It is similar to WordPress in the way the website is designed with different control panels and functions. However, WordPress is the strongest competitor due to its acquisition of 39% of websites, while Shopify, which is its second competitor, accounts for only 3.2%.
The third method
is to start creating a website from scratch by programming it completely using various programming languages, then integrating it with a hosting plan to run it. It is an expensive method and takes a lot of time as it depends on hiring a team of designers and programmers, but it provides the advantage of complete control over the site. In terms of design, management and functionality.
Create a website using WordPress
WordPress provides the ability to create a website without requiring a lot of effort, time, or even knowledge of programming languages.
WordPress is the largest content management system in the world, and is an open source that allows everyone to use it to create or develop websites for free. But before you start directly creating the website through this system, you first need to obtain hosting and a domain.
The detailed steps to create a website using WordPress are as follows:
1- Get hosting
Hosting, in short, is a way to save and share website information among all users, in addition to ensuring its continued operation at any time and the possibility of accessing it from anywhere.
To start designing a website, whether you use WordPress or any other system, you will need paid hosting, which can be obtained from international hosting providers such as Hostinger , Siteground , and Bluehost .
In this case, most popular hosting sites provide two cases. The first is to purchase a general hosting plan on which any type of website can be created, whether you use the WordPress system or not.
The second is to purchase dedicated hosting to build a WordPress website, and it is distinguished from the first by providing additional capabilities such as installing the WordPress system with one click, increasing its efficiency in running WordPress sites, and enhancing the site’s security.
In addition to the above, the hosting plans themselves are divided according to their type and the capabilities they provide, and their types include:
– Shared Hosting:
The shared hosting plan falls within the primitive plans used in designing a website, as it depends on sharing the hosting with other sites so that the capabilities of the server are distributed to all the sites it includes. In most cases, the capabilities of this plan are average and can be relied upon. In case of designing a light website such as a personal blog or personal website.
– Virtual Server (VPS): The VPS plan
depends on a virtual private server, the division of which is controlled through programs to distribute its capabilities according to need. This plan can simply be likened to a computer dedicated to hosting, so that it can be controlled for shutting it down, turning it on, and other custom tasks.
– Dedicated Hosting :
The Dedicated Hosting plan is among the strongest plans that can be chosen in terms of capabilities and control ability. It involves renting a dedicated server to host high-speed websites that receive millions of visits daily.
This plan can allow you to create and design many websites so that they all work efficiently and at high speed, with the ability to control them and divide their capabilities into the sites.
It is worth noting that the previous plans are divided into sub-plans with different capabilities and different prices, and the choice depends on the nature of the site to be created, the expected number of visits, and the desire to control it completely or not.
2- Get a domain
Every website has a domain assigned to it, and the domain is the address of the site that is written in the top bar of search engines, and it can be described as the identification device between the visitor and the server.
Accessing a specific site requires entering an Internet Protocol (IP) address. The protocol can be defined here as the process that helps complete communication between different networks, such as the server that includes the site, the home Internet network, and other networks.
Instead of sharing the site’s IP codes with everyone – which is complicated and easy to forget -, the need arose to rely on the domain, which is an address that expresses the name of the site and at the same time identifies the servers’ IP codes.
Simply put, a domain can be likened to a website’s personal identification card. Domains can be obtained from hosting service providers, and come with a paid plan that is renewed annually. It is important to purchase domain security services within the plan to ensure that the domain registrant’s information is kept out of the hands of hackers.
3- Install WordPress
After purchasing the hosting and domain and connecting them through the hosting service provider, comes the step of installing the WordPress system on the hosting, and most hosting providers provide the ability to install WordPress with one click.
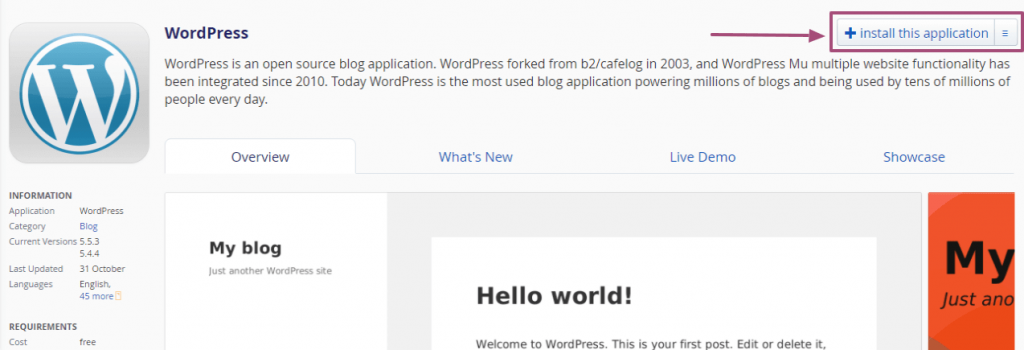
If the previous option is not available, go to the (cPanel) page, then choose WordPress from the (Web Applications) list.

After that, click on the (install this application) button and WordPress will be installed.
4- Install a WordPress template
WordPress templates are responsible for providing a website design through a user interface ready for installation. They are ready-made software files that are installed on the WordPress system without the need to design the appearance of the site from scratch. After installation, the template can be customized to reach the desired design.
There are two types of WordPress templates, free and paid templates, and they differ in terms of the professionalism of their codes and the extent of their availability to modify the template and customize it further to suit what is required.
As for free templates, you can obtain and install them as follows:
– From the WordPress control panel, go to (Appearance) then (Templates).

In the options bar, select the category in which you want to choose the template, such as e-commerce, or search directly for templates in the search bar.

– After finding the appropriate template, click on the (Install) button and the template will be installed on the website.
As for paid templates, there is a market for them available on a number of reliable and approved sites, and among the most popular sites for purchasing WordPress templates are :
These sites offer thousands of paid templates in all languages, categories, and prices. First determine the specifications of the desired template, then search for several models and test the demo for each of them, once the decision to purchase has been made and the template files have been downloaded to the computer.
You can install the template as follows :
From the WordPress control panel, choose (Appearance), then (Templates), then (Add New) at the top right.
– Click on the (Upload Template) button, then (Choose files), then click on the (Install) button.

Is the template ready once it is installed?
Although WordPress templates are pre-made designs, designing a distinctive website does not depend on installing the template only, but rather requires customizing the template as follows:
From the WordPress control panel, click on the (Appearance) option, then (Customize). On the next page, there is a template options panel that allows you to specify the appropriate attributes for the site elements, such as colors, fonts, design templates, and the ability to add pages, menus, widgets, slides, etc.

5- Installing WordPress plugins
WordPress plugins are ready-made software that adds new functions to the website, and are divided into free plugins and paid plugins, whether by purchasing them or paying a monthly plan.
For example, the WooCommerce plugin transforms the entire WordPress site from just a blog to an online store, and adds multiple functions to it, such as the ability to receive money, adding a shopping cart, payment page, and store page, the ability to add products and coupons, and other functions.
How to install WordPress plugins?
Before installing WordPress plugins, you must determine the features you want to obtain and then search for the appropriate plugins for them, knowing that too many plugins can slow down the speed of the site or cause a technical defect in it if they conflict with each other.
Read also: The most important procedures to increase the speed of your WordPress site Comprehensive guide
Therefore, it is important to read the description of add-ons well before installing them, and to use only important add-ons to reduce their number. To install add-ons on a WordPress website, follow the following:
– From the WordPress control panel, choose (Add-ons) and then (Add New).
On the next page, you can search directly for the required add-ons, then click on the (Install Now) button. After they are installed, you must click on the (Activate) button for the add-on to start working. It is worth noting that most of the add-ons have characteristics that require specifying their options in accordance with the site.

6- Adding content to the site
Creating a website does not depend on the previous steps only, as it requires adding the content of pages and menus, and formatting them through template options or the WordPress control panel.
Website pages, for example, could be:
- Homepage.
- Our services.
- Blog.
- who are we?
- Connect with us.
- Policies and terms.
- Privacy.
Each page of a website has a specific look that is designed based on the template, and content needs to be added to it for the site to be complete.
After performing all the previous steps, you have finished creating a website using WordPress. This method does not require a lot of time or costs, and the WordPress system is now the largest in the world in terms of relying on it for creating websites. This is the method in short to create a website using WordPress.
Create a website using building tools
Website building tools are very similar to the WordPress system in the way they work, as they allow you to build and manage a website through a simple control panel that does not require any programming skills, or through the drag-and-drop method.
Website building tools are often more specialized. For example, systems such as Shopify and Square Space provide the ability to build online stores only, while a tool such as Weebly allows for building any type of website, but with More scaling of the additions and features that can be provided to the site.
Most website building tools are very similar in the steps to use, as they depend on registering an account, then choosing a monthly paid plan, and then starting to customize the site.
These tools differ in that you host your site on the servers designated for the service providers, instead of hosting the site files on your own server. In addition, the companies give you the authority to modify the store interface only, and do not give you the authority to modify the code for the site’s functions.
We will give an example of building a website dedicated to e-commerce using Shopify (one of the most famous website building service providers), but the steps are similar to the same idea in other tools such as Weebly or others.
Create a website with Shopify
Shopify is considered one of the largest content management systems for creating online stores, as it competes with (WooCommerce) and (BigCommerce), which are two of the largest players in this industry.
What distinguishes the Shopify system is the ease of building stores within it in several hours, as it provides a simple and direct user interface. But at the same time, due to the ease and speed of use, the process of customizing the site and controlling all its details has become difficult due to the simplicity of the system options.
You can create an e-commerce website on Shopify through the following steps:
1- Register on Shopify
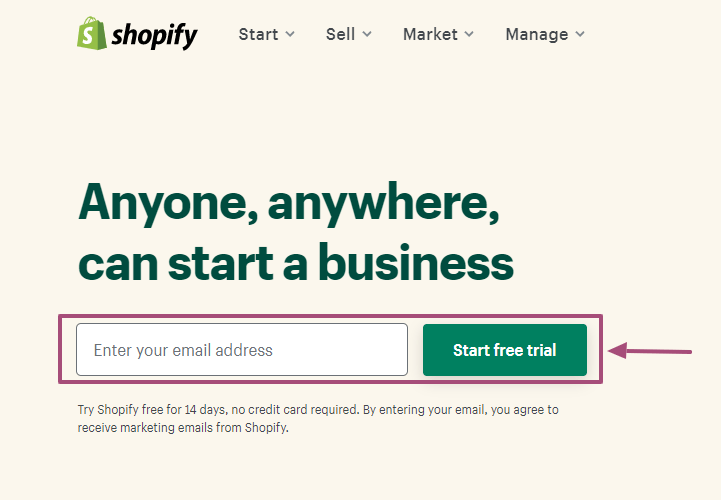
The first step to start creating a website on Shopify is to register an account. This step takes a few minutes, and in this case the Shopify system offers free use for 14 days, after which a plan is chosen between three plans priced at $29, $79, and $299, which are paid each month. Since there is a paid plan, creating a website using Shopify does not require Purchase separate hosting, as this is provided within the plan.
2- Choose the store template
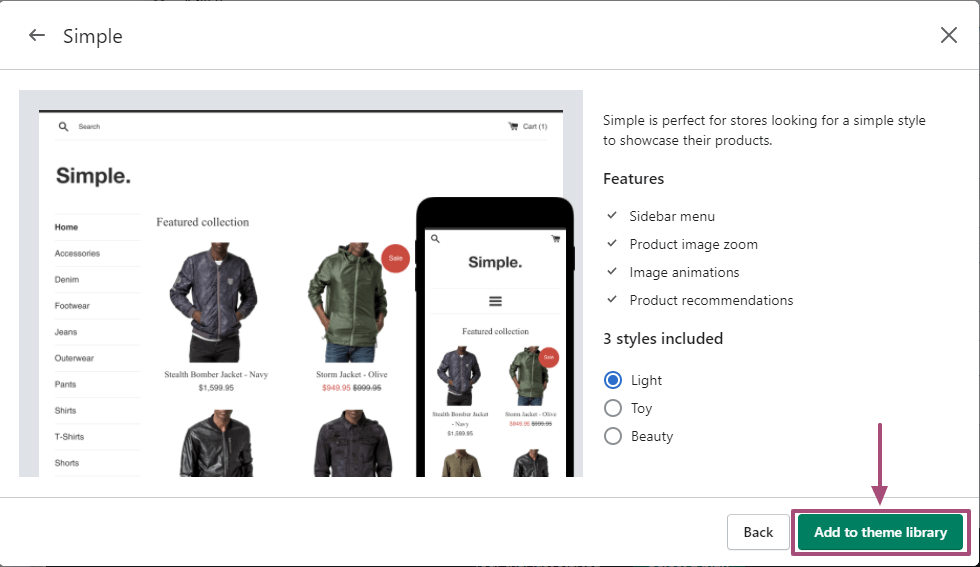
Shopify provides a choice of template for the store, whether paid or free. To accomplish this step, click on (Themes) from the control panel on the left, then choose the appropriate template from it and it will be installed in seconds.
Next comes the task of customizing the template by clicking on the (Customize) button on the (Themes) page, in which the site design is customized through the template’s control panel.
3- Add pages
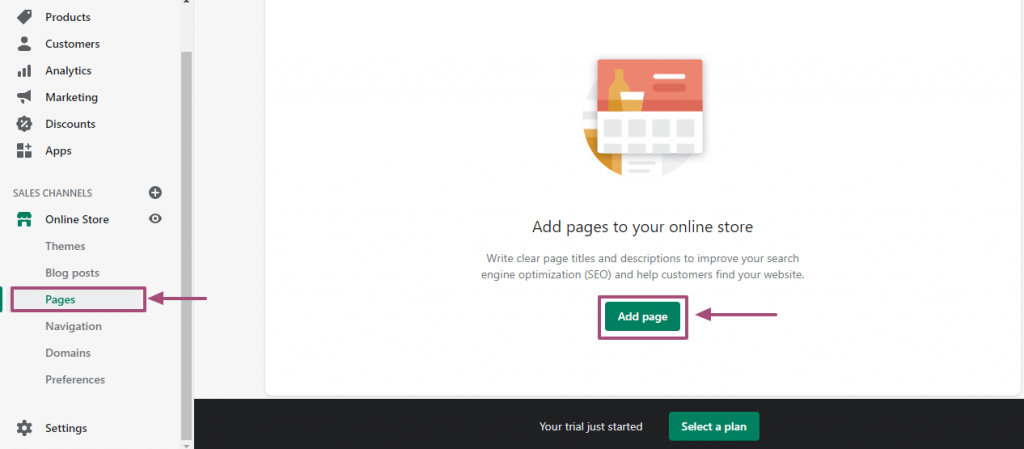
As is the case with WordPress, pages can be created on the Shopify website through the (Pages) option in the control panel, and adding the required pages.
4- Create lists
Listings on Shopify are divided into a main menu located in the top bar of the site, and the footer menus located at the bottom. Other secondary menus can also be added or the existing main menus can be modified.
To do this, choose (Navigation) from the control panel, then (Add Menu) to add a new menu and specify its options.
5- Add publications
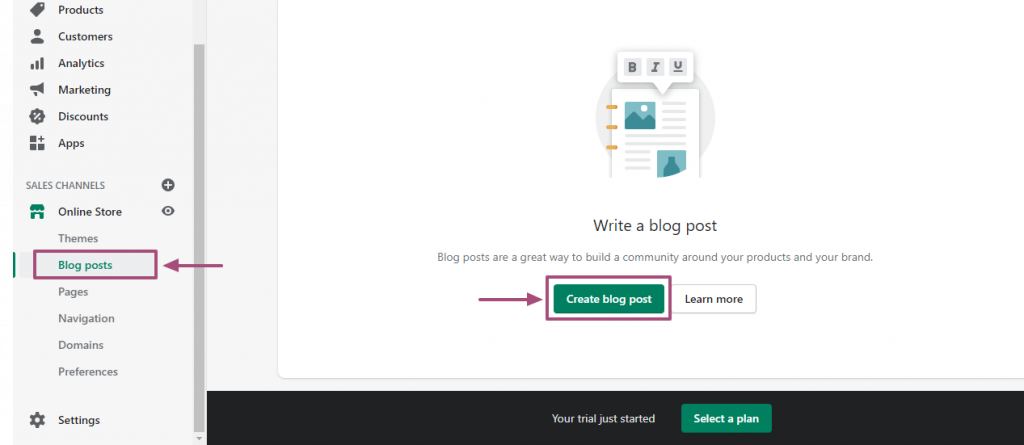
Shopify allows a blog within the online store, and to add posts to it, go to the (Blog Posts) option in the control panel, then click on (Create Blog Post) to start adding the new post.
6- Buy a domain
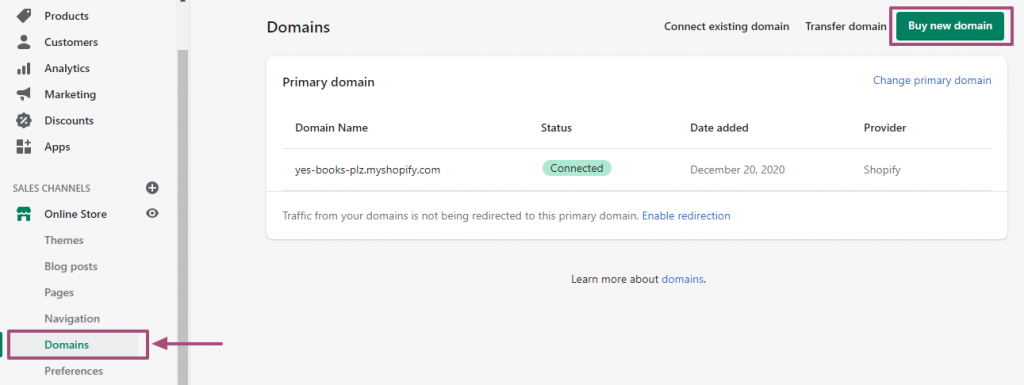
The basic domain of sites created through Shopify is as follows:
(www.sitename.myshopify.com). In this case, an annual domain dedicated to the site can be purchased to be (www.sitename.com), or an existing domain can be transferred to one of the domain and hosting providers sites such as GoDaddy.
To apply this step, go to (Domains) from the Shopify control panel, then select the purchase or transfer option.
7- Customize the site
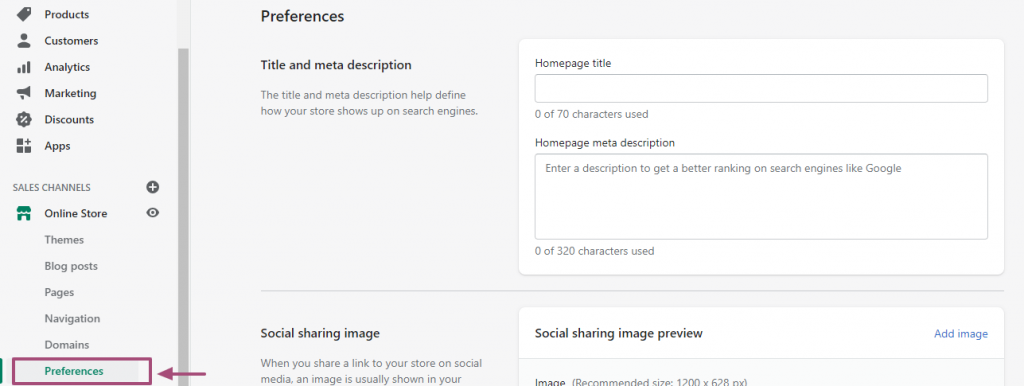
The final step to creating a website on Shopify is to select customization options such as writing a homepage title, setting a short site description, and linking it to social media. This step is important in preparing the site for search engines.
This general idea is to rely on website building tools.
The difference between WordPress and other website building tools?
Although WordPress and website building tools are similar in that they provide the user with proficiency in programming languages to build a website, there are differences between them, including:
1- Hosting and Domain
Website building tools do not require purchasing hosting or a domain, and although it is quite convenient, the ability to control the site’s internal files such as those in (cPanel) is impossible.
While WordPress requires the purchase of hosting and a domain, this is what allows access to the site’s internal files and making modifications to them, so you have greater control.
2- Plugins
Given that WordPress has dominated the website creation arena for many years, in addition to being an open source system, most web developers have turned to creating and launching the best plugins that work to enhance the functionality of sites built using WordPress.
While website building tools may be tempting due to their simplicity compared to WordPress, this has become a double-edged sword, as they remain simple in their design and in the tools they provide as well. Due to the small number of plugins associated with it.
3- Templates:
Since the WordPress system is open source, it contains thousands of templates on WordPress theme markets such as Theme Forest, which makes the possibility of customizing the design on WordPress greater and better than the ability to do the same thing on website building tools.
4- Solving problems
There are many discussion forums about WordPress problems, which means that the possibility of solving an error or problem, if it is on a WordPress site, is faster and greater. There are thousands of solutions and answers to queries and problems that web developers and WordPress users have already encountered before, any of which can be found with just a Google search.
As for website building tools, they only provide communication with customer service to find out the problem and work on solving it, which adds time and lack of control over the site to the matter.
Create a website from scratch
The method of creating a website from scratch costs a lot of money, in addition to taking more time, and may sometimes require hiring an entire team of programmers. However, the greatest benefit of this method is to create a completely detailed website based on your desire, as it is the choice All functions and website design are done from scratch. The steps are:
1- Designing the site structure
When designing a website from scratch, its structure must be designed before starting, such as determining the important elements of the site such as the home page, the communication page, the blog, and the site information page.
In addition to dividing the previous elements into more detailed parts, such as specifying sub-pages, menus, functions and tools that the site provides to the user.
2- User Experience (UX) Design:
The second step is to develop an initial design for the site, so that it meets the best user experience. This step consists of choosing the division of parts of the site and their sizes, such as the site header, menu locations and distribution, colors, font shape and size, advertisement locations if any, and others.
The design of the site depends on its type. Blogs, online stores, and personal websites differ. Each of them has a customized design and a different user experience.
This task is called (UX), and the task of its workers is to reach the best design that achieves a comfortable user experience that meets the purpose, and it is closely related to graphic design and psychology.
3- User Interface (UI) Design
After completing the website design initially on graphic design programs, comes the task of converting it into software codes that reflect the design from just an image to a usable interactive website.
This step is known as (UI), which is an abbreviation for (User Interface), meaning (user interface design). It is the process of building the website’s graphical interface that allows users to use it easily. In this step, programming languages such as (CSS and HTML) are used.
4- Developing the site programmatically.
The previous steps fall within a step called (Front End), which is similar to a dining hall in restaurants, as it expresses the appearance of the site and the way it is used, but no one will be able to eat without a kitchen, right?
Here comes the task of the Back End, which is the back end of the site. It includes the programming files that define the site’s functions and their connection to each other. It is similar to a kitchen.
It focuses on building internal applications and software tools that enable the front end to work, and uses programming languages such as (PHP and Ruby).
5- Uploading the website to the database
After completing the design of the (Front End) and (Back End), comes the task of uploading the website files to the database located on the hosting, the most famous of which is (MY SQL).
Completing this task is considered the final step in creating a website from scratch programmatically, and although it takes a lot of time, effort and costs, it is one of the most helpful ways to control the entire site.
This is the general idea of building a website from scratch. To implement the previous steps, you need to seek the help of one or more professional programmers (depending on the size of your site’s data), and then follow up on the implementation until your site is launched in the desired form and with the specified characteristics.
Thus, we have talked about the different ways to build your own website, whether by relying on open source software (such as WordPress), or by relying on website building tools (such as Shopify), or by hiring a programmer to carry out the required tasks in the way you want.
We hope that you have benefited from this article by determining the best way for you to build your own website, and tell me in the comments your new experience in building


Leave a Reply