lectronic educational platforms are the best educational methods that trainees rely on at the present time, due to the multiplicity of trainers and the ease of arranging lectures and referring to them at any time in an organized manner, with the ability to determine the best appropriate time to start learning.
If you want to establish an educational platform on WordPress and want to rely on the LMS learning management system, you will find a large group of LMS add-ons that work to transform the WordPress platform into an educational platform.
We have previously provided a comprehensive guide to the best LMS add-ons, and in today’s article we will talk in detail about the Masterstudy Lms add-on, starting from installing the add-on on your website until fully preparing your educational platform, but first let’s get to know the Masterstudy add-on.
What is the Masterstudy Lms add-on?
The Masterstudy add-on is one of the best WordPress add-ons that transform the basic WordPress system into an educational platform. There is a free version available that you can rely on to prepare an educational platform with medium features, and a paid version supported by a wide range of features that work to develop the educational platform.

The Masterstudy add-on was programmed by the Stylemix Themes team, which is a distinguished team specialized in programming WordPress add-ons and templates. The Masterstudy add-on is considered one of the best add-ons that the team has worked on because it was able to limit all the features and requirements of creating an integrated educational platform in one place. The Masterstudy add-on consists of three basic elements as follows: :
- Adding Masterstudy LMS to equip the educational platform.
- Masterstudy template to prepare the educational platform interface.
- The Masterstudy app is compatible with Android or iOS.
We will explain all the details of this group in the following paragraphs, so continue reading with us.
Explain the addition of Masterstudy Lms?
The Masterstudy add-on is considered one of the LMS add-ons that is straightforward to use and features a complete control panel through which you can completely customize your electronic platform.
First, you install the Masterstudy plugin by logging into the WordPress control panel, then clicking on Plugins from the side menu and choosing Add New from it, as in the following image:

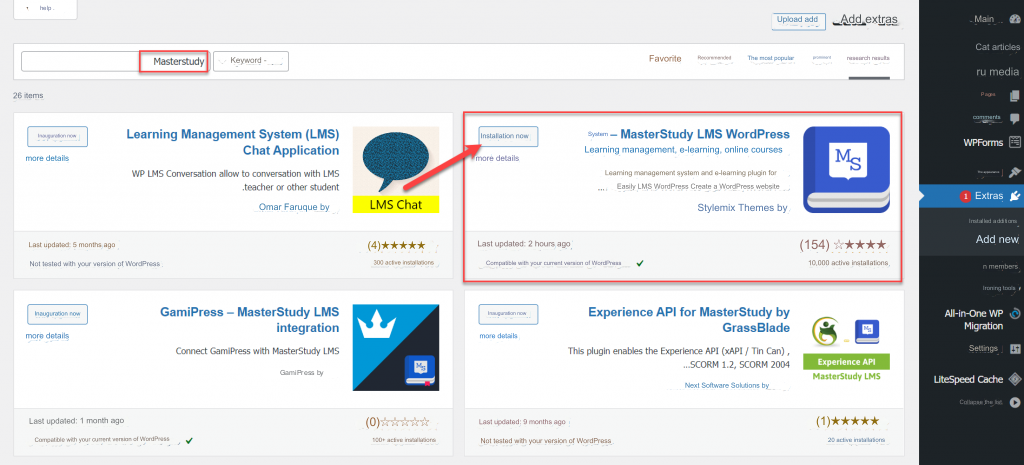
After that, you type the name of the add-on in the search box “Masterstudy”. The add-on will appear to you as MasterStudy LMS WordPress. You will click on Install Now and wait until the add-on is downloaded and installed, then click Activate as in the following image:
After that, it will transfer you to the quick installation panel from which you can adjust most of the add-on settings, and it consists of 6 stages. We talked before about how to install a WordPress plugin and activate it on your site correctly
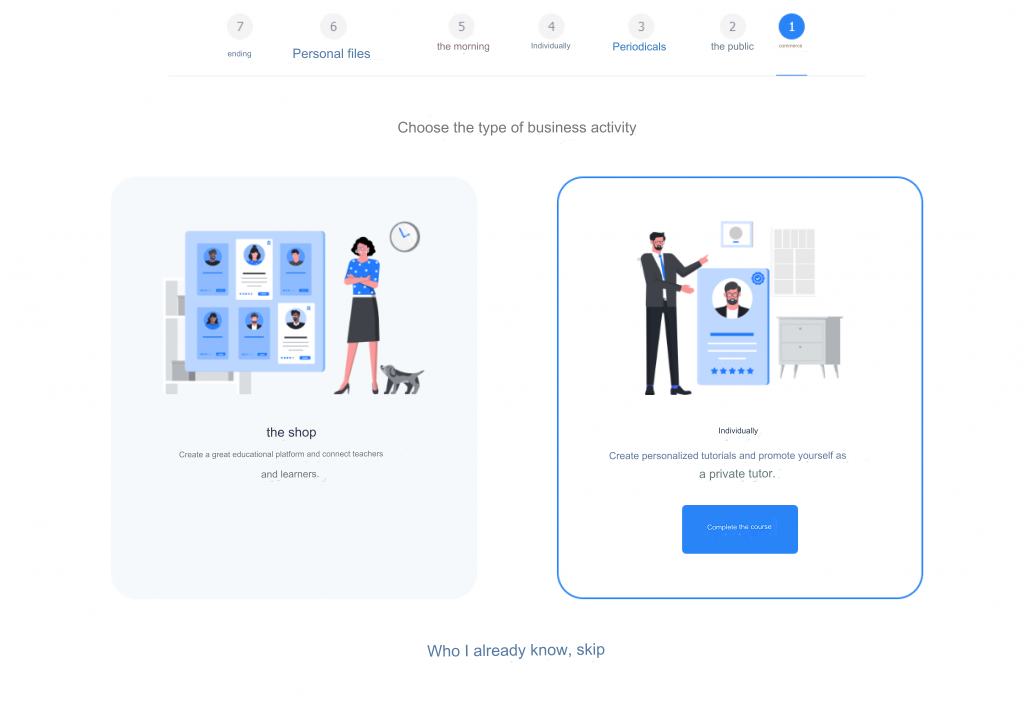
In the first stage, you will be asked to choose the type of activity, whether it is personal or commercial. The difference between them is the activation of the multi-trainer feature only, that is, the possibility of adding more than one trainer on the platform and multiple trainers on the same course, so choose the classification that is most appropriate for you, for example: Individual to If you want to create a platform Personal education for you, then click on Next as in the following image:
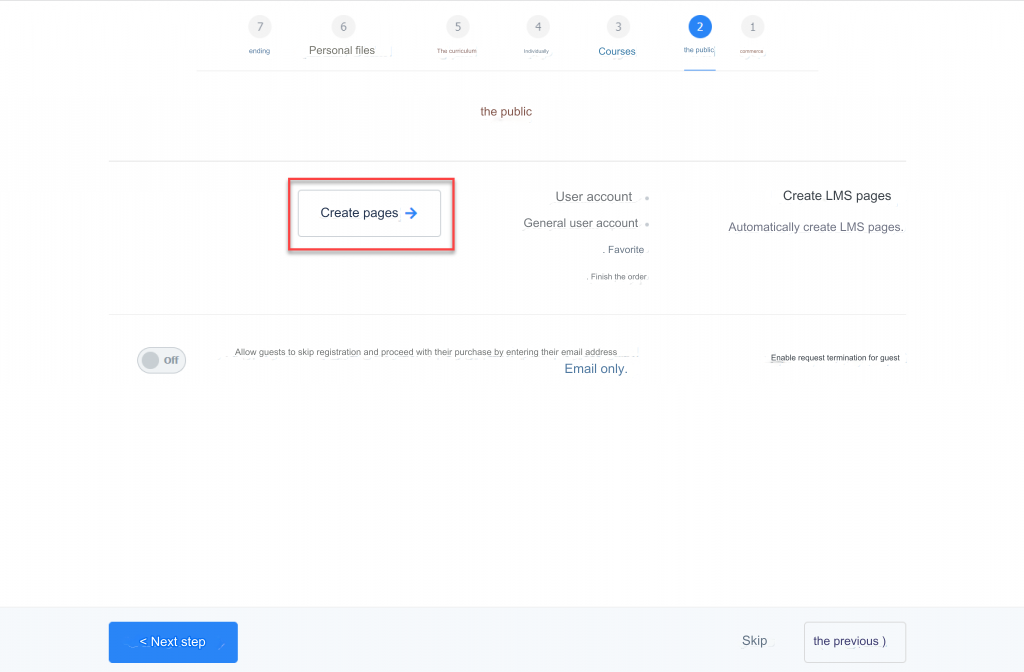
The second stage of adjusting the Masterstudy add-on settings will require you to adjust some general settings for the educational platform. First, create the platform’s basic pages, which are the registration pages and application pages. You then click on Create Pages in front of the LMS Pages Creation option to create the pages automatically.
The second point is the option to skip registration, which is an option that allows trainees to purchase courses directly via e-mail only without the need to register. The account details will be automatically sent to their e-mail. I do not prefer this option, despite its ease for trainees, because some problems may arise. In sending details messages via e-mail, which causes pressure on technical support to solve problems.
After that, you click on Next to take you to the cycle setting stage, as in the following image:
The third stage is adjusting the course settings. You will first be asked to create a course page by clicking on the Create Course Page button in front of the Create LMS Pages option.
After that, you will select the way to display the courses on the home page, and you will have two options available to you: a grid view or a list view, so choose what is most appropriate for you.
Then you will be asked to specify the number of courses that you would like to appear on one page, and you will find that it is automatically 9 courses, which you can also identify or increase the number to suit you. You then specify the number of courses in one row and try to make the page consistent, that is, the number of courses. On the page, it is divided by the number of courses in the row. For example, the number of courses on the page is 9 courses, and the number of courses in the row is 3 courses, so that only 3 consistent rows appear on the page.
After that, you enable or disable the option to filter courses by category, levels, price, etc., to help the trainee access the course faster, then click on Next, as in the following image:

After that, you will set up some options for the main pages of the course in the Masterstudy add-on. The first option is redirection to payment, which makes the trainee move to the payment page directly if he clicks on purchasing a course. However, if you deactivate this option, the trainee will continue browsing the site normally if he adds Course to the shopping cart. When he finishes browsing the platform, he can enter the shopping cart and complete the purchase of the course. I prefer not to activate this feature because the trainee will most likely purchase only one course at first, as in the following picture:

Then you adjust the tabs that will appear on the course page, such as description, curriculum, instructions, announcements, or reviews.

After adjusting the course tabs, you click on Next until it takes you to the fifth stage, which is adjusting the way the courses interface is displayed. You will find in front of you two options: the default or classic view. Then you choose the method of displaying the tests and you will also find two options in front of you: one page for all questions, or multiple pages, where each One question at a time, and you will find illustrative pictures next to all the options to clarify the display method, as in the following image:

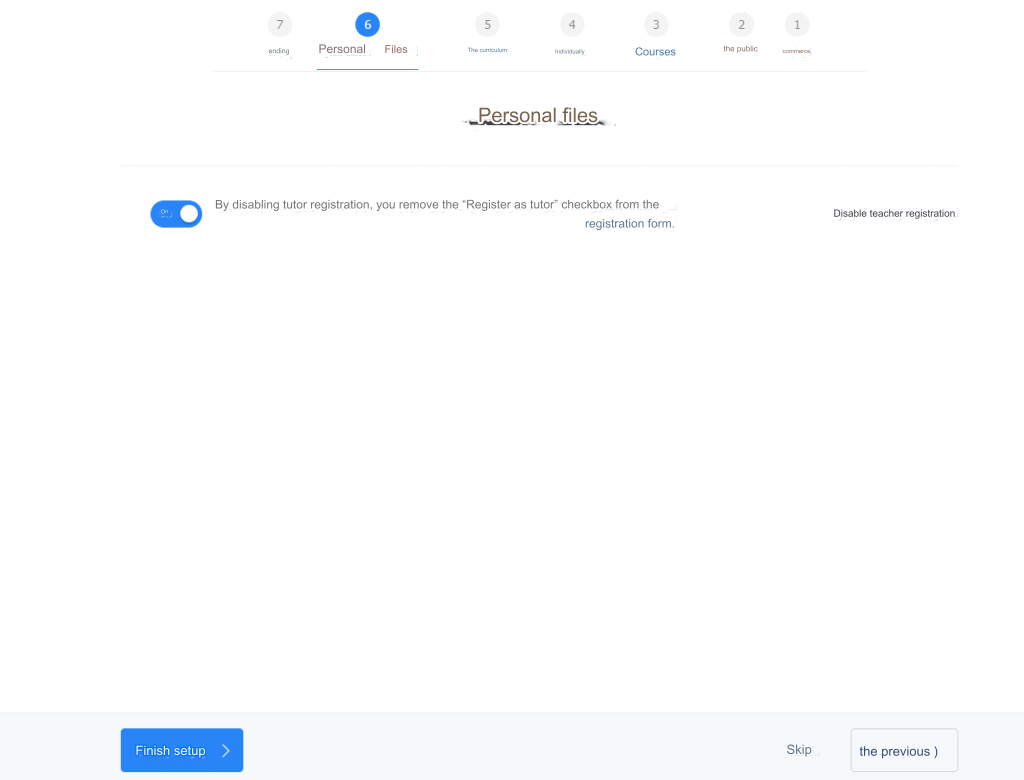
After that, you click on the next step to take you to the personal page options, which is an option that helps allow new trainers to register on the Masterstudy platform. Therefore, this option must be activated if your site accepts external trainers, as in the following image:
Then you click on Finish Setup to take you to the last page in the Masterstudy add-on settings, as in the following image:

Adjust Masterstudy add-on settings
During the previous steps, we adjusted the Masterstudy add-on settings in general, but now we will show you how to adjust the add-on settings in detail for points that were not controlled in the quick adjustment and modification of most of the previous points.
Firstly, you go to the WordPress panel. You will find an additional option that appears in the side menu called MS LMS. You will click on it and choose LMS Settings from it, as in the following image:

You will see all the basic options for the educational platform, whether it is the courses page, the courses page, tests, payment methods, personal files, certificates, etc.
Adjust the general settings of the educational platform
The first page in the LMS Settings page options are the general settings, which help you control the main colors of the educational platform and are divided into the primary color, which represents the general character of the interface, and another secondary color.
After that, you will find the settings for the currency, where you specify the currency symbol, for example, the Egyptian pound, the US dollar, or the Saudi riyal, then specify the position of the currency in relation to the price, whether it is on the left or right, then specify the method of displaying the price using decimal points, separators, and the number of fractions, as in the following image:

After that, you can control the guest order feature, which helps trainers purchase the course without registering. We controlled it during the quick installation of the Masterstudy add-on. It is preferable not to activate this feature and have the trainee register a full account before purchasing the course.
You can also control the Preloader feature, which helps download images, GIFs, and videos when accessing them while browsing the page and not at the beginning of loading the page, thus increasing the speed of loading pages in general.
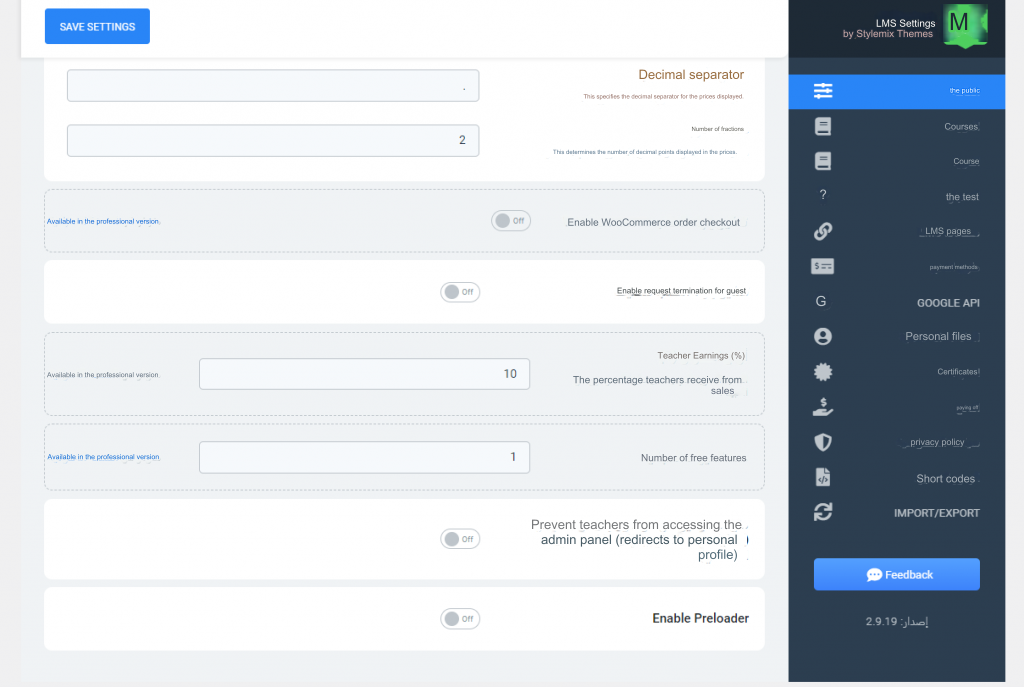
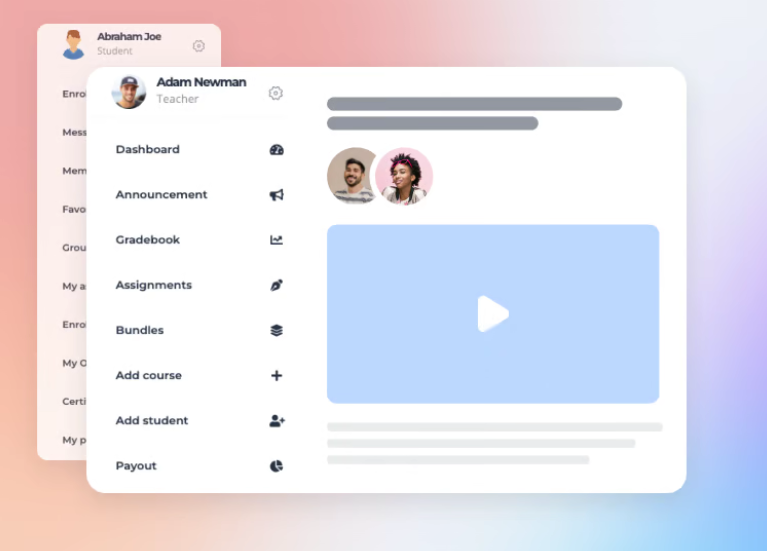
You will then find the ability to control trainers’ profits from the Teacher Earnings option, where you determine the percentage of the educational platform’s profits with sales to trainers outside the platform. You can also restrict trainers’ access to the WordPress control panel, and control is from an external control panel specially prepared for trainers, as in the following image:
Set the courses page
The next options on the LMS Settings page are the options to control the external courses page, the main courses interface, and then control the exams page.
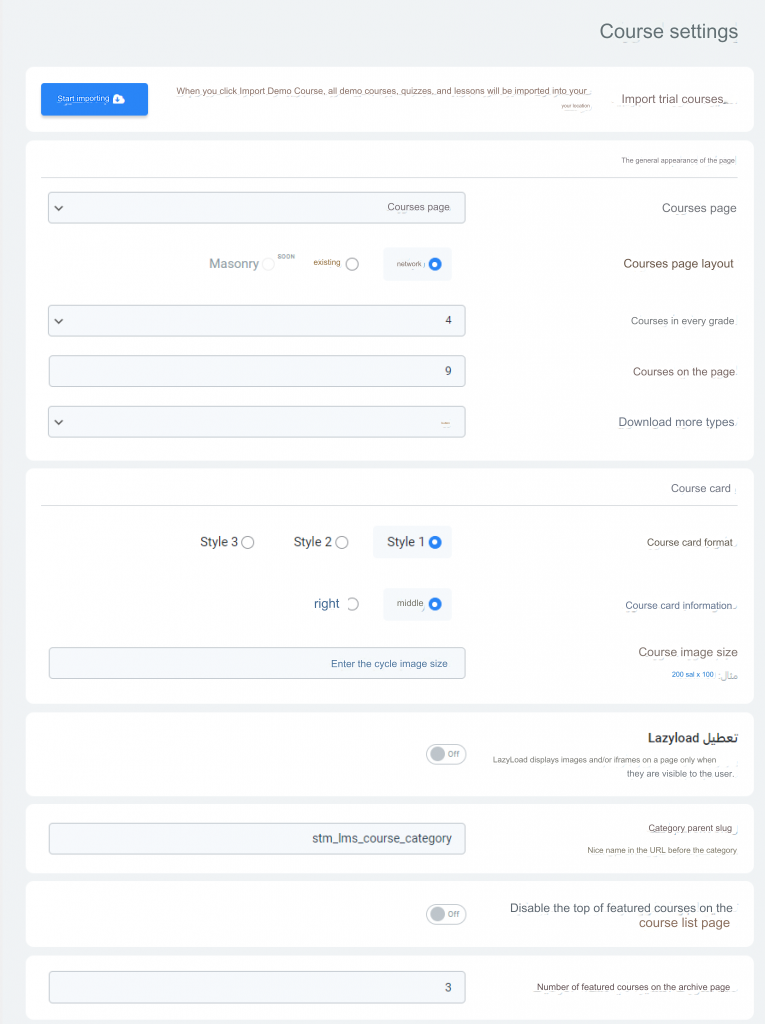
Firstly, you can control the external courses page, through which you can control the following points:
- Courses Page: Select the Courses page and you will find it pre-defined, which can be modified if you have another page for your educational platform.
- Courses page layout: It helps you control the appearance of the courses page, whether it is a grid view or a list.
- Courses in each grade: You can edit the courses that appear in each grade on the Courses page.
- Cycles per page: Through this you can modify the number of cycles on the page in general.
- Load more types: Choose the Load more courses feature via the More button or scroll to view all courses on the same page.
- Course card format: This option helps you control the format of the course card on the courses page. You will find 3 different shapes that you can choose from based on experience, and you can also specify the dimensions of the appropriate course image.
- Disable Lazyload: This feature helps increase the speed of the courses page by loading the page without the complete images, and the required images are downloaded when they are accessed while browsing the courses page.
- Control the top of the courses if you want featured courses to appear in it or not.
- You can control the number of distinct courses that appear on the archive page
- You can also control the appearance of the cycle filtering feature through a special filter.
You modify all of these points in accordance with your site settings, then click on Save Settings as in the following image:
The next option on the LMS Settings page is to adjust the main course page settings, and you can control it in the following points:
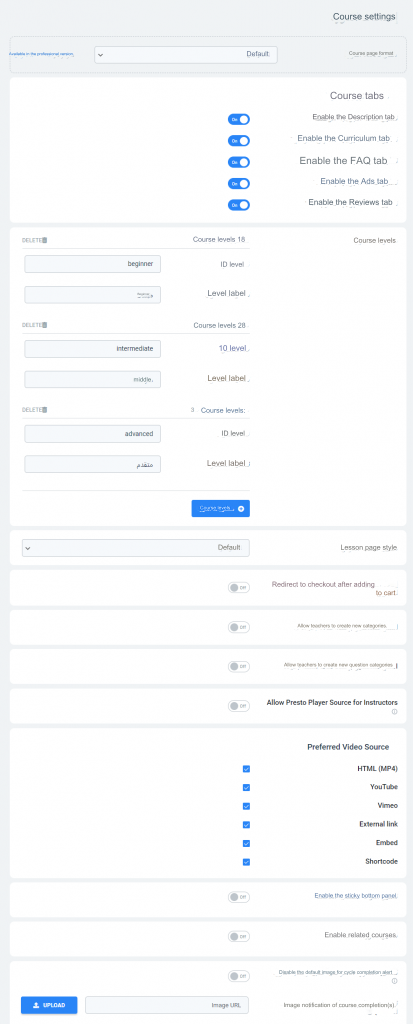
- Course page format: In the Masterstudy add-on, you will find three different formats for the course page. You can choose the appropriate format for you by experimenting with this feature in the paid version of the add-on.
- Course Tabs: You can control the tabs that appear at the top of the course page, for example Description, Curriculum, or Frequently Asked Questions.
- Course levels: You specify the basic course levels on your educational platform in order to help in the process of filtering courses and enable the feature of registering courses according to levels. A trainee cannot enter an advanced level until he or she completes the lower level.
- Lesson page style: This option enables you to control the lesson page within the course, and you will find two different options: the traditional or classic format.
- Redirect to checkout after adding to cart: This option brings the trainee directly to the shopping cart when purchasing a course and we have previously explained its use in quick installation of the add-on.
- Allow instructors to create new categories: Giving the instructor the ability to create new categories for courses helps.
- Allow instructors to create new question categories: Giving the instructor the ability to create new question categories within courses helps.
- Types of supported formats: Through this option, you can specify the supported formats for videos, for example, YouTube, Vimeo, and others. It is preferable to enable all of these options.
- Enable sticky bottom panel: This option shows a sticky panel at the bottom of the courses page with the course description, cost, and a buy course button. It is very useful for the trainee to purchase the course faster.
- Enable Related Courses: This option helps courses related to the main course appear throughout the sidebar.
- Default image for course completion alert: This option helps send notifications on an ongoing basis to the trainee urging him to complete incomplete courses.
You modify all of these points to suit your educational platform, then click on Save Settings as in the following image:
The next option on the LMS Settings page is to adjust the test page settings. You can control the way the test page is displayed, whether it is a single page or consecutive pages, by allocating each question to a separate page and the type of media available on those pages, as in the following image:
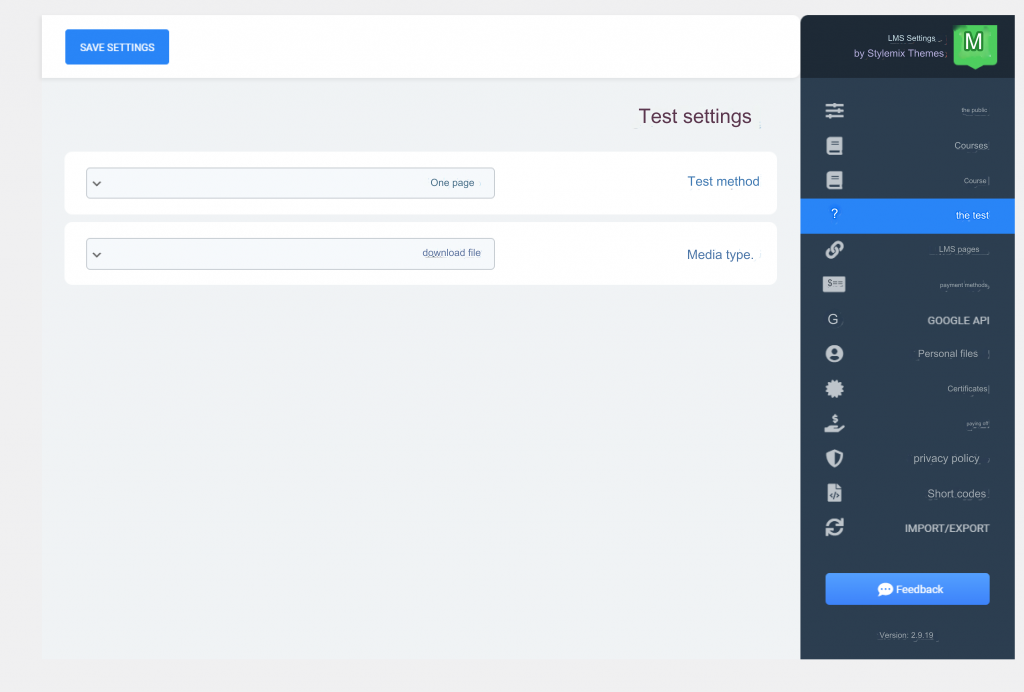
After completing all the previous settings for your educational platform pages in the Masterstudy add-on, you click on Save Settings.
Adjust the payment methods available in the Masterstudy add-on
The next option on the LMS Settings page is Payment Methods, which will help you determine the payment methods available within your educational platform. You will find 4 methods available as follows:
- Offline payment: It is an offline payment method that you can control, for example, local payment methods or payment on receipt.
- Bank transfer: The second option is bank transfers, which you can rely on to receive payments on the bank account. When you select this option, you will be asked to enter all the bank information, including the account number, the Swift number, the name of the account owner, and the name of the bank.
- PayPal Bank: The third option is to pay via PayPal and you will be asked for your email and the main currency for payment.
- Stripe Bank: The fourth and final option is to pay via Stripe Bank, which provides the ability to pay via Visa or MasterCard from all over the world, but you must initially register an account with a commercial record in Stripe Bank.

Adjust profile settings in Masterstudy add-on
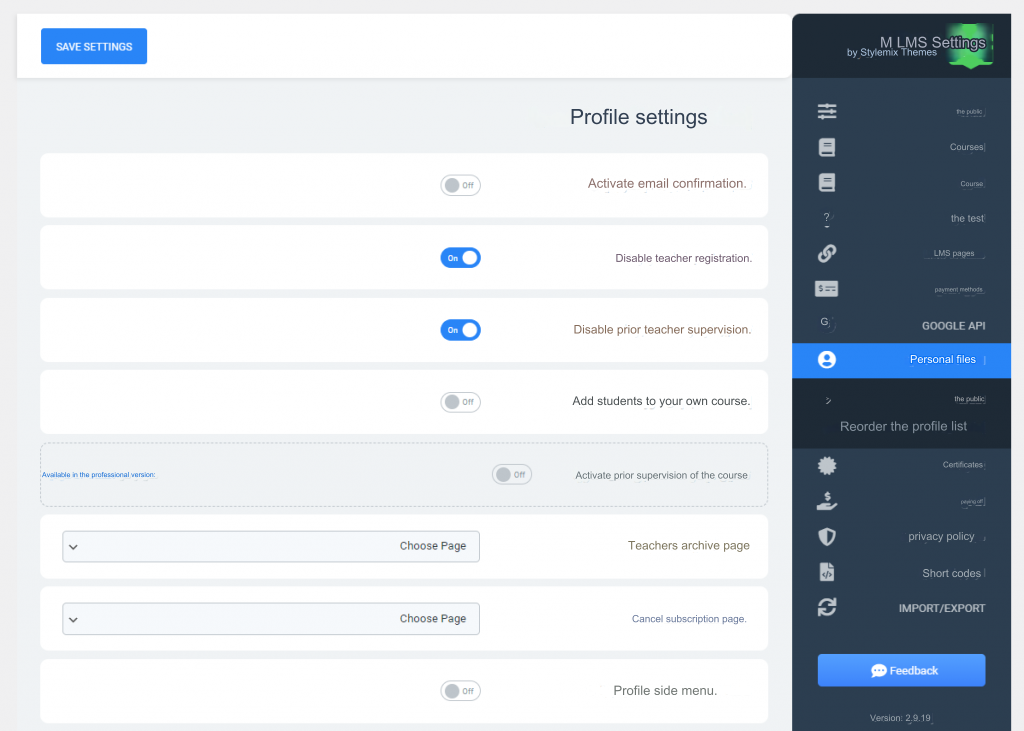
The eighth option on the LMS Settings page is to set personal files, and through it you can control the following points:
- The option to activate email for new trainees so that they can complete the course. I do not prefer to activate this option due to email problems.
- Option to disable teacher registration, which helps open or stop the registration feature for new trainers.
- And the option to add students to your own course, which helps the trainer to add new trainees to his own course without completing the payment process. I do not prefer activating this feature so that you can better monitor the educational platform.
- The profile side menu is a side menu that appears on the main page and contains all the basic shortcuts that the trainer or trainee needs.

There is another sub-option in the personal files menu, which is to rearrange the personal profile menu, through which you can control the order of the side menu items by dragging and dropping for the trainee and trainer, as in the following image:
Issuing certificates
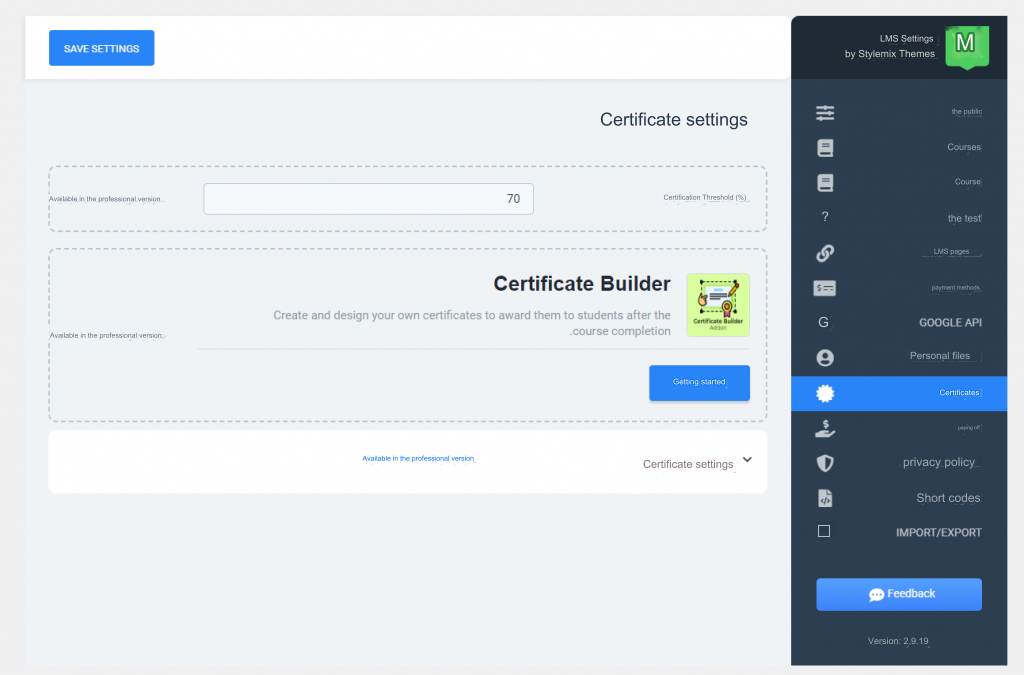
The last option on the LMS Settings page is the Certificates option, and you can control it in the settings for course completion certificates for trainees.
The first option, which is the certificate threshold, is an incorrect literal translation of the Masterstudy addition, but it means the percentage of completion of the course after which the trainee can obtain the certificate. For example, if it is 70%, this means that the trainee can obtain the certificate after completing only 70% of the course. .
You can control the design of the course completion certificate through the Certificate Builder plugin, and we will explain the mechanism for dealing with it in the Masterstudy platform additions section.
How to upload courses on the Masterstudy platform
Now that we have prepared our educational platform and adjusted all the main and sub-settings to add Masterstudy, the next step is a very important step, which is the step of uploading courses to the educational platform.
First of all, you should know that courses are divided into lessons and tests, so you should start by adding lessons, then tests, and then group them into one course.
So we go to the main WordPress panel and choose from the MS LMS side menu and choose the lessons from it as in the following image:

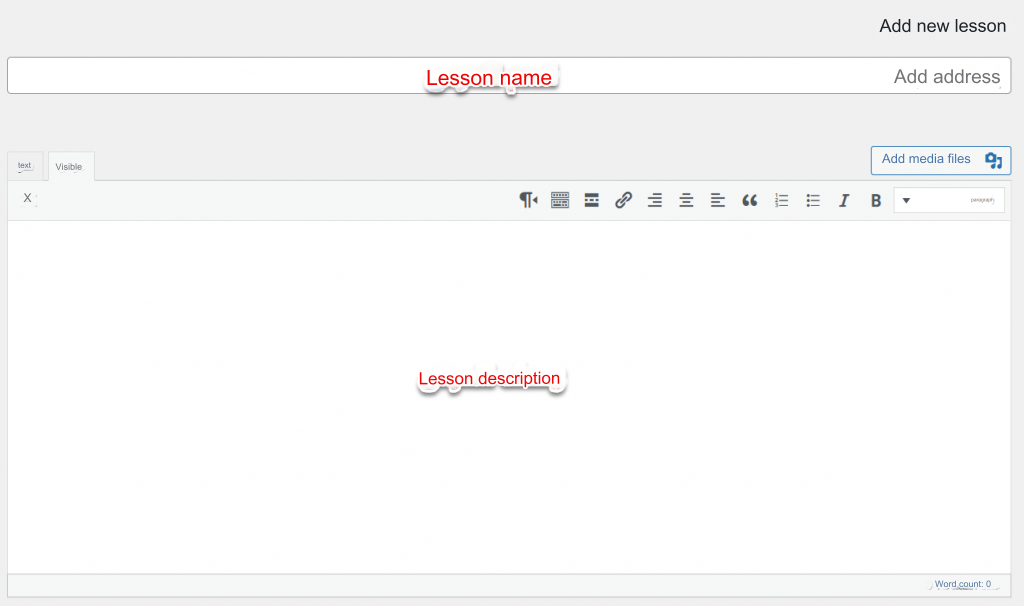
Then we click on Add New and all the details of the lesson will appear to you. You first write the title of the new lesson, then you write a description of the lesson and upload the details of the lesson, whether it is text or a video link from the supported video platforms, for example YouTube, as in the following image:
After that, you scroll down a little and you will find the lesson settings, as in the following image

Through the Lesson Settings section, you can specify the following:
- The type of lesson, whether text or video.
- Lesson duration in minutes.
- Possibility of previewing the lesson if the lesson is a free sample in the course.
- Detailed description of the lesson for the main interface of the lesson.
- Lesson Tools By clicking on Add Lesson Tools, you will upload the lesson tools from attachments or files.
Now you have uploaded the lesson correctly, the next step is to upload the tests by selecting tests from the MS LMS side menu and then adding a new one as in the following image:

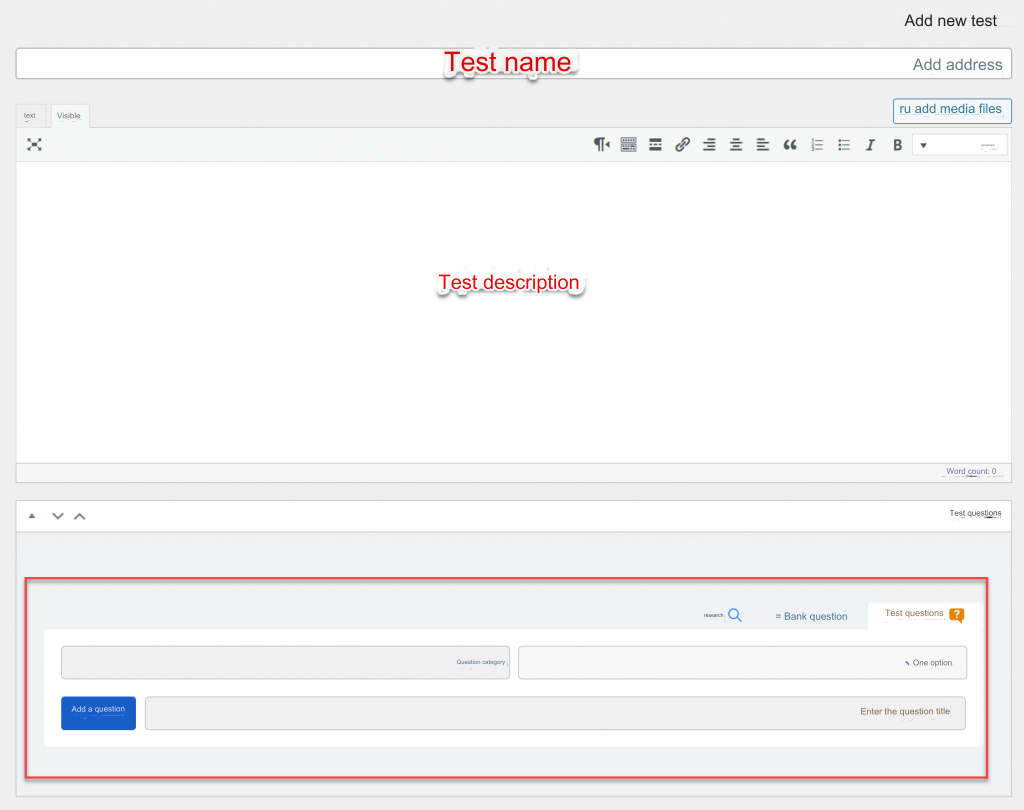
Now you write the name of the test, then write a detailed description and content of the test, then specify the type of test, and you will find 7 types of tests as follows:
- One option.
- multiple options.
- True or false.
- Match the items.
- Match the picture.
- Matching words.
- Fill the void.
You can also choose the question bank and add a group of questions sequentially, then specify the test category and then the question title as in the following image:
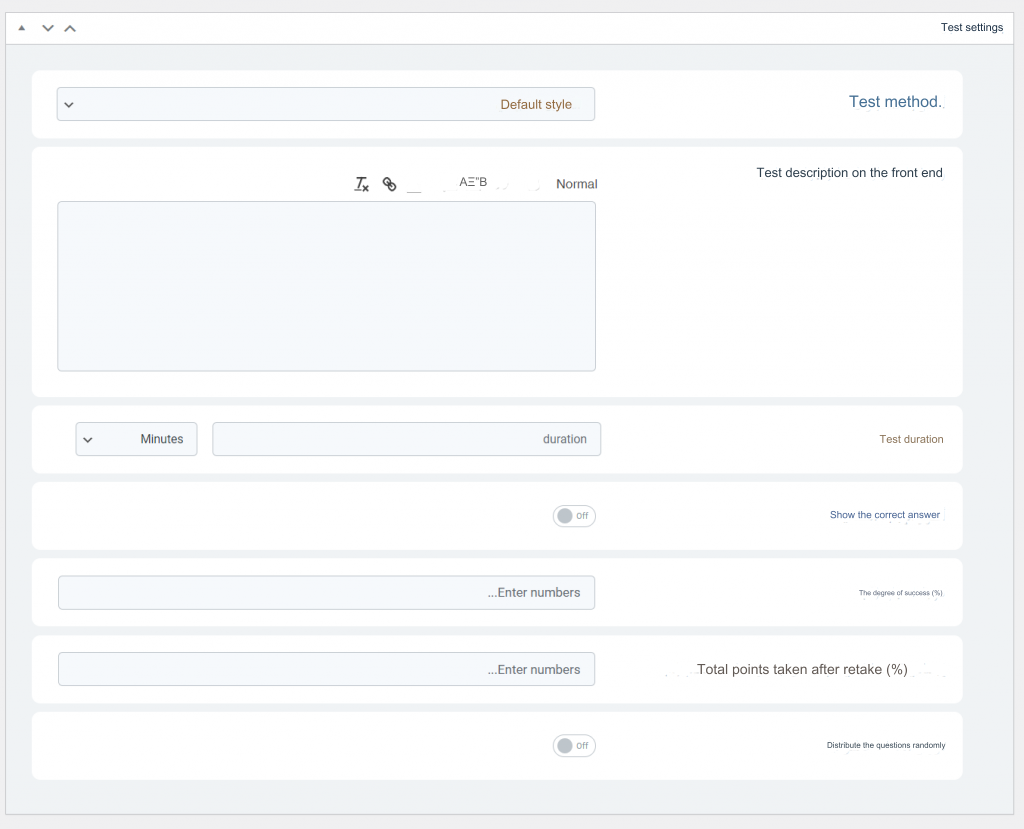
After that, you modify the test settings. First, you determine the method of displaying the test if all the questions are on one page, or allocate each question on a separate page, from which you can move. Then you write a description of the test on the front end, then the duration of the test, and then control the option to show the correct answer. Or not when the test period ends, then determine the passing score as a percentage of the total tests and also control the option to distribute questions randomly as in the following image:
Now that you have uploaded the lessons and tests, you now combine the lessons and tests into one course by selecting courses from the MS LMS side menu, then Add New, and then specify the course title, then the course description, as in the following image:
After that, you determine the course curriculum by testing the lessons from the course curriculum section, adding the lessons that you want to collect in that course, then choosing the test and specifying the tests that you want to put in this course, which you have previously uploaded, as in the following image:
Now you adjust the general settings for the course. First of all, you determine whether the course is a special course or not so that it appears at the top of the courses page. Then you specify the number of times the course has been viewed as a number that appears in front of the trainees in order to increase the trainees’ confidence in the course, and it is not preferable to cheat at that point so that you are worthy of the trainees’ trust.
After that, you determine the course level and you can manually modify the number of current course students from the Current Students field, then determine the course duration as an overall average, then determine the average duration of the course videos as in the following image:

After that, you enter the course price tab, up to the cost of purchasing the course, and you can leave it blank if the course is free. You will find an option called the institution’s price, which you can activate if it offers special offers for groups, for example, 3 or 4 trainees together, as well as the option to include the course within special memberships as well. In the following picture:

Then you go to the expiration tab and specify the subscription expiration period after purchase, for example 30 days, or you close this option if the course is available for life.

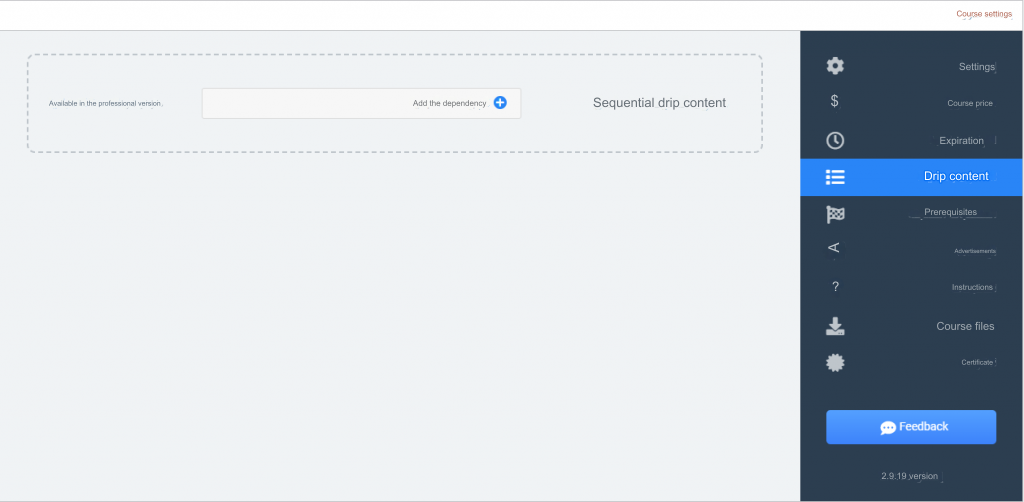
After that, you will find the drip content option. This is if you want to offer a group of lessons for free, then the course will be stopped until the course is fully purchased.
You will then find the prerequisites option and here you can link advanced courses to lower courses, as the trainee cannot purchase the advanced course except upon completion of the basics courses and determine the success rate of those courses as in the following image:
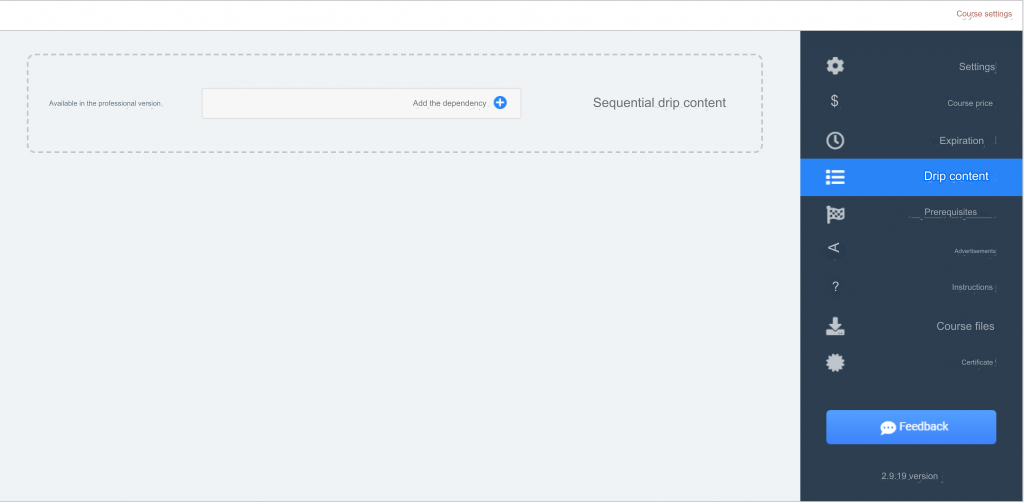
Then you control the advertisements tab if you want to place special advertisements within course lessons, as in the following image:
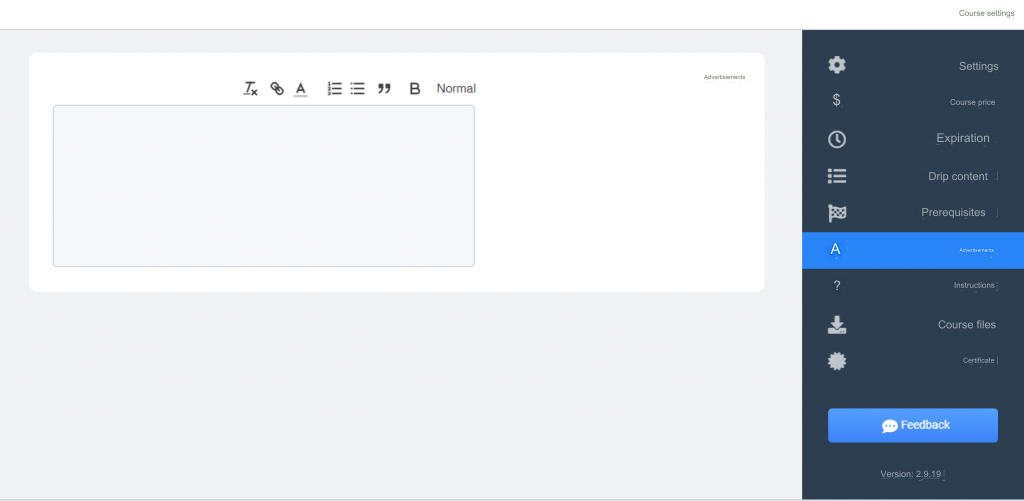
After that, you will find the Instructions tab, and you can add within it the frequently asked questions about the course, for example, the course requirements, required experiences, etc., as in the following image:
After that, you enter the course files tab and upload the course attachments if there are attachments that the trainees want to obtain directly when purchasing the course, as in the following image:
Finally, you go to the certificates tab and choose the format of the certificate that you want the trainees to obtain upon completion of the course, as in the following image:
After these steps, you will have uploaded the course correctly from the lessons and tests and set all the settings required for the course on the Masterstudy add-on, so you will go to the top and click on publish the course.
Masterstudy platform add-ons
The Masterstudy add-on provides a set of features that help you develop the performance of your educational platform as well as distinguish it from other LMS add-ons. Most of these components are in the paid version of the add-on and you can access them by selecting Add-ons from the MS LMS side menu and you will find the following components:
- Udemy Importer : You can rely on this component to import courses directly from the Udemy platform without the need for additional components.
- Prerequisites: This component helps to establish a set of tests that applications must pass before being able to purchase the course, for example an aptitude test for admission to the course.
- Statistics and payments: Through this component, you can know all the statistics about your educational platform in an organized manner, for example, sales, profits, effective offers, etc.
- Online tests: Activating this feature helps prepare online tests at a specific time to test all course trainees directly.
- Drip Content: This option allows for more flexible and controlled restrictions on courses that have free lessons.
- Trial Courses: This option provides you with a set of additional settings that you can control for free lessons within paid courses.
- Live Broadcast: You can rely on this add-on to provide interactive live broadcast lectures with trainees within the courses.
- Assignments: The assignments component helps provide assignments in more than one different style to trainees and handle assignments and evaluation entirely from within the platform.
- Groups: The groups component helps you with the ability to add a group of trainees within the course at once at a specific discount, for example, offering to register 3 friends for a 30% discount.
- Course Package: This component provides you with the ability to place a group of related courses within one package and apply a special price or a specific discount percentage to them.
- Points system: The points system provides the possibility of granting points as a type of prize to trainees in exchange for registering, purchasing new courses, promoting courses, etc., and using those points to obtain financial profits or discounts on new courses.
- Google Classrooms : This component helps you link your Google Classroom account to your educational platform and import the required classes directly from your account.
- Multiple trainers: This feature provides the ability to add more than one trainer to the same course and assign a specific authority to each trainer.
- Certificate Builder: This component helps you design a course completion certificate for students using a built-in editor with the Masterstudy add-on in a flexible and good manner.
- Email Manager: The Email Manager component helps you design, organize and send emails as notification to a group of trainers and trainees you select to promote offers and discounts for new courses.
- Template Editor: The template editor included with the Masterstudy plugin helps you design tables and integrate them with the various plugin pages.
In this way, we have explained to you the most important features of the Masterstudy add-on that distinguish it from other LMS add-ons. Now let us explain to you some other external features during the following paragraphs, so follow the guide with us.
Masterstudy template

The Stylemix Themes team has prepared a custom WordPress template that is fully compatible with the Masterstudy add-on, known as Masterstudy – Education WordPress Theme. This template provides a set of additional features over the Masterstudy add-on, especially by providing a special interface for the trainer and trainee through which he can control his entire account without entering the WordPress control panel. .
The MasterStudy template also provides a set of ready-made interfaces (18 interfaces) that suit most of the needs of educational platforms in order to help you design the interface of your electronic platform in the simplest and fastest way possible.
The Masterstudy template is a paid WordPress template that costs $69 with technical support for 6 months, with the possibility of increasing technical support for a year at an additional cost of $22.
App Masterstudy application
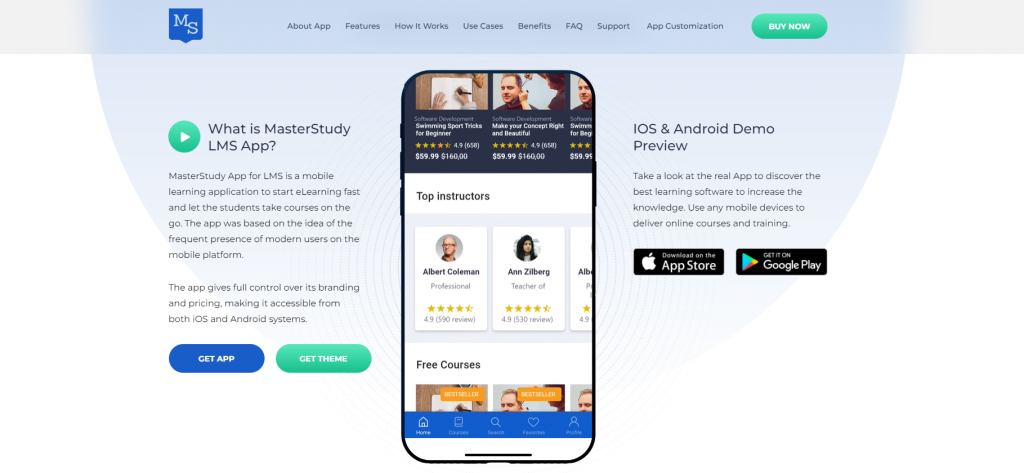
If you want to turn your educational platform into an application in the future, the Stylemix Themes team has prepared an application known as MasterStudy LMS Mobile App , which is in the Flutter programming language and turns your educational platform into an application that is compatible with the iOS or Android operating system.
The cost of the code for this application is 49 US dollars. You can purchase the code and modify it so that your educational platform is linked to the application and you have an electronic application for your educational platform ready for publication with the lowest possible cost and effort.
Cost of adding Masterstudy?
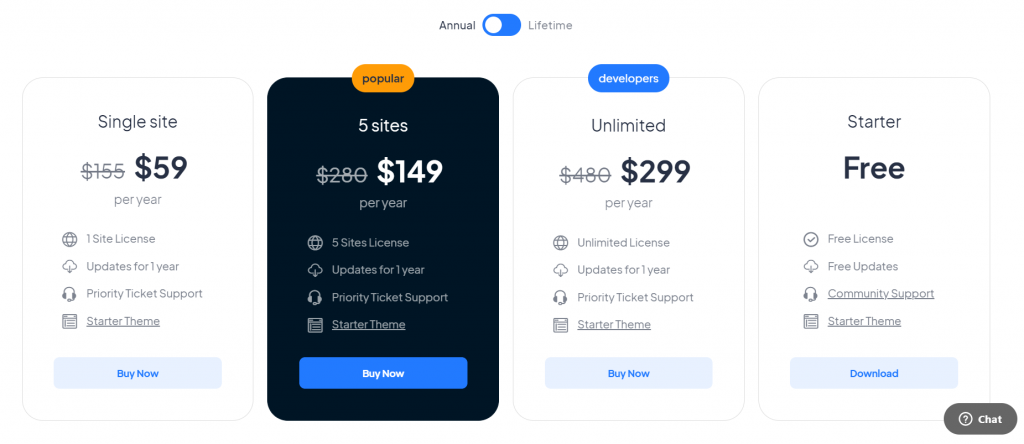
The Masterstudy add-on has a completely free version that you can rely on to design the basics of your educational platform, and the other is a paid version that enables you to use all the features of the add-on that helps you design an integrated educational platform in terms of offers, restrictions, and full control over all details of the courses, as we explained in the previous Masterstudy platform add-ons paragraph. All These components are in the paid version only.
The cost of adding Masterstudy is $59 per year for one site, or $149 for 5 sites per year. The more sites shared in the same package, the lower the cost for each site individually.
However, we do not recommend purchasing the Masterstudy add-on independently, but rather it is preferable that you purchase the Masterstudy template at a cost of $69 USD for life. As we explained in the previous paragraph, it includes a lifetime Masterstudy add-on subscription as well, so you will find the total cost much lower, especially since it is only one non-renewable subscription annually.
Conclusion
The Masterstudy add-on is one of the best LMS add-ons that you can rely on to transform your WordPress site into an integrated educational platform, especially because of its features that help you develop your educational platform in the future.
As well as providing a distinctive template with multiple interfaces that is compatible with the add-on and many other features, and an application that is compatible with the iOS or Android operating system, making you not need any other add-on external to the Masterstudy add-on.
In this way, we have reached the conclusion of the article after providing a comprehensive guide to adding Masterstudy. If you have a question or special inquiry, do not hesitate to comment below the article, and one of the technical support representatives will respond to you as soon as possible, God willing.


Leave a Reply