

Many WordPress site users ignore how to use tags and categories well to improve the site’s user experience, whether in terms of providing a distinctive user experience for visitors, archiving the site’s pages and articles, or improving their appearance in search results (SEO optimization).
If you are planning to develop your site, outperform your competitors, top search results, and provide a distinctive user experience for your visitors, then one of the most important steps you can take in order to achieve this is to use classifications and tags on your WordPress site in a distinctive manner. This article will be of great help to you and will provide you with a simplified guide to everything. You need to know.
The difference between tags and categories
In order to know the difference between tags and categories, and before we explain the difference between using both tags and categories, let us first learn about the concept of tags and classification and their use in WordPress.
What are tags?
A tag is a descriptive word or short phrase that is used to define or clarify specific content, such as an article, image, or file published online. As for the content of WordPress sites, tags are used to add brief descriptions to articles published within the site in order to facilitate access to them, by searching for the tag to which the articles belong.
Suppose, for example, that you published medical articles about nutritional sciences on your site, then if you added tags such as “immune strengthening” or “medical prevention” to those articles, then the visitor will be able to access the content he is looking for, simply by searching for these phrases that represent A “tag” for these articles.
What are the classifications?
Categories (in English Categories) are a method used to collect and archive items or things that are similar to each other. In WordPress, classifications are used by assigning a classification to each article within the site so that all articles that belong to a specific classification can be linked together.
Categories help WordPress sites archive and organize their content, so that it is easier for the visitor to access similar articles that contain content that falls under one category. For example, you can create a category called “Computer Software” that contains all published articles that deal with topics related to computer programs and the latest news about them.
The most important differences between tags and categories
Many users confuse the concepts of tags and categories within WordPress. Although they are similar in use, there are some important differences that must be known in order to optimally use each of them, and here are the most important differences between them:
- Categories are used to collect similar articles in one place, while tags are used to describe articles with terms that express their content and help users reach articles through search engines when searching for terms similar to tags that were previously assigned to the article.
- Categories can be customized to a great extent by creating main categories and subcategories, while tags do not have main and sub-tags; Tags are assigned to each article according to its content.
- Tags are optional in WordPress, meaning you don’t have to use tags to produce organized content, although setting appropriate tags for each post would be a good step to make searching easier. In contrast, classifications are not optional; If you do not specify an appropriate classification for each article on the site, WordPress automatically adds it to the default “Uncategorized” classification.
- Both categories and tags are useful for improving a site’s SEO if used in the right way.
Add and use tags
Certainly, if you are a WordPress user, you have noticed the presence of a “ tags ” box within the editing page of any article that you have created or modified before.
The basic function of tags is that they add a character of description to the content of the article, which may contain hundreds and thousands of words within it, but by using tags you can save time on search engines and also for visitors by knowing the basic topic around which the content of the article revolves, as tags are written in the form of very brief words. Between one and three words maximum, such as “WordPress” or “SEO tips.”
Adding and using tags is not complicated, we will first need to add those tags to the site so that they are ready to be used and attached to relevant articles.
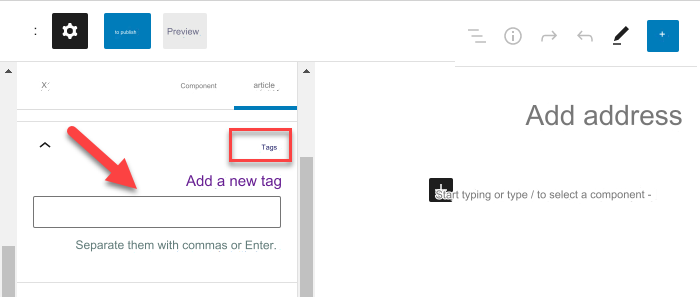
To add tags to a WordPress website, we must first go to the control panel, then choose “ Articles ,” then “ Tags .” The Add New Tag window will appear, as shown in the image. We now have to enter the name of the tag and its description (the description here is optional), then click on the “Add a new tag” icon and those tags will be stored on the site, so that you can use them later within articles:

Place the tags icon within the website pages
You can add a special box for tags within your site to make it easier for visitors to access all articles that include specific tags, through the WordPress control panel, then “ Appearance ,” then “ Widgets .” We drag the “ Tag Gallery ” widget and drop it into any part you want on your site, as in the picture. :

Now when you visit the site, a box will appear containing all the tags found on your site, as in the image below:
The visitor can click on any tag to be taken to a page that includes all articles containing this tag within the site. This will make it much easier for visitors to access articles that address a specific topic they are looking for.
The usefulness of tags in improving SEO
Tags play an important role in improving the SEO of WordPress sites, as search engines use these tags to know the subtopics that you cover within your site’s articles, and thus the chance of the site’s pages appearing among the first search results related to the content of the article increases.
Try to use tags in a way that expresses the content of your articles well. Use relevant phrases that the visitor may search for. You can conduct a search for the keywords that users are searching for on a specific topic and then use the most prominent keyword phrases related to the content of the article in the form of tags within the article itself.
There is no specific number of tags that you can add within one article, but this does not mean that your articles should be filled with tags related to and not related to the article. Rather, be careful as much as possible to select tags that are popular among users and only add tags that you deem expressive of the content of your article and have a strong connection to its content.
Use of classifications on the site
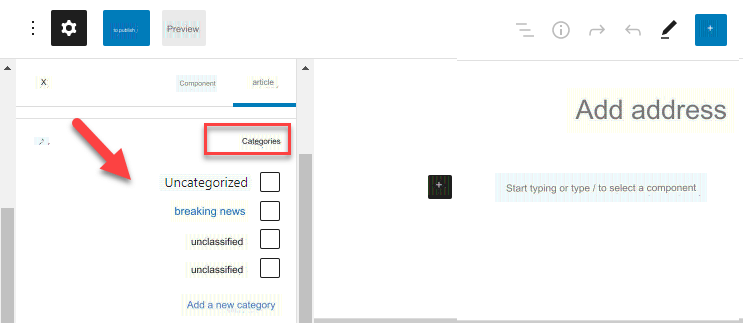
Within the editing page for any article on your WordPress site, you will find a “Categories” box through which you can specify the classification for your articles. This is not optional, as if you do not choose any classification for your article, WordPress will automatically assign the article to the default classification of “Unclassified.”
Note : You can change the default classification on your site from “Unclassified” to any other title, so that this classification is set to display any article that does not belong to a specific classification.
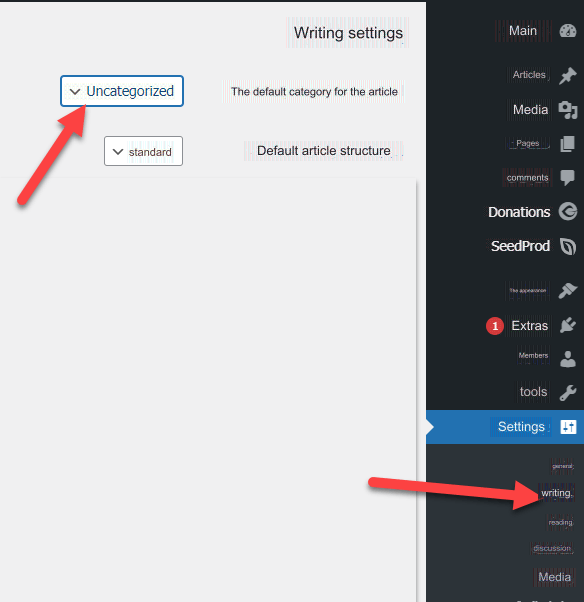
To change the default classification of the site, you must first go to the control panel, then “ Settings, ” then ( typing ). You will find a selection box from which you can choose the default classification that you want for your site instead of “Unclassified,” as in the picture:
As we mentioned, the basic function of the categories on your site is to organize the site’s content into categories and sections that the visitor can easily browse and move between, so that he chooses the section or classification he is looking for and avoids entering into a maze of content that is not related to what he wants to read.
For example, if you own a website that sells food goods, in this case you can have many categories of goods that you sell, such as “baked goods,” “vegetable oils,” “meat,” and others. In this case, it would be a good idea to organize your site’s content according to the categories that that content falls under and in a way that suits visitors’ interests and what they are searching for. These categories will be displayed within the main navigation menu of the site to ensure easy browsing of the content by visitors.
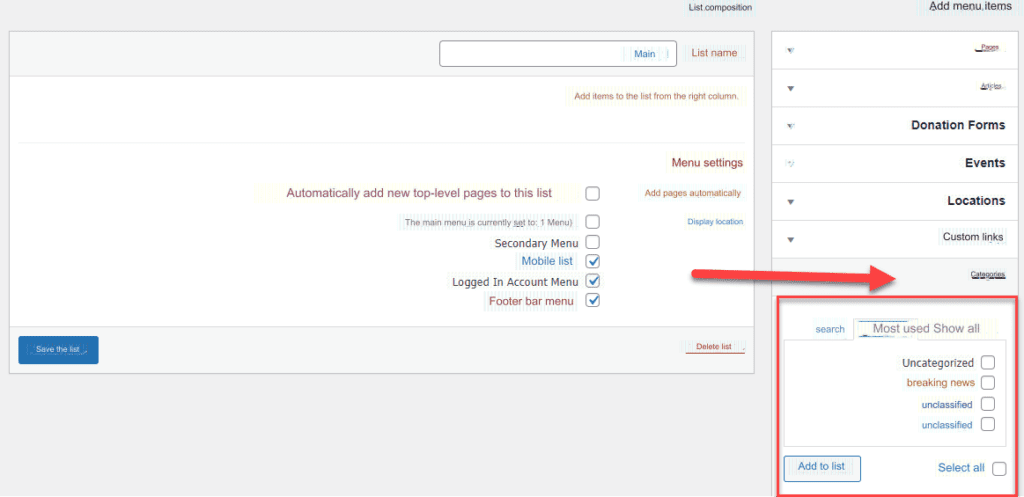
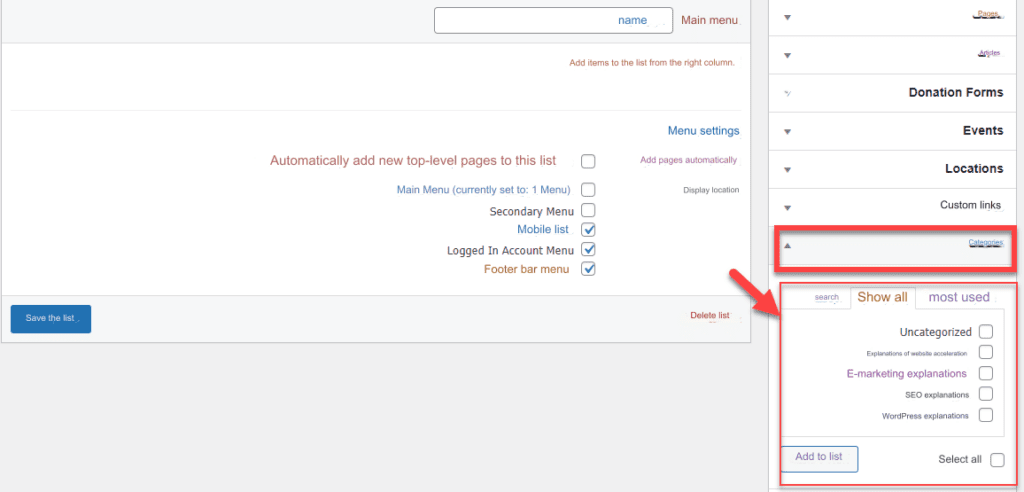
You can also add classifications for your site’s articles to the navigation menu at the top of the site’s pages easily, by entering the control panel, then the “ Appearance ” option, then “Lists.” You will open the main menu and you will find among the options that you can add to the menu the “ Categories ” option. You can choose any number of categories you want to add within the main navigation menu on your site, as shown in the image below:
Similar to the process of adding tags to your site’s articles from within the editing page, you can also easily add categories to your WordPress site for use later. To add categories to your site, you can go to the WordPress control panel, then “Articles,” then “Categories.” From there, add the categories that you want to assign to your site for use later. These categories will appear to you on the editing page while editing the article so you can choose from them the appropriate category for each article on the site, as in the picture:

As you can see in the previous image, there is a “ parent classification ” element, which is an option through which you can set the classification as a main classification under which other sub-categories on your site are included. For example, you can create a category “Meals” and a subcategory called “Meals for Children,” so that the category “Meals” is the parent category for other categories related to it.
Categories appear within article links on the site. When you open any article within your site, you will find under the title or in any other part the name of the category under which this article falls. For example, the article in the following image is titled “SEO” and it belongs to the “Breaking News” article category, as in the image:
When you click on the category name, the link for the category will open for you, which will be as follows: Breaking News/www.example.com/category
This link contains all the articles that belong to the “Breaking News” category on your site, and this link is automatically generated by WordPress based on the name of the category that you previously set on your site.
Show categories within your site pages
WordPress provides you with the ability to display the categories that exist on your site within the site pages so that visitors can browse them. This is done by entering the WordPress control panel, then “Appearance,” then “ Widgets ,” then drag and drop the “ Categories ” widget into the part of your site that you want to show, as in the picture:

After adding the category, you will notice when browsing the site that a box appears containing all the categories on your site. In this way, the visitor can click on any category to open a link containing all the articles that belong to this category, as in the picture:
The importance of classifications in improving SEO
Rankings help your site improve your site’s visibility in search results on various search engines. Having organized classifications on a site helps search engines better archive and rank your site’s content, so that the search engine presents your site over competing sites that do not have a good classification and archiving of their content.
One of the ways in which classifications support site SEO is by displaying the name of the classification within the link to the site’s articles and pages.
In addition, WordPress provides the ability to customize and set up permanent links on the site so that they contain the category name of the articles on the site.
You can customize permalinks through the WordPress control panel, then “ Settings ,” then “ Permalinks .” From there, you can choose the categories to be present within the site links, as in the picture:

Although the use of classifications is well useful on the site, which will reflect positively on the site’s SEO, using them randomly can have adverse results on your site, such as using several classifications for the same article without them being related to each other:

The image above shows an incorrect use of categories within the site, which is choosing more than one main category for one article. It is correct, of course, for the article to fall under one main category or one subcategory, such as, for example, using the main category “Software” for an article entitled “Tips for Mastering Working on the PowerPoint Program.” You can also – which is better – designate a more precise “subcategory.” For the previous article, you would include it under the subcategory “Windows Programs,” which falls under the main category “Software,” for example.
Avoid adding more than one category to a single article, because WordPress automatically creates a link for each category on your site. Therefore, if you add an article to more than one category, the article content will be present on more than one link within your site, and thus the “duplicate content” problem can occur. This is one of the problems that negatively affects your site, so make sure to use classifications correctly.
In addition, do not create more than one category with the same name. Each category must have a distinctive name, because this will negatively affect the appearance of your site’s pages and links in search results.
In the end, if you want to give your visitors a smooth and enjoyable experience, your next goal should be to control and organize your site’s content through good use of tags and categories. WordPress has many distinctive options that make it easy for you to organize your content through tags and categories, but do not forget to choose the correct tags and categories in order to raise your site to the first search results