Setting up shipping in WooCommerce stores is important for professional store management, as aspects related to the process of shipping physical products play a pivotal role in how visitors and customers see your online store, as well as in making the decision to buy the product or not, and for this you must be careful to make the process of shipping products in your store high quality.
Therefore, in this article, we will explain to you how to set up shipping and adjust its options in WooCommerce in detail, starting with specifying shipping areas and adjusting shipping methods to them, and ending with adding shipping categories to change the shipping price based on the product category. We will also introduce you to the best shipping companies that integrate with WooCommerce to facilitate Shipping products to customers and saving time and effort.
What are WooCommerce shipping options?
Shipping options in WooCommerce are the options and methods that the online store owner can provide or offer to customers to ship products from his store to them. The default shipping options that WooCommerce provides the ability to set include the following:
- Flat Rate : You can set a flat rate for shipping to a specific geographic region, where you charge a set, fixed fee for each shipment to a customer.
- Free Shipping : When you select this shipping method for a specific region, when the customer requests shipping to that region, he does not pay any amount for shipping. You can specify a condition that the customer must fulfill in order to be able to benefit from free shipping, such as if it exceeds a specific value for the order. .
- Local Pickup: You can enable the customer to choose to receive products from your store without having to ship them to him. It is preferable to set this option to be without shipping cost to the customer, although WooCommerce provides the ability to adjust its cost.
By default, the WooCommerce add-on does not provide you with other shipping options, but more options can be added to it through add-ons. There are WooCommerce add-ons that allow you to add additional shipping options, such as the ability to change the shipping price based on weight , or determine the shipping price based on shipping prices in… Real-time carriers or other options.
How to set up shipping on WooCommerce
To set up shipping on WooCommerce, you must adjust a number of settings located under the shipping tabs on the shipping page within the program settings page. The way to do this is to specify the shipping areas and the methods provided in each area, in addition to the cost of each method. It is also possible to adjust the shipping settings. Additional are the shipping categories which we will explain later.
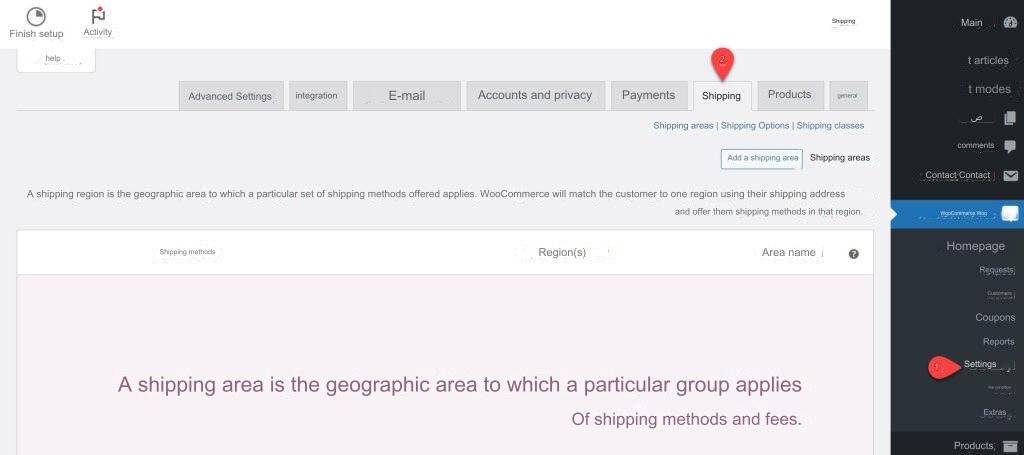
To adjust the default shipping settings on WooCommerce, first go to the WooCommerce settings page by clicking on the ( Settings ) option under the (WooCommerce) tab in the WordPress control panel , then click on the ( Shipping ) tab on that page.

The shipping tab includes 3 tabs related to shipping products: Shipping areas – Shipping options – Shipping categories. We explain below how to adjust the settings for each of them to set up shipping in the online store.
First: shipping areas
The shipping regions tab options allow you to specify independent shipping methods and costs for each geographical region (or group of geographical regions). You can, for example, make shipping free within the country of Egypt, and set a price for it in the rest of the Arab countries.
One of the most appropriate strategies that can often be applied to adjust shipping zones is:
- Create a shipping zone that includes the city where your store is located, and allow customers in that zone to pick up products locally by visiting the store.
- Create a shipping zone that includes cities near the city where your store is located, and make shipping free in this zone.
- Create a shipping zone that includes all cities in the same country as your store, and set a low, fixed price for shipping to them.
- Create a shipping zone that includes all the countries in the world that support shipping to them, and set a high fixed price for shipping to them (this zone can be divided into several zones depending on specific factors).
It is not necessary to adhere to this strategy precisely, but you can modify it according to what you deem appropriate for you. You can cancel free shipping, make shipping free in all cities in the country where the store is located, or make other modifications.
When setting shipping zones on WooCommerce, you must adjust each zone separately, and here we do not mean every geographical zone, as a group of geographical zones can be grouped together to create a single shipping zone for them. Rather, the settings of each zone that is supposed to have the same characteristics are adjusted on its own.
To add and adjust shipping zone settings, click on the ( Add Shipping Zone ) button under the Shipping Zones tab in WooCommerce.
The form for adding a shipping area in WooCommerce will appear directly in front of you, and you must fill it out. Enter the name of the shipping zone you want so you can come back and modify it later when needed (example: Nearby Zones), then select the geographic zones that belong to that zone.
Note : You can specify geographical areas by starting to enter their names and choosing them from the drop-down list that appears once you start entering the name.
After selecting geographic regions, you need to determine the shipping methods available for that shipping region. To do this, click on the ( Add shipping method ) button.

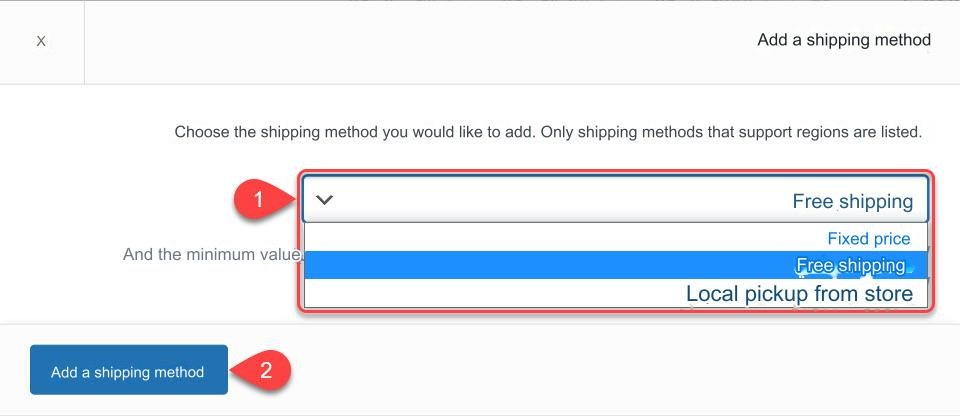
A window will appear asking you to choose a shipping method. Choose the method you want from the methods we explained previously, then click on the ( Add Shipping Method ) button.
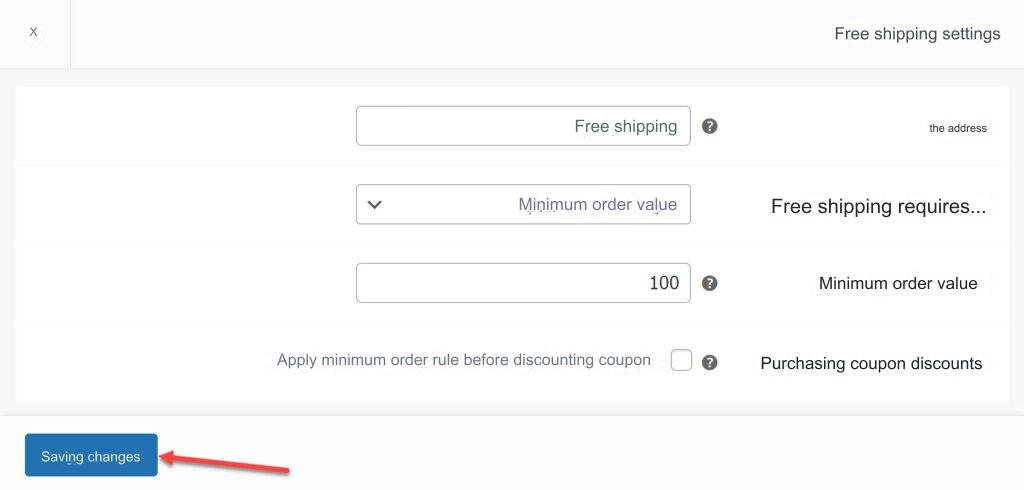
The shipping method will be directly added to the shipping area, and you can edit its options by clicking on the ( Edit ) button that appears below it when you hover your mouse over it.

Shipping method options vary, but flat rate shipping options are similar to local pickup options. Whatever shipping method you added, you must adjust the shipping options according to what you want, then click the ( Save changes ) button.
After adjusting the shipping method options as you wish, you can add other shipping methods to the shipping area by re-clicking on the ( Add Shipping Method ) button and following the same steps that we explained above to adjust its options. Then, you can click on the ( Save Changes ) button to add the shipping area to your store. WooCommerce.
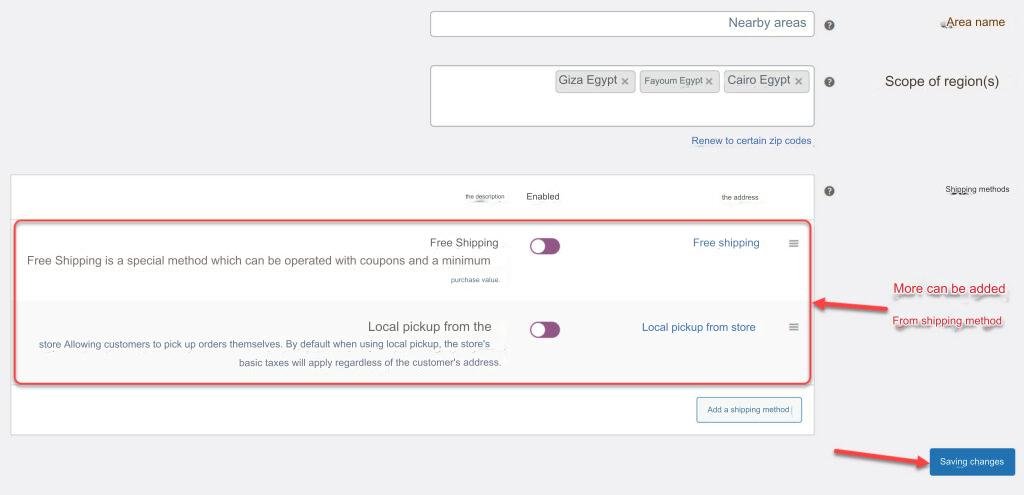
After that, you can add more shipping areas in the same way, and when a customer visits your online store, the shipping address he provides will be matched with the shipping areas you added, and the shipping methods you specified and the prices you entered will appear to him.
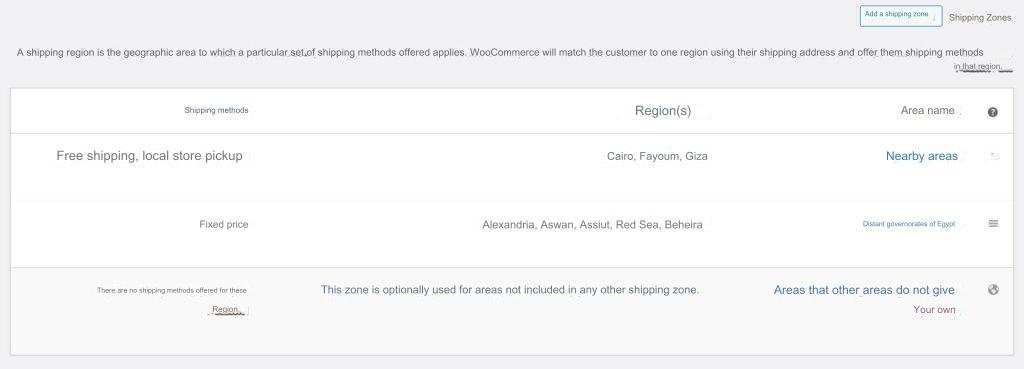
Note that there is a default shipping zone that appears in WooCommerce as (zones not covered by your other zones). If you do not add shipping methods in this region by entering it and changing its settings, customers will see that shipping is not available to their region if it is not covered by one of the other added shipping regions.
If you do not want to provide the ability to ship to a specific geographical area, you can create a shipping area for it in WooCommerce, and not add shipping methods to it, as this will inform customers who want to ship to that area that shipping is not available in their city.
Second: Shipping options
After you set the shipping zones on WooCommerce, you must adjust the settings and options in the Shipping Options tab. This tab includes a set of settings related to shipping. You can leave the options set as default, but you can also change them depending on what you want.

One of the important options included in the Shipping Options tab is the option (Activate the shipping cost calculator on the shopping cart page). When this option is activated, the shipping cost calculator will appear to the customer on the shopping cart page. When the customer enters the shipping address in the calculator, the costs will appear to him based on the settings you specified. In shipping areas and methods.
The rest of the charging options are well explained, and you can adjust them as you want by placing or not placing a check mark next to them, then clicking on the ( Save changes ) button.
Third: Shipping categories
WooCommerce shipping categories are used to group similar products together and display the same shipping methods and prices. For example, you can provide shipping rates for clothing that differ from shipping rates for furniture to the same shipping area, or you can provide shipping rates for light-weight products that differ from shipping rates for medium-weight and heavy products.
If you don’t want to use shipping categories in your online store, it’s not mandatory, but for most online stores, it’s better to use them to optimize the shipping functionality of the store, and charge shipping costs that are fairly proportional to the size and weight of the product. To add and adjust shipping categories on WooCommerce, go to the ( Shipping Categories ) tab on the Shipping page, then click on the ( Add Shipping Category ) button.

You will be presented with a number of fields that you need to fill in , which are the category name, nice name, and description. Do this, then click on the ( Save Shipping Category ) button to add the category to the category list.

You can add the shipping categories you want, and it is not necessary to add all the categories at the same time, but you can modify the categories and add more of them at any time you want.

After adding shipping categories, you can specify a custom shipping price for each category based on the region through the Shipping Areas tab, where you can return to the Shipping Areas tab, then go to the Edit a specific shipping area page, then click on the Edit button for one of the shipping methods, and you will notice that A group of new options that allow you to determine the shipping price to this region based on the category.
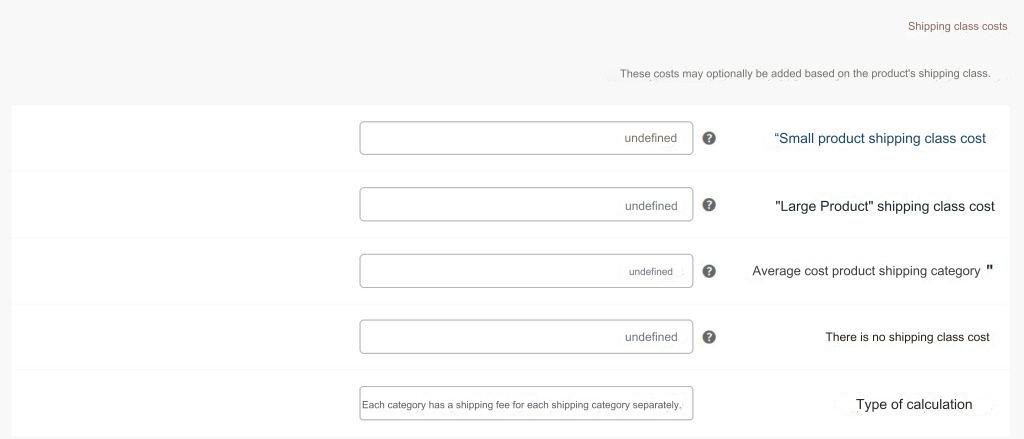
Note: Of the default shipping methods on WooCommerce, only the (Flat Rate) shipping method supports the ability to set the shipping price based on category, so the options shown in the previous image will not appear unless you have clicked the Edit button for one of the (Flat Rate) shipping methods ).
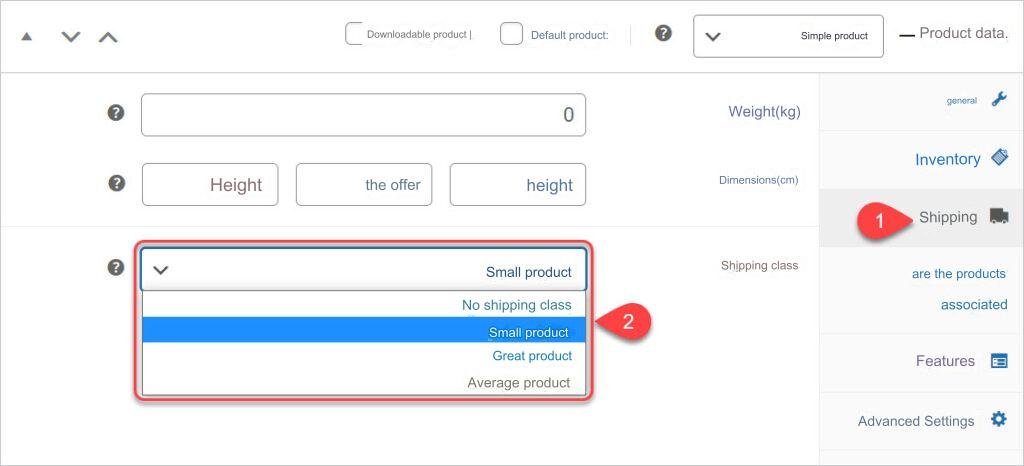
After adding shipping categories under the Shipping Categories tab in WooCommerce settings, the categories you added will appear as a drop-down list in the (Shipping) tab in the Product Data section on the Edit Product page. When you choose one of the categories on a product page, its shipping costs will appear to the customer. Depending on the price you set for the category under shipping zones settings.
Shipping companies that WooCommerce integrates with
WooCommerce offers different strategies to handle the process of shipping products to customers. You can carry out the entire shipping process depending on yourself or your store employees. If your store is still small and you do not receive a lot of product shipping requests, when a customer buys a product from your store and requests it to be shipped to him, you can To assign one of your employees the task of delivering the product to a transportation company to be shipped to the customer’s address.
But if you would like to organize the shipping process more, or if you receive a lot of purchases and shipping requests, it would be inconvenient to carry out shipping in this way, and then you can use shipping companies that integrate with WooCommerce to facilitate the process, reduce the time and effort required for it, and add more options and benefits. To the charging function. The most prominent shipping companies that can be relied upon to ship WooCommerce store products to customers include the following:
1. Aramex company
Aramex is one of the most famous shipping companies that integrate with WooCommerce in various countries of the world, including Arab countries. In addition to having hundreds of branches around the world, it provides many advantages related to shipping products, including but not limited to:
- Price calculator to calculate shipping price.
- Wide and accurate options for managing shipments.
- An application for Android and iOS devices that allows easy tracking of shipments.
- High-level technical support provides helpful answers.
- Confirm product delivery via text message or email.
- Customs clearance services for imported products.
Aramex also has many other advantages that make it one of the best shipping companies integrated with WooCommerce. In order to link your online store with this company, you can use the Aramex Shipping WooCommerce add-on , but you will also need to create a company account with Aramex, and this requires identification documents.
2. DHL company
DHL , which is one of the most prominent, famous, and best local and international shipping and parcel delivery companies in the world, offers many options and capabilities that facilitate the automation of shipping operations through the company on WooCommerce by taking advantage of the following advantages:
- Print shipping labels from your WooCommerce dashboard.
- The ability to order shipping without leaving your WooCommerce dashboard.
- Schedule a free delivery after printing the label.
- You can take advantage of the company’s shipping features, such as shipment tracking and express shipping.
The company also has many other advantages, and there are several WooCommerce add-ons that can be installed to support the company’s integration with the online store, including DHL Parcel for WooCommerce and DHL + WooCommerce , but these add-ons do not yet integrate well with WooCommerce in the Arab region.
3. Fedex company
Fedex is the global leader in express shipping, providing this service in more than 220 countries and territories around the world. This company’s shipping services are integrated with WooCommerce based on the options provided by its WooCommerce add-ons, including the following options and benefits:
- Displaying the company’s shipping rates to the customer on the payment page.
- Add the Fedex shipping price to the total amount to charge the customer shipping fees.
- You can use the weight and height modules you want in your store and the extensions will integrate with them.
There are many add-ons that can be used in WooCommerce in order to make the store integrated with Fedex, the best of which is the FedEx Shipping Method add-on , which calculates the shipping price on the payment page and adds the shipping price to the invoice until the customer pays it. You can also use special software that you program yourself or by hiring Independent to make the store more integrated with the company.
In addition to Aramex, DHL, and Fedex, there are many companies that integrate with WooCommerce and facilitate the process of receiving and executing shipping orders, including Bosta, which is one of the best shipping companies inside Egypt, and Zajil , which is one of the leading companies in the Kingdom of Saudi Arabia.
If you run an online store in Egypt or Saudi Arabia, and you do not want to rely on one of the shipping companies that we mentioned above, you can rely on one of the companies that we mentioned in these two lists:
And here, dear reader, we have finished explaining in detail how to manage and set up shipping on WooCommerce, and introducing you to the best shipping companies that integrate with this program. In conclusion, we would like to draw your attention to the fact that the shipping aspect is one of the important aspects in electronic stores, and care must be taken to pay attention. It can be used, accelerated and facilitated as much as possible to improve the customer experience, attract new customers, and make existing customers loyal.


Leave a Reply