Product tables help improve the user experience and increase the effectiveness of displaying and arranging products in an organized manner within the store, which contributes to improving the customer shopping experience and increasing the sales rate. This can be achieved, for example, on store home pages, marketing articles, etc.
In this article, we will present to you the main steps for creating product tables within your online store pages, focusing on how to organize those tables, improve the user experience, and make the most of this tool in enhancing the sales of your online store’s products.
Steps to create a product table within your store pages
Product tables are tables that include specific products within your online store, and are presented in an organized and concise manner to customers. It is an effective way to arrange and organize the store’s products, especially if a large number of products are available.
When creating product tables, a balance must be achieved between the aesthetic appearance of the table – in terms of colors and organization – and the basic functions related to purchasing products, in addition to providing sorting and searching options for customers, in order to get the most out of them.
There are many tools available that help you create product tables in WooCommerce , for example, you can use the “ Product Table for WooCommerce by CodeAstrology ” plugin, the “ Ninja Tables ” plugin, or the “ WC Product Table Lite ” plugin.
All of the previous options provide the required service well, but it is preferable to consider adding “ Product Table for WooCommerce by CodeAstrology ,” as it provides excellent customization options, in addition to being easy to use for beginners. We will explain to you in detail how to create product tables within your online store pages based on this add-on.
1- Install and activate the Product Table add-on
First, you need to install the Product Table for WooCommerce add-on on your WooCommerce store by entering the main WordPress control panel, then choosing “ Plugins ” from the side menu, and then “ Add New .” After that, you can search for the “ Product Table for WooCommerce by CodeAstrolog ” plugin and click on the “ Install Now ” button next to it, as shown in the following image:
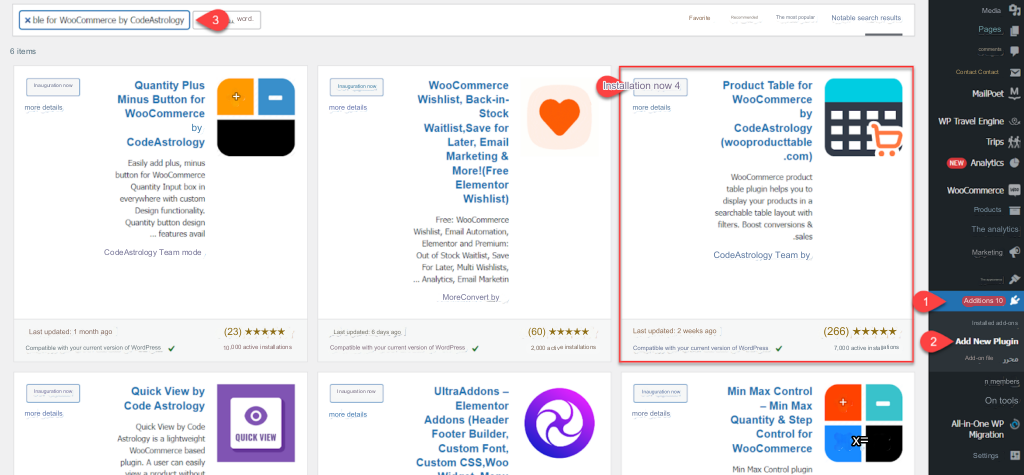
After that, you must wait for the add-on installation to complete. Once finished, you can click on the “ Activate ” option, and in this way the add-on will be successfully installed on your store’s website.
2- Create a new products table
You can now start creating product tables on your store by returning to the main WordPress dashboard. After that, click on the “ Woo Product Table ” option in the side menu, and then choose “ Product Table ”. This step will direct you to the Schedules page, which you will rely on to manage and organize the schedules on your store.
To create a new table of products, simply click “ Add New ” as shown in the following image:

3- Customize table columns
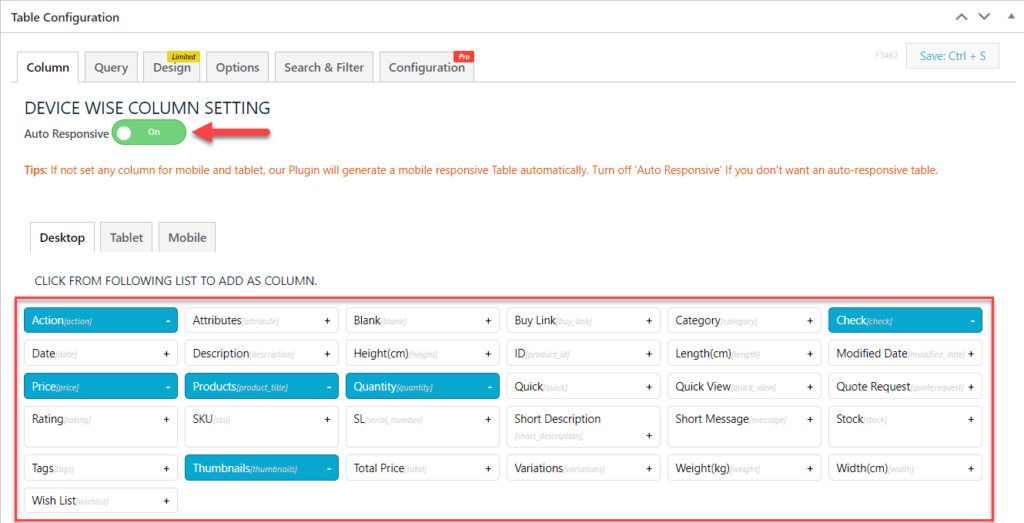
You start setting the table options from the “ Table Configuration ” tab, then choose “ Column ” from the top menu to control the table columns. You’ll find the ability to separately select which items appear in the table on computers, mobile phones, and tablets.
For example, you can choose the basic elements of a table as follows:
- Product name “ Products ”.
- Product price “ Price ”.
- Quantity of product required .
- Thumbnail of the product “ Thumbnails ”.
- Multiple selection of products “ Check ”.
- Direct purchase button “ Action ”.
You will also find various other options such as product description, stock quantity, product variants such as color or size, product classification, etc. Choose the columns that suit your needs. It is preferable to activate the “ Auto Responsive ” option so that the columns automatically respond to different screen sizes. In this case, you don’t need to set up separate rows for mobile or tablet, as the illustration below clearly shows:
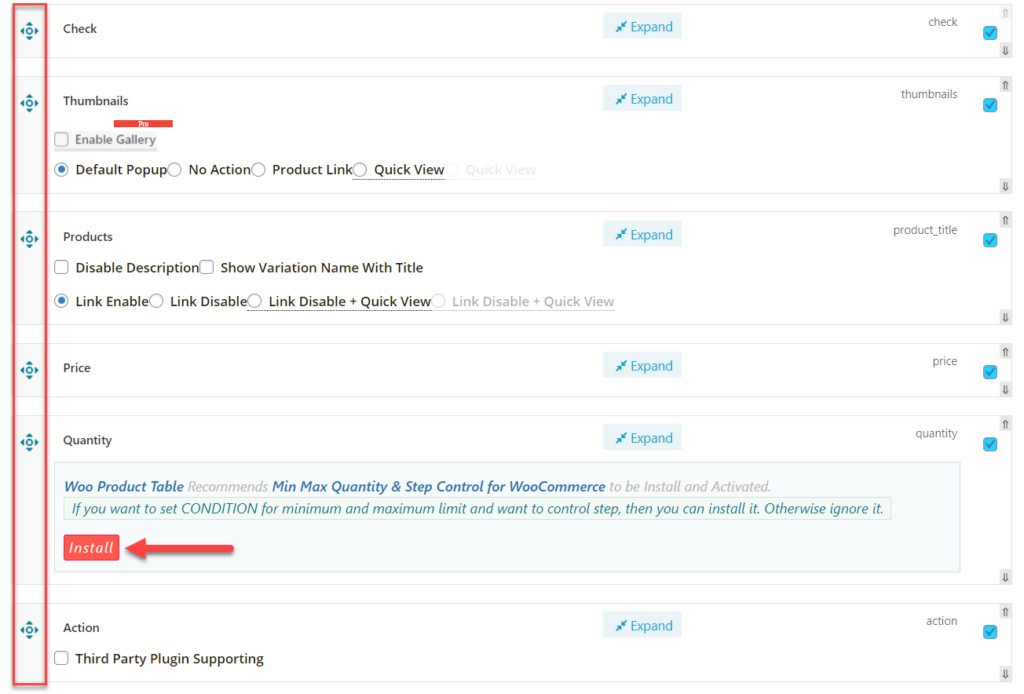
Then, you can arrange the columns according to the appropriate view for your store, and you can do this directly by dragging and dropping. Some columns may need sub-adds. For example, the Quantity column may require sub -adds. In this case, the “Product Table for WooCommerce” plugin provides a recommendation for the desired sub-add, and you can do this by directly clicking on “ Install ” for the sub-add as shown in the image below:
You will be directed to the add-on installation page. You must wait until the installation process is completed. After that, click on “ Activate Plugin ”, as shown in the image below:

After completing the installation of the sub-add-on, you will be redirected to the table setup page again, and you can complete the setup options. The Product Table for WooCommerce add-on provides multiple options for the way columns are displayed.
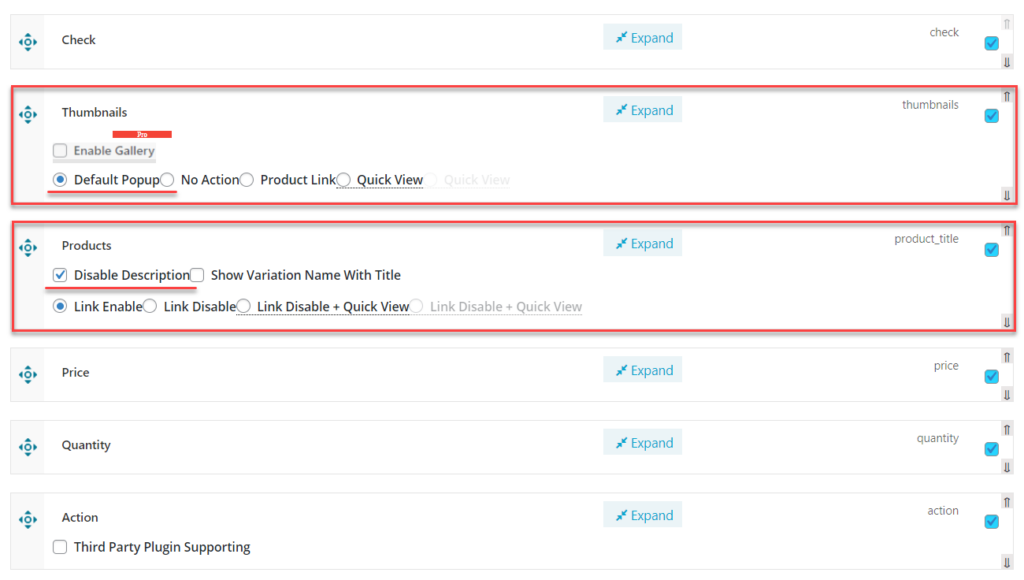
For example, in the “ Thumbnails ” column, you can control the result that appears when you tap the thumbnail, such as making the image larger, going to the product link, or a quick view of the product. Likewise, in the “ Products ” column, you can control the content of the product tab, whether only the product name appears, or the product description as well. You can also control the outcome of clicking on the product name, such as going to the product page, a quick view of the product, etc.
It is preferable to activate the option to enlarge product images in the “ Default Popup ” pop-up window in the “ Thumbnails ” column. It is also preferable to activate the “ Disable Description ” option to cancel the product description in the “ Products ” column in order to organize and shorten the table, especially if the product description is long, and this is clearly shown in the illustration below:
4- Identify the products of the table
Next, select the products you want to appear in the table. To do this, choose the “ Query ” tab from the top menu, then select the categories you want to appear within the table using the “ Product Categories Include ” option. This is shown in the illustration below:
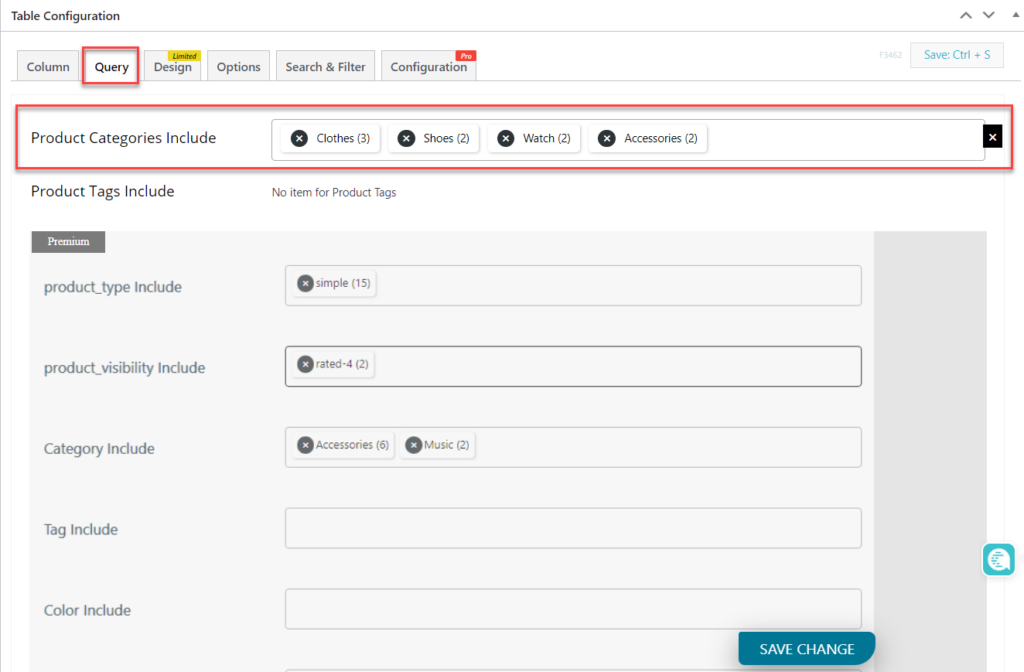
You will find that the “Product Table for WooCommerce” plugin does not allow adding products individually. Therefore, you can add a new category, and then add all the required products to this new category. After that, choose this category within the “ Product Categories Include ” option.
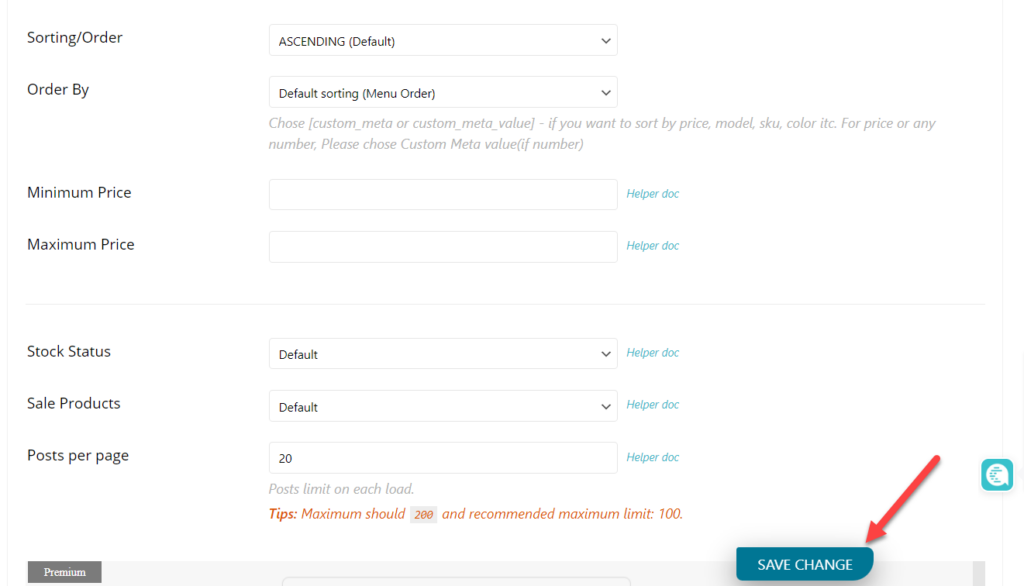
Then, you can specify how products are ordered within the table, such as by name, price, or quantity. You can do this through the “ Order By ” option, with the ability to specify the order from lowest to highest or vice versa, through the “ Sorting / Order ” option.
You can also control the display of products with a discount percentage only, or all products, through the “ Sale Products ” option. This idea is similar to not displaying products that are out of stock, through the “ Stock Status ” option.
Finally, you can specify the number of products you want to appear on one page, for example, 20 products per page, through the “ Posts per page ” option. After completing all the settings, click “ Save Change ,” as shown in the image below:
5- Modifying the design of the product table
After that, you can modify the design of the product table, such as colors, fonts, etc., by going to the “ Design ” tab in the top menu. You will find that the “Product Table for WooCommerce by CodeAstrology” extension provides you with several ready-made templates for tables at the free and paid levels, as shown in the image below:
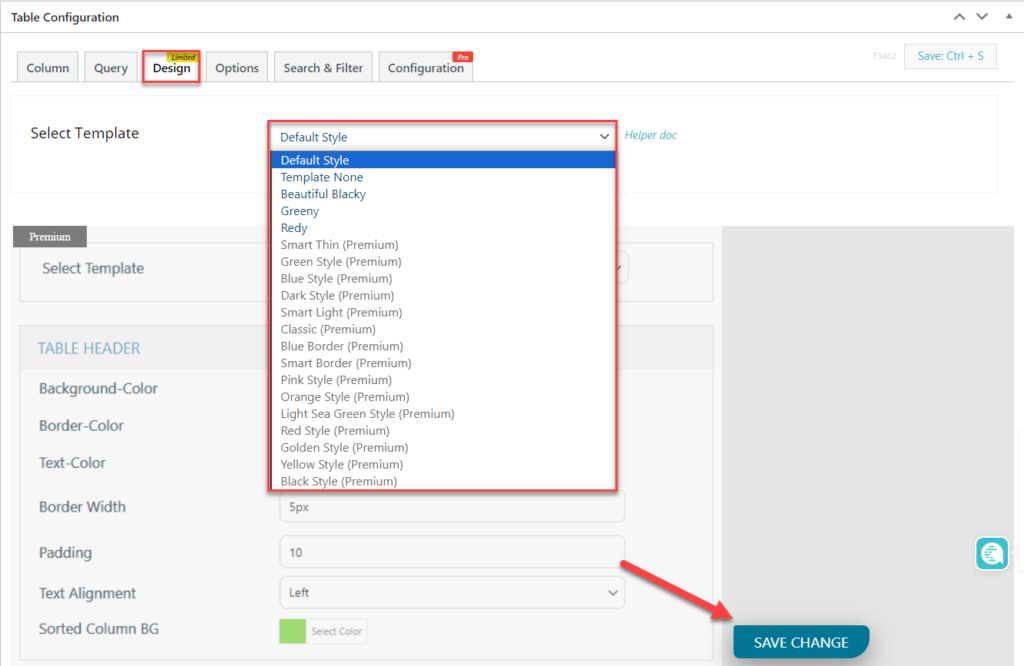
You can gradually test templates, or manually customize table colors to match your store’s identity. After finishing, click “ Save Changes ”.
6- Arabization of product table options
Next, you need to localize the product table options to suit the language of your online store, for example, the “ Add To Cart ” button, number of table pages, number of products, multiple selection, etc.
To achieve this, go to the “ Option ” tab from the top menu, and start writing the appropriate translation for the product table items. Next, click on “ Save Changes ” as shown in the image below

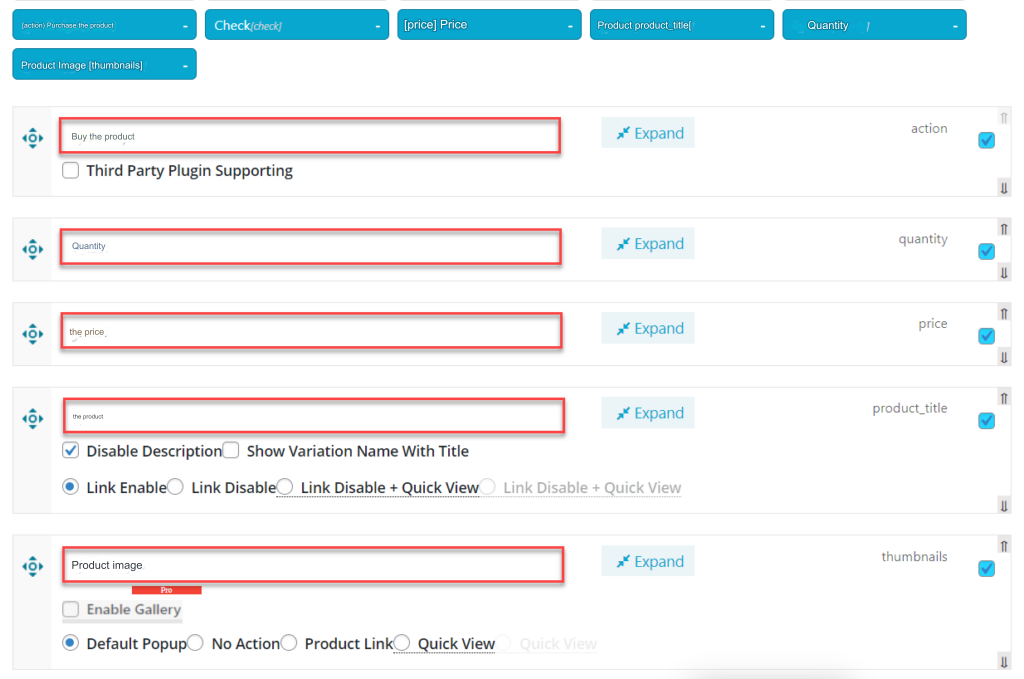
You can also edit table column titles in Arabic. You move to the “ Column ” tab from the top menu, then select the desired column, and modify the title in Arabic. The same applies to arranging the columns to suit the view from right to left, as shown in the following image:
After that, you may find some words still in English in the Products table. Here you need to choose the “ Woo Product Table ” option from the WordPress side menu, and then choose “ Configure ”, and after that you have to go to the “ Label Text ” tab from the menu. upper as shown in the following illustration:

You will find all the product table terms in the Product Table for WooCommerce add-on in English. Edit them and write the appropriate Arabic translation as shown in the following image:
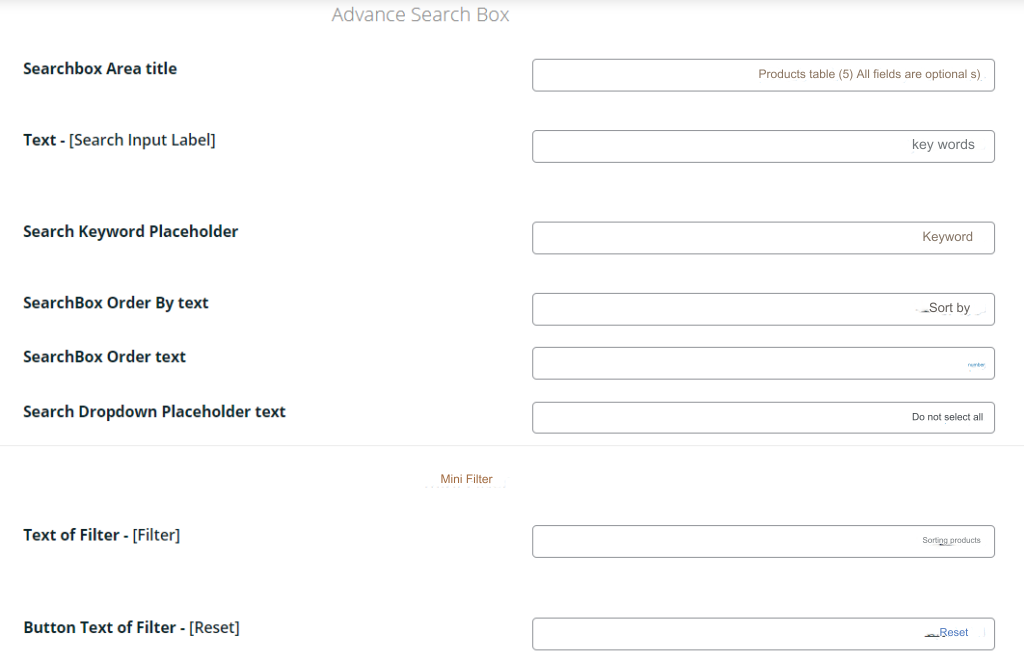
After that, save the modifications by clicking “ Save Changes ”, and in this way the product tables in the Product Table for WooCommerce add-on have been fully Arabized.
7- Activate search and sorting options in the product tables
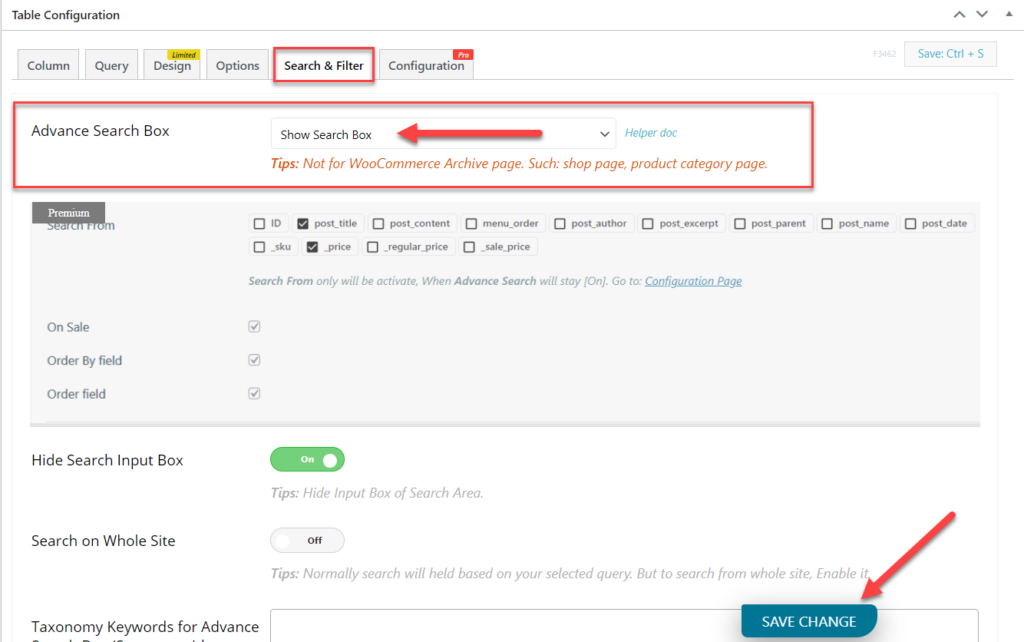
After that, go to the “ Search & Filter ” tab from the top menu. Then, choose “ Show Search Box ” from the “ Advance Search Box ” section, to activate the search and sorting options in the product tables, then click “ Save Changes ” as shown in the image below:
8- Publish the product schedule on your store
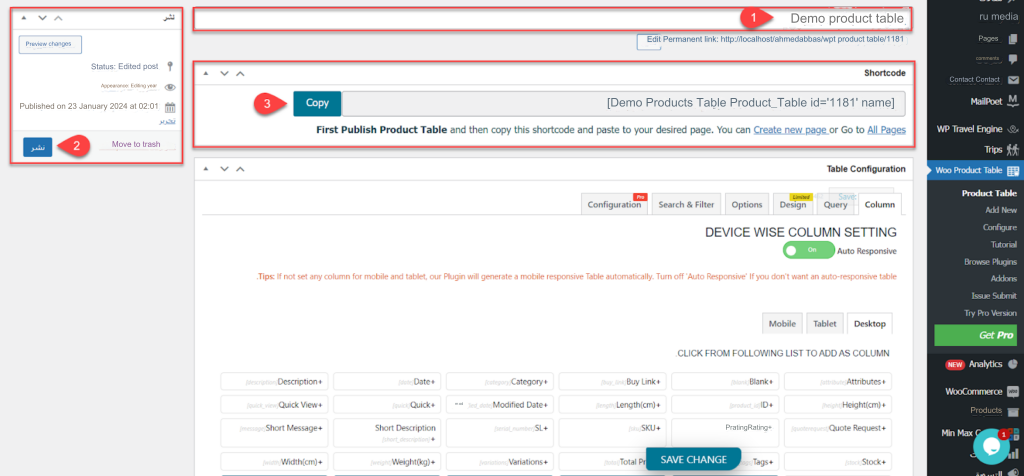
After completing all the previous settings, you will find that the product table is ready to be published on the pages of your online store. Specify the table name, then click “ Publish .” The schedule will be published and the Products Schedule page will reload. After that, copy the table code from the “ Shortcode ” tab as shown in the image below:
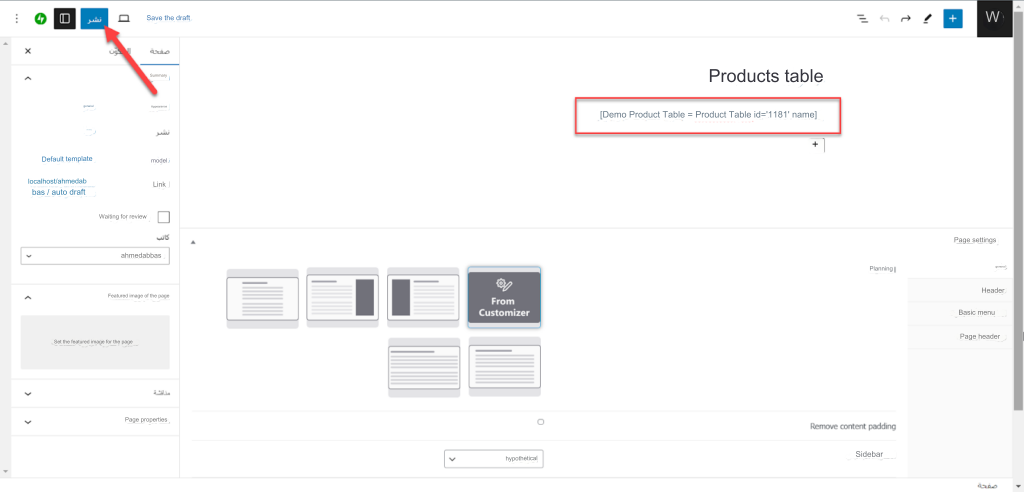
Next, go to the page where you want to include the products table, and paste the code for the products table you copied earlier. Then, click “ Publish ”, as shown in the image below:
You can now preview the final appearance of the products table, as shown in the following image:
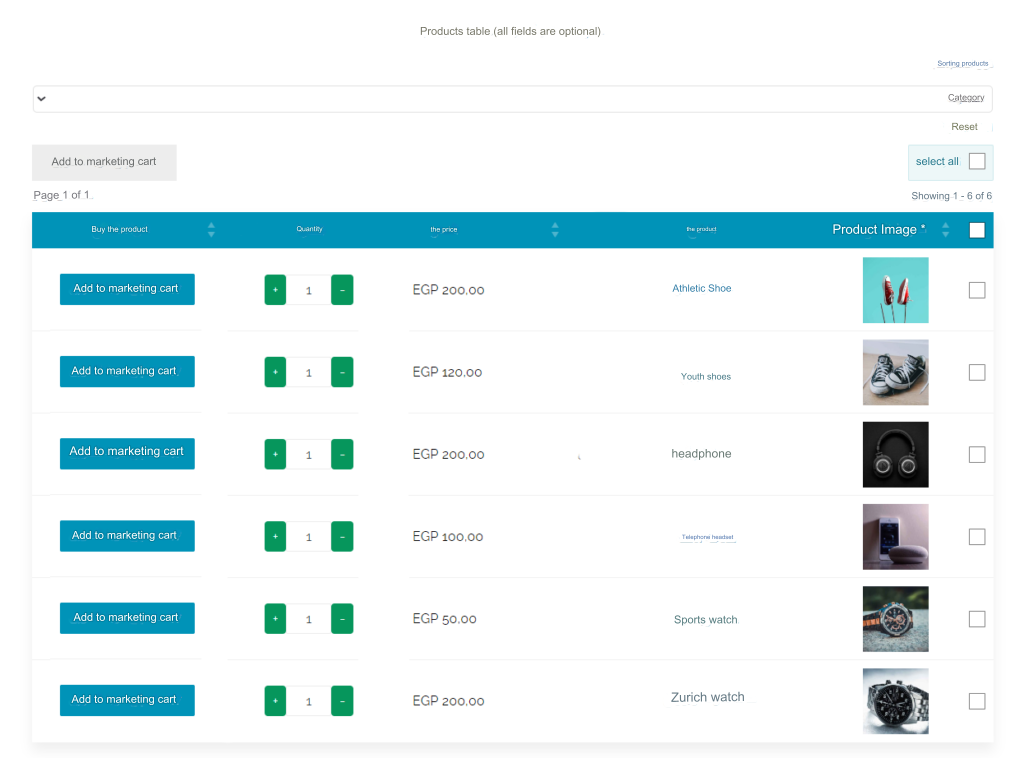
You can modify table elements, such as columns and their content, order of elements, translation, and more. You’ll find that edits are applied directly to the table. You can include the product table on store pages or articles without restrictions, which helps you get the most out of the product tables and boost sales on your store.


Leave a Reply