The step of uploading products to the online store is one of the basic steps that online store owners need to take in preparing the online store for the final publishing stage.
You may not feel that there is a problem if you want to upload a small number of products, for example 5 – 10 products, but if you upload a large list of products, for example 20 – 100 products or more, you will find the need to allocate a lot of time and additional effort in order to Uploading all these products with the required quality and details.
The ideal solution to this problem is to rely on uploading products in bulk in one step on WooCommerce, based on all product details, available options, classifications, etc.
There is more than one method that you can rely on for this function. The first method is to upload bundled products based on the WooCommerce add-on itself. The second method is by relying on external add-ons, for example adding Product Import Export for WooCommerce or adding Product CSV Import Suite , etc., in order to provide options. Advanced uploading is not found in the traditional WooCommerce add-on, and this is what we will explain in today’s article.
Uploading products in bulk using the Woocommerce add-on
The first and best way to upload products in bulk to the WooCommerce store is to rely on the file recovery mechanism for the WooCommerce add-on directly, and that is by relying on the Execl program in the CSV file format, as it is the format supported without problems on most WordPress plugins.
You can prepare a new Excel file and divide the file to suit your online store, or you can rely on the basic file for adding WooCommerce, and then you can modify the file to suit your online store instead of starting from the beginning completely, or at least until you understand how to create a new file. For your online store.
You can first download the Excel file for the WooCommerce add-on, which we will rely on in today’s article, through this link, and after downloading the file, it will appear to you as shown in the following image:

First of all, a set of points must be taken into account when dealing with the Excel file, which are as follows:
- The file must be saved in CSV format so that you can upload it to the WooCommerce plugin without problems.
- Different values can be separated by a comma , for example the categories include men’s clothing, children’s clothing, and so on.
- When you want to specify a main value and a sub-value, for example, a main classification and a sub-classification, you can rely on the > tag, so you write Clothes > Men’s Clothes. This means clothes is a main classification and men’s clothes is a sub-classification of clothes.
- Options that work on yes or no: The number 1 is used to indicate yes and the number 2 is used to indicate no. For example, the desire to publish the product is used. 1 is used to indicate publishing the product directly, or number 2 is used to indicate saving the product on the online store without publishing.
If some entries are not present in the online store, for example, a new classification, etc., the new classification is added automatically with the products. Now let us learn how to deal with and prepare the Excel file, so continue reading with us.
1- Add the product details to the Excel file
After downloading the Excel file from the direct link in the previous paragraph and learning about the mechanism for dealing with inputs with the Excel file, we now begin to learn how to prepare the file and add products in accordance with the WooCommerce addition.
First, you will find the Excel file divided into basic columns, and the product details must be written in accordance with those columns. In the traditional mode, the column details are as follows:
- SKU : SKU is the product code in the store.
- Name : The name of the product is written.
- Short Description : A brief product description is written.
- Description : A detailed product description is written.
- Published : The option to publish the product either by allowing it by typing 1 or denying it by typing 2 as we explained previously.
- Visibility in Catalog : The option for the product to appear in the catalog. You can write Visible if you want the product to appear in the catalog, or leave it blank if you want to hide the product from the catalog.
- Regular Price : The price of the basic product is written:
- Sale Price : The price of the product is written after the discount and left blank if there is no discount available.
- In Stock : It is determined whether the product is available in stock or not, where the number 1 is written if it is available and the number 2 if it is not available.
- Stock : The quantity of the product available in stock is written.
- Weight : The weight of the product is written if the weight is linked to the shipping cost.
- Images : A link to the product images from your online store is written. You first upload the images to the store, then obtain the link and place them in the Images box corresponding to the product. We will explain this step in detail in the practical example.
- Type : The product type is determined between the basic types, which are a simple product, a variable product, or a virtual digital product, so you write the product type directly, for example, Simple or Variation.
- Categories : You write the main and sub-categories of the product and separate them with a comma and a > sign to clarify the main and sub-categories as we explained previously.
- Tags : You write tags or signals for the product in the same way as the previous Categories option.
- Attribute Name : You specify the product attributes, for example, colors, sizes, etc.
- Attribute Values : You specify attribute variables, for example the available colors are white, black, and so on.
- Attribute Default : Defines the main attributes that appear automatically.
- Attribute Visible : You determine whether the attributes appear in the product or not by 1 for approval or 2 for rejection as we did previously.
For example, we want to add a new product, which is a men’s T-shirt, so we specify the SKU code, for example A27, then you write the product name Men T shirt, then the brief product description Cotton T shirt, and then the detailed product description, for example 100% Pre-Shrink Cotton. Shirt, then we write the number 1 in Published to want to publish the product directly, then we write Visible in the Visibility in catalog box so that the product appears in the catalog, and then we specify the price of the product, for example, $100, and after the discount, $80, as shown in the following image:

After that, you determine whether the product is available in stock or not. For example, we write instock, then we specify the quantity of stock, for example, 20 pieces, and the size of the piece is 0.5 kilograms.
After that, you need to upload images of the product to your online store. You go to the main WordPress panel, then choose Media from the side menu and choose Add New.
Then you click on Select Files and upload all the product images, or you can rely on the drag and drop feature in the WordPress panel. After uploading the images, you click on Copy the link to the clipboard for the required images of the product, as shown in the following image:
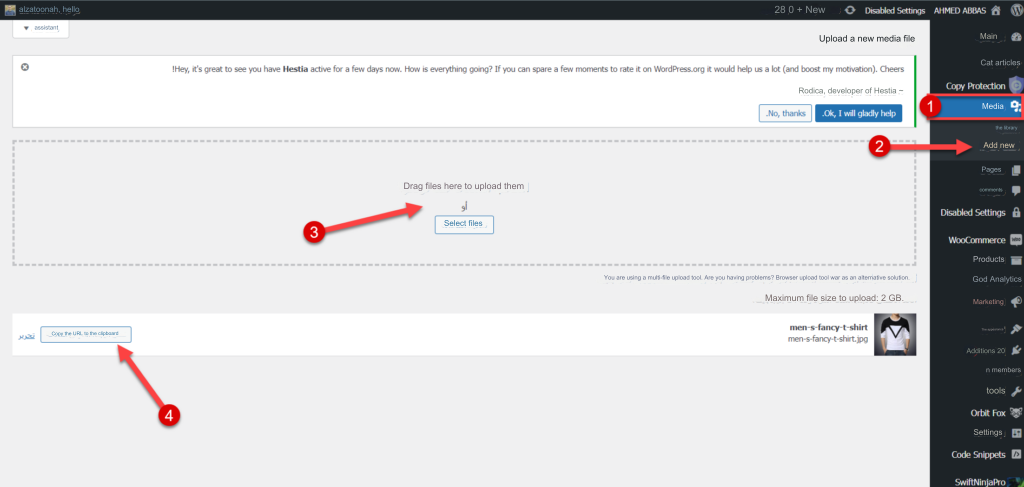
Now you go back to the Excel file and paste the image link into the Images box. You can add many images, but you must take into account the separations between the images, as shown in the following image:

After that, you select the product type, for example, Variation, and you can review the section on products in the WooCommerce explanation article to create an integrated online store – step by step to learn about all the types of products available and the difference between them.
Then you select the main and sub-categories of the product from the Categories option. For example, we need to add a main category Men, another main category T shirt, and a subcategory Men T shirt, so it will be as follows: Men, T shirt > Men T shirt. The same applies to tags or tags, for example Cotton T. shirt, as shown in the following picture:

It is worth noting that these categories do not already exist on the online store, so they will be created automatically with the products as well.
The last point specifies the product attributes on your online store in the Attribute Name field, for example Size, and you specify the available sizes in the Attribute Values field, and a separator is placed between them, for example M, L, XL, XXL.
After that, you select the basic option for attributes, for example XL, and specify the ability of the attributes to appear from the Attribute Visible option, so we type 1 for the product to appear, as shown in the following image:

After that, you repeat the previous steps to add all the products in an organized manner within the Excel file. After completion, you save the Excel file and you must ensure that the file format is CSV. In this way, the file is ready to be uploaded to your online store, and you move to the second step.
2- Upload products to the WooCommerce add-on
After completing the preparation of the Excel file in CSV format, you enter the main WordPress panel, then choose the products from the side menu, choose all the products from it, then click on Import, as shown in the following image:
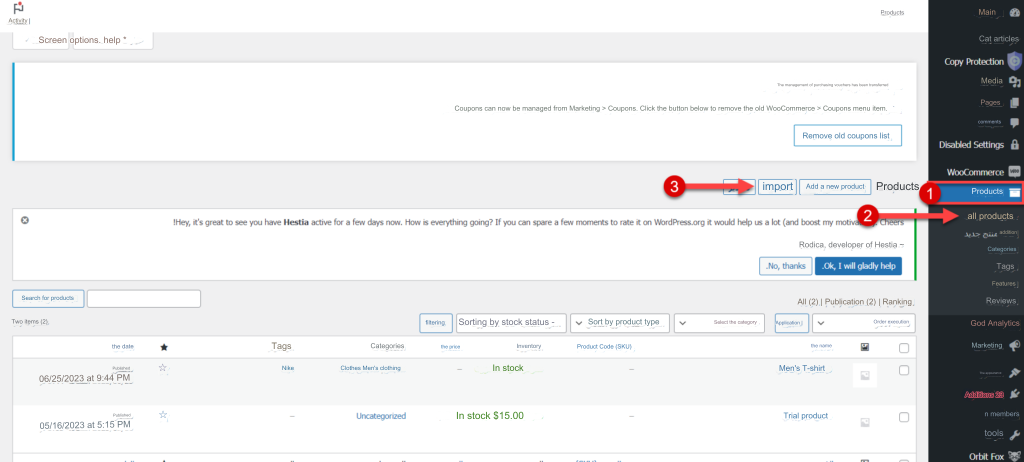
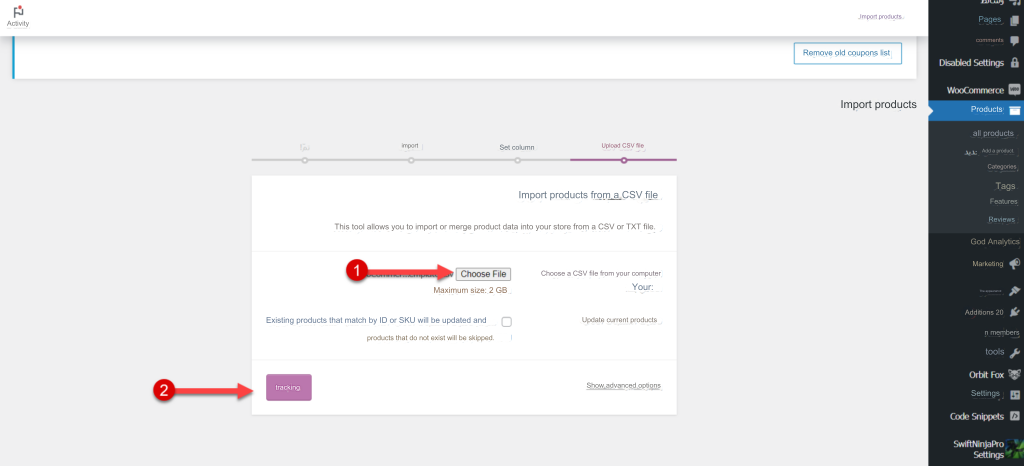
After that, you will be directed to the import products page, where you click on Choose File and specify the location of the CSV file on your computer. You can also click on Advanced Options in order to show the option to place a link to the CSV file if you rely on Google Sheets or otherwise.
You will also find the option to update existing products. You activate this option if you want to update data for products that are already on your online store, and the data is compared based on the ID code or SKU code. In this case, products that are not on your online store will be bypassed, but we want to upload new products, so we do Deactivate this option and then click Continue as shown in the following image:
After that, a column will appear for you showing the name of the basic columns in the Excel sheet, as we explained previously, and another column with the name Assigned to the field. In this step, we configure the data of the Excel CSV file to add WooCommerce.
Where you compare the general name with the field assignment box, for example, the first row, SKU, represents the product code SKU in the field assignment box, this is correct. Then the second column, Name, corresponds to the name in the field assignment box, and this is also correct.
You will also notice a sample of each tab in the general name below the name, for example in the Name box, showing the Wool Sweater model so that the content of the column becomes clear to you if the column label is incorrect.
It compares all rows between the global name and the field assignment, as shown in the following image:

However, if you find an inappropriate row or you do not need to add it to your online store, for example Attribute 1 global, which we do not need in the store, we choose not to import from the description row, and after completing the complete description of the Excel CSV file, you click on Run the import tool, as shown. In the following picture:
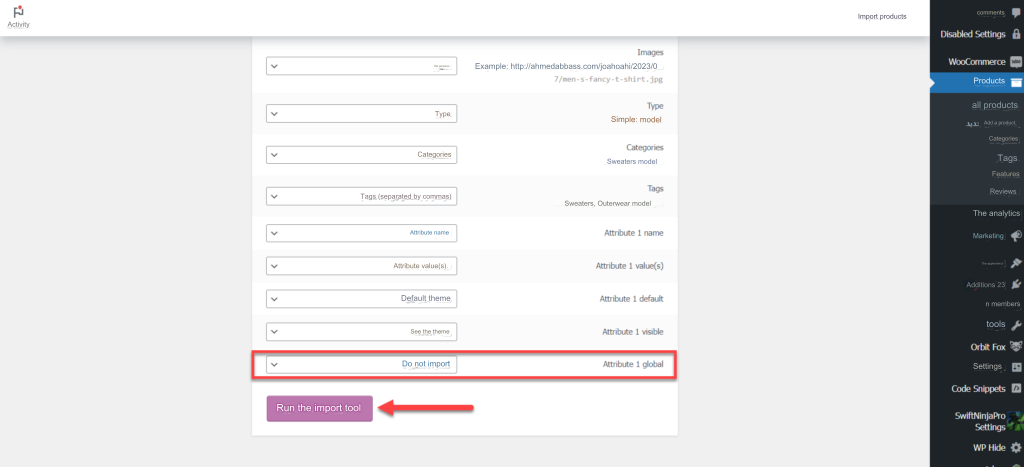
After that, the products from the file will begin to be imported automatically. You must wait until the file is successfully retrieved and the Import Complete message appears.
Our file contains 3 products, and it appears that 3 products were successfully imported without problems. However, if the number appears lower, the word “View Report” will appear. You click on it, identify the products that have a problem and the cause of the problem, and modify them. Most likely, it may be a comma or another simple command.
After you finish uploading all the products, click on View Products as shown in the following image:
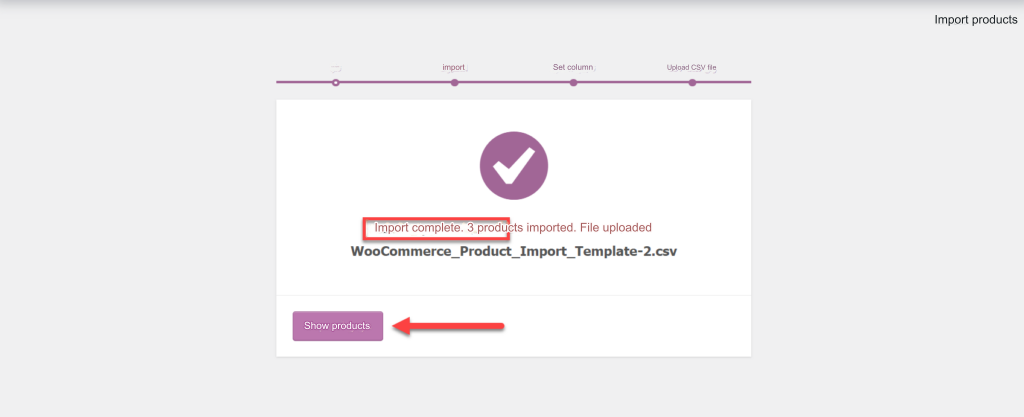
After that, you will be transferred to the products page, and you will notice that all the products that we have prepared have been uploaded in a CSV file. When you review the practical Men T shirt application, you will notice that the SKU code is correct, the price, the quantity available in the store, the classification, and the tag, and that the product has been published directly, and therefore all settings are correct as shown. In the following picture:

In this way, the products have been uploaded in bulk to WooCommerce, relying on import features to add WooCommerce, and you can rely on external add-ons that provide you with many advanced features, and this is what we will explain in the following paragraphs, so continue reading with us.
Uploading products in bulk using WordPress plugins
The second way to upload products in bulk on WooCommerce is to rely on WordPress plugins dedicated to this matter, as they provide many advanced options for controlling products, for example, controlling images or making modifications to all products directly, etc.
There are many options that you can rely on in this specialty, for example, adding Product Import Export for WooCommerce , adding Product CSV Import Suite , or adding Import Products from any XML or CSV to WooCommerce .
For example, we rely on the Product Import Export for WooCommerce add-on, which is one of the best free options available. You go to the main WordPress panel, then choose Add-ons from the side menu, and from there choose Add New.
You search for the Product Import Export for WooCommerce add-on and click on Install Now as shown in the following image:

After completing the installation of the add-on on your online store, you click on Activate, then you return to the main WordPress panel and choose from the side menu the Webtoffee Import Export Basic option, and from there you choose Import.
After entering the add-on’s import page, you search for the Select a post type to import option and specify the type of data to be imported, for example, products, discount coupon, members list, classifications, etc. This is one of the most important features of the add-on over the WooCommerce add-on.
So we select Products and then click on Step 2: Select Import Method, as shown in the following image:

After that, you click on Sample CSV to download the special Excel file with its own format. You will find the format very close to the previous WooCommerce add-on format, and you deal with the Excel file and add product data exactly as we did previously.
After finishing editing the Excel file and saving it in CSV format, you return to the add-on page and click on Click And Upload, then select the location of the file and click on Upload, and you can rely on the drag and drop feature as well.
Then in the Delimiter option, you select the comma sign, and you can change it to suit the format of the previous Excel file, then click on Step 3: Map Import Columns, as shown in the following image:
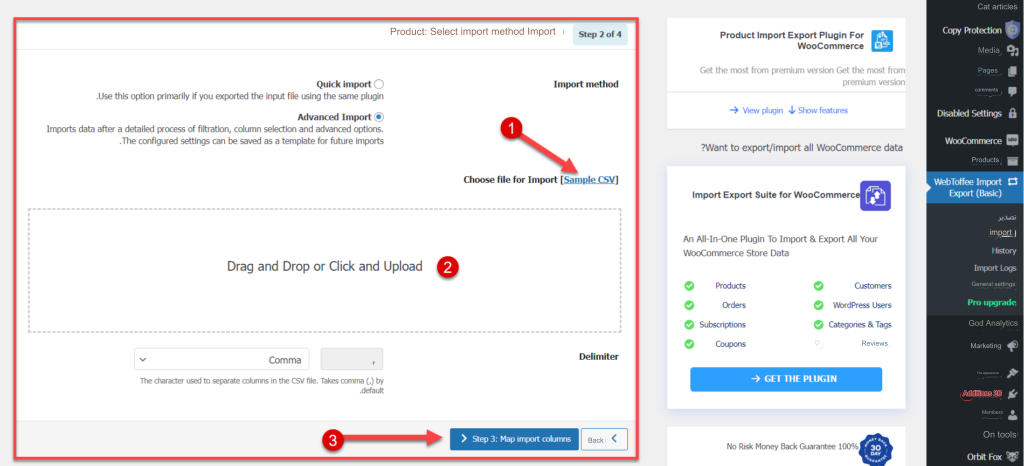
After that, you will be transferred to the data description stage, as we also did in adding WooCommerce, so you will compare the Product Fields column of the online store with the File Columns of the data contained within the Excel file, as shown in the following image:
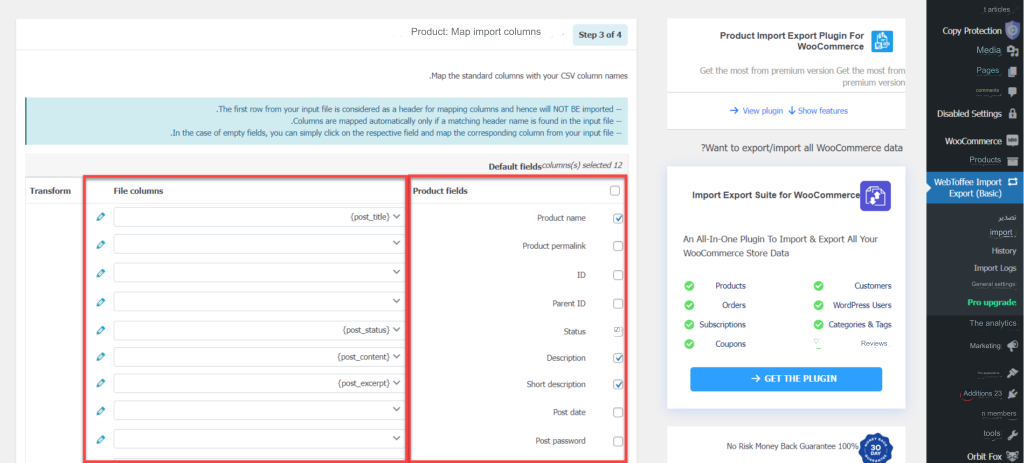
If one of the rows is incorrect, it removes the row from the File Columns list and repositions it in the appropriate row of the Product Fields column.
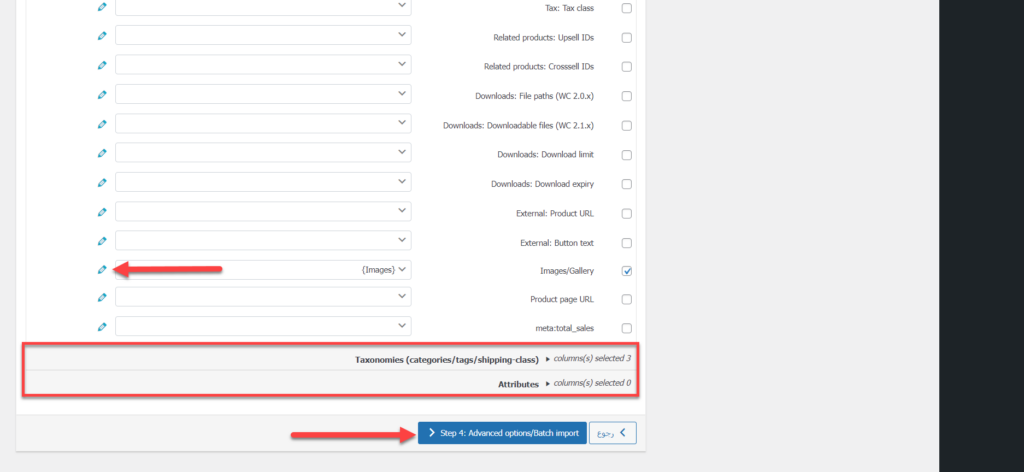
You can also click on the edit mark next to all the rows in order to preview the data available in the row to ensure that the data is in the appropriate row. You can also delete the row completely and skip that data during the data recovery process.
When you scroll down, you will find a section dedicated to Taxonomies variables, for example description, keywords, fees, shipping options, etc., and you will also find a section dedicated to Attributes.
Then you modify all this data and describe it correctly, and then click on Step 4: Advanced options/Batch import, as shown in the following image:
After that, you will be transferred to the advanced settings, which is the last stage, and you will find 4 options as follows:
- Skip import of new products : This option only imports new products from the file, and this is what is required, so you activate the option. However, if you want to update the data, you deactivate this option.
- Match products by their : This option helps you determine how to compare products, whether by ID or SKU, so select what is appropriate for your online store.
- If product exists in the store : This option helps you determine how to deal with files if they match your old online store files, and you will have the option to bypass importing the file or updating the file.
- Import in batches of : You specify the number of products to be imported at one time. You will find the number traditionally to be 10 products, but if the process of importing products fails, you gradually reduce the number in proportion to your online store’s server.
After completing the previous settings, you click on Import, as shown in the following image:

After that, the process of importing products will begin, and after completion, a report will appear to you showing the products that were successfully imported, the products that have problems, and the required modifications to them, as shown in the following image:

You will notice in the previous image that all products were successfully imported without problems. When you return to the products page on your online store, you will notice that all the products have been added automatically in terms of name, description, pictures, SKU code, stock quantity, price, discounts, classifications, etc., as shown in the following image:

In this way, the products were successfully imported into your online store using the Product Import Export for WooCommerce add-on and controlling all its basic and advanced options. You can also rely on this add-on to transfer products from one store to another quickly and many other features.
In the end, uploading all products in bulk saves time and effort, and there are many methods that you can rely on to upload products in bulk to the online store.
If you want to upload products with traditional characteristics, you can rely on the first method. However, if you encounter a problem with the first method or want to get more advanced options, such as modifying all products during import, controlling images and arranging them, or importing separate data, for example, discount coupons or… Member data or otherwise, you can rely on the second method.


Leave a Reply