

There are many techniques and practices that allow online store owners to increase their sales and profits if they are applied in the correct manner and at the right time and place. One of these techniques is the use of a countdown timer in order to notify the visitor of the scarcity of the product or offer by telling him that this offer or product will not last or It’s available forever, but will expire or run out soon.
In this article, we will highlight the mechanism through which the countdown timer technology works, and we will teach you how to use it to increase the sales of your online store, and we will also explain to you how to easily add this timer in WordPress.
What is a countdown timer?
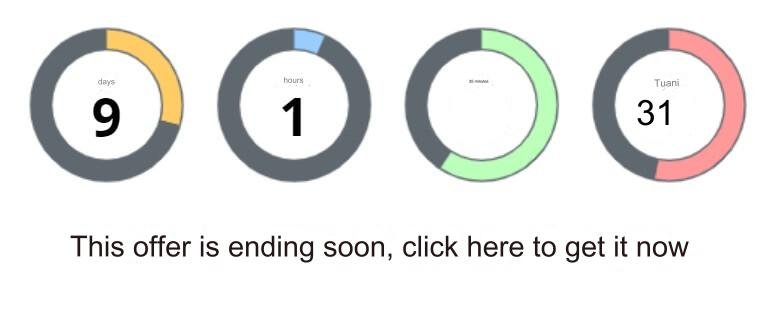
A Countdown Timer is a technology and element that can be used on websites managed by the WordPress content management system (or in any other way) to achieve specific goals such as increasing sales, as it allows online store managers, for example, to determine the remaining time. To start and end an event, whether it is a savings offer or something else, as in this image, for example.
The countdown timer can be used outside of websites in shopping malls in order to increase sales, or to inform people of the time remaining for the launch of a section in a mall, and also on TV channels in order to market a TV show and increase its number of views, as well as in any field that requires marketing benefit. This technology provides by influencing the audience and making them believe that they will feel regret if they do not get what will not be available after that countdown timer reaches zero.
The importance of using a countdown timer
The use of countdown timer technology in electronic stores that sell products and services benefits the owners of these stores and visitors, as it contributes to increasing sales and raising profits, and also tells visitors or potential customers more information about the price of the product and the advantages of the offer.
In fact, research published by the University of Nebraska has proven that creating a perception among a potential customer that the product offered to him is rare contributes to pushing him to buy it immediately. It is clear that using the countdown timer technique creates this perception among potential customers, because it makes them feel that they cannot Take advantage of the offer after the specified time has expired.
Also, it is useful to inform your store visitors with more information about the offer that you provide to them. If you offer free shipping of the product to the buyer if he buys it within the first week of displaying it in the store, you will need to inform him that shipping will not be free forever, and of course you can do This is done by adding a countdown timer in the appropriate place.
How does this technology increase sales?
Here we will not conduct a deep analysis of human feelings and actions to explain precisely how the countdown timer in online stores increases your sales and profits, but we will briefly explain the mechanism of this technology’s impact on potential buyers and sales.
The countdown timer technology increases sales and profits by motivating potential customers to purchase. When a potential customer who enters your online store sees the presence of a countdown timer whose numbers represent the time remaining until the end of a special offer on a product or service, he will automatically have the perception that this The offer is rarely possible to obtain, which prompts him to buy the offer as a result of creating a feeling of “fear of missing out” or what is called “FOMO” in him, meaning that the customer is afraid to miss the offer in front of him and then regret it in the future. As a result, he makes a decision to purchase the product and obtain the offer.
How to add a countdown timer in WordPress
There are many free plugins that provide the ability to add a countdown timer to any page of your site immediately after installing it on your WordPress. Here we will explain in a graphic form how to use the Countdown Timer Ultimate plugin and the Countdown Builder plugin to add this feature.
Countdown Timer Ultimate
We will first explain the Countdown Timer Ultimate add-on, which allows you to create a time countdown on your site with the ability to get many benefits in exchange for paying some money. You have to install it from the WordPress control panel, then use it to create a timer, and then add that timer to your pages. Your location is where you want.
If you do not know how to install the plugin on your site based on the previous instructions, see our detailed article “ How to install a WordPress plugin and activate it on your site correctly, ” in which we explained with pictures several ways to install WordPress plugins.
First: Create a countdown timer
After installing the Countdown Timer Ultimate plugin on WordPress, we will have to create a timer using it. To do this apply the following:
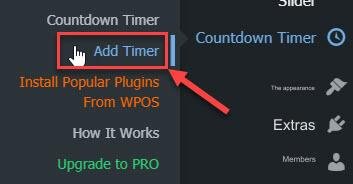
- Click on the ( Add Timer ) button in the drop-down menu that appears when you place the mouse cursor on the name of the add-on in the WordPress control panel, as this image shows.
A page will appear asking you to enter the data for the meter you want to create. Type an appropriate name for the countdown timer you want to create in the field designated for the title,
Then choose the end time and date of the event for which you want to create a counter from the tool that appears when you click on the field next to the phrase (Expiry Date & Time), then click ( Done ).

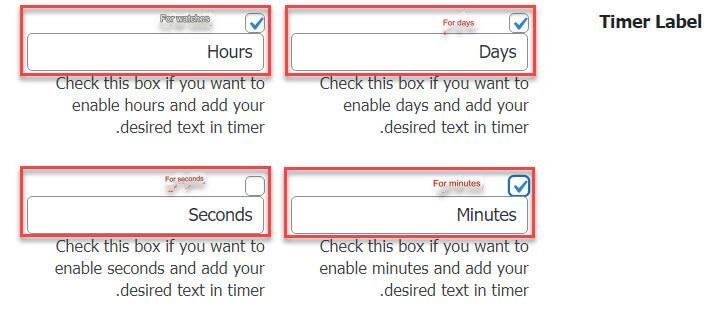
Now scroll down a little to reach the (Timer Label) section. You will find 4 options, each of which consists of a box in which you can place a check mark by clicking on it, and a field whose text content can be modified.
These options determine whether the four parts of the counter (days – hours – minutes – seconds) will appear or not, in addition to the text that will appear within each part. If you put a check mark in the box for the option, it will appear to the visitor, and if you do not, it will not appear.
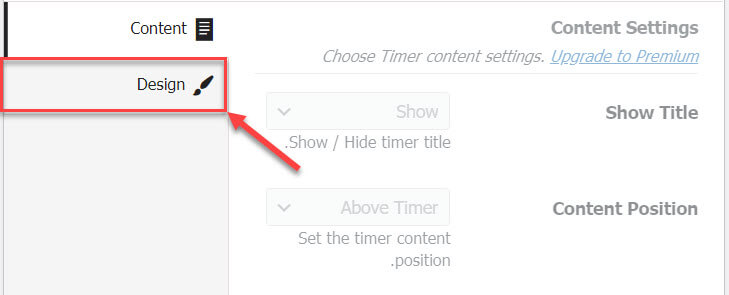
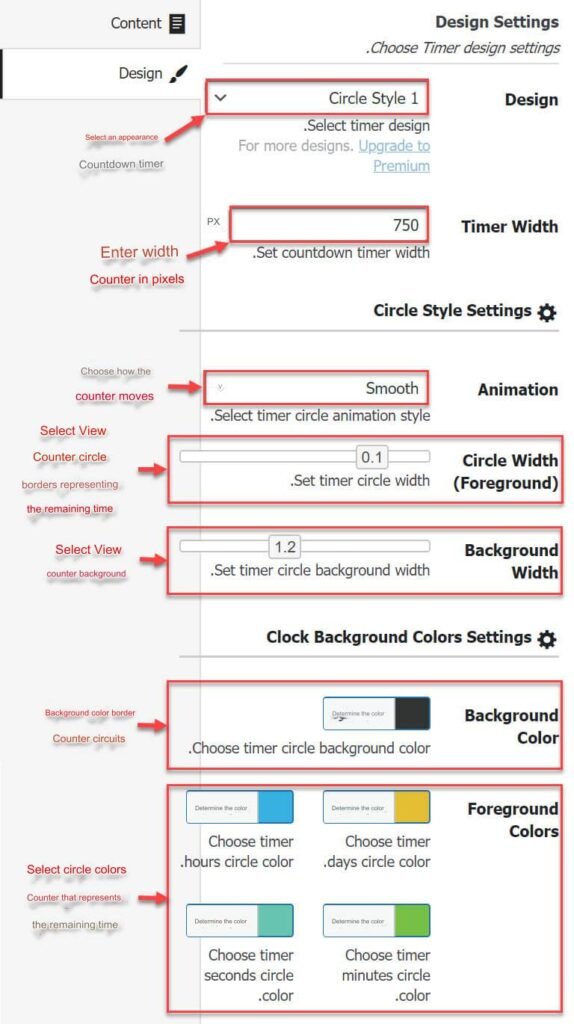
Scroll down until you reach the ( Content Settings ) section, then click on the ( Design ) tab to show the Design Settings, as the following image shows.
Now specify the design settings for the meter to appear as you want it to appear, based on what is shown in the following image.
After that, click on the Publish button .

Second: Include a countdown timer on one of the pages
After we have created a countdown timer using the Countdown Timer Ultimate plugin, we will be able to display it with the properties we specified anywhere we want on your website pages using the plugin’s short code .
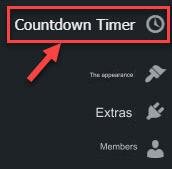
You can do this through the WordPress control panel, by going to the (Countdown Timer) tab and clicking on the phrase ( Countdown Timer ) in the side menu.
All the countdown timers that you have created will appear on this page. You can create and insert more than one timer on your site in the same way as we explained in the previous paragraph.
Within the columns of information that WordPress displays for each meter, you will find a column titled (Shortcode). Copy the short code for the counter that you want to insert on one of your website pages, as this image shows.

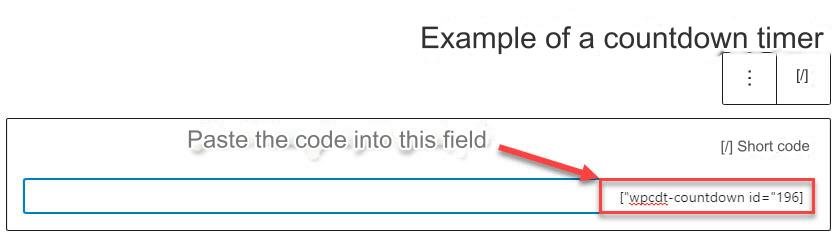
After that, go to the edit page of the page (or article) where you want to insert a countdown timer, then find the Shortcode component and add it to it where you want to place the timer.

Paste the shortcode for the counter you created (the code you copied in the step before the previous step) into the field in the shortcode component.
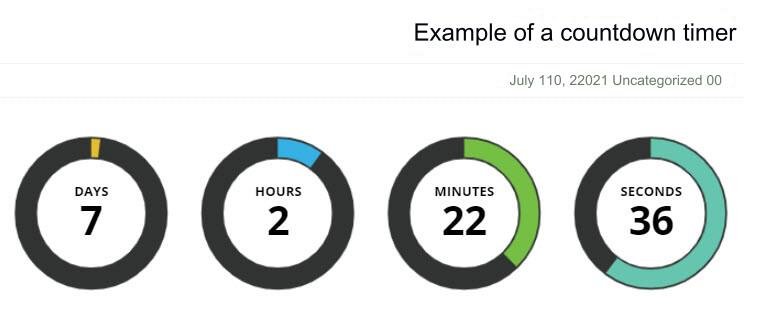
Publish the page or update it if it is already published by clicking on the “Publish” or “Update” button, then go to it to view it as it appears to the visitor, by clicking on the (View Article) button.
. You will definitely notice that the countdown timer you created is listed according to the features and settings you selected.
It is worth noting that you can include the same counter on more than one page on your site, by repeating the steps of the previous paragraph. You can also include more than one counter on the same page in the same way that we explained in the previous paragraphs, taking into account setting the settings according to what you need and what you want. Show it to your website visitors.
Countdown Builder
You can also use the Countdown Builder plugin – which has a free and paid version available – one of the best and simplest plugins that allows you to insert time countdowns into WordPress sites, as it is very easy to use and provides many customization options that allow you to display the counter on the page as you want. exactly.
Countdown Builder also provides the creation of a “Coming Soon” page through a dedicated tool.
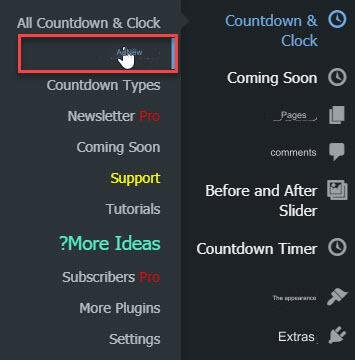
To insert a time countdown using the Countdown Builder add-on, install and activate the add-on, then you will find the ( Countdown & Clock) tab , from which a drop-down list containing (Add new) will appear as follows:
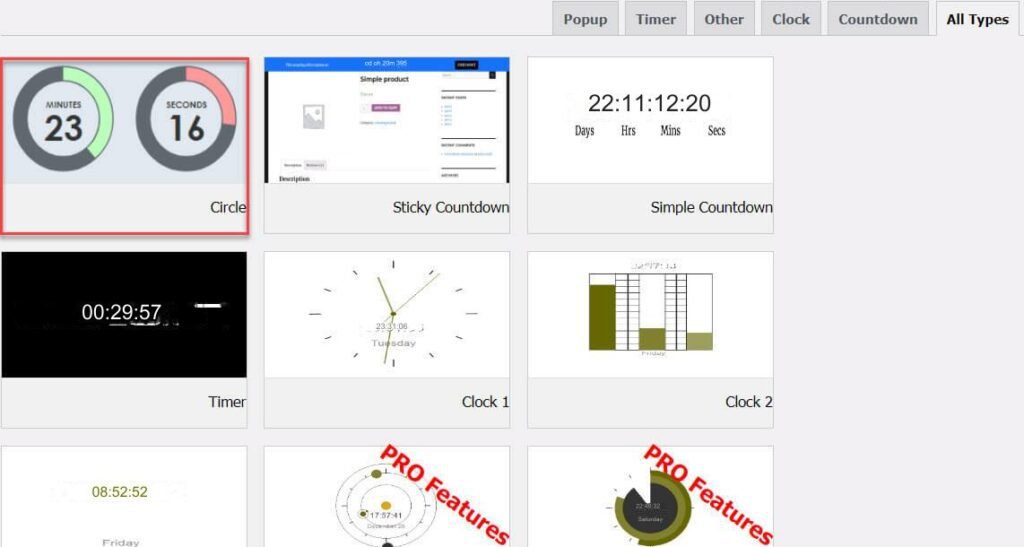
A window will now appear asking you to choose the type and appearance of the counter you want to create. Choose what suits you from the options available in the free version, or get the paid version of the add-on to use one of the premium paid options.
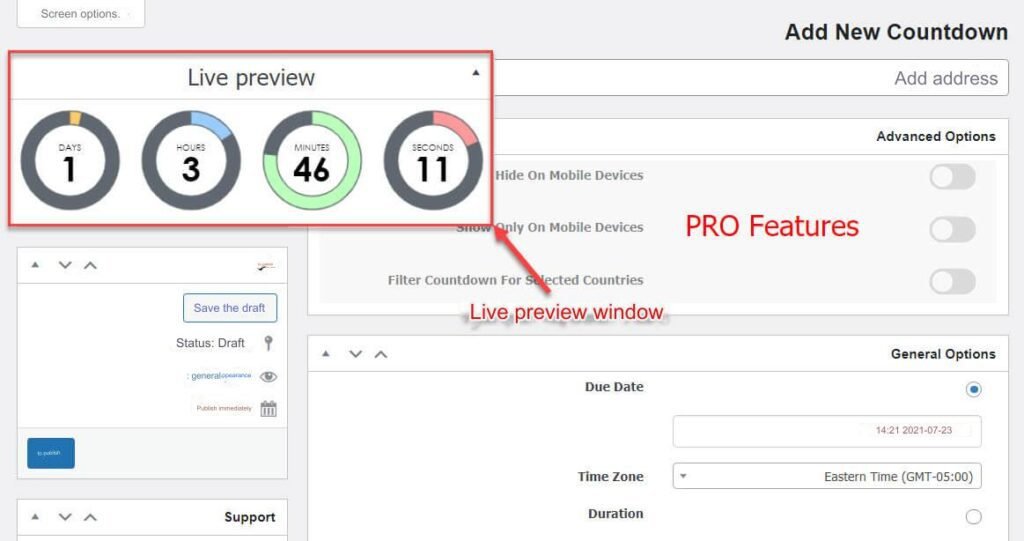
The meter creation page will appear to you, and it includes many options and settings that determine its various characteristics. Some of them are free and others cannot be used for free. Within this page, the Live Preview window will appear to you, as this window will display the result of any change you make to the settings. It shows the counter in the same way it appears to the visitor if the current settings are adopted.
You now have to adjust the options to create the appropriate countdown timer. Enter an appropriate address for the meter in the “ Add Address ” field, then modify the general options in the “ General Options ” section as appropriate, based on the following image that shows what each option specifies.
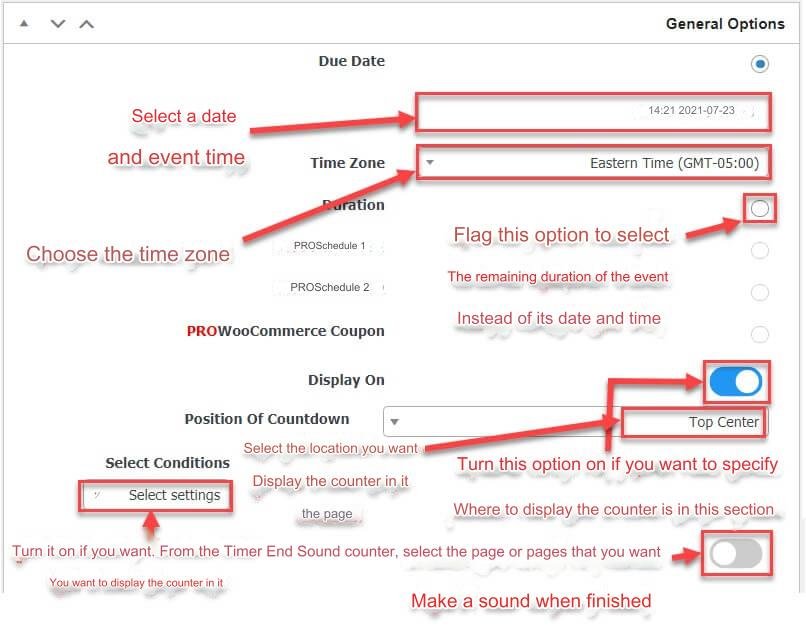
Note: If you deactivate the “Display On” option in the previous image, the countdown timer will not appear on any page of your site without inserting its short code in it. We recommend deactivating it if the number of pages on which you want to insert the counter is small, and it is easy for you to insert the shortcode within them, as this will allow you to specify exactly where the counter will appear.
Now scroll down until you reach the Countdown options tab , then modify the options in this section as you wish. The Countdown options section allows you to modify many of the countdown properties including font sizes and colors of the different counter parts, but some of them can only be changed in the paid version of the add-on.
Click the Publish button to save the changes and make the counter ready for use.
In order to insert a countdown timer you created into a page of your site, simply copy its shortcode and paste it into the shortcode component field where you want the timer to appear. You can do this by following the steps in the (Add a countdown timer created on the page) section itself.
Other additions to create a countdown timer
Other than the Countdown Timer Ultimate plugin and the Countdown Builder plugin, there are many WordPress plugins that provide the ability to create countdown timers, and the best of these plugins are:
- OptinMonster add-on : This add-on is one of the best WordPress plugins for creating pop-ups, but it also provides the ability to create countdown timers and display them on your website to visitors in many attractive ways. It also allows you to create a countdown timer for each visitor individually, meaning the time and date of the event will not be The same for all visitors to your site. The only significant drawback of this add-on is that it does not allow creating a counter for free, as you will need to visit the OptinMonster website and subscribe to a paid plan.
- SeedProd add-on : This add-on is the best landing page builder, and is suitable if you want to create a page (wait for us soon) for your WordPress site, because it enables you to set your site to run automatically when the counter reaches zero, but it also suffers from the same problem. The disadvantage of the OptinMonster add-on is that it does not provide the ability to create a timer for free, and you will need to go to the plans page on the SeedProd website to obtain the paid Pro version to use this feature.
There are also other add-ons that can be used to make many types of countdown timers, such as HurryTimer , or other add-ons that perform the same function.
When and where do you use a countdown timer in your online store or website?
As we explained earlier, countdown timers play a role in motivating potential customers to purchase the product or service by creating a sense of scarcity and urgency, which is why it is useful to use them on pages that users are likely to consider purchasing when they browse them, such as product pages when you are running a limited-time sale on them, Or product section pages on the store, as well as the home pages of online stores, and the like.
You can also use the countdown timer to achieve another goal other than increasing sales, for example in order to show the time remaining until your site is open after it is closed for maintenance purposes, as well as anywhere you find that using the timedown timer is useful, but do not use too many timers. On your site, and always be sure to be honest and sincere with your audience when using this technique.
Here we finish introducing you to the countdown timer technology and its marketing benefit for stores and websites, the way to add it to WordPress sites using several plugins, and where and when you should use it on your site. We hope that our article has provided you with the information you were looking for regarding this important technology to increase… Sales and communicating information in an attractive and enjoyable way to visitors and potential customers